All products were chosen independently by our editorial team. This review contains affiliate links and we may receive a commission for purchases made. Please read our affiliates FAQ page to find out more.

Plaster of Paris: where to buy moulds, kits and supplies

Plaster of Paris is a popular sculpting material - it's easy to use and a lot of fun! Read up on everything you need to know about plaster of Paris, including where to buy, how to use and project inspiration.

Try our magazines – get 6 issues from just £9.99!

Published: March 7, 2024 at 5:24 pm

Have you ever used plaster of Paris? Perhaps you used it with animal moulds when you were little - or maybe you have little ones you want to introduce the craft to.

Even if you've never used it before, it's easy to learn and a whole lotta fun!

In this article, we go through everything you need to know, from its uses and where to buy, to our favourite craft projects and the best kits.

undefined

What is plaster of Paris?

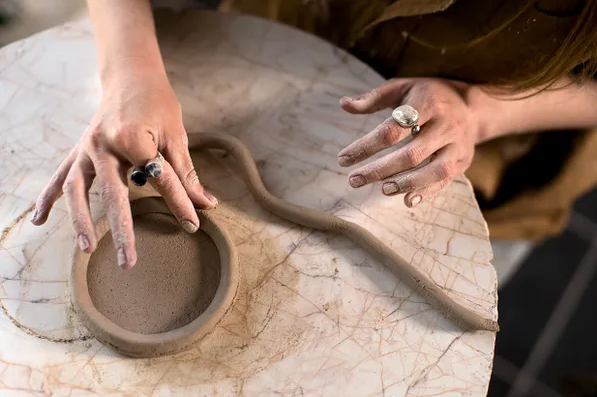
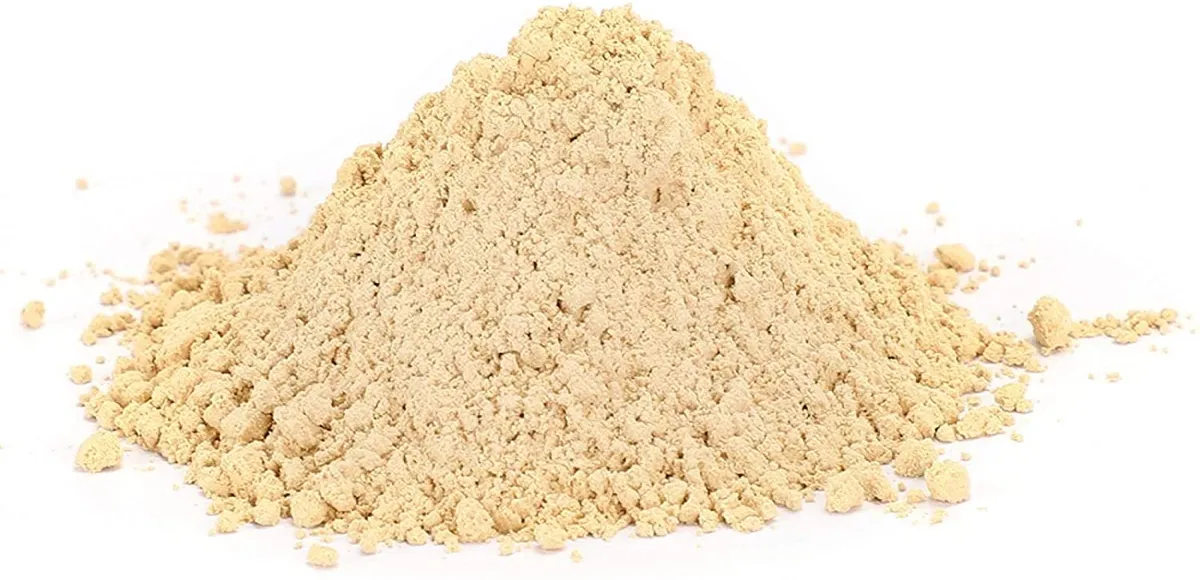
Plaster of Paris is a quick-setting powder made from the soft, white (ish) mineral gypsum.

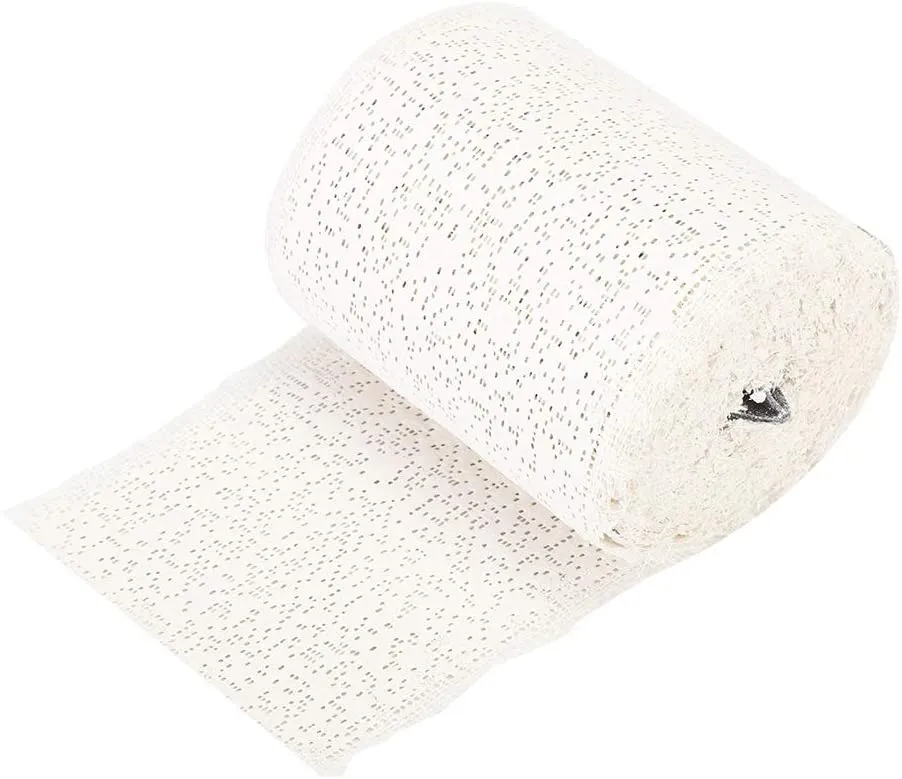
There are two types of plaster of Paris that you are likely to come across: loose powder, and bandage form.

Plaster of Paris is commonly used as a building material, as well as in dentistry and orthodontics. It's used to make plaster casts for broken bones, sculptures, decorative elements and, of course, in the craft industry.

Why is it called plaster of Paris?

It is called plaster of Paris, because of the abundance of the mineral gypsum near Paris in France.

After the Great Fire of London in 1666, Parisians covered many of their wooden walls with plaster, at the order of the King, to protect the buildings from fire damage, should a disaster like that ever hit the city. This is because plaster is non-combustible.

Paris subsequently became the centre of plaster production in the 1700s. Historically, the use of plaster dates back to around 9000 years and has been used by the ancient Egyptians, Greek and Roman civilisations!

Where to buy plaster of Paris moulds, kits and supplies

Thankfully, it's not hard to come by, and you can pick up both the powder and bandage types at most DIY stores or craft stores. It's relatively inexpensive, but it can be messy!

If you're looking for plaster of Paris to buy, it's useful to know that the bandage form is also called modroc.

Plaster of Paris kits and moulds

If you're looking to make sculpture your next craft project, check out our pick of the best plaster of Paris kits you can buy right now.

4M Mould & Paint Dinosaurs

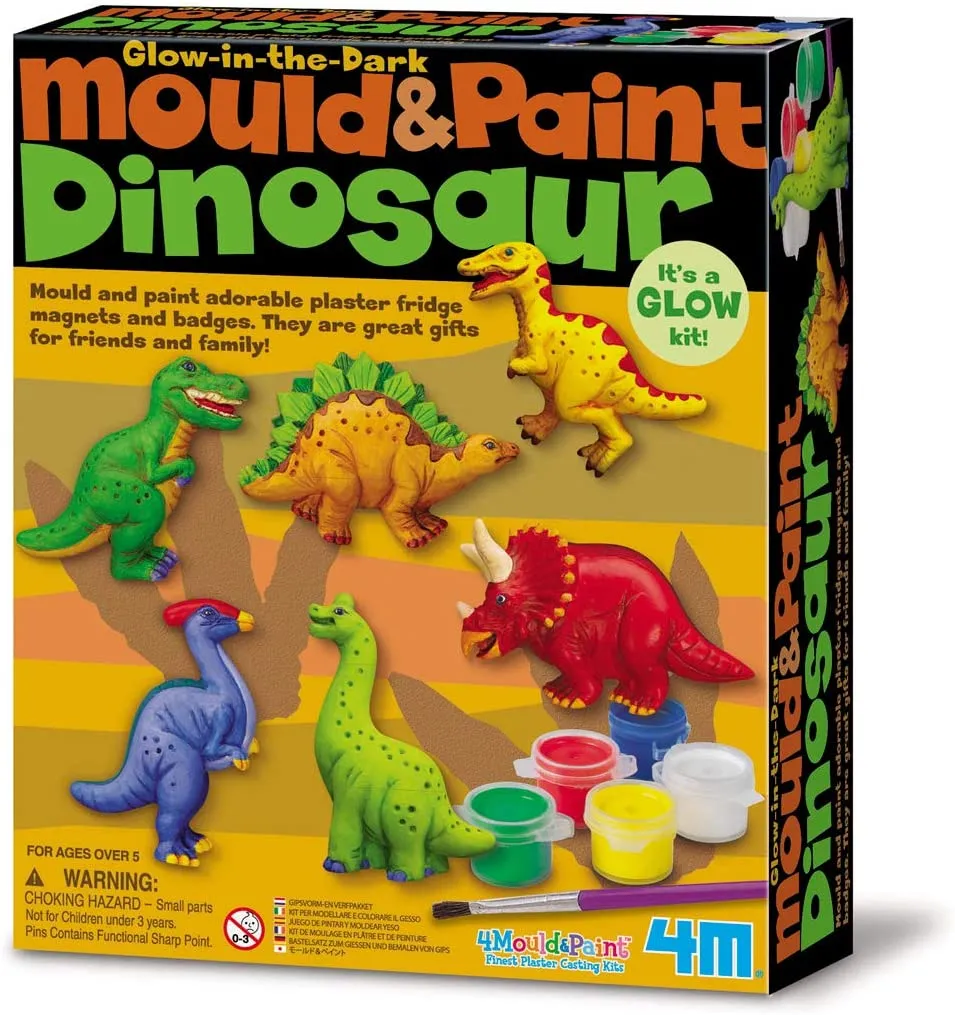
This plaster of Paris kit from 4M allows you to make five different dinosaurs! Turn your dinosaurs into fridge magnets with the included magnets - keep some superglue handy if you're having trouble making the magnets stick - or make glow-in-the-dark dinosaurs with the glow paint!

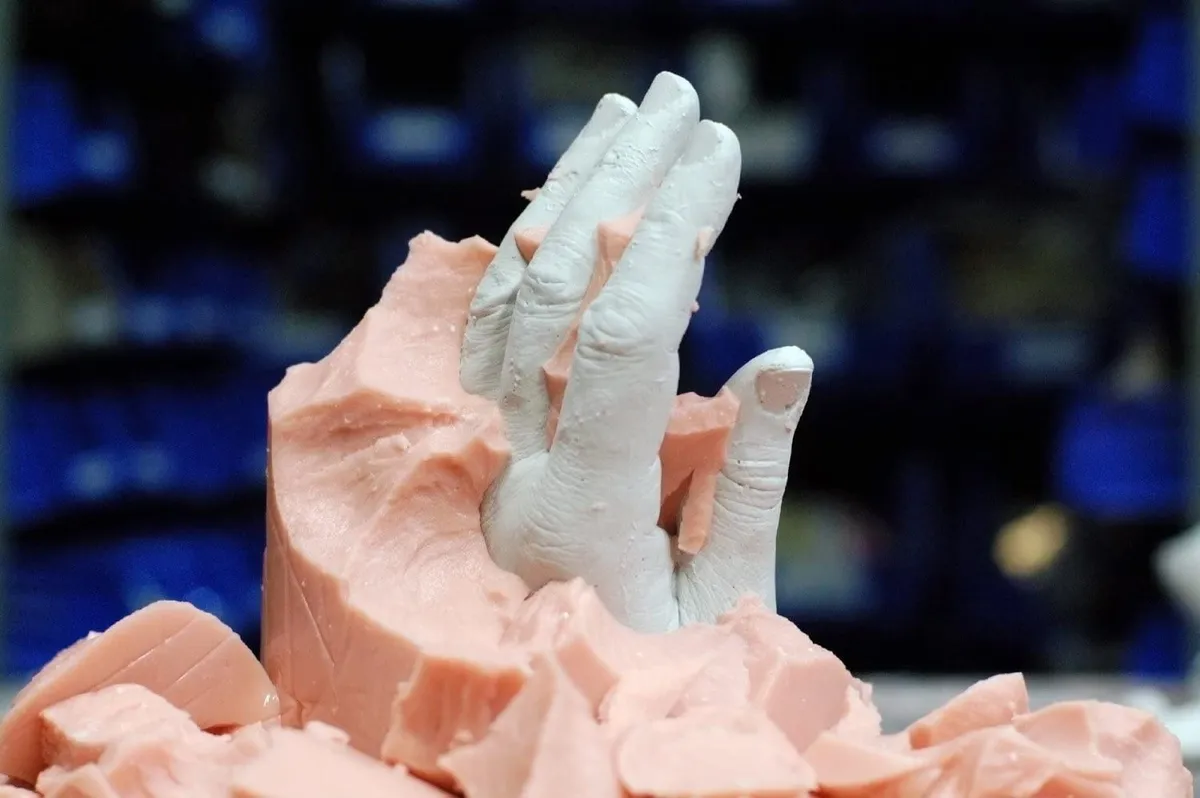
3D Family Hand Casting Kit

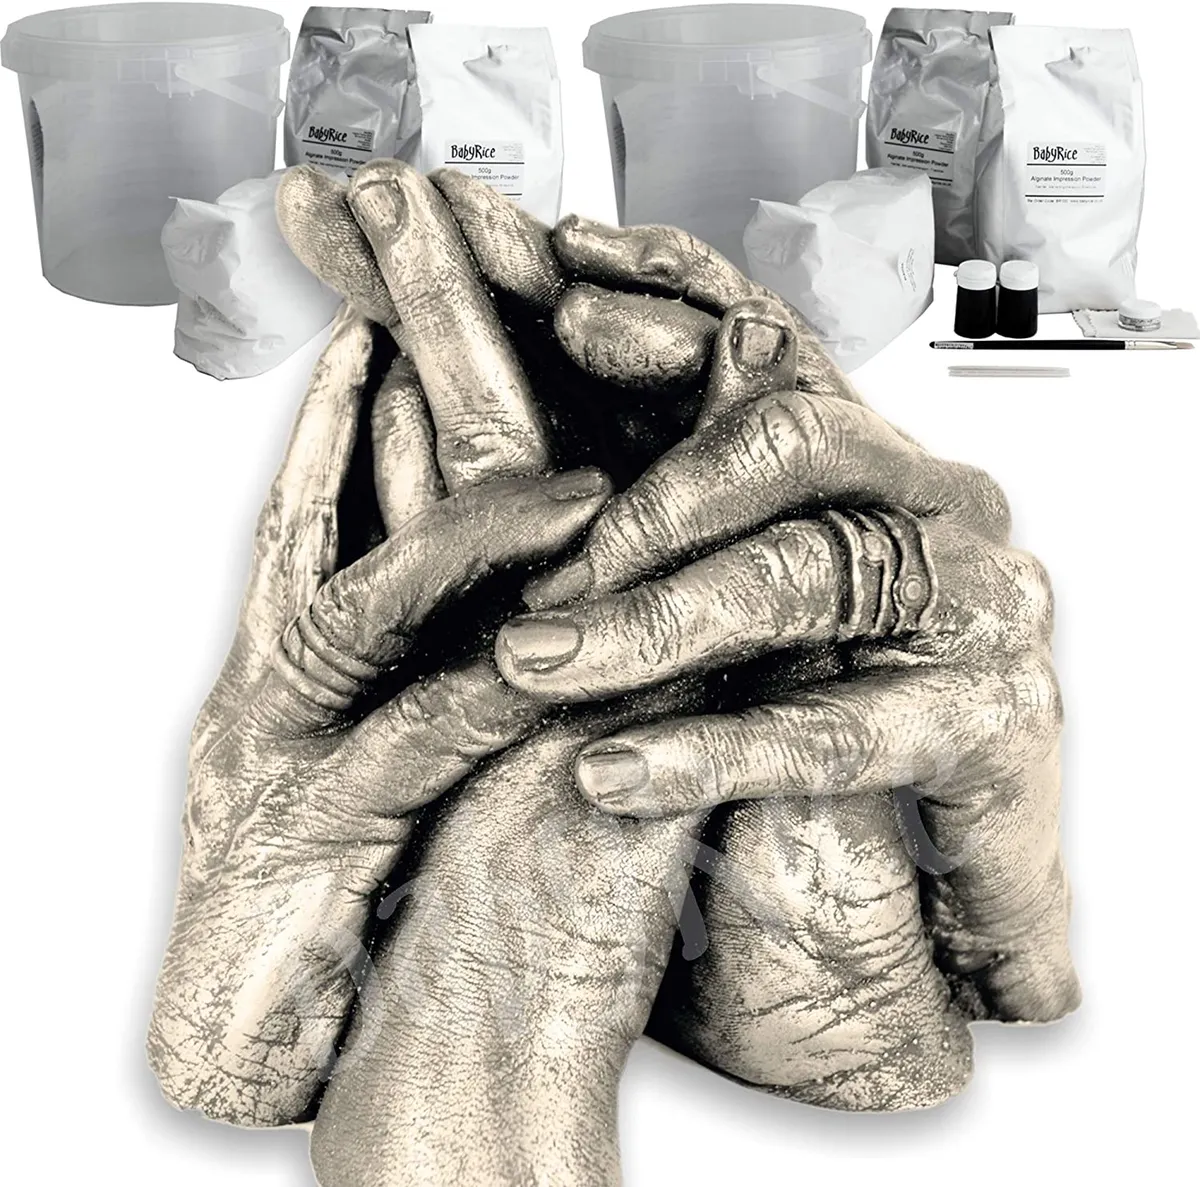
Although slightly on the more expensive side, this plaster of Paris kit will help you make a treasured keepsake of your family. Hold hands with the rest of your family members and plunge into the bucket to create a mould. Pour the plaster of Paris into the mould, leave to dry and pull apart the mould to reveal a 3D replica of your hands!

Horse Casting and Painting Kit

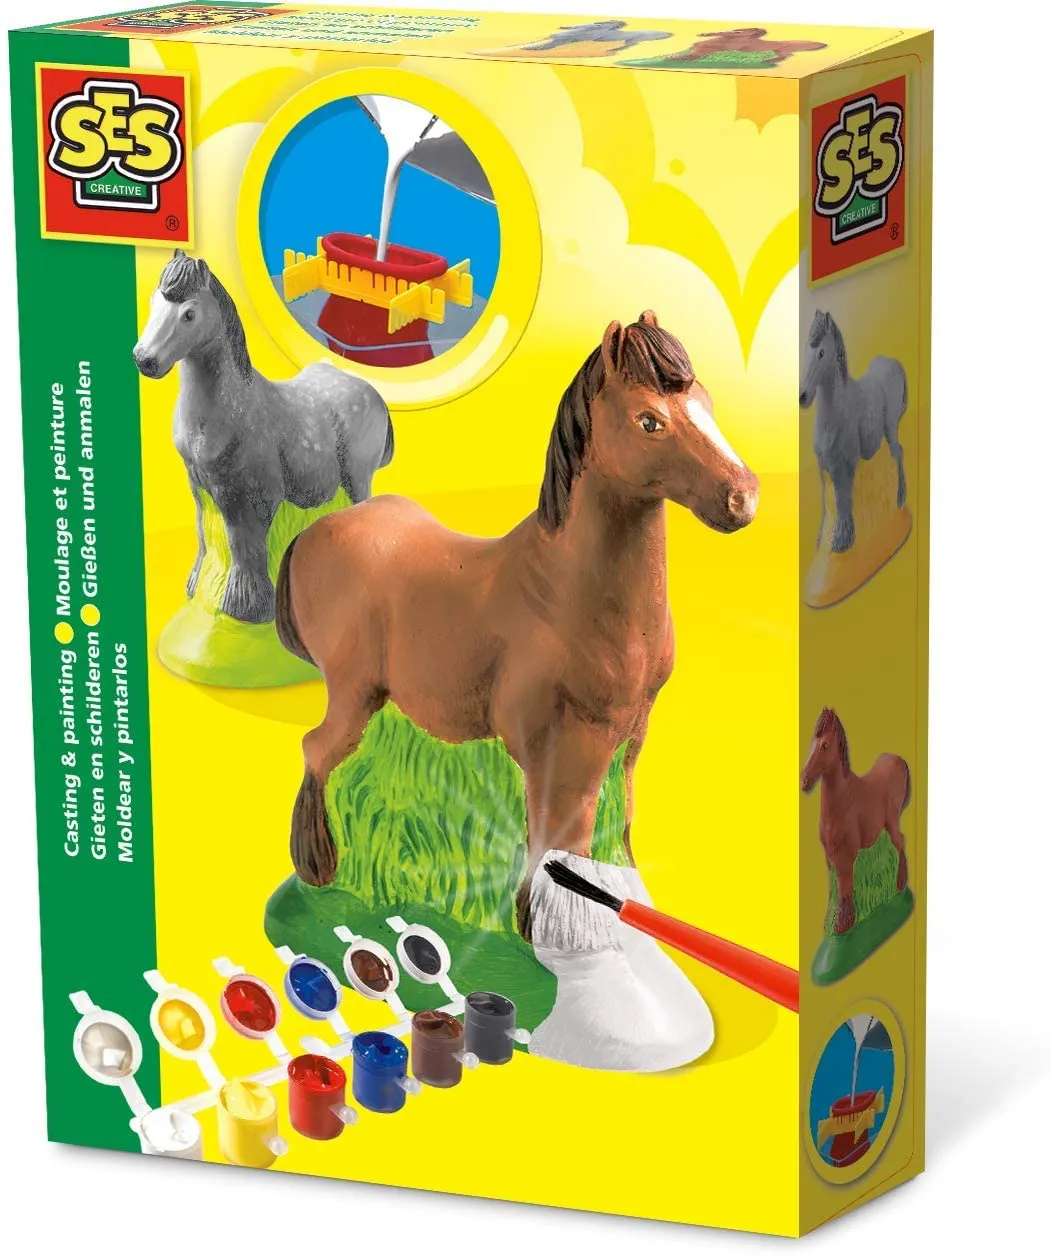
Make a 3D horse sculpture with this kit! Be careful when turning out the mould as the neck is fairly slim in comparison to the body. This is a nice gift for any crafty horse lovers!

Junior Holding Hands Kit

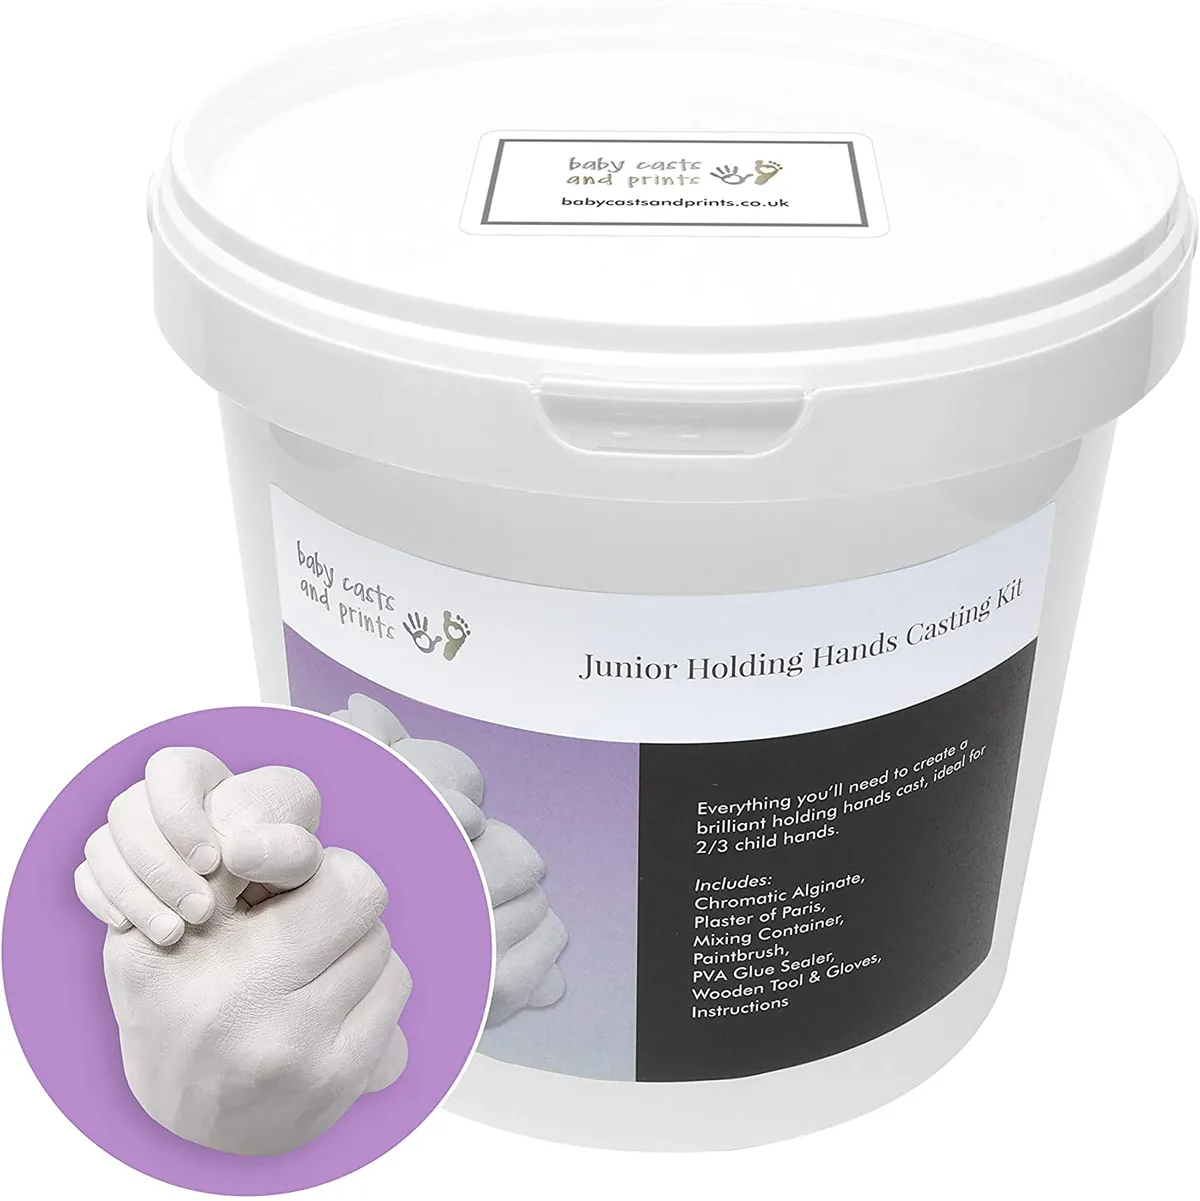
This kit is ideal for capturing those precious early years of parenting a young child. It's a similar concept to the family kit (listed above). Hold hands with your little one, and plunge them into the bucket to create your mould. Mix up the plaster of Paris, pour into the mould and leave to dry.

4M Mould & Paint Space

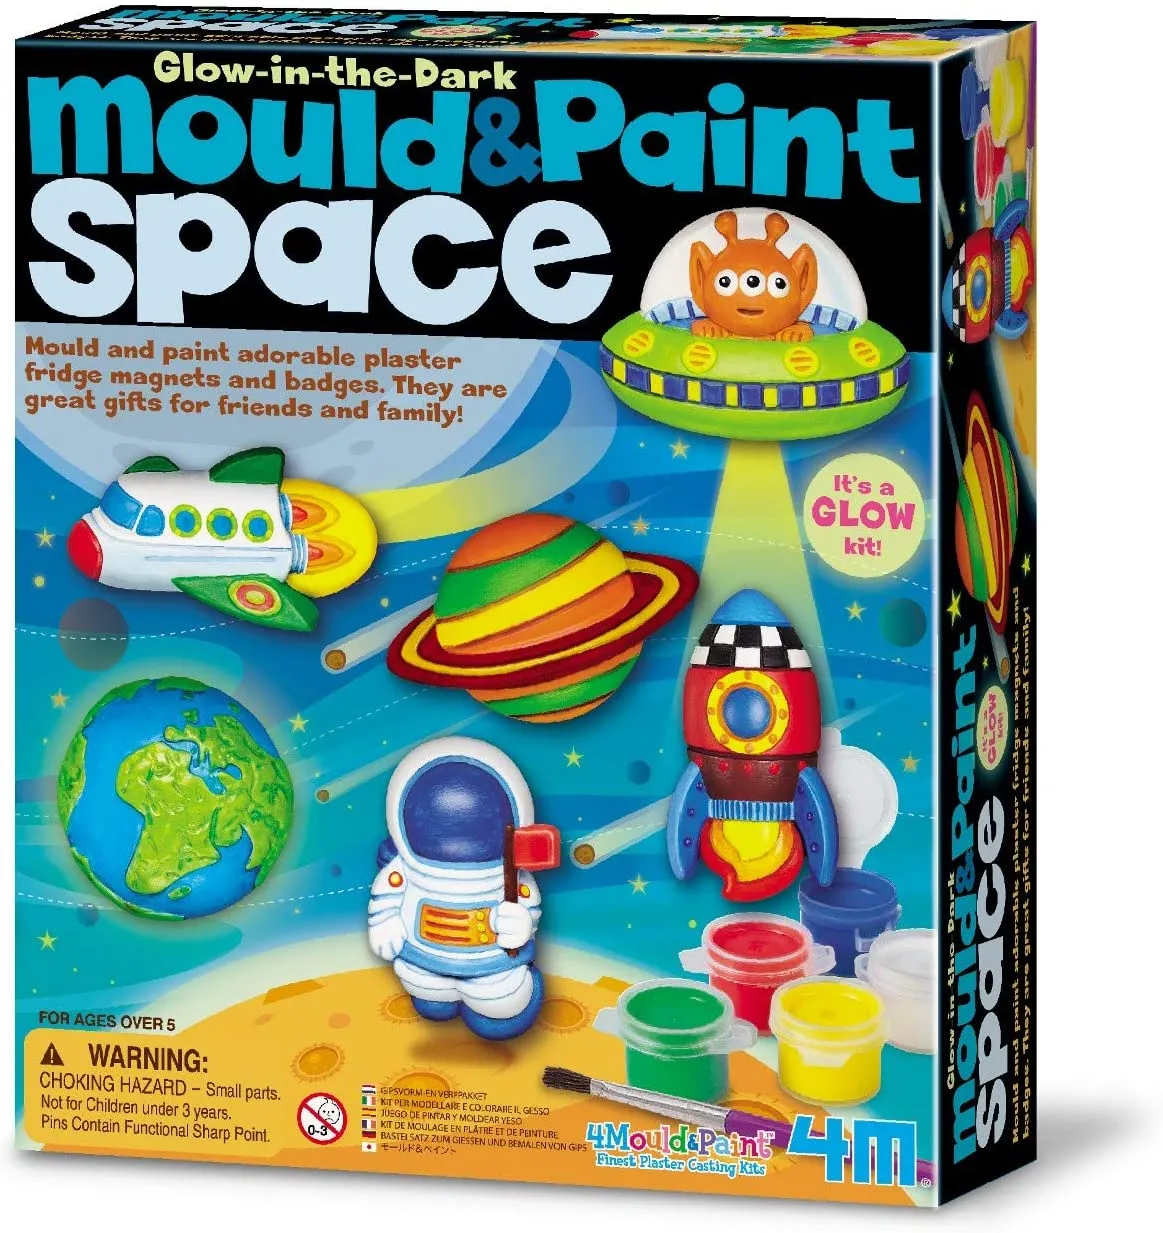
This kit is simply out of this world! It comes with glow-in-the-dark paint which, no matter how old you are, seems like magic!

Mould rocket ships, astronauts, planets and space shuttles with this fun kit. Then fix magnets on the back and pop them on your fridge!

4M Mould & Paint Robots

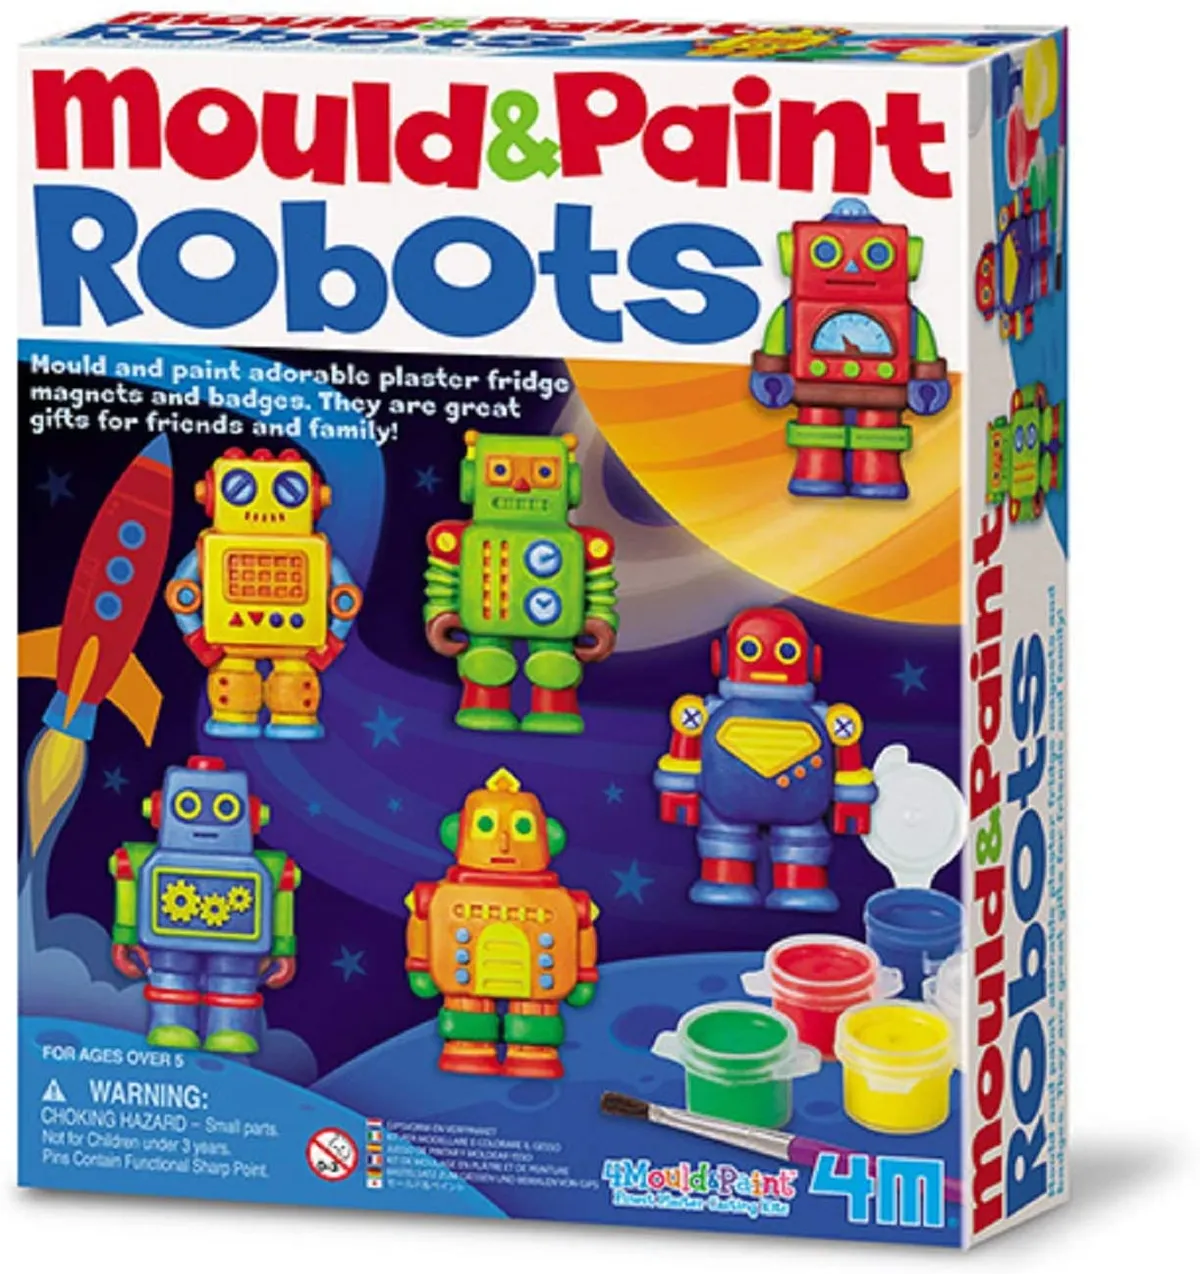
Make five different robots with this brilliant kit! Paint them bright colours with the included paints, or grab some silver paint (or spray paint) from your local craft shop for a metallic shimmer.

Llama Mould & Paint Kit

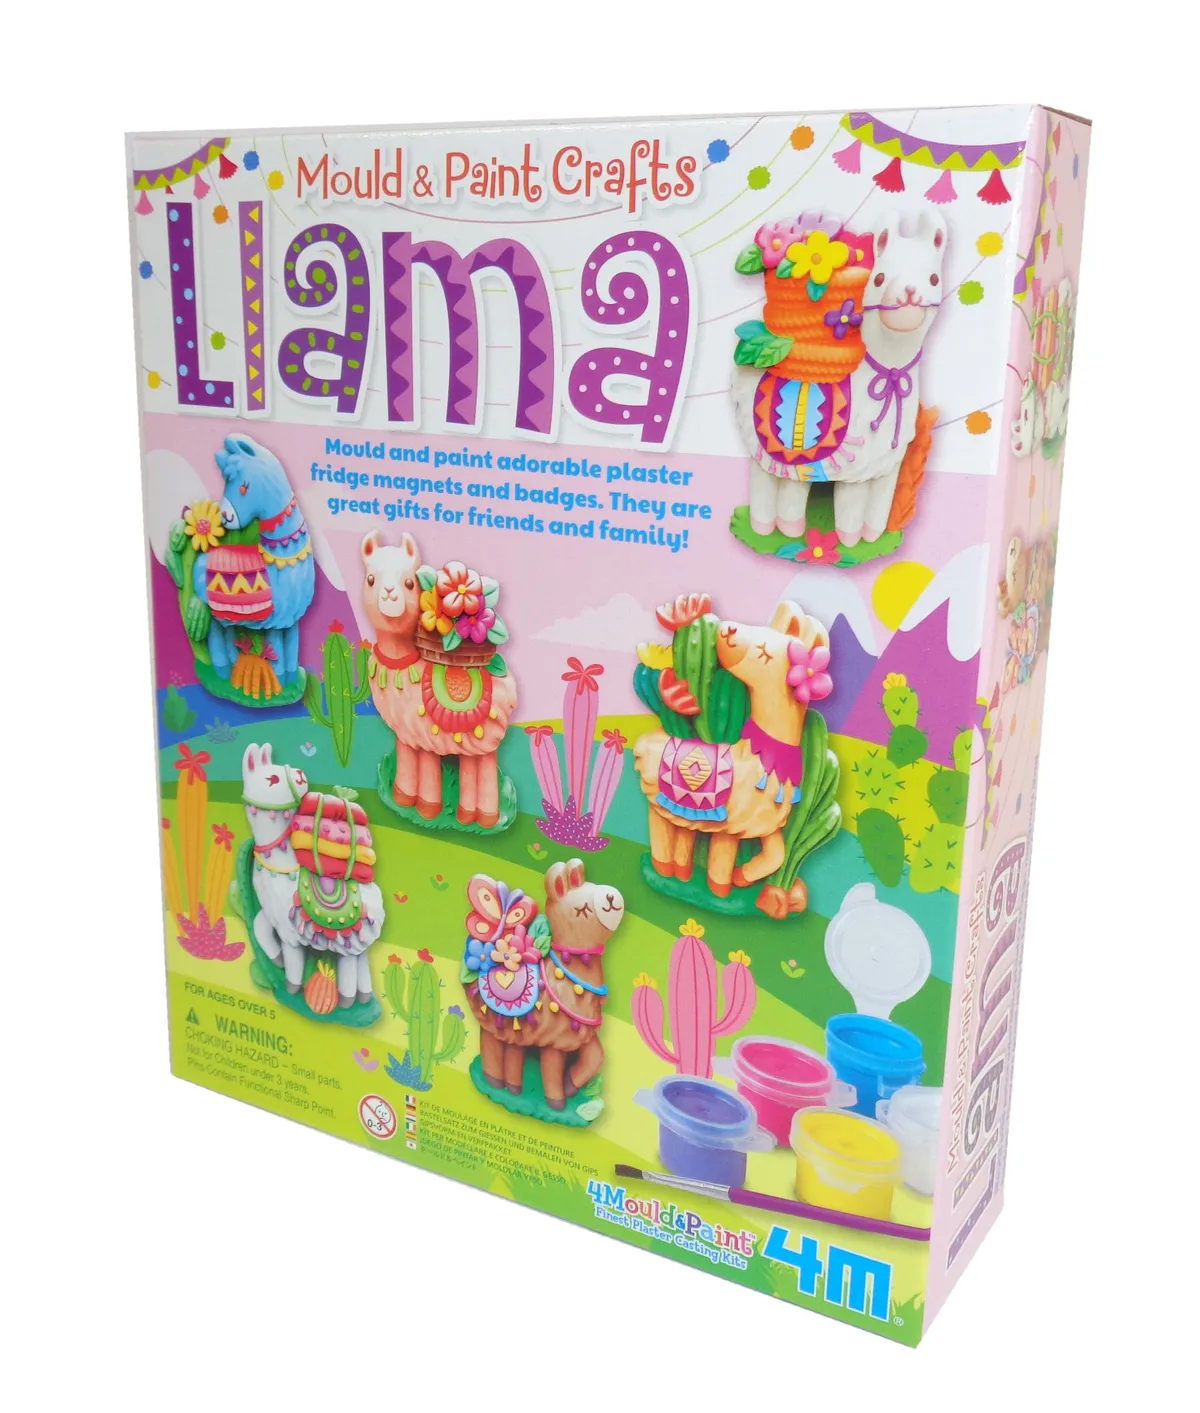
Who can resist these colourful, prancing llamas? There are five to mould and paint, each in a different pose with fun accessories.

Once you're done making llamas, you can use the moulds to make resin versions. The resin needs to be bought separately - check out our how to use resin guide if you're interested!

Body Part Plaster Casting Kit

Similar to the previous hand-holding kits - this skin-safe kit is marketed towards creating 3D moulds of "body parts". Take from that what you will!

Just the bandages

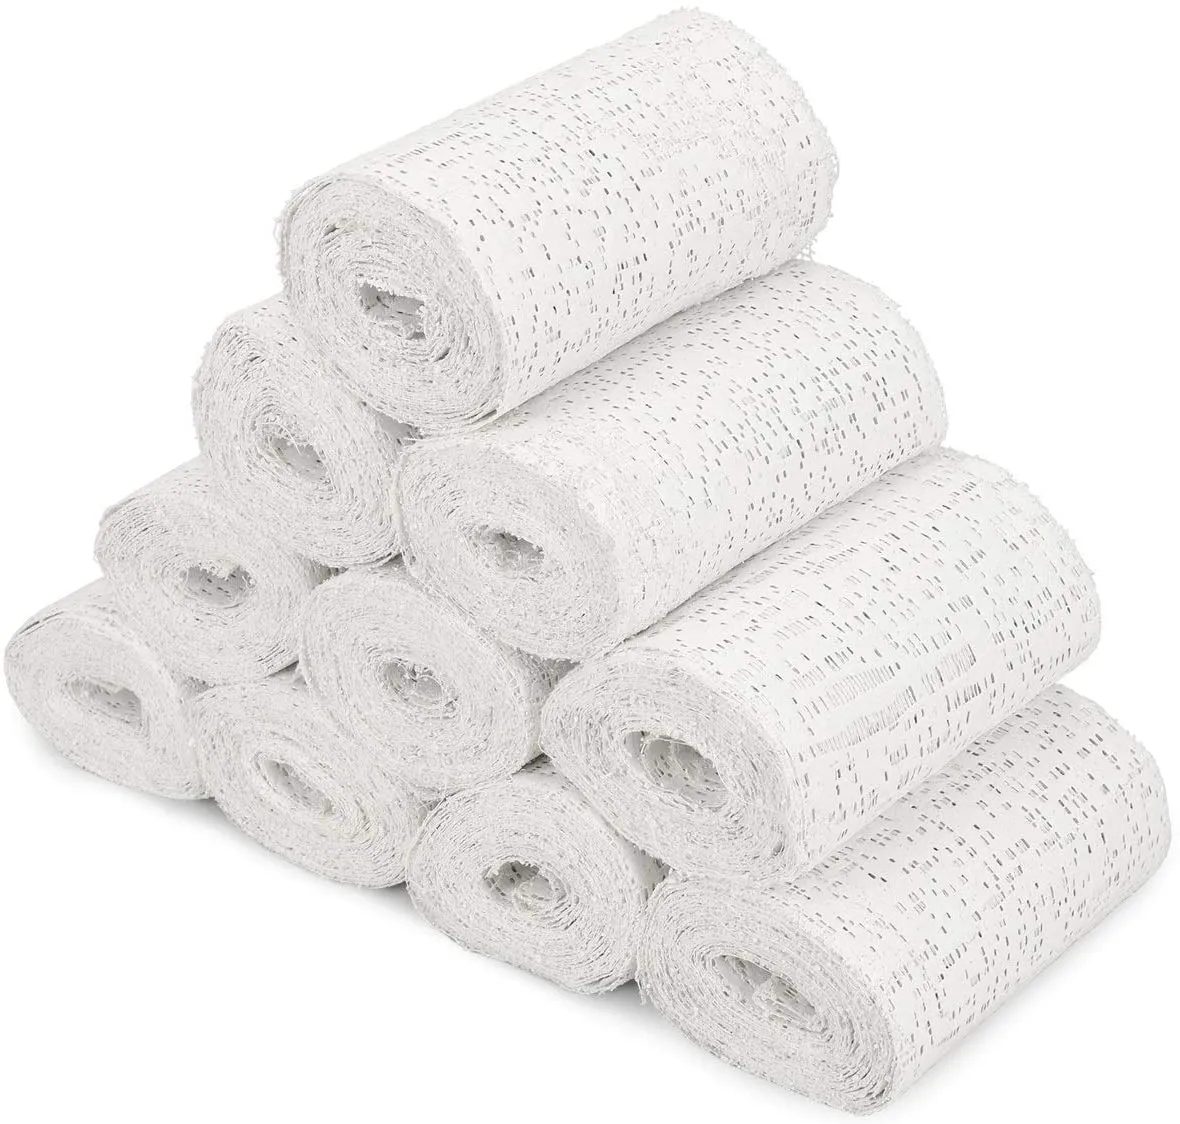
From faces to bodies, easily and safely make casts and mementoes with the pack of plaster bandages from Navaris. The skin-safe bandages can be used for arts and crafts, sculpting, or even contours of pregnant tummies.

More plaster of Paris moulds

Skull

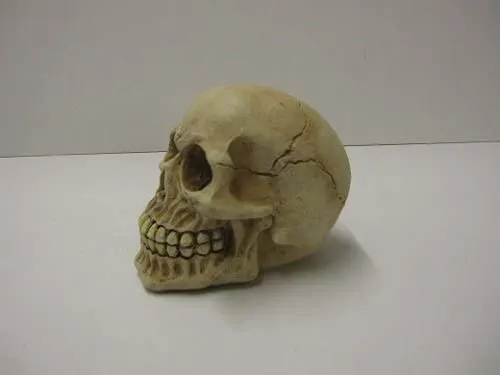
This realistic skull plaster of Paris mould is ideal for Halloween! It's made from reusable latex and, once painted, this 8 x 8 x 10cm plaster of Paris mould is the perfect addition for dialling up the spooky factor via your desk or mantelpiece.

Fairy Door

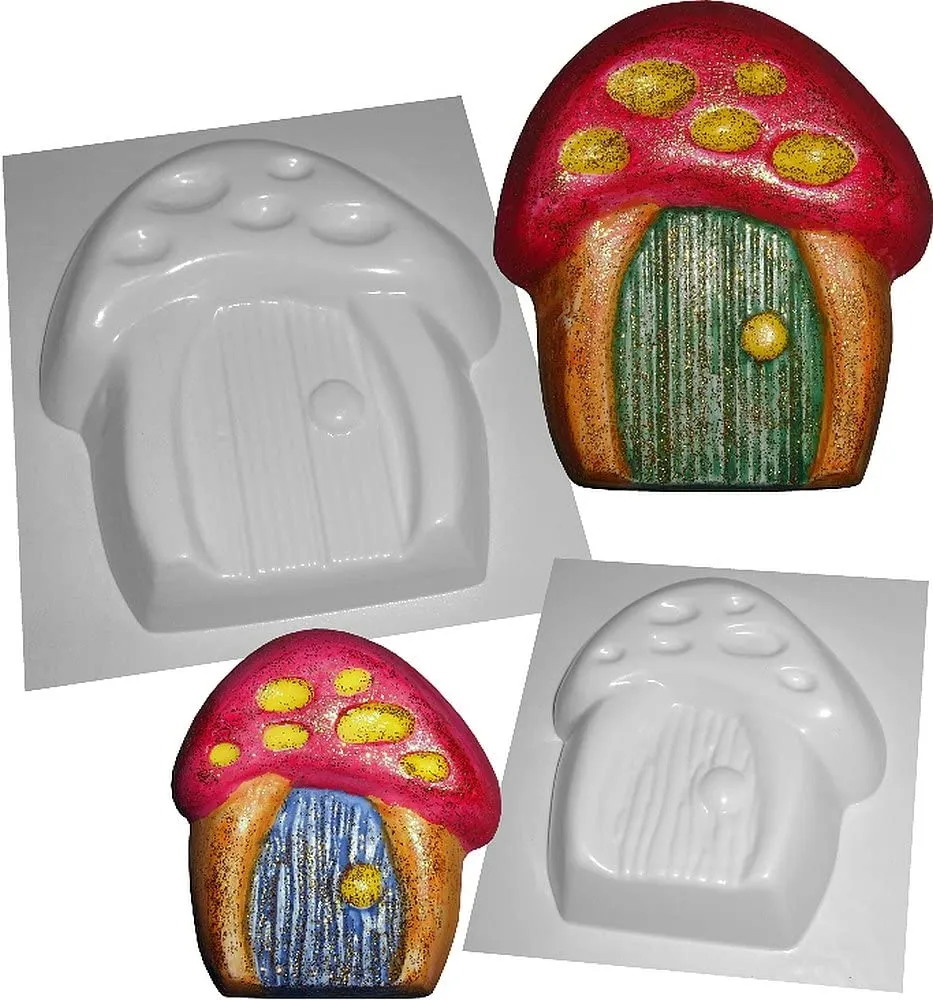
This is a cute set of two reusable ABS plastic moulds for casting fairy doors with plaster of Paris (or concrete). We think these plaster of Paris mould would be ideal for adding to the base of trees or along skirting boards for little ones to discover the fairy realm!

Traditional Farmyard

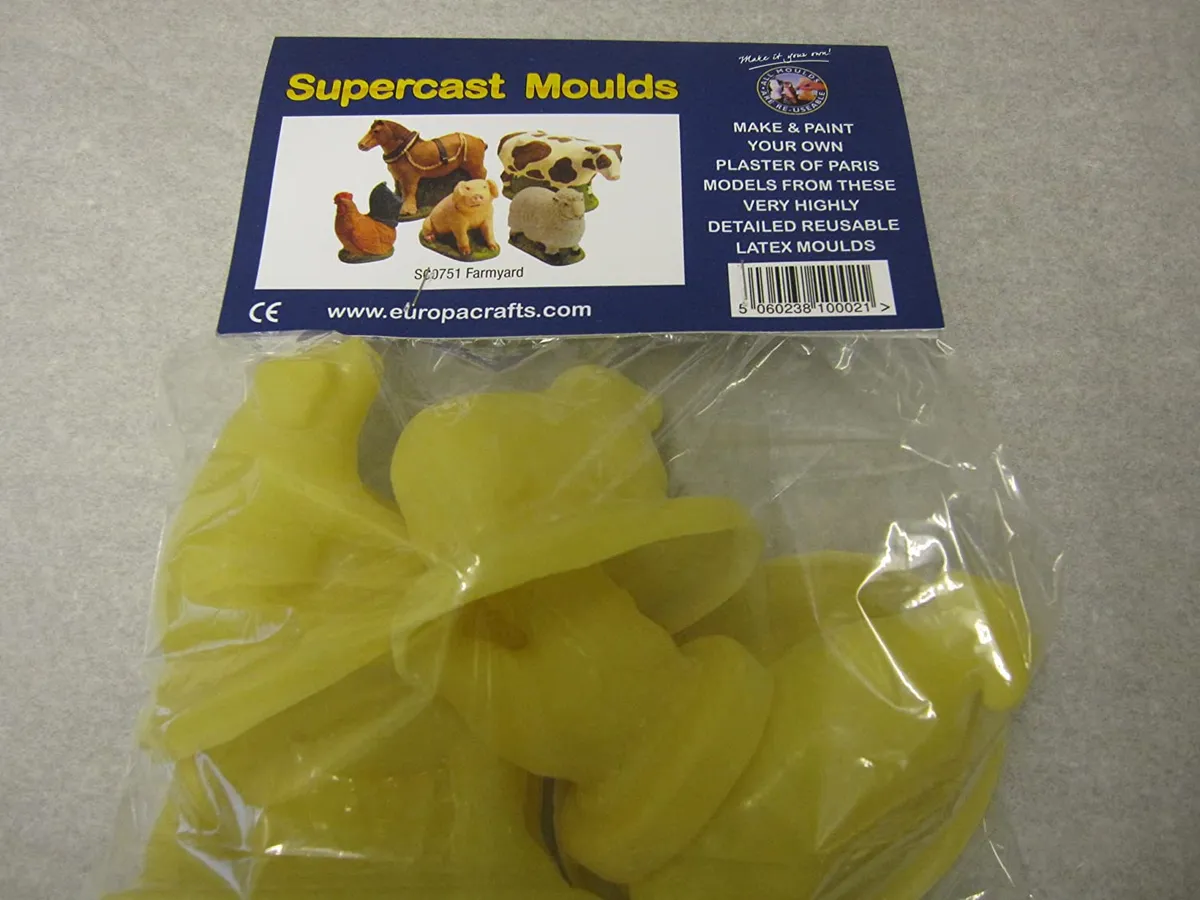
These are the traditional moulds that many of us remember from childhood. Make and paint your own farmyard animals with these highly detailed reusable latex moulds. There's a horse, cow, pig, sheep and cockerel for you to fashion your own menagerie.

Stones

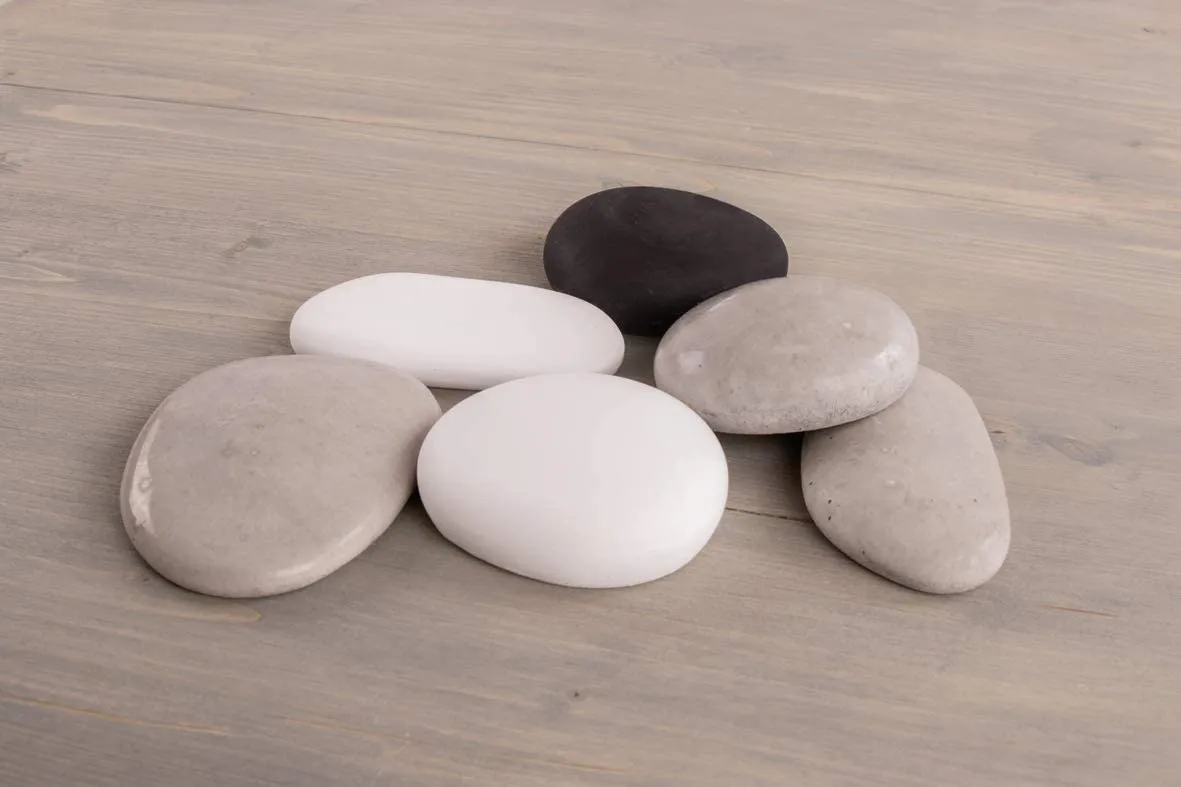
Use these pebble moulds for rock painting, and create wonderful patterns, mandalas or quirky stone animals. You can use acrylic markers or a dotting tool to transform the plain stones into colourful masterpieces. Moulds like these would also be great for making soap.

Christmas Nativity

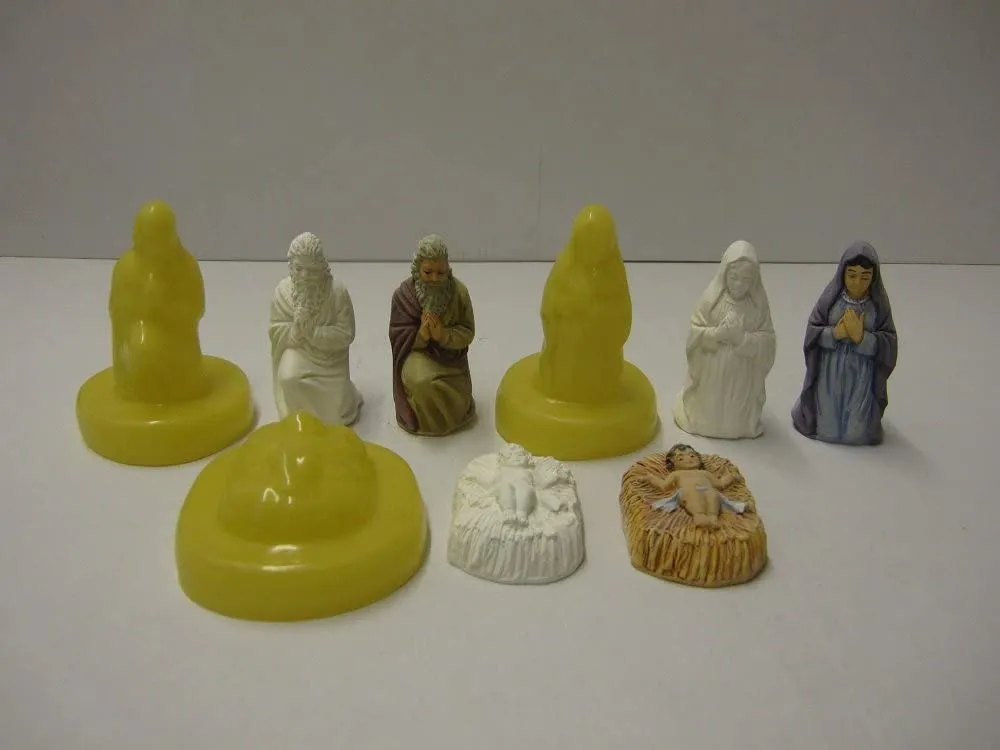
This eight-piece mould kit features Joseph, Mary and Baby Jesus. It also has the wise men and shepherds so you can make your own traditional Nativity.

Venus de Milo

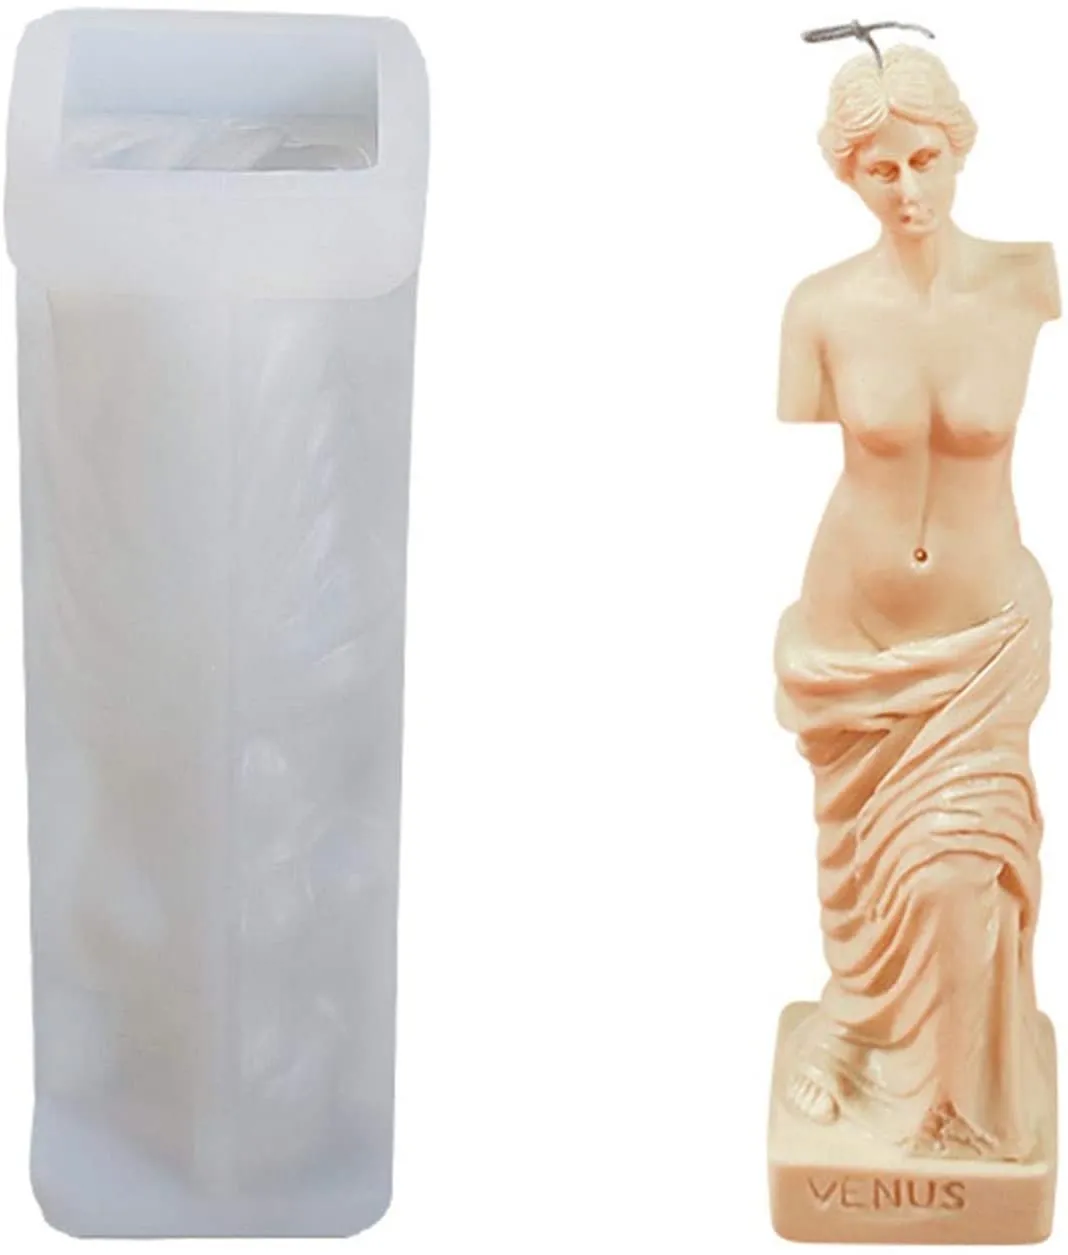
This elegant Venus goddess mould is actually for candles, but it can also be used for plaster of Paris, resin and soap! Just be careful to work out the air bubbles to retain as much strength as possible where the features are more delicate (like her neck).

How to use plaster of Paris

Step 1

First, protect your workspace. Plaster of Paris can get quite messy – it’s a fine powder that can get everywhere! Old newspaper or plastic sheets are good if you have any. Get your moulds ready, and set to one side.

Step 2

The ideal ratio to use is 2:1. That means two parts plaster of Paris to one part water. Measure out your water first, and pour it into your mixing container.

Step 3

Next, measure out twice as much plaster of Paris. Put this in a separate container for now, and break part any lumps with a fork or a spoon.

Step 4

Gradually add the powder to the water, one spoon at a time.

If you have a strainer, it’s a good idea to sift the plaster of Paris powder through the strainer, into the water this way. This helps to avoid clumps forming and prevents you from adding too much powder in one place. You’re aiming to get the powder evenly dispersed throughout the water, so add the powder to different parts of the water.

Step 5

Every so often, tap the side of the container to disperse any air bubbles that might have formed in the mixture. We do not want air bubbles – plaster of Paris dries quickly, so air bubbles in the mixture can be transferred to the mould, which will dry in place and weaken the final product.

Step 6

Keep adding the powder until it is no longer being absorbed by the water. It will appear as though the powder is sitting on top of the water.

Now stir the mixture. Go slowly because we do not want to introduce air to the mixture, as this will form air bubbles.

Step 7

Once the mixture has reached a smooth, creamy consistency, pour it into your mould. Do not wait for more than a few minutes (maximum) as it will start drying and become difficult to pour.

If you have some spare mixture that you’re not going to use – either use it with another mould or dispose of it in the trash. Don’t pour it down the drain because when it dries it will clog the drains and cause a blockage.

Step 8

Put the mould in a safe place – somewhere where it will not be disturbed – and leave it to cure for 48 hours. It will become touch dry after just a few minutes and will appear dry after one hour, but to ensure the inside is dry we need to leave it for 24-48 hours.

Step 9

Once it’s dry (it will feel cold and hard) turn the mould inside out to reveal your sculpture! Paint your sculpture with acrylic paint, spray paint or poster paint, then leave to dry.

Step 10

Finally, varnish your sculpture to add strength (you can get matt or shiny varnish). Varnishing plaster of Paris will also help to prevent accidental chipping. Once dry find somewhere to display your plaster of Paris masterpiece!

How long does plaster of Paris take to dry?

Plaster of Paris is a quick-drying material, becoming touch-dry within just a few minutes. If you are using it with a small craft mould, you can remove it from the mould within around an hour. However, for best confidence, you should leave it for 24-48 hours to fully cure (dry).

How do you speed up drying time?

You can speed up the drying time for plaster of Paris by using hot water instead of cold water. If you want to do this, have the mould and everything laid out and ready to go, as it will start setting very quickly.

Adding salt to the mixture will also speed up the drying time. However, be aware that if you do this, it will weaken the final product and it will become more susceptible to shattering or crumbling.

Plaster of Paris ideas

Thinking about getting some plaster of Paris? Here are some of our favourite plaster of Paris crafts to get you inspired:

1. Plaster of Paris Air Fresheners

Plaster of Paris air fresheners – by Little Yellow Wheelbarrow

Untreated plaster of Paris is porous – so when cured, it will easily absorb liquids that touch its surface, including essential oils and perfume. These homemade air fresheners make use of this property – and look good enough to sell, too. Beautiful! Get the full tutorial over at Little Yellow Wheelbarrow.

2. Plaster of Paris Fossils

How to make plaster of Paris fossils – by broogly

Make your own fossils! Bonus – why not bury your handmade fossils in some sand and let your little ones excavate them!

3. Leaf impressions

Leaf prints by That Artist Woman

This is perhaps one of the easiest, but most effective plaster of Paris crafts that you can do. Check out the full tutorial, packed full of helpful hints and tips over at That Artist Woman.

4. Plaster of Paris Ghosts

Plaster of Paris ghosts by Ashbee Design

Make these spooktacular ghosts using plaster of Paris bandages! As it dries hard (very hard – the bandages help reinforce the structure) you can bring Casper out year after year. We love it! Get the full step-by-step tutorial with pictures, at Ashbee Design.

5. Footprints in the Sand

Footprints in the sand by My Kid Craft

Use wet sand as an easy way to make a mould before pouring in your plaster of Paris. Get the full tutorial over at My Kid Craft.

6. Pavement Chalk

Sidewalk chalk using plaster of Paris – by Hello, Wonderful

You can make your own safe, washable, chunky sidewalk chalk! Get the tutorial over at Hello, Wonderful.

7. Cupcake Candle Holders

Cupcake candle holders made with plaster of Paris by Songbird Blog

Do you have any cupcake cases in the kitchen? How about using them to make these adorable cupcake candle holders. Get the full tutorial over at Songbird Blog.

8. Freeform Sculptures

Freeform sculpture using plaster of Paris – First Palette

This is a fun project! Pour the plaster of Paris into balloons, then squish and squash the balloon (while the plaster is drying) to create stunning freeform sculptures! Get the full – and quite brilliant – tutorial over at First Palette.

9. Pots of Joy

how-to-custom-color-plaster-4

Learn how to make these simple pots over at Paper & Stitch blog! We love the pastel colourway. This would be an ideal project for over the summer. The easy-to-follow tutorial also gives advice on how to add colour to your plaster of Paris and is crammed full of helpful hints and tips.

10. Heart Charms

Homemade charms using plaster of Paris – by My Kid Craft

Make these charms by adding powder paint to your mixture. Find out how over at My Kid Craft.

11. Playdough Moulds

Plaster of Paris moulds – handprints

Do you have some play dough? You can use it to make moulds! Make impressions of beach shells, toys, handprints (or pawprints!) and pour in plaster of Paris. Don’t have any playdough? You can make some using basic kitchen ingredients – here on Gathered Zoe shows you how to make playdough.


What is plaster of Paris? It's a crafter's dream!

If you've ever broken your arm or leg you will have had a cast made from plaster of Paris. It's used in dentistry too and also in the building trade. You can buy the powder or bandages and make your own moulds and sculptures, or you can buy kits to make specific items. The choice is yours! Then once it's dry you can get creative with your paintbrushes then varnish it for a glossy finish.

Try your hand at pottery

Plaster of Paris involves methodical work – making the mould, stirring the mixture, pouring it into the mould and carefully removing it. It takes a little time and patience.

If you enjoy meditative tasks such as this, coil pots could be the next step in your crafting journey. You can create amazing ceramics using the easy coil pottery technique - all you need is some clay and a small number of tools. You can make your pot as small or large as you like and incorporate intriguing and elaborate patterns. Check out our guide and discover the world of pottery with Gathered!


Making a coil pot