Crochet clutch bag pattern

Hook yourself the ultimate accessory with Laura Strutt’s crochet clutch bag pattern. This tactile textured bag is bound to make a few heads turn!

Try 6 issues of your choice of craft magazine from just £9.99

Published: September 27, 2021 at 8:30 am

Team Mollie are always up for expanding their crochet repertoire – especially when handbags are involved – so we couldn’t resist Laura Strutt's crochet clutch bag pattern. Using a technique called puff stitch to add interest and texture to the crocheted fabric, we guarantee you’ll be fending off compliments whenever you break out your new crochet clutch.

Laura used a mustard yellow yarn for the main body of the bag, accented with a neon pink tassel, but experiment with your choice of colours to make yours more personal. You could even add a bag charm or pom pom for extra pazazz! Just make sure you have enough yarn before you begin though – this crochet clutch bag may look like a fairly small project, but puff stitch uses a lot of yarn, and tension can vary dramatically. Try to keep each of the loops as even as possible when creating the stitches, as this will ensure the individual puffs come out at a similar size. If you need a little more assistance then head over to our crochet for beginners guide which covers all the basic techniques.

You’ll need

  • Brown Sheep Lamb’s Pride Worsted, 85% wool/15% mohair, 113g/173m per ball, one ball in Sunburst Gold (M14)
  • 5 mm (UK 6, US H/8) crochet hook (find the best crochet hooks on the market in our round-up)
  • Yarn for tassel
  • Lining fabric, 29 x 38cm (11½ x 15″)
  • Zip, 20cm (7 78“)
  • Sewing needle
  • Matching sewing thread
  • Yarn needle

Tension

5.5 sts and 7.5 rows in puff st to measure 10cm (4″)
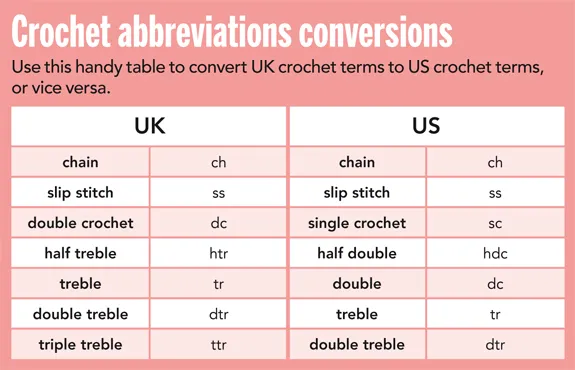
Abbreviations

You can find a full list of all abbreviations we use in our abbreviations and conversions guide. This pattern is written in UK terminology but you can easily convert it to US terms using this handy chart.

Finished size

28 x 18cm (11 x 7 18“)

How to make a crochet clutch bag

You will need:

  • Yarn
  • Crochet hook
  • Fabric

Puff stitch technique

Step 1

crochet clutch bag step 1

Wrap the yarn around the hook and insert hook in st, then wrap the yarn around the hook again.

Step 2

crochet clutch bag step 2

Draw the hook back through the stitch – there should be three loops on the hook.

Step 3

crochet clutch bag step 3

Wrap the yarn around the hook again and insert the hook in the same stitch. Wrap the yarn around the hook again before drawing it back through.

Step 4

crochet clutch bag step 4

Repeat a further five times more until there are 13 loops of yarn on the hook.

Step 5

Wrap the yarn around the hook and draw it through all the loops on the hook – there will now be one loop on the hook.

Step 6

Work a chain stitch to secure the loops of the puff stitch in place.

How to make the crochet clutch bag

First side

Step 1

The bag is worked from the base upwards, rejoining the yarn to work the second side. You’ll join the side seams together next, then sew the zip and lining in place, and add a yarn tassel to finish.

Foundation ch35

Row 1 (RS) 1dc in 2nd ch from hook, and each st to end, turn [34sts]

Rows 2-4 ch1 (does not count as st), 1dc in each st along, turn

Row 5 ch3 (counts as 1tr), 1tr in each of next 2sts, *miss next st, ch1, ps in next st; repeat from * to last 3sts, work 1tr in each of next 3sts, turn [13 puff sts]

Row 6 ch3 (counts as 1tr), 1tr in each of next 2sts, *ch1, miss next st, ps in next st; repeat from * to last 4sts, ch1, miss next st, 1tr in each of next 3 sts (the 3rd tr is worked into the 3ch of the ch on previous row), turn

Repeat Rows 5 and 6 a further eight times more, making sure to work the puff stitches into the chain spaces and working the final tr of each row into the 3rd ch in previous row.

Row 23 ch1 (does not count as st), miss first st, 1dc in next st, 2dc in ch-sp, 1dc in each st to last ch-sp, 2dc in ch-sp, 1dc in each st to end, turn

Repeat Rows 2-4, then break yarn and fasten off.

Second side

Step 1

crochet clutch bag step 5

Row 1 with RS facing, rejoin the yarn to opposite side of foundation ch and work 34dc along, turn

Rows 2-3 ch1 (does not count as st), 1dc in each st along, turn

Repeat instructions for First side from Row 5 onwards.

Finishing

Step 1

Weave in all yarn ends and fold the bag in half, aligning the sides and upper edges. Join each of the side seams in turn with 1dc in each st and join 4sts at each side of the upper opening with 1dc in each.

crochet clutch bag step 6

Open the zip and pin into place with one half on each side of the opening of the bag. Secure in place with hand stitches.

crochet clutch bag step 7

Fold the lining fabric in half lengthways with RS together. On each of the short ends, press 1cm (38“) to the wrong side, then sew the two side seams of the lining using a 1cm (38“) seam allowance.

crochet clutch bag step 8

Place the lining inside the bag and secure in place along the zip tape with neat slip stitches.

crochet clutch bag step 9

Create a tassel by braiding 20cm (7 78“) of yarn and knotting the ends together to form a loop. Cut several 15 x 20cm (6 x 7 78“) lengths of yarn and place inside the loop. With the knot in the centre, fold the lengths of yarn in half. Take a small scrap of yarn and tie around the top of the bundle to secure the strands of the tassel in place. Loop through the zip tab to finish.

And you’re done! We hope you’ve enjoyed hooking up Laura’s crochet clutch bag pattern and will wear it all around town. For more fun projects check out our free amigurumi crochet patterns and our free crochet poppy pattern