
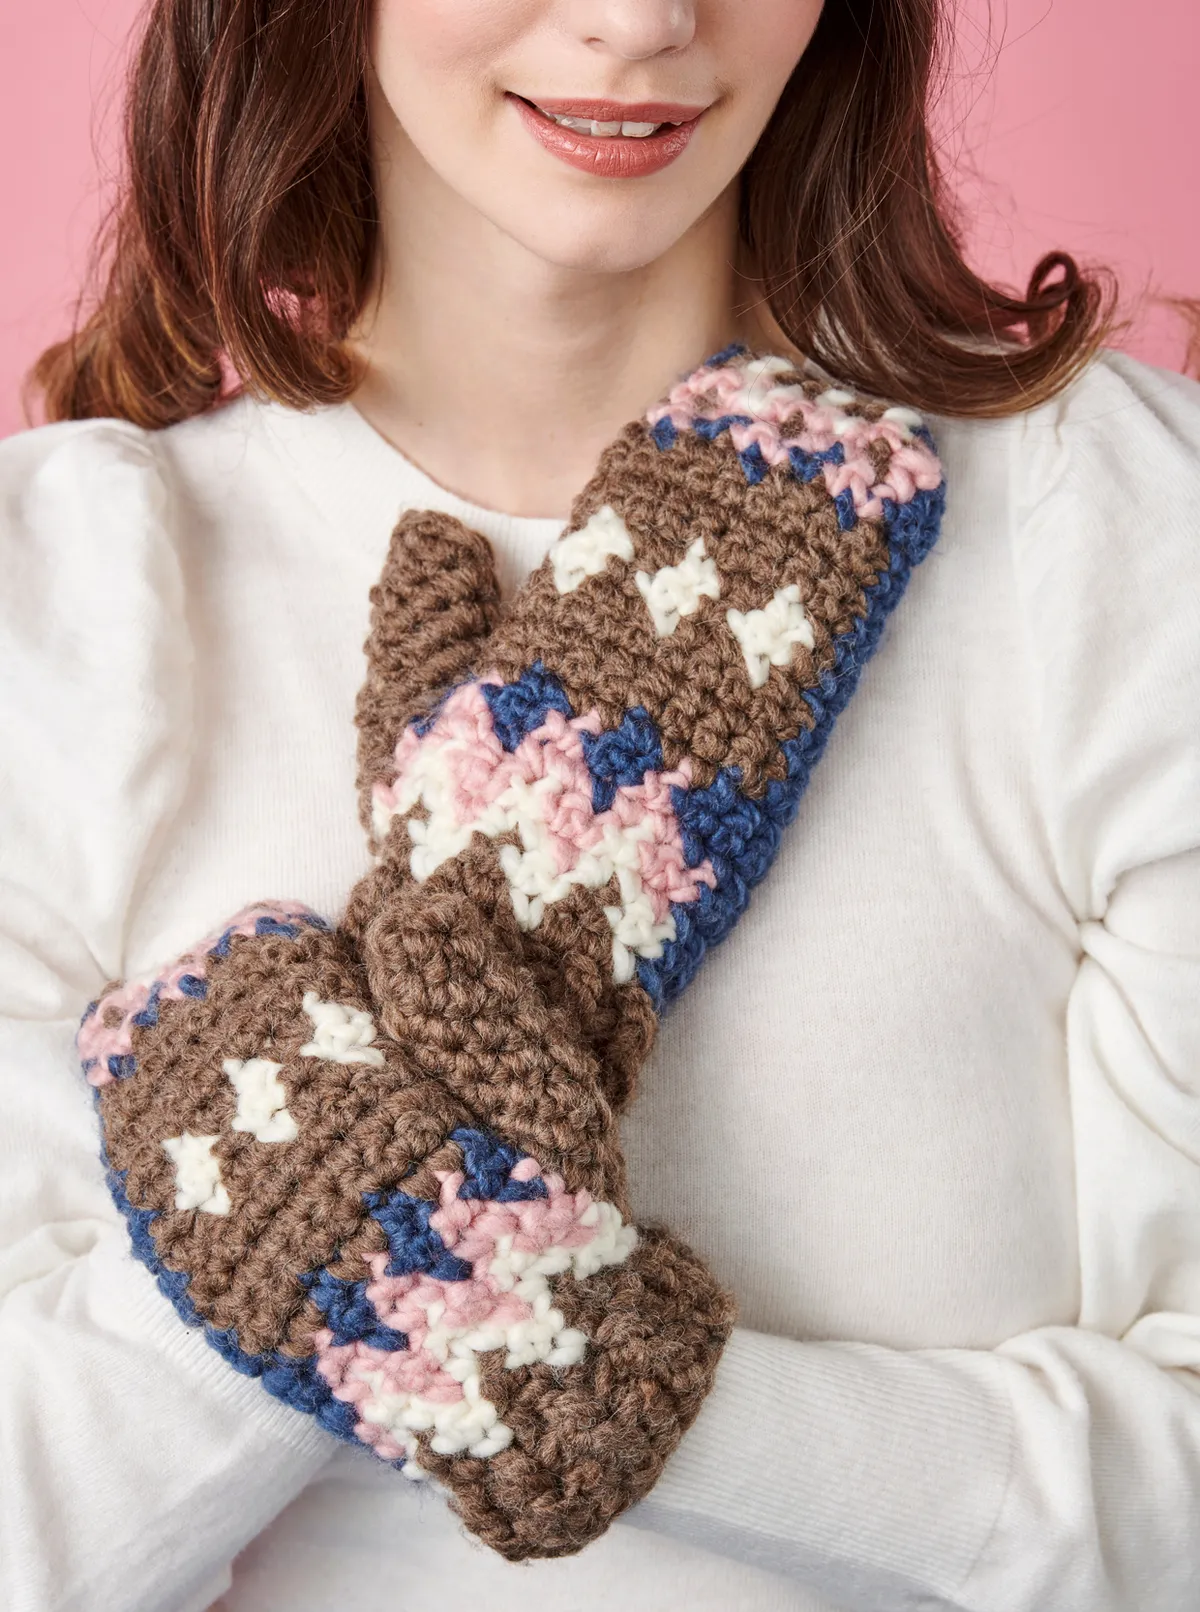
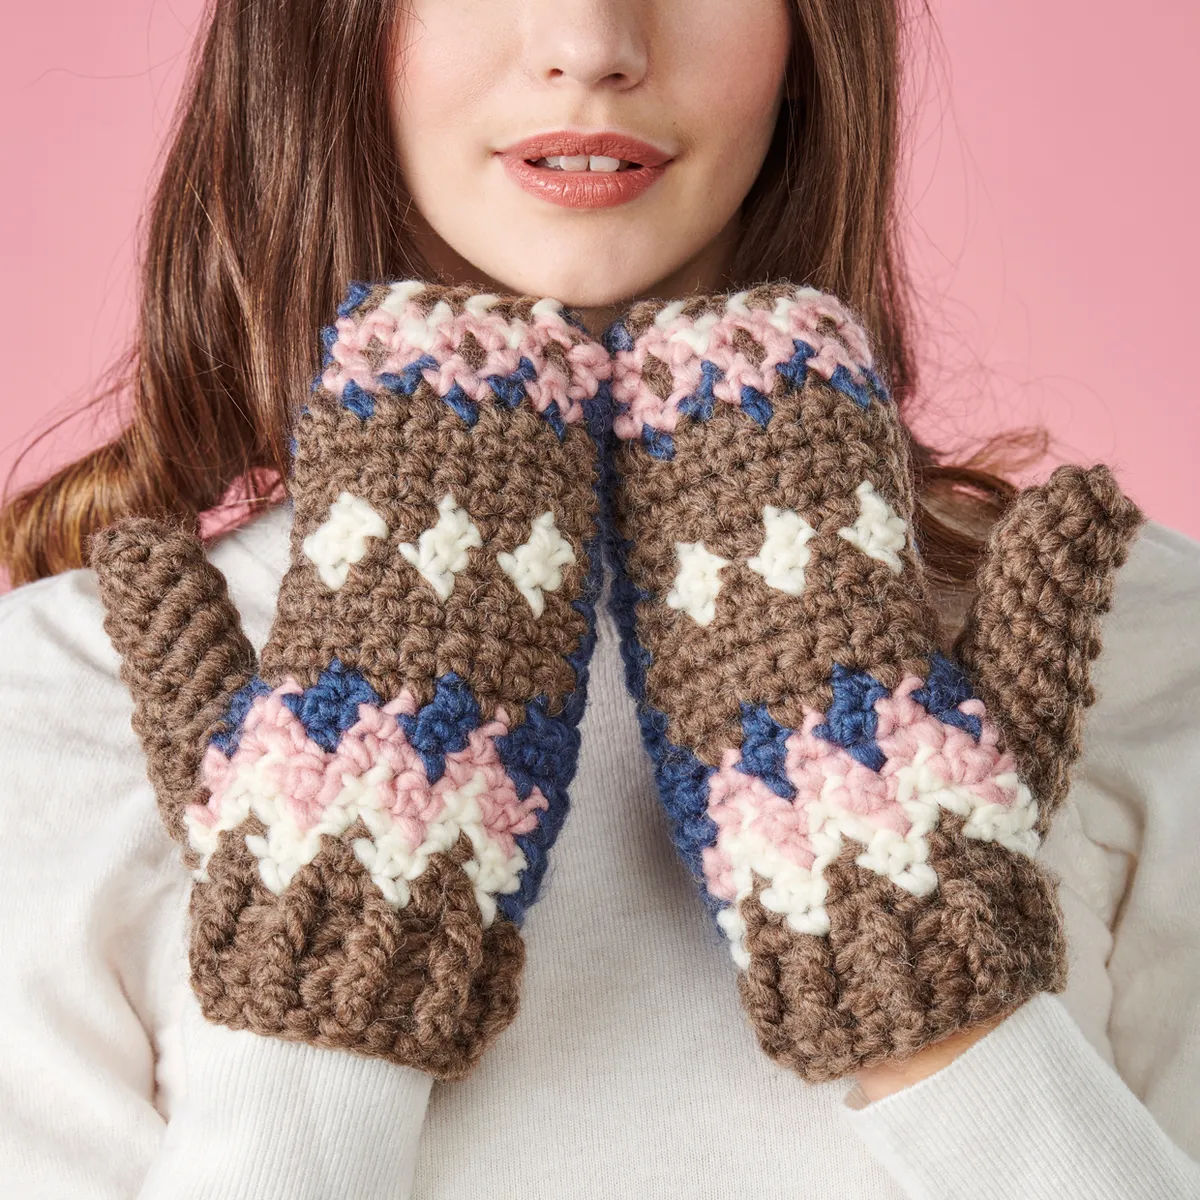
Make yourself a chunky pair of crochet mittens that are perfect for chilly days
Designer Becky Skuse says: “Inspired by Bernie Sanders’ mittens, my chunky pair will keep your hands cosy whatever the weather. The Scandi style is perfect for winter, and the colourwork pattern is simple to create with just four colours. Each mitten is pretty quick to hook, and they make a wonderful gift to warm someone’s heart as well as their hands!”
We love Becky's chunky mittens, and we can imagine they'd look fantastic in other colour combinations too! If you're new to crochet colourwork, be sure to check out our how to do crochet colourwork tutorial.
You will need
Bernat Roving (80% acrylic, 20% wool; 100g/109m), or alternative chunky weight yarn, 1 ball each of
- Yarn A Bark (00011)
- Yarn B Cobalt (00104)
- Yarn C Rice Paper (00100),
- Yarn D Quartz Pink (00717)
Measurements
Finished mitten is 23cm long and 22cm in circumference
The thumb measures approximately 7cm wide and 10cm long
Mittens fit an average ladies hand
Tension
The yarn used works as chunky at this tension:
11 sts and 12 rows to 10x10cm in dc using 6mm hook
Notes
Use the colour charts in each section below to create the colourwork section of each mitten.
On the charts, each square represents one stitch in double crochet, worked using a specific yarn colour. The stitches are worked in rows, so you need to start at the bottom-right corner, working even-numbered right-side rows from the right-hand side towards the left, then working odd-numbered wrong-side rows from the left towards the right.
The numbers along the bottom of the chart represent the stitch count, while the numbers up the side of the chart represent the row count.
To change colour between stitches on the same row, you need to anticipate each colour change. So when working the last dc in one colour, you need to work the final yrh of that dc in the new colour. This should give you a working loop in the new colour, ready to work the next dc.
When changing colour like this, make sure you twist together the old and new yarns colours at the WS of the fabric. When working WS rows, you need to bring the yarn back to the WS of the fabric before twisting together the old and new yarn colours and then work yrh with the new yarn. Carry unused yarn across the WS of the fabric. If a colour is not being used for several rows/rounds, fasten off and rejoin when it is re-introduced.
Rounds 1-3 are worked in standard rounds with the RS facing you on each round.
Rows 4-10 are worked in standard rows, turning the fabric at the end of each row. This creates the thumbhole.
Rounds 11-24 are worked like rounds (joining the last stitch of the row to the first stitch with a ss) but also like rows (turning the fabric at the end of each row and working in the opposite direction). This creates a consistent look in the fabric.
Abbreviations
Invisible Decrease (inv dec) (Insert hook in front loop only of next stitch) twice, yrh and pull up a loop, yrh and pull through 2 loops on hook. (If you want more help with this, check out our how to do the crochet invisible decrease tutorial)
You can find a full list of all abbreviations we use in our abbreviations and conversions guide. This pattern is written in UK terminology, but you can easily convert it to US terms using the guide.
Free crochet mittens pattern
Cuff
This is the same for both mittens and is not shown on the charts.
Using Yarn A, ch20, ss to first ch to form a loop, being careful not to twist the chain.
Round 1 (RS) Ch2 (counts as htr), htr in next and each chain around, ss to top of beg ch-2. [20 htr]
Round 2 (RS) Ch2 (counts as BPtr), *FPtr around next htr, BPtr around next htr; repeat from * to last htr, FPtr around last htr, ss to top of beg ch-2. [10 BPtr and 10 FPtr sts]
Round 3 (RS) Ch2 (counts as BPtr), *FPtr around next FPtr, BPtr around next BPtr; repeat from * to last FPtr, FPtr around last FPtr, ss to top of beg ch-2. [10 BPtr and 10 FPtr sts]
Use a stitch marker to mark the working loop of Yarn A that’s on the hook.
Left Mitten
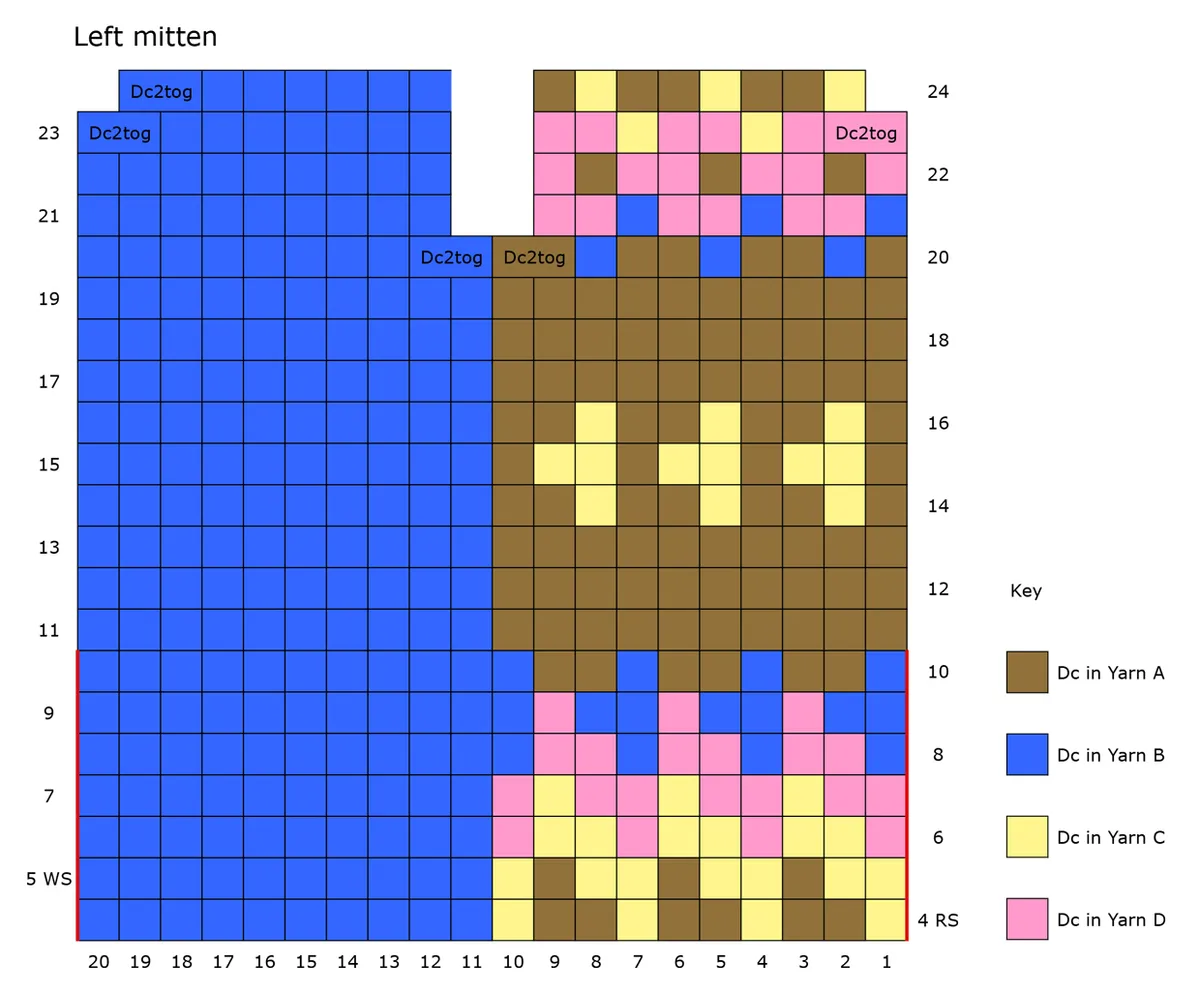
Begin working from Left Mitten Chart, working Row 4 from chart as follows:
Row 4 (RS) Using Yarn C, ch1 (does not count as st), dc in first st (changing to Yarn A on the final yrh), *using Yarn A dc in each of next 2 sts (changing to Yarn C on the final yrh of the second dc), using Yarn C dc in next st (changing to Yarn A on the final yrh); repeat from * twice more, changing to Yarn B on the final yrh of the final Yarn C dc; using Yarn B dc in each of next 10 sts, turn without joining into the round. [20 dc]
At the beginning of each row, ch1 using the yarn colour of the first dc of the next row (to give you a working loop in the right colour). The ch1 will be worked over when the thumb is made.
Continue to follow the chart in rows to the end of Row 10.
Round 11 (RS) Work to the end of the row following the Chart, then ss to first dc to join into the round and turn to work the next round in opposite direction.
Rounds 12-19 Continue working in rounds, joining at the end of the round and turning to work the next round in the opposite direction. Work the ss at end of each round using the colour of the first dc of next round.
Rounds 20-24 Continue working in rounds as set, turning at the end of each round. These rounds include decreases shown as dc2tog across two stitches on the chart. For example, Round 20 will have the first 8 dc sts worked in the colours shown on the chart, changing to Yarn A on the last yrh of the eighth dc. Dc2tog over the next 2 sts with Yarn A, changing to Yarn B on the last yrh, then dc2tog over the next 2 sts with Yarn B before completing the row.
On Round 21 there is now only one stitch shown above each dc2tog of the previous row which has caused a gap in the chart, but this does not mean there is a gap in the round - just continue working each st in the round as before, with two fewer sts in the round.
At the end of Round 24, fasten off, leaving a long tail. Use the long tail to sew the top of the mitten closed. Weave in all ends.
Right Mitten
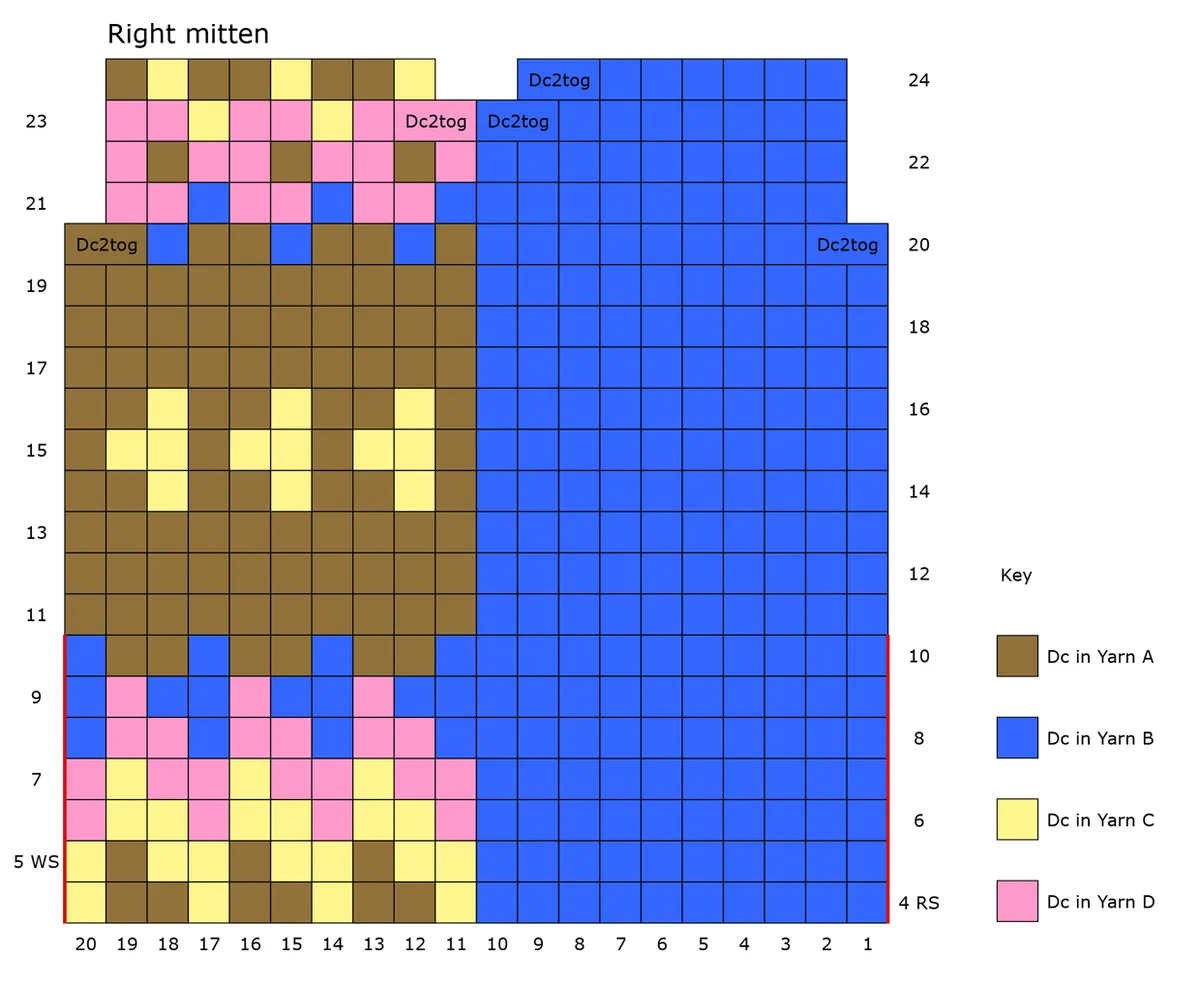
After working the cuff, begin working from Right Mitten Chart, working Row 4 from chart as follows and placing a stitch marker in the first stitch:
Row 4 (RS) Using Yarn B, ch1 (does not count as st), dc in each of next 10 sts (changing to Yarn C on the final yrh of the final Yarn B dc), *using Yarn C dc in next st (changing to Yarn A on the final yrh), using Yarn A dc in each of next 2 sts (changing to Yarn C on the final yrh of the second dc); repeat from * twice more, using Yarn C dc in next st, turn without joining into the round. [20 dc]
Continue to follow the chart as outlined for the Left Mitten.
On Round 20, the dc2tog in Yarn A will need a final yrh in Yarn D.
On Round 23, the dc2tog in Yarn D will need a final yrh in Yarn B.
On Round 24, the dc2tog in Yarn B will need a final yrh in Yarn C.
At the end of Round 24, fasten off, leaving a long tail. Use the long tail to sew the two short ends together. Weave in all ends.
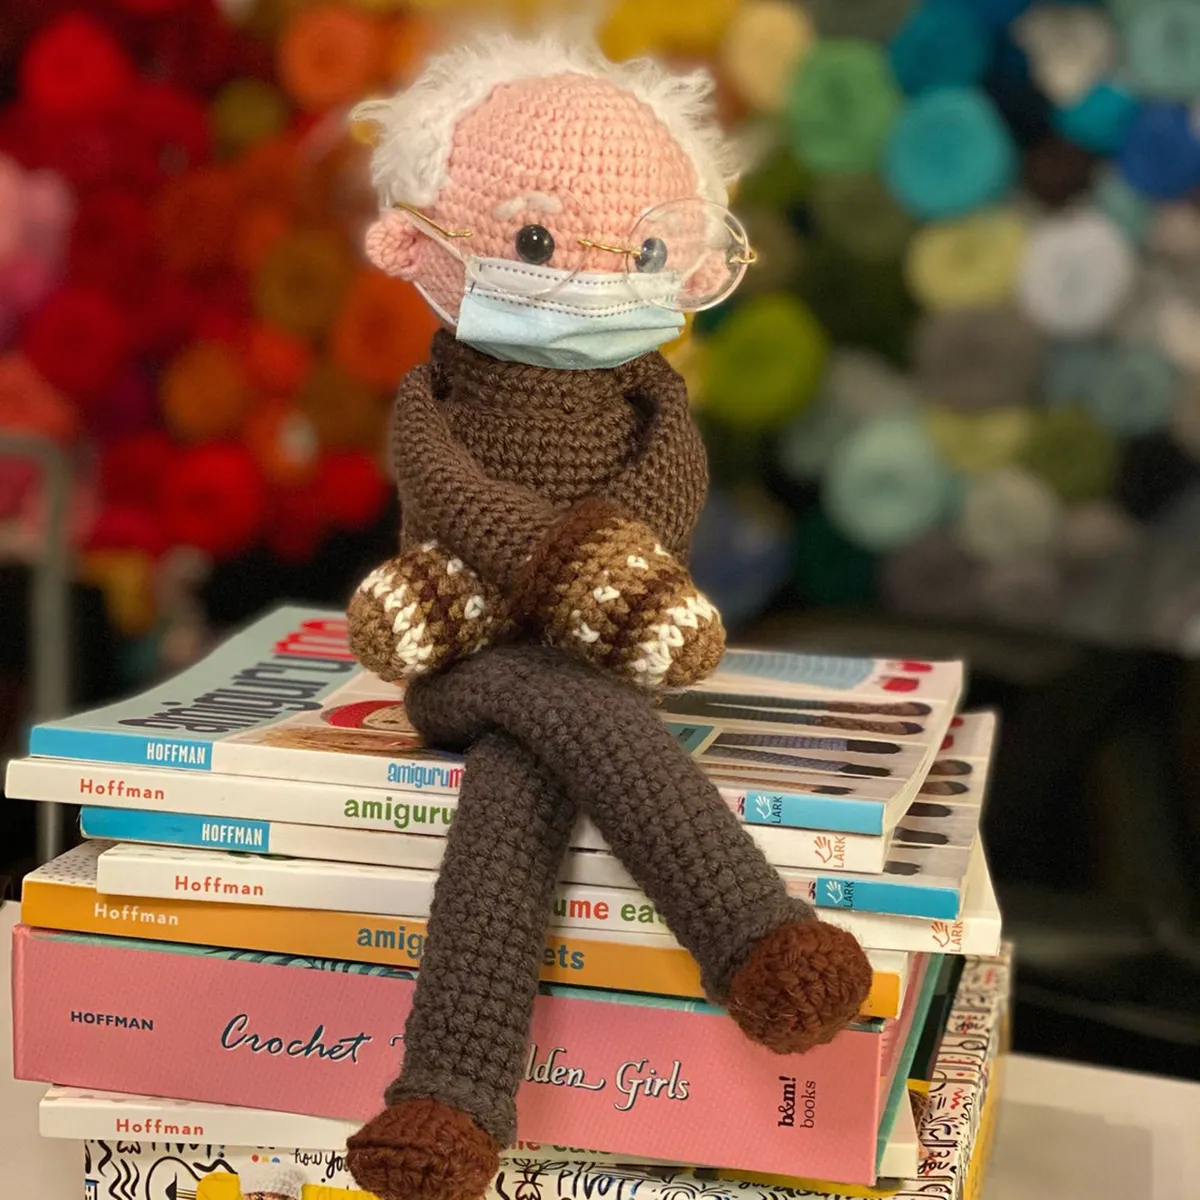
It's amazing how a politician wearing some handmade mittens can quickly turn into a worldwide internet meme, inspiring tons of creative projects! If you want to crochet the man behind the meme, then check out this amazing amigurumi Bernie Sanders crochet pattern by Allison Hoffman!
Thumb
Instructions are the same for both mittens.
Locate the stitch marker you placed at the start of Row 4. Rejoin Yarn A here.
Round 1 (RS) Ch1 (does not count as st throughout), dc into the row ends of the next 7 rows (make sure you insert the hook under the ch1 that’s at the start of each RS row), and continue on RS of the other side of the mitten with a dc into the row end of the next 7 rows, dc into the top of the cuff ribbing, ss to first dc. [15 dc]
Round 2 Ch1, inv dec, inv dec, dc in next 2 dc, 2dc in next 3 dc, dc in next 2 dc, inv dec, inv dec, ss to first dc. [14 dc]
Round 3 Ch1, inv dec, inv dec, dc in next 2 dc, 2dc in next 2 dc, dc in next 2 dc, inv dec, inv dec, ss to first dc. [12 dc]
Round 4 Ch1, inv dec, inv dec, dc in next dc, 2dc in next 2 dc, dc in next dc, inv dec, inv dec, ss to first dc. [10 dc]
Round 5 Ch1, inv dec, dc in next 2 dc, 2dc in next 2 dc, dc in next 2 dc, inv dec, ss to first dc. [10 dc]
Round 6 Ch1, inv dec, dc in next 2 dc, 2dc in next dc, dc in next 3 dc, inv dec, ss to first dc. [9 dc]
Round 7 Ch1, inv dec, inv dec, 2dc in next dc, inv dec, inv dec, ss to first dc. [6 dc]
Fasten off, leaving a long tail. Weave the long tail in and out of the last 6 dc, pull tight and secure. Weave in ends.
If you've been inspired by Bernie Sanders mittens and enjoyed this free crochet mittens pattern, why not check out some of other fab free accessory patterns, like our free crochet bobble hat pattern or our free mens scarf crochet pattern.


