How to make a crochet potholder

Learn how to make a crochet potholder to keep your teapot cosy and sides protected!

Try 6 issues of your choice of craft magazine from just £9.99

Published: September 6, 2021 at 9:09 am

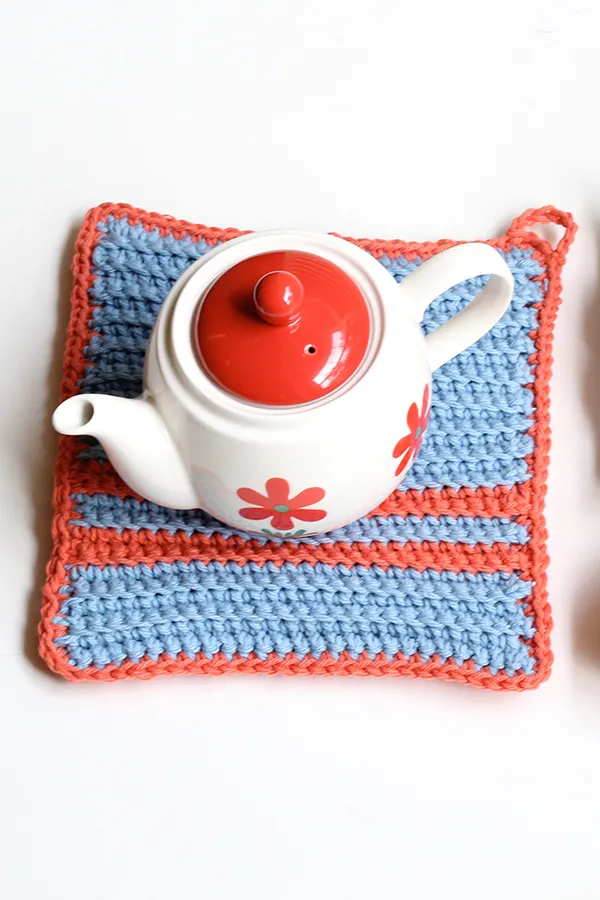
Everyone loves a hot cup of tea and we think it tastes even better when it's straight from the pot. Save your sides and fingers from burns with our super sweet crochet potholder pattern. Our tutorial will teach you how to stitch your own crochet cotton potholder to match your vintage-style kitchen décor! This potholder can be used for any hot pans, plates, or cups and you could even adapt the pattern to make matching mini coasters. The unique texture is created by hooking in the back loops of your stitches only and we just love the effect it gives. It's also a great stash buster project because you can turn all your yarn scraps into a practical potholder.

Our crochet potholder pattern is completely beginner-friendly but if you need a little more assistance then head over to our crochet for beginners guide. All the basic techniques for this crochet potholder are included so you can hook yours up with ease. Once you've made your potholder why not make some other pieces for your kitchen? We love these crochet jar covers and these crochet teatowels with crochet shell edging. Now it's time for the tutorial! Here's how to make a crochet potholder...

How to make a crochet potholder close up

You’ll need:

• Size 5.00mm (H8) hook (find the best crochet hooks on the market in our round-up) • Two colours of cotton yarn • Tapestry needle • Scissors

Abbreviations

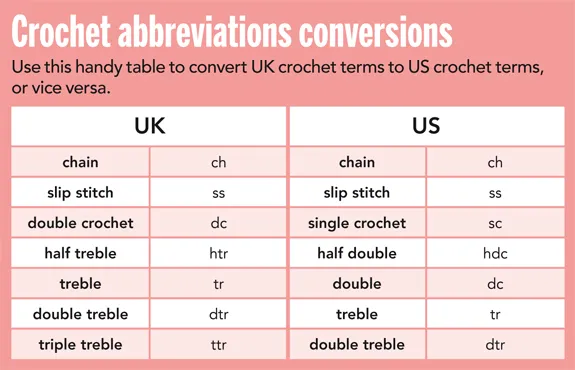
You can find a full list of all abbreviations we use in our abbreviations and conversions guide. This pattern is written in UK terminology but you can easily convert it to US terms using this handy chart.

Simply Crochet UK-to-US conversion chart

How to make a crochet potholder

You will need:

  • Yarn
  • Crochet hook
  • Scissors

Step 1

How to make a crochet potholder step 1

With your first colour ch 27.
Row 1:
 In the second ch from the hook, dc in the back loops only. Rep across (26 dc).
Row 2–30: Ch 1, turn, dc in the back loops only. Rep across. Bind off.

Step 2

How to make a crochet potholder step 2

Using your second colour ch 27.
Row 1: In the second ch from the hook, dc in the back loops only. Repeat across (26 dc).
Row 2–18: Ch 1, turn, dc in the back loops across. Repeat. At the last dc, change to the stripe accent colour.

Step 3

How to make a crochet potholder step 3

Row 19–20: *Ch1, turn, dc in back loops across. Change colours.*
Row 21–22: Rep from * to *.
Row 23–24: Rep from * to *.
Row 25–30: Ch1, turn, dc in back loops across. Bind off.

Step 4

How to make a crochet potholder step 4

Weave in the ends with the tapestry needle and cut the excess yarn.

Step 5

How to make a crochet potholder step 5

Join the two crochet squares together by crocheting dc in each stitch around the edge. Join with a sl st.

Step 6

How to make a crochet potholder step 6

Ch 10. Join with a sl st on the other side of the corner to make a loop. Weave in the ends, and you’re done!

How to make a crochet potholder final

We hope you’ve enjoyed making your crochet potholder. For more cute projects check out our free amigurumi crochet patterns and our free crochet poppy pattern

How to make a crochet potholder close up How to make a crochet potholder