All products were chosen independently by our editorial team. This review contains affiliate links and we may receive a commission for purchases made. Please read our affiliates FAQ page to find out more.

How to make i-cords

Learn how to make a crochet icord, a fabulous and useful technique that is useful for so many crochet projects!

6 issues of Simply Crochet magazine for £14.99|Save 72%

Published: March 21, 2021 at 9:00 am

These narrow tubes of yarn aren’t just for knitters any more – it’s surprisingly simple to make a crochet i-cord, and there are loads of creative ways to use them in your projects.

I-cords can actually be created using all sorts of tools: a crochet hook, a French knitting dolly, a circular knitting needle, double-pointed knitting needles, or an i-cord-making machine. Whichever tool you use, the finished i-cord looks the same – the only difference is the specific technique used with each tool, although they all involve pulling one loop of yarn through another loop of yarn.

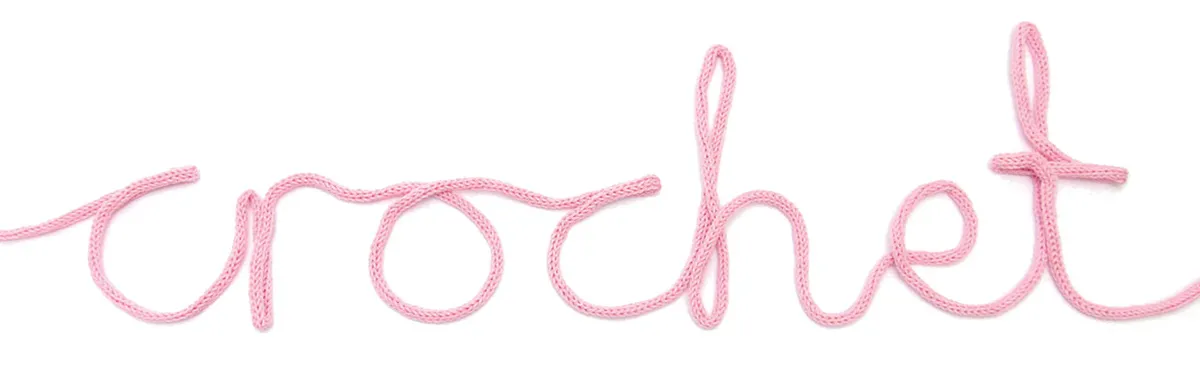
There's loads of uses for i-cords - you can use them spell out your favourite words, to make arms and legs for toys, and even mats and rugs by looping them into flat shapes – such as circles, ovals, squares and rectangles – and stitching them together to form a solid, stable piece. Once you’re more confident, you can use i-cords in garment-making as closures or to edge a hem (known as an applied i-cord). The possibilities are endless.

No one knows for sure how long i-cords have been around for – we know they were mentioned in Victorian needlework manuals, where they were called ‘stay lace’ and used to lace up corsets. Later, they were made using a spool with nails in the top and called ‘idiot cords’. Legendary knitter Elizabeth Zimmerman reinvented the technique in the 1970s, simplifying it for knitters and giving it a more diplomatic name: the ‘i-cord’.

In this guide, we’ll show you two methods for making i-cords: How to crochet an icord and how to use an i-cord-making machine. Each method creates the same finished i-cord, but each one has pros and cons.

An i-cord machine usually has four hooks and it can only create one size of i-cord. With a crochet hook you can create various sizes of crochet i-cords, from two to four loops. An i-cord machine only works on smooth yarns with no fuzzy fibres (such as cotton), from 4ply to DK in weight. With a crochet hook you can use any yarn, although novelty yarns will be trickier to work with. In terms of speed, a machine will always win!

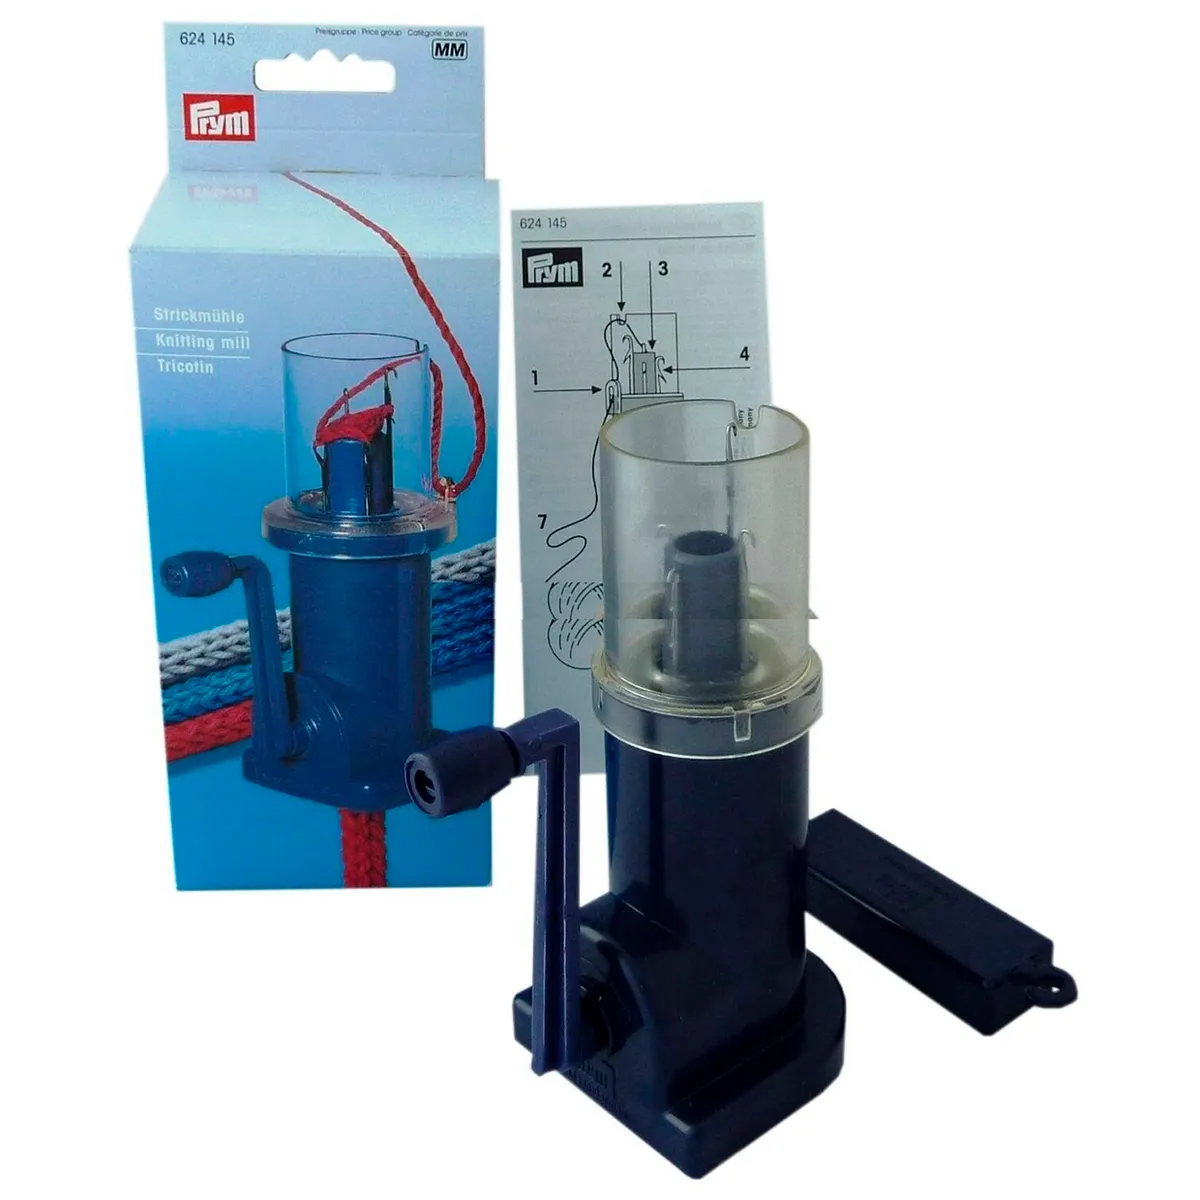
Looking to treat yourself to a i-cord machine? Here's a few different knitting mills to get your churning out those cords super-quick!

Prym Mini Mill Knitting Machine from Ebay

Easy Weaver Knitting Mill from Amazon

Prym Comfort Twist Knitting Mill from Amazon

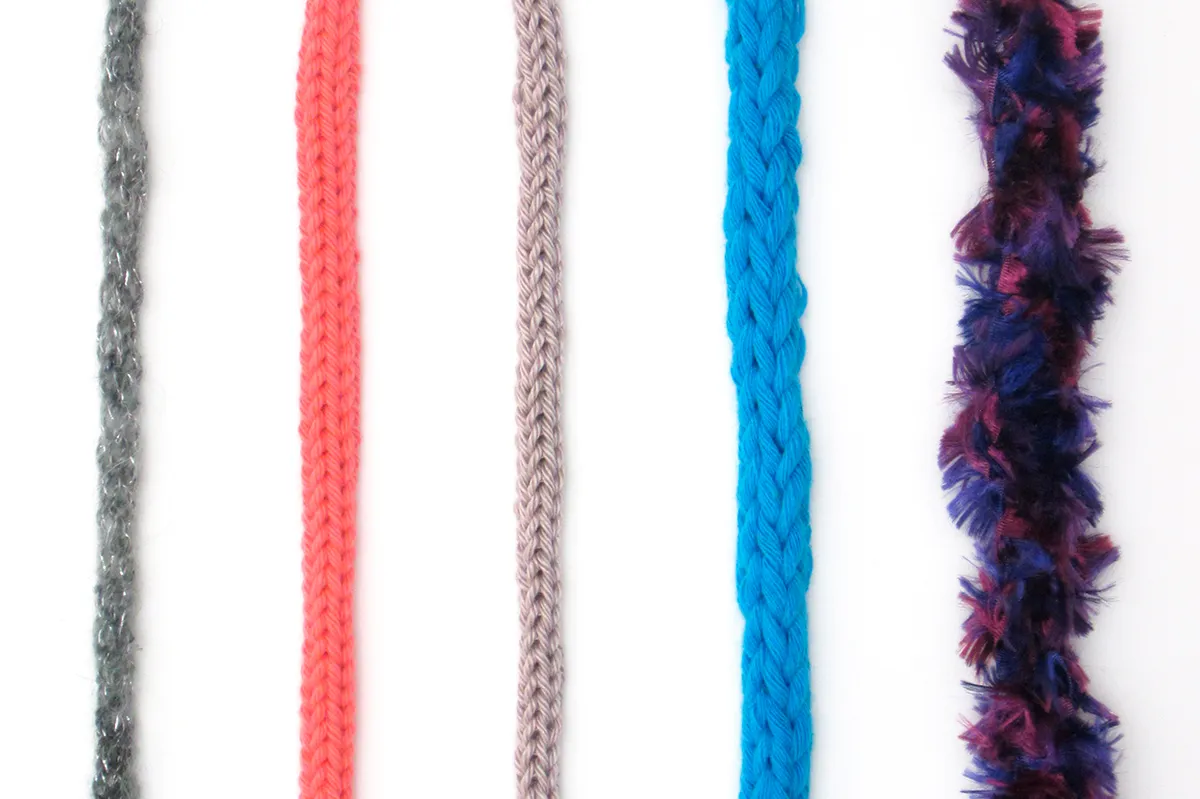
Below is a range of i-cords made using various methods and yarn weights (all using four loops) to give you an idea of the variety you can achieve.

  • The narrow grey length on the left is a crochet i-cord made using a fine mohair yarn.
  • The next pink i-cord is a cotton DK and was made using an i-cord machine.
  • Next, the beige length is cotton 4ply that was also formed by machine.
  • The sky blue crochet i-cord is a chunky cotton that was hooked by hand.
  • Finally, the purple length is a fluffy novelty yarn and it was also worked by hand.

How to make an i-cord

You will need:

  • Yarn
  • Crochet hook
  • icord machine (Optional)

How to crochet an i-cord

Step 1

The most flexible way for crocheters to make an i-cord is to use a hook. You can use any yarn you like, but we recommend you start off using a 4ply or DK yarn in a smooth cotton, with an appropriate size hook. We’re going to make an i-cord using three loops, but it’s easy to make a smaller or larger i-cord by adjusting the number of starting chains in this first step.

To make a crochet i-cord using three loops, start by making three chains.

How_to_crochet_icords_Step_01

Step 2

Insert hook in the second chain from the hook, yrh and pull up a loop. Keep this loop on the hook. Repeat this process with the next chain, working yrh and pull up a loop, keeping it on the hook.

How_to_crochet_icords_Step_02

Step 3

Now you need to be brave! Remove the hook from the last two loops and hold onto them with your fingers to prevent them being pulled out. To help with this, try to hold the yarn with less tension than usual.

How_to_crochet_icords_Step_03

Step 4

Your hook will be positioned in the first of the three loops. Now work yrh and pull the yarn through the first loop. This might feel a little awkward but just keep the tension fairly loose for this first row.

How_to_crochet_icords_Step_04

Step 5

Now reinsert the hook into the next loop (the middle of the three loops).

How_to_crochet_icords_Step_05

Step 6

Work yrh and pull the yarn through this loop only.

How_to_crochet_icords_Step_06

Step 7

Reinsert the hook into the next loop (the third of the three loops), work yrh and pull through this loop only. You will have worked one row of loops!

How_to_crochet_icords_Step_07

Step 8

Repeat Steps 3-7 to work more rows of loops and create an i-cord that’s your desired length. You’ll probably find that the first loop of each row is the hardest to work – there’s a risk of pulling out the last loop of the previous row, plus you’re trying to take the yarn from the last loop and move it to the first loop, which can be quite a distance. To make this easier, try to allow the old first loop to move towards the back of the i-cord and sit behind the other two loops. Just work slowly, with a slightly looser tension than usual.

How_to_crochet_icords_Step_08

Step 9

Turn the i-cord over to the back and you’ll see how the first and last loops end up sitting next to each other, effectively ‘zipping up’ the back of the i-cord into a smooth tube. To fasten off, just cut the yarn leaving a tail approx 7cm, yrh and pull the end through all the loops, tightening to secure.

How_to_crochet_icords_Step_09

How to use an i-cord machine

Step 1

We love making things by hand and by hook, but there are times when we think it’s OK to cheat and let a machine take the strain of a time-consuming technique. An i-cord-making machine definitely fits that bill and is a great investment for expanding your creativity.

There are various models of i-cord-making machines available, but each one works in a similar way – we’ll show you how in the steps below. We used a machine from Prym called the Knitting Mill Mini, which comes with a weight.

With a 4ply or DK cotton yarn, thread the end under the guide on the left of the machine, into the groove in the lip of the upper edge, and down into the centre of the machine until it emerges from the base. Tie a knot in the end of the yarn to form a loop (this is where we’ll hook the weight later).

How_to_use_an_icord_machine_step_01

Now turn the handle slowly (there should be an arrow on the side of the machine to show you which direction to turn it in – it’s usually clockwise) so that the machine’s first hook catches the yarn.

Step 2

Turn the handle again until the machine’s second hook is about to catch the yarn. You need to skip this hook for now, so use a crochet hook (in any size) to move the yarn out of the way.

How_to_use_an_icord_machine_step_02

Turn the handle again so the machine’s third hook catches the yarn in the same way as Step 1. Skip the machine’s fourth hook using a crochet hook in the same way as at the start of this step.

Step 3

Now you’ll be back to the machine’s first hook. Turn the handle so it catches the yarn but make sure the first loop of yarn lies below the latch on the hook – use your crochet hook again to guide the yarn into the right position.

How_to_use_an_icord_machine_step_03

Step 4

Turn the handle so the machine’s second hook catches the yarn. At the same time, make sure that the machine’s first hook has pulled down the new loop of yarn through the old loop of yarn.

How_to_use_an_icord_machine_step_04

Repeat the process in Steps 3–4 with the third and fourth hooks.

Step 5

You should now have securely started the i-cord and you’ll be ready to get going! Hook the weight onto the loop of yarn at the base of the machine.

How_to_use_an_icord_machine_step_05

Step 6

Lift the machine so the weight is pulling on the tail end of yarn and turn the handle to create the i-cord. Make sure there’s no tension on the yarn entering the machine by pulling out lengths from your ball of yarn. Reposition the weight as needed so there’s always weight on the i-cord at the base.

How_to_use_an_icord_machine_step_06

Step 7

When you’re ready to fasten off, just cut the yarn leaving a tail approx 7cm. Keep turning the handle until the i-cord falls out of the base of the machine. Remove the weight. Undo a little of the i-cord you’ve made until it’s the right length for you, keeping the last row of loops visible. Carefully insert your hook into these loops, starting with the loop next to the tail end of yarn.

How_to_use_an_icord_machine_step_07

Step 8

Work yrh and pull through all the loops. Continue pulling the loop until the tail end comes all the way through.

How_to_use_an_icord_machine_step_08

Step 9

Pull the yarn tail gently to secure the loops. Now you can get creative with it!

How_to_use_an_icord_machine_step_09

We hope you’ve enjoyed this tutorial, now that you know how to crochet an icord you’ll be looking for any excuse to incorporate them into your crochet projects! If you’re looking for more fun techniques, you might be interested in our tutorials on how to make a pompom or how to make loom bands for beginners!