
Whether you’re brand new to crochet or have been hooking for years, following a crochet pattern can be a bit like trying to crack a secret code. Even when you think you’ve learnt the language, you can encounter a crochet pattern that looks very different depending on which magazine, book, website or blog it appears in (for an example, try taking a look at some of our own free crochet patterns).
We’ve put together this guide on how to read crochet patterns, explaining the key elements that should appear on every pattern and what they mean. We've also included an additional section on the anatomy of a crochet pattern, which will help if you're struggling to understand the various asterisks and brackets used in a pattern.
The first step to understanding a pattern is to take the time to read it through, slowly and calmly – this will help eliminate potential mistakes later on. It also helps you to get an idea of the techniques involved, and if there are new skills you can learn and practice them with some spare yarn (undoing and reworking as many times as you like) before you work them into your final piece.

How to read a crochet pattern
It starts with a slipknot...
With most crochet patterns, the first thing you’ll need to do is make a slipknot, but you’ll very rarely be instructed to do that. Usually a pattern will instruct you on the length of the foundation chain to make and expect you to know that you need make a slipknot first before you can form a chain.
What all the parts of a pattern mean
We'll now take a look at a typical crochet pattern layout, using a page from Simply Crochet magazine.
Remember that the layout may differ from page to page, and especially so if you are looking at other magazines or books.
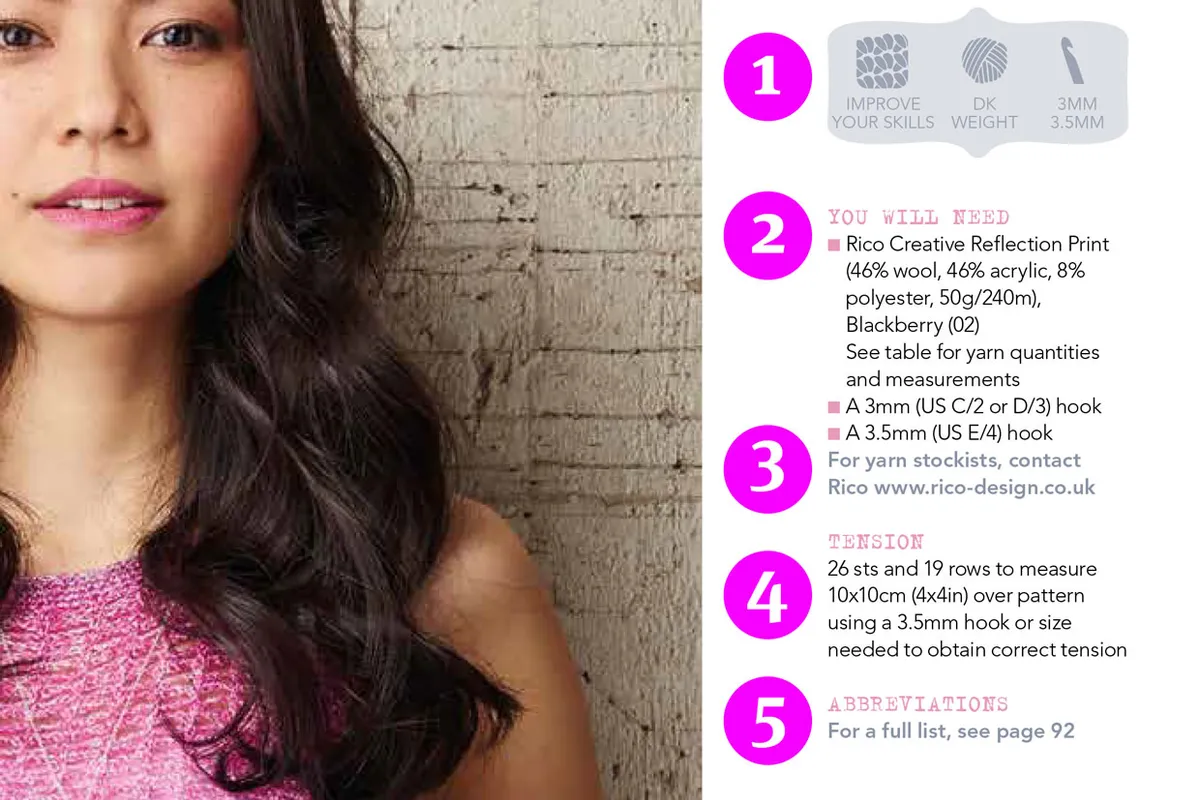
1. Summary
Some patterns include a summary of what’s involved in the pattern to help you decide whether it’s something you fancy making.
The summary might include a difficulty level, techniques involved, weight of yarn used, size of hook used and how much time it might take - it's a good place to judge whether a pattern is suitable for your skill level.
2. You will need
This is where you will find all the materials you need for the pattern: yarn, hooks, stitch markers, buttons and more.
Some items may not be listed, such as scissors, tapestry needle and tape measure because these should form part of a general kit you use for every pattern.
For each yarn used, the pattern should state the manufacturer, brand name, fibre content, weight and length of each ball, how many balls you need and in which colours. This information will help you purchase the right yarn or help you to make a suitable yarn substitution.
Yarn amounts quoted are based on average requirements, so if your tension is loose, you might need more – feel free to change the hook size stated until you achieve the stated tension.
3. Stockists
Most patterns use a specific yarn and many crocheters prefer to use the same yarn as the designer. To help you get that yarn, some patterns include stockist information – this will either be a shop that stocks the yarn or details of the manufacturer’s stockist helpline or webpage.
Where to buy yarn online!
If you're new to yarn crafts, make sure to check out our post on the best places to buy yarn online.
4. Tension
Getting the correct tension is vital with some patterns as this is how you ensure that your piece of crochet will be to the correct size and as the designer intended. This panel will tell you how many rows/rounds and stitches you need to make a specific sized tension square, then you can adjust your hook size to account for if your tension is too tight or too loose.
Alternatively, some patterns will state the size of the piece after a short number of rows or rounds so you can get started quickly on a pattern and only rework it if your measurements don’t match. If there’s no tension information, you can usually assume that it’s not important to the outcome of the pattern, such as with a shawl.
Find out everything you need to know in our guide on how to check your crochet tension.
5. Abbreviations
All crochet patterns use the language of abbreviations, which are simple ways to shorten the description of techniques you do regularly.
Some patterns will list all the abbreviations they use, while some patterns won’t list any but will include a list of abbreviations elsewhere in the publication, such as at the back of a book or on a web page.
However, crocheters in the UK and US use different terms and abbreviations so you’ll need to double check whether your pattern is using UK or US crochet terms. An example of this is that a ‘single crochet (sc)’ in US terms is the same stitch as a ‘double crochet (dc)’ in UK terms.
Check out our handy crochet abbreviations and conversions guide for more information.
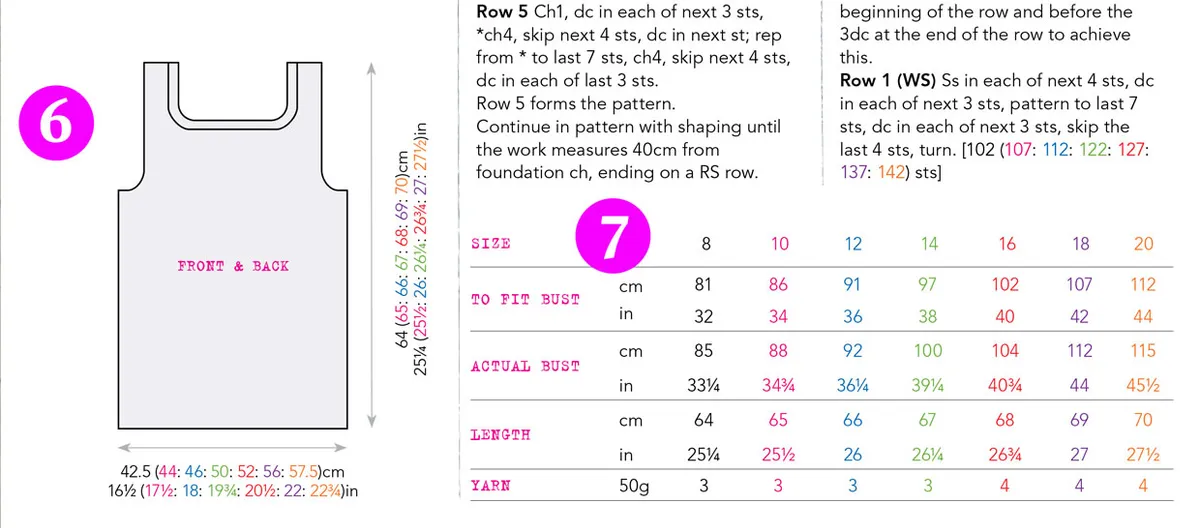
6. Measurements & Schematics
A pattern usually tells you the finished measurements of the item you’re going to make – this is often referred to as the ‘actual size’. There might also be a ‘to fit’ measurement, which refers to the measurements of the person who will wear the item. Don’t worry if the ‘to fit’ measurement is larger than the ‘actual size’, crochet items often stretch from the ‘actual size’ to the ‘to fit’ size.
If the item is circular in shape, there might be a ‘circumference’ measurement (the distance around the outside of the circle) or a ‘diameter’ measurement (the distance from one side of the circle across to the opposite side).
Sometimes the measurements will be given in the form of a schematic, which is a specific kind of diagram that can help with patterns for garments and accessories. Schematics are a guide to the finished measurements of the different crocheted pieces that make up your item. You can use the measurements in the schematic to check that your finished pieces are the right size and block the pieces to these measurements.
Not sure what size you need?
If you don't know your own size to make your crochet garment to, our friends on Simply Sewing have a handy how to measure yourself guide.
7. Different Sizes
If the pattern is for a garment or other item that can be made in different sizes, the measurements will often be in a table like this, along with the yarn amounts needed for each size.
The table and pattern instructions will often be colour coded to help you follow the instructions for the size you’re making. All you need to do is look at the table and choose the colour that matches the size you want to make, then follow the instructions in this colour throughout the pattern – these will often be in brackets to help distinguish between different sizes.
Our pro tip is to photocopy the pattern and circle the colour instructions you need! That way you don't need to mark the original so you can use the pattern again to make a different size.
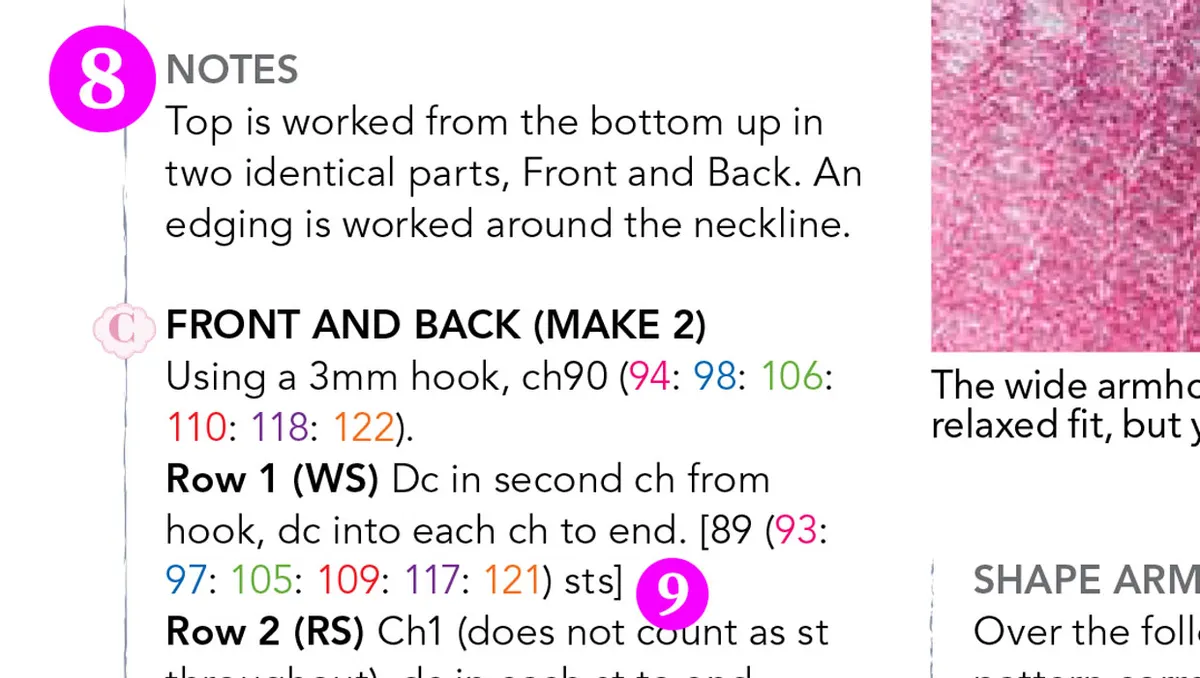
8. Notes
Any other important information you need to know about the pattern will be in the notes section, so make sure you read it before you start. This panel will often contain golden nuggets of information that will save you hours.
9. Stitch Counts
At the end of a row or round, you’ll often find a number or a set of numbers, usually in square brackets (although this can differ between publications). This is your stitch count, which tells you how many complete stitches you should have made in that row. These are particularly handy when working rows with multiple different stitches involved.
Charts
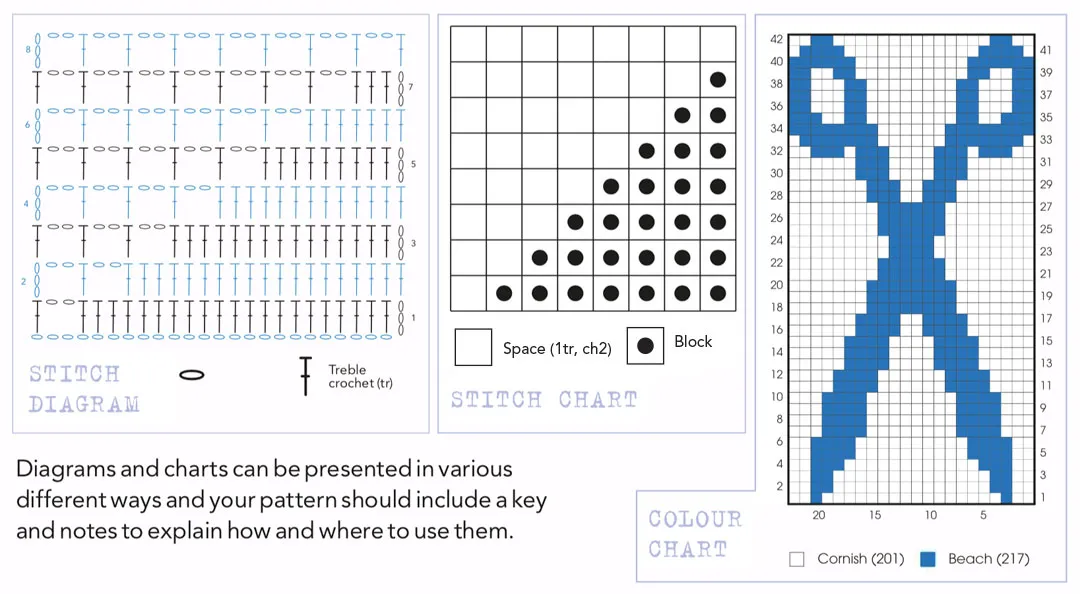
Patterns will sometimes include stitch charts or colour charts, either as a visual way to follow the instructions, or instead of written instructions.
Some charts sit next to the pattern instructions, or they might be placed in a section at the back of the magazine or book. Instructions on how to use the chart and where to find them if they're not on the page will normally be stated in the notes section or within the pattern.
- Check out our complete guide on how to read crochet charts!
The anatomy of a crochet pattern
Understanding the asterisks and brackets in a crochet pattern.
Once you've familiarised yourself with the crochet abbreviations and conversions, reading a crochet pattern for the very first time can still seem a bit confusing. This is largely due to the use of repeated sections, but once you know how to spot the subtle differences it'll soon become second nature.
Instead of writing out all the instructions you need for a specific row or round (which would make patterns incredibly long), most patterns use asterisks and brackets to show repeated sections of instructions.
In the example below, the brackets around ‘puff st, ch1’ indicate that this section needs to be repeated ‘in next dc and each dc around’ – the instruction ‘around’ with no text after it means that this includes the last stitch of the round.
Ch2, (puff st, ch1) in next dc and each dc around, ss to top of beg ch-2 to join.
In contrast, on the below example, the ‘2htr in next puff st, htr in next ch-1’ section in brackets needs to be repeated in order ‘around’ until you reach the last stitch of the round, then there are separate instructions for the last stitch.
If the section in brackets isn’t repeated all the way to the end of the row or round, you’ll be told how many repeats to work – in the Puff stitch abbreviation, we’re told that the section in brackets needs to be repeated 3 times.
Ch2, (2htr in next puff st, htr in next ch-1) around up to last st, htr in last st, ss to top of beg ch-2 to join.
Asterisks are used in the same way as above, but they tend to be used for larger sections of instructions, where you need to repeat the section from the * (asterisk) to the ; (semicolon) all ‘around’.
Ch2, (skip 1 st, puff st in next st, ch1) 3 times, *(puff st in next st, ch1, skip 1 st) 3 times, puff st in next st, ch1; repeat from * around, ss to top of beg ch-2 to join.
Sometimes brackets and asterisks become more complicated, and you might see a combination or multiples of asterisks, round brackets and occasionally curly brackets (square brackets are normally reserved for stitch counts). These might seem confusing at first glance, but the aim is actually to help make the instructions clearer.
In the example below, you will see that we start off with two brackets. This is usually done to indicate where a certain set or group of stitches is to go. The inner brackets containing (tr, ch1, tr) is a group of stitches all to be worked 'in next st', so it has been given brackets to separate this from the outer brackets ((tr, ch1, tr) in next st, skip 1 st) which is repeated as a whole.
Ch3, *((tr, ch1, tr) in next st, skip 1 st); repeat from * around, ss to top of beg ch-3 to join.
So patterns use different shapes of brackets to help show a section of repeated instructions within a larger section of repeated instructions.
In more advanced patterns, you may come across a double asterisk symbol ** and this performs a similar function to a contrasting shape or repeating of brackets. If we look at the below example
Ch2, *((puff st, ch1) in next st**, skip 1 st) 4 times ending last repeat at **
The key here is to ignore the ** until you’re told to pay attention to it, so you can work the whole section in the outer brackets 3 times just as it’s written, then on the fourth repeat, just work the (puff st, ch1) in next st’ section and end there without working the part after the ** which is ’skip 1 st’. If the instructions for this section were written out in full, it would read: Ch2, (puff st, ch1) in next st, skip 1 st, (puff st, ch1) in next st, skip 1 st, (puff st, ch1) in next st, skip 1 st, (puff st, ch1) in the next st.
If it helps, you could go through the pattern and write out the repeats in longhand until you get the hang of it. It will get easier to follow patterns the more of them you work through – as with so much else in life, practice will help!
Take your time reading crochet patterns
As tempting as it is to get hooking straight away, it's always worth taking the time to read over your whole pattern carefully before starting. As patterns are often made up of multiple different sections, sometimes the way a pattern comes together isn't entirely obvious until later on in the make. There might also be important information such as rows that you need to omit for certain sizes that you could easily miss.
Become a crochet pro!
Now that you've learnt how to read a crochet pattern and know some basic stitches, it should be plain sailing right? Well, if your crochet still isn't coming out quite right, check out these crochet troubleshooting tips from Gathered.

