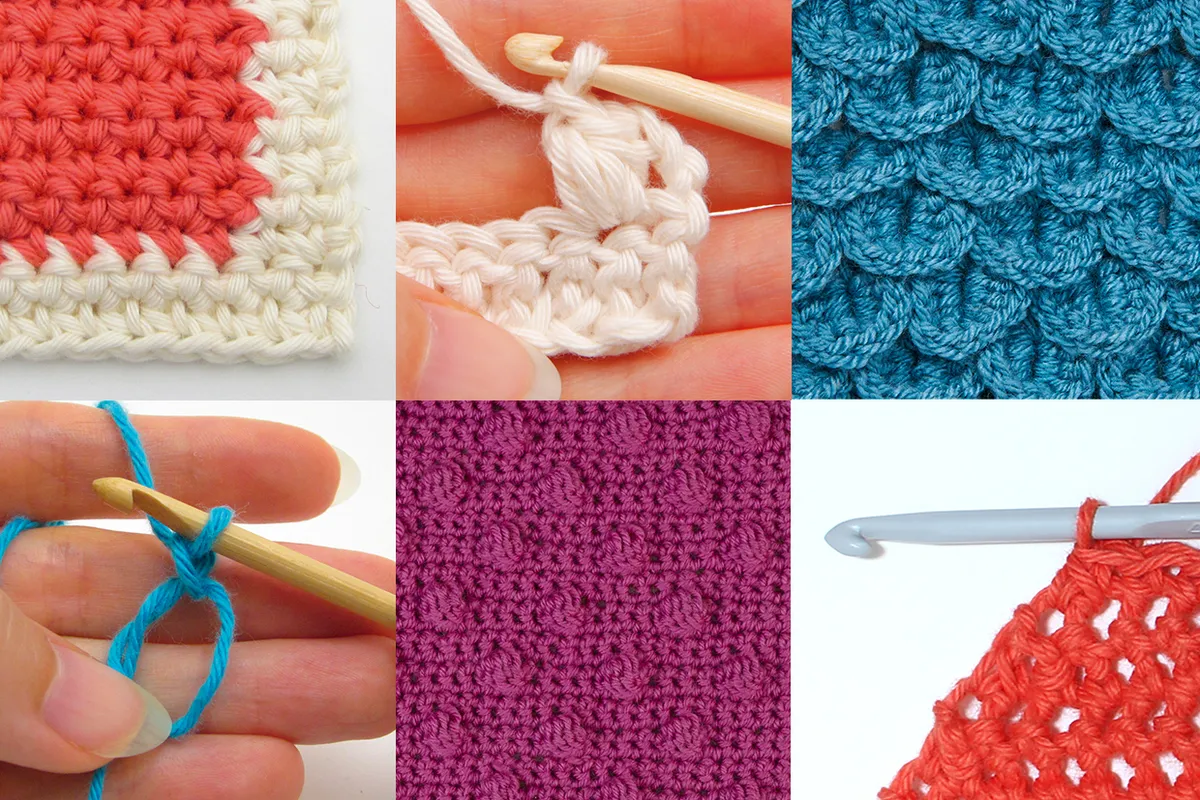
How to read crochet charts
Don’t be afraid of stitch diagrams and charts, they can actually be really helpful – just follow our simple guide.
It's a really useful skill to know, as once you're familiar with reading crochet patterns with diagrams, it makes it far easier to tell where stitches go and understand tricky parts that require long text instructions.
Types of crochet charts and crochet symbols
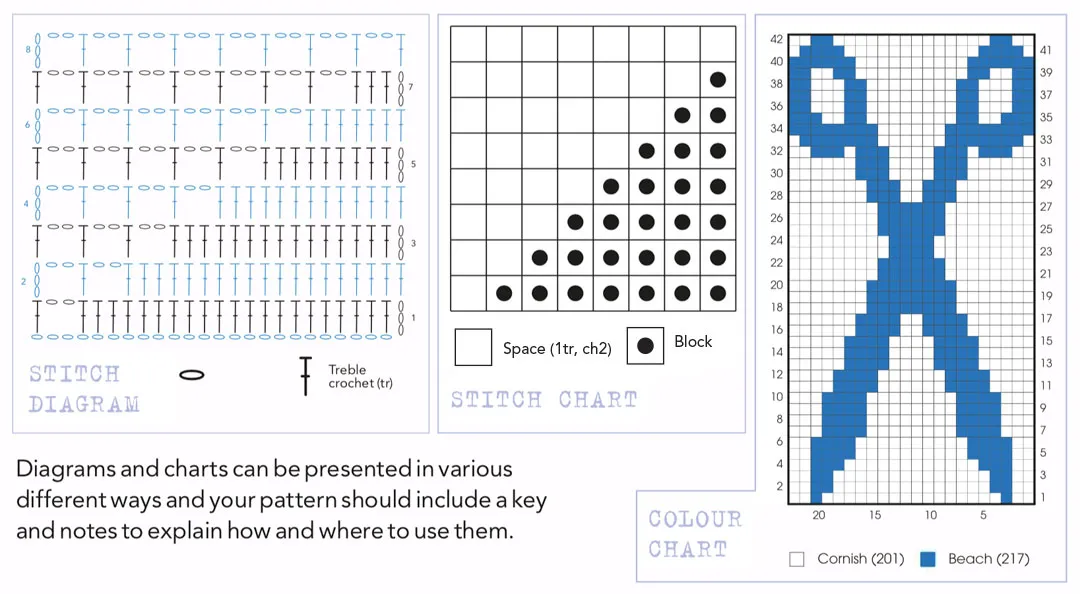
Some crochet patterns would be impossible to follow without a diagram or chart, and there are three main types of crochet stitch charts.
- Stitch diagram – Where each stitch is represented by a symbol. It’s a visual guide of which stitch to work where.
- Stitch chart – Uses squares to represent a specific stitch or group of stitches, such as in filet crochet.
- Colour chart – Uses squares to represent a specific yarn colour, such as for a striped pattern.
We’ll explain just how to use them all in this guide. Don't forget, if you're new to patterns, to take a look at our guide on how to read a crochet pattern for loads of helpful tips.
If you need help with a specific type of crochet stitch chart, you can jump to the relevant section using the handy links below.
Crochet symbols in crochet stitch diagrams
Follow the symbols to work your crochet pattern.
Stitch diagrams are really helpful in crochet because they show you exactly where to work each stitch.
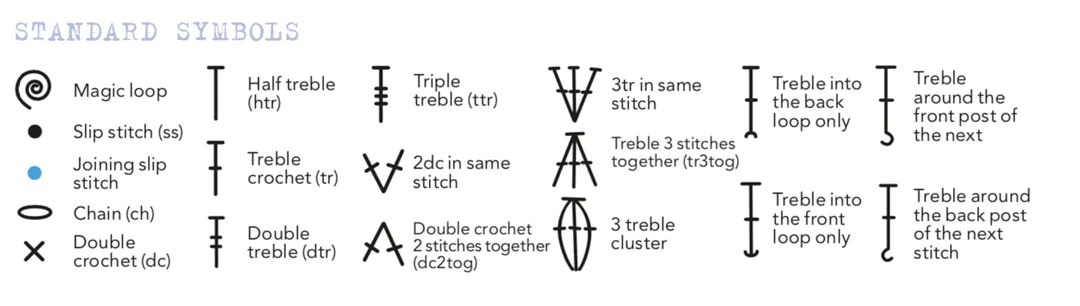
Each crochet stitch has a standard symbol used on stitch diagrams (see above). Sometimes collections of crochet stitches will have their own special symbols, such as tr3tog.
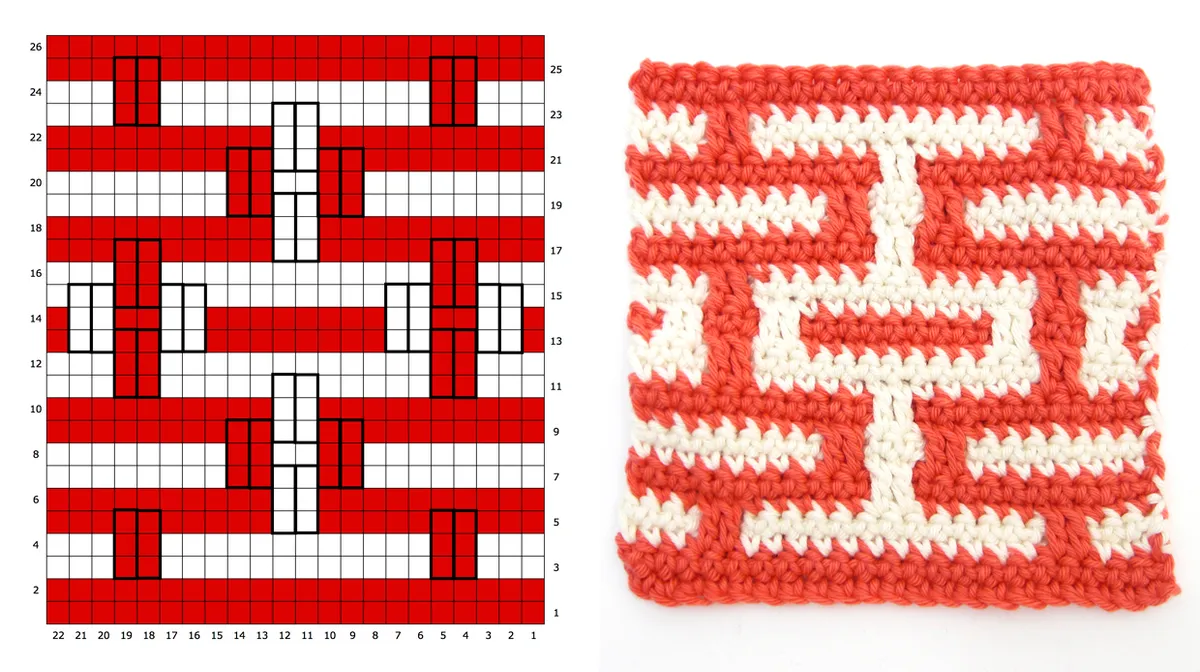
Stitches are usually shown in relative sizes, so it gives you a good idea of how the stitch pattern will look. Below you will find an example of a stitch diagram worked in rows, followed by a picture showing the finished crochet pattern.
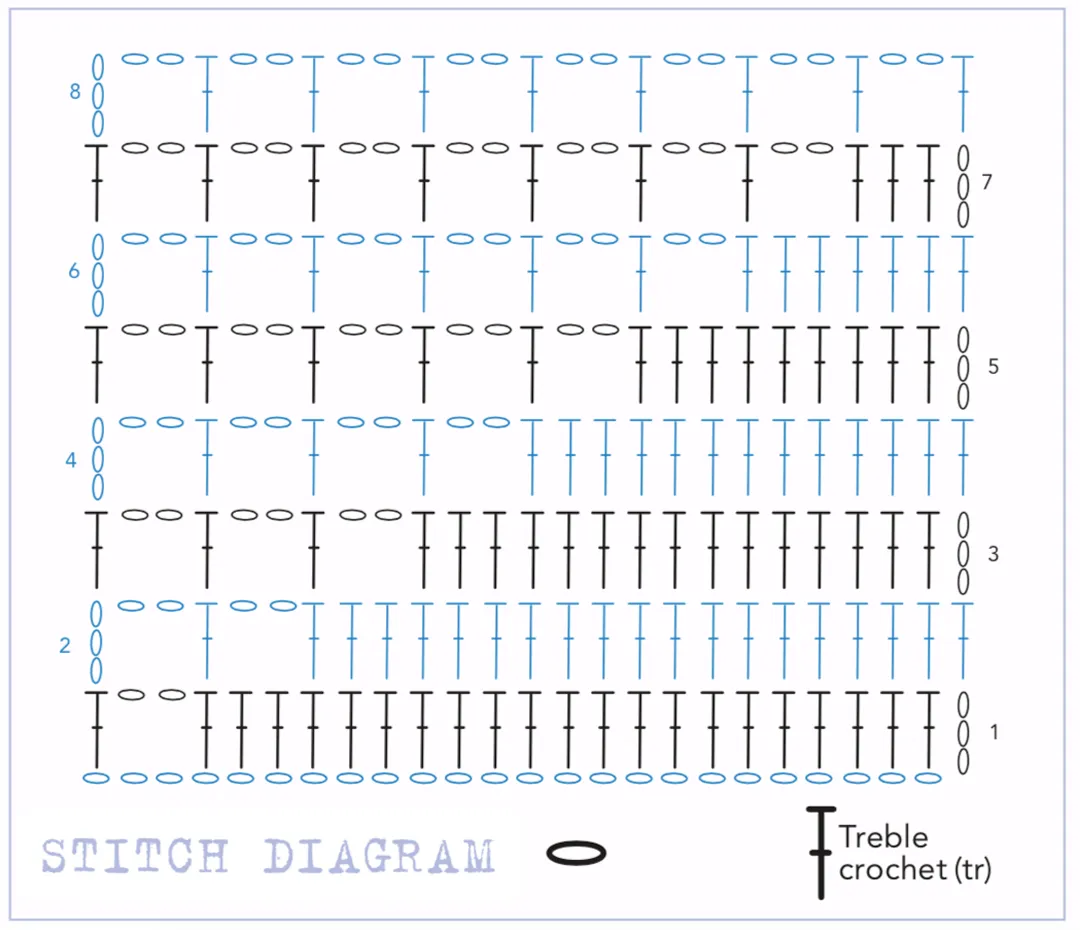
To work from a stitch diagram in rows, start from the bottom left and work the foundation chain from left to right (if you’re right-handed) - shown in blue in the crochet stitch chart above.
Then work Row 1, shown in black, starting at the bottom right of the diagram and working each stitch towards the left. Note that the starting ch3 is also part of Row 1, so it is also shown in black, even though these three chains may be included as part of your initial foundation chain.
Then work Row 2 from the left side towards the right, and so on. The row numbers are placed at the start of each row. Odd-numbered rows (shown in black) are usually right-side rows, while even-numbered rows (in blue) are usually wrong side rows. Contrasting colours are used for alternate rows (black and blue here), to help.
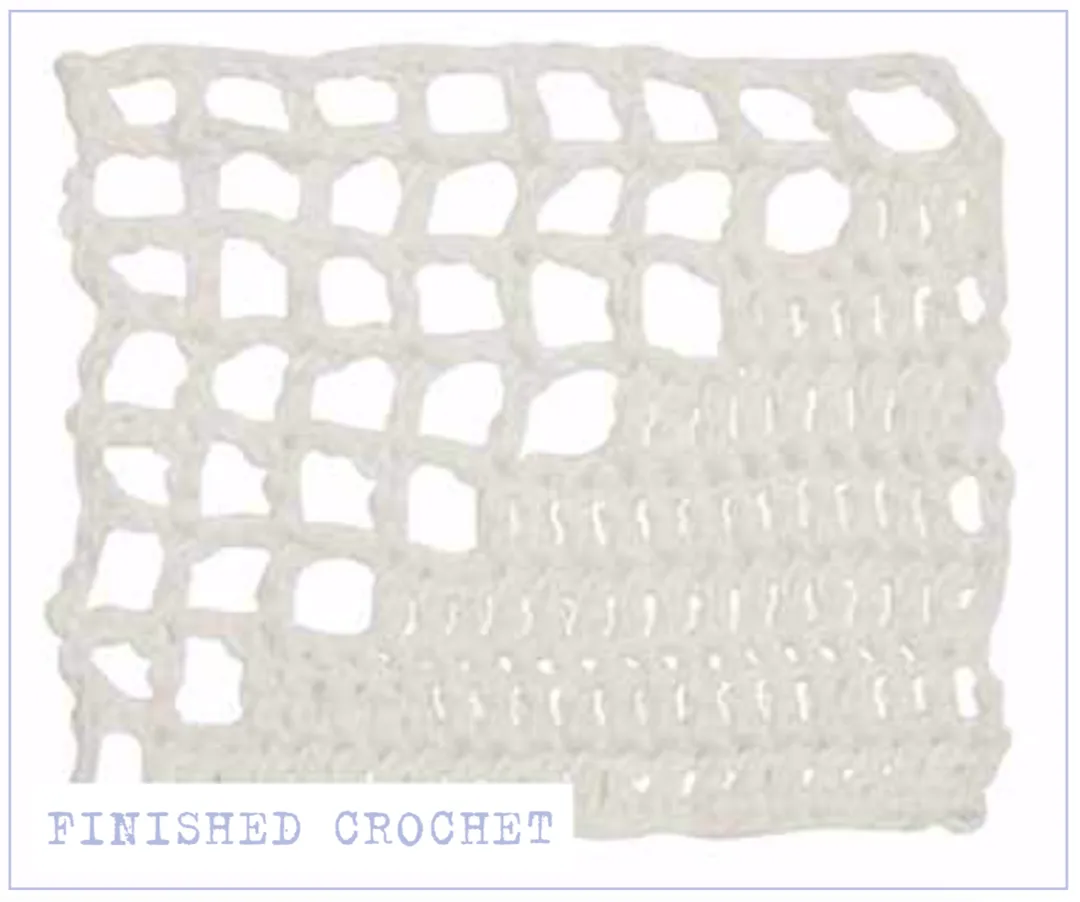
The position of each stitch symbol shows you which stitch to work into on the row below. A stitch directly above another stitch means that’s where you work it.
An increase is shown as a group of stitches where the stem of each symbol starts at the same stitch – see the groups of trebles in the square diagram below. A decrease is shown as a group of stitches where the stem of each symbol starts at different stitches, but they all lead to the same point.
There are many different symbols, but your pattern or key should explain what each symbol means and how to crochet it.
Crochet stitch diagrams for working in the round
Often used for granny squares and other flat motifs.
Below is an example of a stitch diagram where the stitches are worked in the round to create a flat motif. You’ll find that many crochet motifs and granny squares include a diagram like this to help guide you visually on where to place your stitches.
They function similarly to a stitch diagram worked in rows (see above), but you need to start at the centre of the diagram and move outwards, completing each round in turn.
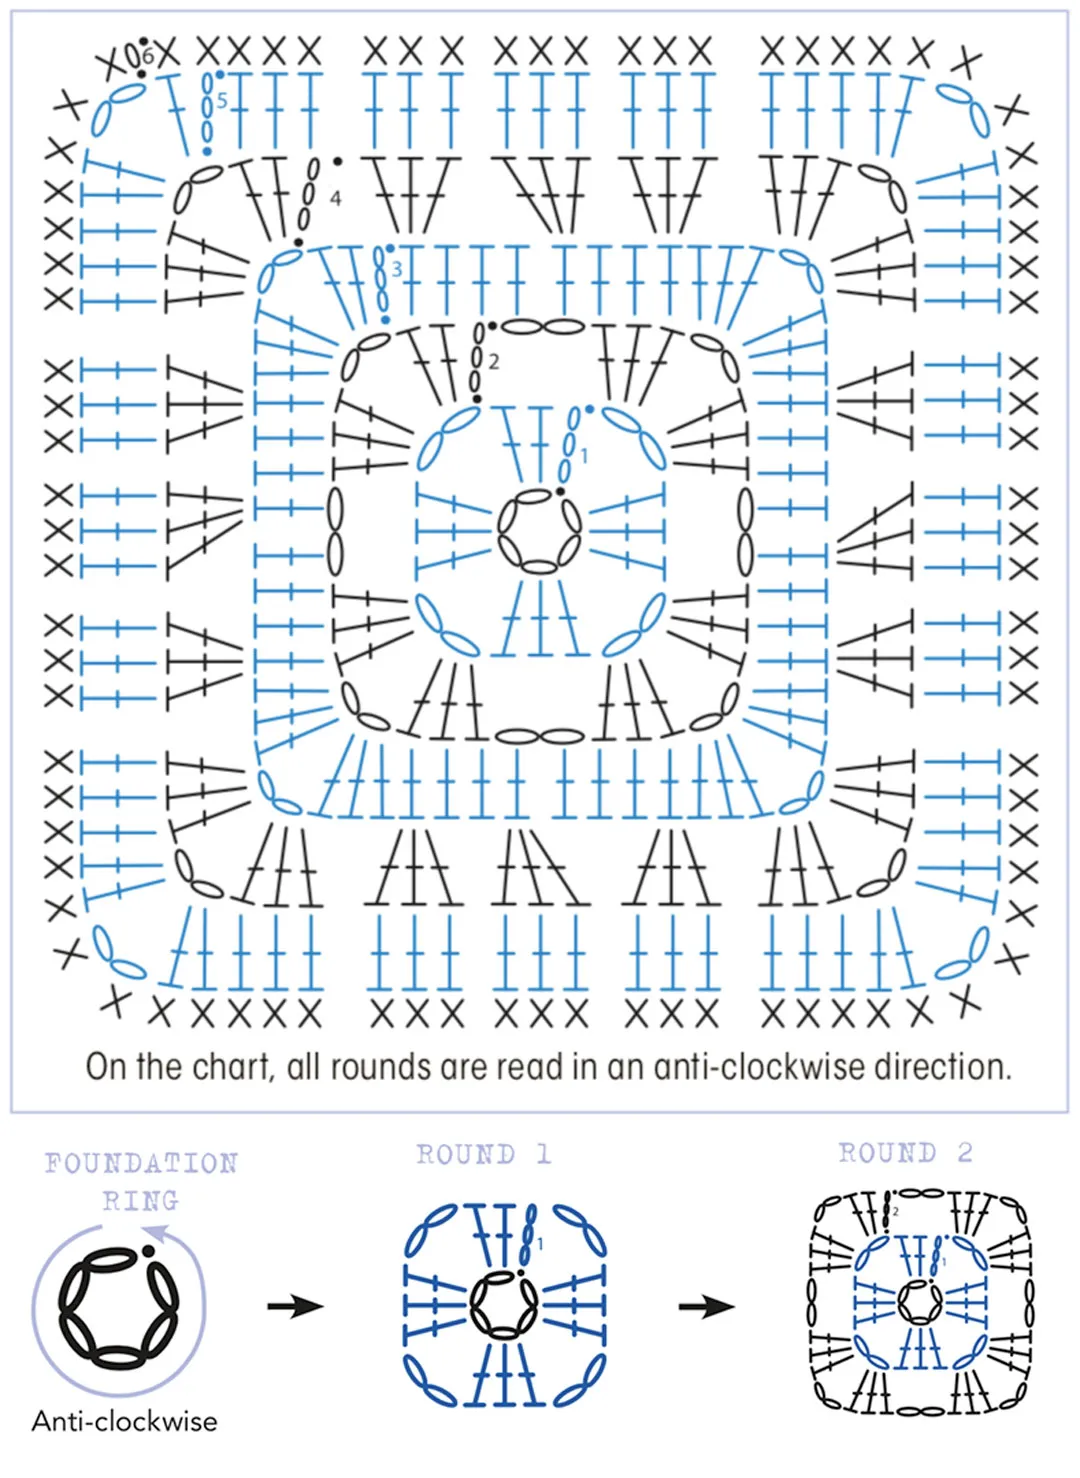
To follow the chart above, we would start at the centre, working on the foundation ring.
Then work the next round out, which usually starts from where the previous round ends (unless you fasten off and change colour). In this case, our foundation ring ended with a slip stitch, so our Round 1 starts with the three chains directly above this. Refer to the pattern text for colour changes and to help you learn the symbols on the diagram.
Continue in this way, working Round 2 from the symbols in the stitch diagram.
Work all the following rounds in turn in this way. As before, the position of each symbol shows you which stitch to work into from the round below, while the numbers on the diagram are placed just to the right of the first stitch of each round.
Most diagrams will be drawn for right-handed crocheters, and you follow the symbols around in an anti-clockwise direction. If you’re left-handed, simply work the same stitches in a clockwise direction instead. Sometimes a flat motif worked in the round may ask you to ‘turn’ and work stitches in the other direction, then turn again. This sort of change should be marked on the stitch diagram or specified in the pattern notes.
Many patterns include stitch diagrams alongside text instructions, and we recommend that you use both sets of information to work a pattern. Always read through a pattern’s text instructions because there may be notes about how to use the stitch diagram.
Similarly, a stitch diagram can help you to understand exactly what a set of text instructions is asking you to do. You might also come across patterns that only use stitch diagrams (including ones from Japan), so it’s a good idea to practise working from stitch diagrams.
Crochet stitch charts
Crochet stitch charts are used for specific types of projects, such as filet crochet. On these charts, each square represents a stitch or group of stitches.
The chart below shows the layout of spaces (1tr, ch2) and blocks (3tr) in a filet crochet pattern. You’ll notice that the resulting fabric is the same as you get from the first stitch diagram we looked at.
A stitch chart helps you to visualise the overall effect of a pattern and enables you to design your own patterns. There should be a key to explain what each symbol means.

Colour graph crochet charts
Sometimes a chart or diagram covers just one specific part of a crochet project. The written pattern should explain what to do with the chart or diagram and when you need to use it.
For example, a pattern might ask you to start the row by working plain treble crochet stitches, then ask you to work the pattern from a chart, then ask you to work plain treble stitches again to the end of the row. Or you might be asked to repeat the stitches from a chart or diagram a certain number of times along a row. This is often the case with colour charts, but each pattern should explain how to use the chart or diagram and include a key.
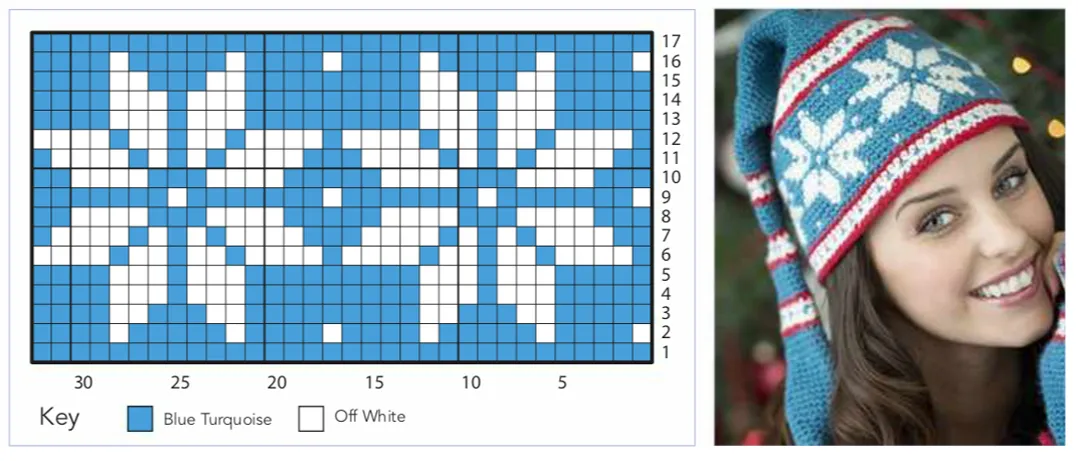
The chart below is an example of a colour chart worked in rows. Each square represents a single stitch, worked in a different yarn colour – the type of crochet stitch you need to work will be explained in the pattern text.
Foundation chains aren't normally included on a colour chart; instead, the charts will start with the first row where the chart needs to be used. In the example, our chart starts from row 9 and begins in the bottom-right corner, working odd-numbered right-side rows from the right to left and even-numbered wrong- side rows from left to right. The numbers along the bottom represent the stitch count.
Most colour charts are worked in a plain stitch pattern, such as all double crochet stitches. This makes the finished fabric fairly plain so that the colourful motif can stand out. It also means that while you’re busy thinking about changing colours and following the colour chart, you shouldn’t have any complex stitches to have to worry about.
With colour charts, you’ll sometimes find that once your colour pattern is crocheted, it can look different to the pattern on the colour chart. Don’t worry, this is totally natural, and you haven’t done it wrong!
Stitch charts are generally worked in perfect squares, whereas crochet stitches are different shapes – double crochet stitches are fairly square, but treble stitches are tall and thin. So if you use treble crochet to work a colour motif that was intended for double crochet, it will look much taller and thinner.
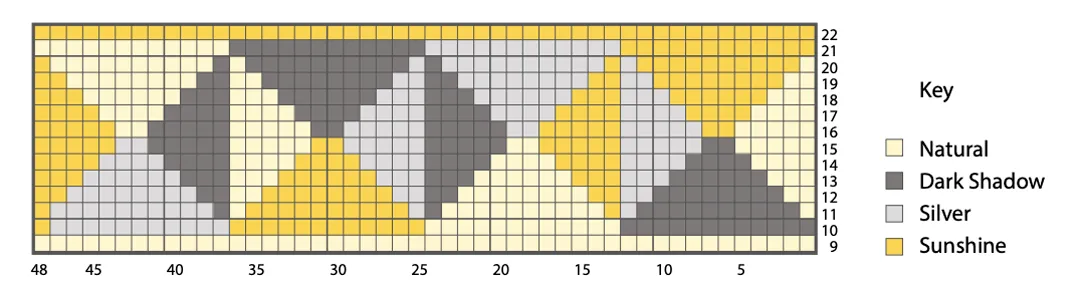
Colour graph crochet charts in the round
Working a colour chart in rounds involves the same techniques as working a colour chart in rows (see above). The only difference is that all the round numbers will be on the right-hand side, with each new round starting here.
This is because you start each new ‘row’ in the same place each time, instead of turning at the end of a row to create a fabric with two side edges. So don’t turn your work, just keep going round and round.
This snowflake chart below is an example of a colour chart worked in rounds. To work from this chart, you would start from the bottom-right corner, work towards the left, and you’d finish back at the right-hand side again, ready to work Round 2.
As with all colour charts, this chart only shows you a small part of the pattern – the written instructions should tell you where to work the chart and how many times to repeat it across the round.
The chart above was originally intended for a festive hat and was repeated three times between Rounds 87 and 103 – illustrating that it's always important to read notes, as the 1-17 numbers on the side refer to the chart only and not the rows where it's worked.
Corner 2 Corner crochet charts
We've explained how to use colour graph charts worked in rows and in the round, but there is one more type of these colour graph charts, and that's for when you're doing corner-to-corner crochet (sometimes known as C2C).
A C2C chart is likely to look the same as any other colour graph chart, with one very important exception - the numbers on the sides of your chart.
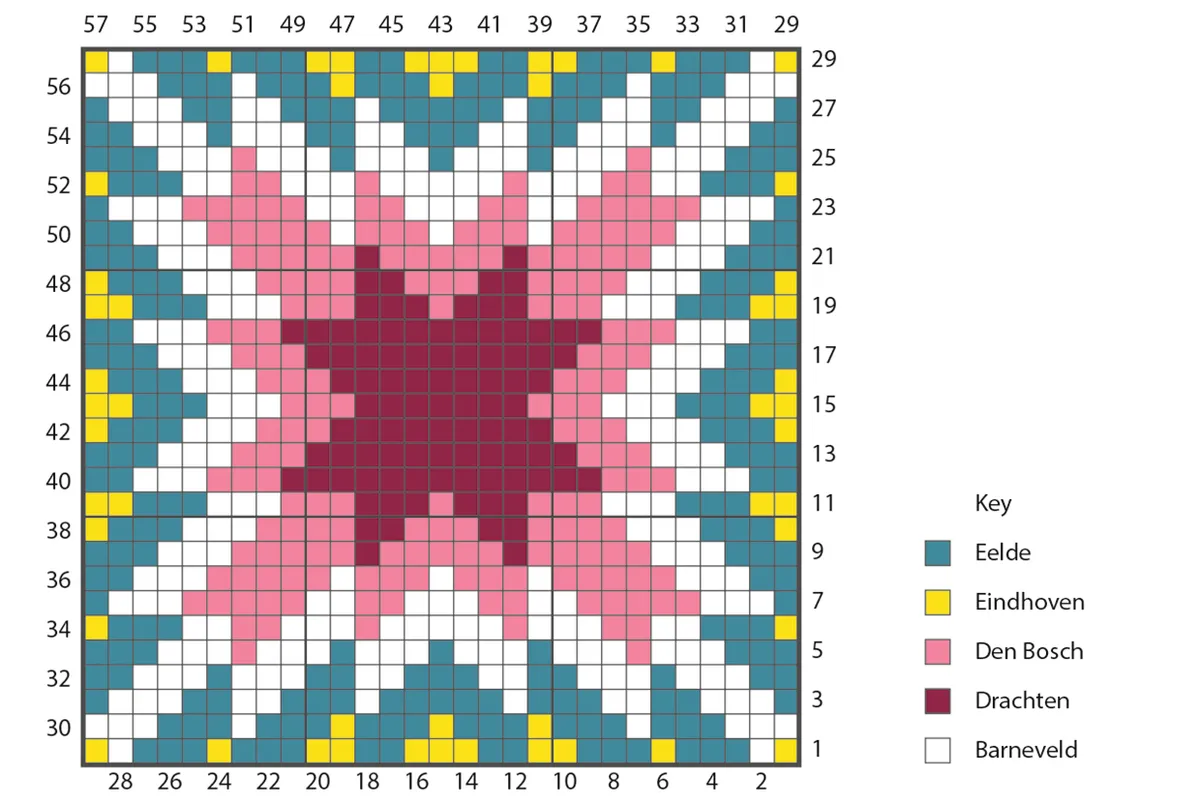
Rather than going back and forth in rows or working in rounds, C2C is worked from a bottom corner to the opposite top corner (or vice versa). Each square of a C2C colour chart also indicates a 'block' of stitches, rather than just a single stitch.
So when it comes to reading your 'rows' on a C2C chart, the number indicates the diagonal row. For example, row 29 with the yellow square in the top right goes all the way diagonally down to the yellow square in the bottom left of the chart.
It's a little tricky to explain, but once you're familiar with corner-to-corner crochet it will make a lot more sense. Take a look at our guide on How to do corner to corner crochet for more info.
Mosaic crochet charts
While most types of crochet stitch charts will fall into one of these three categories, mosaic crochet charts are a combination of a crochet stitch chart and a crochet colour chart. This is due to the fact that mosaic crochet uses different stitches positioned in specific places to create a colourwork design, rather than just changing yarn colours.
There are 2 different types of mosaic crochet charts, inset and overlay, and you can find out all about them in our guide to mosaic crochet.
Understanding charts – your key to crochet success
While they may look a bit complicated at first, understanding crochet charts will really help you to develop your crochet skills. Whereas UK and US patterns use different terminology, crochet symbols are universal – so even if you're using a pattern written in a different language, you can just follow the stitch diagram and still get the same result.
Know your stitches
Knowing what a symbol stands for or how to follow a colour graph crochet chart is one thing, but you still need to know how to make the stitches used (and even the best of us need a reminder from time to time).
Never get stuck on a stitch again by checking out our crochet stitch library.