How to make knitted wrist warmers with cloud motif

Use Amy Philip’s how to make knitted wrist warmers with cloud motif tutorial and keep your fingers warm this winter.

Try 6 issues of your choice of craft magazine from just £9.99

Published: September 27, 2021 at 9:00 am

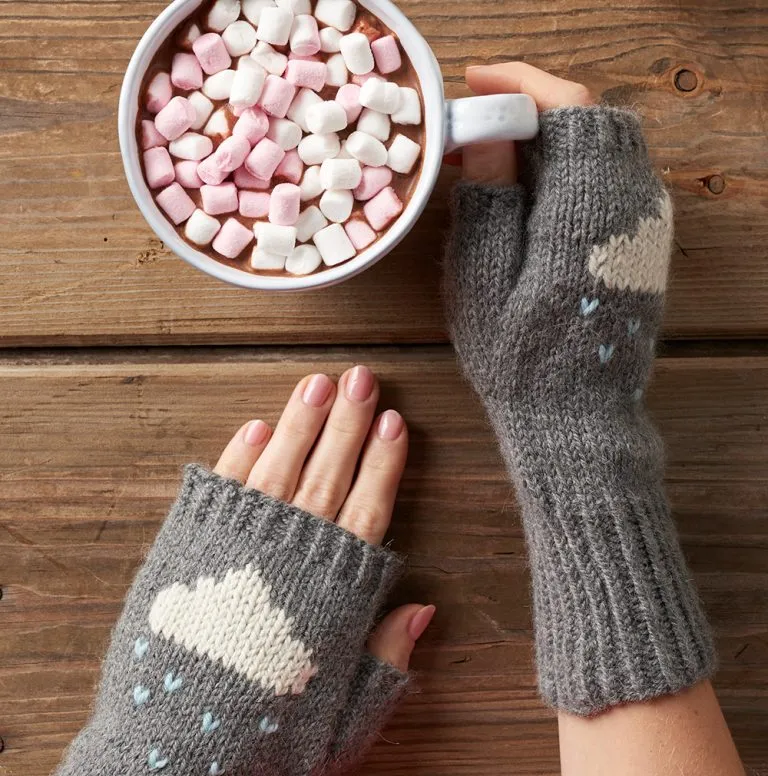
Keep cosy and take inspiration from wintery skies with Amy Philip’s knitted wrist warmers. These soft-as-a-cloud gloves are so gorgeous you’ll be wearing them all winter, and through those April showers, too. We’d never have thought the combination of grey skies and rainy days could be so appealing, but Amy Philip’s pretty design has officially converted us. Use our beanie knitting pattern and chunky knit cowl pattern to make matching winter accessories and look super chic on your winter walks.

The knitted wrist warmers themselves are knitted in a single shade of yarn, with the fluffy cloud and raindrops being stitched on using the chart once you’re done. Cosy up one evening and make a pair for yourself, or knit as a gift for a friend – if you can bear to give them away that is.

If you’re a newbie to knitting, don't worry you can still make your own knitted wristwarmers. We have a knitting for beginners guide to help you master all the techniques mentioned. Are these knitted wristwarmers still proving tricky? Check out our knitting kits blog post which includes loads of glove-making kits that are perfect for complete beginners and come with complete instructions.

You’ll need

  • Wool and the Gang Sheepaca yarn, 50% alpaca, 50% merino wool, 100g/233m per ball, one ball in Tweed Grey (Yarn A), small amount in Ivory White (Yarn B)
  • Small amount of Yarn Stories Fine Merino DK, 100% wool, 50g/120m in Duck Egg (Yarn C)
  • 3.25mm (UK 10, US 3) circular knitting needles
  • 4mm (UK 8, US 6) circular knitting needles
  • Scrap yarn
  • Stitch markers
  • Tapestry needle
  • Cloud motif chart

Tension

22 sts and 30 rows to 10cm (4″) over stocking stitch on 4mm needles

Abbreviations

st(s) stitch(es)

k knit

p purl

M1R make one right

M1L make one left (see instructions below for a guide to these techniques)

Head to our knitting abbreviations chart and yarn weight conversion chart for more help.

How to make knitted wrist warmers

The gloves are knit in the round, so you can either use circular needles (learn how to knit with circular needles) or divide the sts evenly over double pointed needles. It is possible to knit the mittens flat on straight needles, but you’ll need to cast on two extra sts for seam allowance and sew up the mittens at the end.

The left and right mittens are identical, so follow the pattern through twice to knit the pair. The rainclouds and raindrops are sewn onto the mittens after, with the left and right being mirror images.

To M1R, pick up the bar between the sts on right and left needles by bringing the left needle through from back to front, then knit into the front of this st.

To M1L, pick up the bar between the sts on right and left needles by bringing the left needle through from front to back, then knit into the back of this st.

Note – the tension used is not the standard tension for this yarn, but the tension needed for the project. Knit a tension square before starting, and adjust your needle size if needed. The finished mittens will each measure approximately 23cm (9 18“) long and 9cm (3 58“) wide.

You will need:

  • Wool
  • Knitting needles
  • Tapestry needle

Knitted wrist warmers : Cuff

Step 1

knitted wrist warmers step 1

Using Yarn A and 3.25mm needles, cast on 40 sts.

Join to work in the round, being careful not to twist the sts – knitting and purling into the back of the sts will make the both the cuff and tips look more defined and neater.

Place a stitch marker to show the start of each round when working.

Work 24 rounds in k1 p1 rib – the cuff is approx. 7.5cm (3″) long.

Knitted wrist warmers : Lower hand

Step 1

knitted wrist warmers step 2

Change to 4mm needles and k 14 rounds.

Knitted wrist warmers : Thumb gusset

Step 1

knitted wrist warmers step 3

Round 15 M1R, k2, M1L, k to end of round [42 sts]

Round 16 k

Round 17 M1R, k4, M1L, k to end of round [44 sts]

Round 18 k

Round 19 M1R, k6, M1L, k to end of round [46 sts]

Round 20 k

Round 21 M1R, k8, M1L, k to end of round [48 sts]

Round 22 k

Round 23 M1R, k10, M1L, k to end of round [50 sts]

Round 24 k

Round 25 M1R, k12, M1L, k to end of round [52 sts]

Round 26 k

Round 27 M1R, k14, M1L, k to end of round [54 sts]

Round 28 k

Round 29 M1R, k16, M1L, k to end of round [56 sts]

Round 30-31 k

Knitted wrist warmers : Prepare for thumb

Step 1

knitted wrist warmers step 4

You’ll now need to place the thumb gusset sts on a scrap yarn holder and join to work in the round again to knit the upper hand. Don’t be tempted to use a straight stitch holder – scrap yarn works best as it doesn’t get in the way.

Slip 1 st (the first st on the left needle) from the left needle to the right. Transfer 16 thumb sts onto scrap yarn using a tapestry needle. Next, slip the slipped st on the right needle back to the left needle.

To join in the round ready to knit the upper hand, hold the right needle and cast on 1 st to the right needle using the backward loop method. Beginning the round again on the left needle, k the first two sts together then k to the end of the round [40 sts].

There may be a slight hole between the thumb gusset and the hand, but this can be sewn up while weaving in the ends when finishing

Knitted wrist warmers : Upper hand

Step 1

knitted wrist warmers step 5

K 11 rounds.

Change to 3.25mm needles and work 4 rounds in k1 p1 rib.

knitted wrist warmers step 6

Cast off all sts loosely ribwise.


Knitted wrist warmers : Thumb

Step 1

knitted wrist warmers step 7

Transfer the 16 sts on scrap yarn to 4mm needles, rejoin Yarn A and k 4 rounds.

Change to 3.25mm needles and work 2 rounds in k1 p1 rib.

Cast off all sts loosely ribwise.

Knitted wrist warmers : Adding the motif

Step 1

knitted wrist warmers step 8

The chart shows the placement for the left mitten, so you’ll need to reverse it for the right mitten to create a mirror image.

To mark the centre of the cloud, count from the column of stitches next to the thumb as shown on page 21 by the purple marker. The thumb will be to the left for the right mitten and to the right for the left mitten.

The centre is 13 sts in as shown by the green marker. Following this column of sts up, place a marker 5 sts down from the ribbed tip of the mitten as shown by the top pink marker. This is the top of the cloud.

Still on this centre column, count down 10 sts, this is the centre st of the cloud’s bottom row. Place two markers 5 sts out on either side from the centre, to mark the start and end of the bottom row of the cloud.

Cut a length of Yarn B approximately 150cm (59 18“). Following the chart, add the cloud using a tapestry needle, working duplicate stitch and matching the tension of the mitten. You’ll need another 150cm (59 18“) length of Yarn B to finish the cloud.

Add the raindrops using Yarn C, then weave in any loose ends on both gloves to finish.

Knitted wrist warmers complete just in time for the chilly months. Knit more up and give as Christmas gifts if you’re feeling generous! For more wintery knitting patterns head to our free poppy knitting pattern and our premature baby hats knitting patterns.