Divide the Ladies knitted waistcoat for Front and Back
Now we’re going to divide our single piece of knitting to allow for the arm holes. You’ll need a spare needle for this next step!
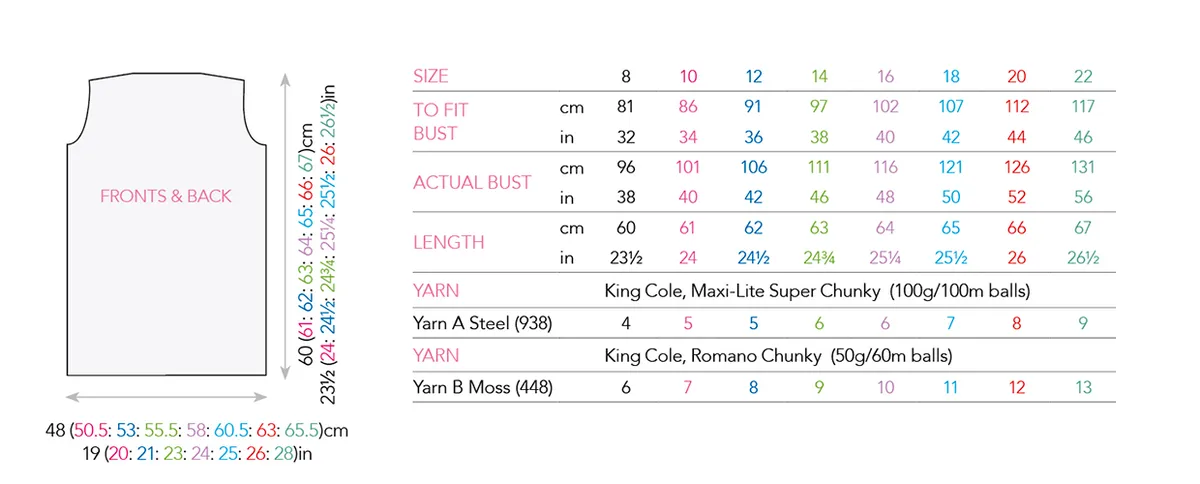
Patt first 48 (50: 52: 56: 58: 60: 64: 66) sts, place these sts on a spare needle, patt next 96 (102: 108: 110: 116: 122: 124: 130) sts, turn, leave rem 48 (50: 52: 56: 58: 60: 64: 66) sts on a spare needle.

Knitting the back of the ladies knitted waistcoat
Work straight on 96 (102: 108: 110: 116: 122: 124: 130) sts, until work measures
60 (61: 62: 63: 64: 65: 66: 67)cm from cast-on edge, ending with pattern row 3.
Knitting the shoulders of the ladies knitted waistcoat
Patt first 30 (32: 34: 34: 36: 38: 38: 40) sts, place these sts on a spare needle, cast off next 36 (38: 40: 42: 44: 46: 48: 50) sts, patt to end turn, leave last 30 (32: 34: 34: 36: 38: 38: 40) sts on a spare needle.
Return to held set of 48 (50: 52: 56: 58: 60: 64: 66) sts for Left Front, rejoin yarn to armhole edge and continue to work in Double Knitting pattern, increasing as follows:
Row 1 (inc row) (Worked as row 1 of Double Knitting pattern, WS). With Yarn B, patt to last 4 sts, K into front and back of next st, yf, sl1 pwise, yb, K1, yf, sl1 pwise, yb. Slip sts to other end of needle, take up Yarn A.
(1 st inc’d)
Row 2 (inc row) With Yarn A, patt to last 5 sts, sl2 pwise, P into front and back of next st, yb, sl1 pwise, yf, P1, yb. Turn work, take up Yarn B.
(1 st inc’d)
Row 3 With Yarn B, sl1 pwise, yf, P1, yb, sl2 pwise, yf, P2, yb, patt to end. Slip sts to other end of needle and take up Yarn A.
Row 4 With Yarn A, K1, yf, sl1 pwise, yb, K2, yf, sl2 pwise, yb, patt to end. Turn work, take up Yarn B.
Row 5 (inc row) With Yarn B, patt to last 6 sts, K1, yf, M1A, yb, K1, yf, sl1 pwise, yb, M1B, yf, sl1 pwise, yb, K1, yf, sl1 pwise, yb. Slip sts to other end of needle and take up Yarn A, ready for row 2 of Double Knitting patt.
(2 sts inc’d)
Row 6 With Yarn A, patt to last 6 sts, sl1 pwise, yf, P1tbl, yb, (sl1 pwise, yf, P1, yb) twice. Turn work, take up Yarn B.
Row 7 With Yarn B *sl1 pwise, yf, P1, yb; rep from * to end, then slip sts to other end of needle, take up Yarn A.
Row 8 With Yarn A, K1, yf, sl1 pwise, yb, then turn work, take up Yarn B.
Rep the last 8 rows 3 times more. [64 (66: 68: 72: 74: 76: 80: 82) sts]
Work straight until same number of rows has been worked to shoulder shaping, ending at armhole edge, ending with pattern row 4.
Shaping the shoulder of the ladies knitted waistcoat
Break off yarns. Place first 30 (32: 34: 34: 36: 38: 38: 40) sts on a holder for shoulder, rejoin yarn to rem sts.
Work rows 1&2 on these 34 (34: 34: 38: 38: 42: 42: 42) sts.
.
Shaping the collar of the ladies knitted waistcoat
Row 3 With Yarn B *sl1 pwise, yf, P1, yb; rep from * 9 (9: 9: 10: 10: 11: 11) times, then slip sts to other end of needle and take up Yarn A.
Row 4 With Yarn A *K1, yf, sl1 pwise, yb; rep from * 9 (9: 9: 10: 10: 11: 11) times, turn work and take up Yarn B.
Row 5 With Yarn B *K1, yf, sl1 pwise, yb; rep from * 9 (9: 9: 10: 10: 11: 11) times, slip sts to other end of needle and take up strand of Yarn A.
Row 6 With Yarn A *sl1 pwise, yf, P1, yb; rep from * 9 (9: 9: 10: 10: 11: 11) times, turn work and take up Yarn B.
Row 7 With Yarn B *sl1 pwise, yf, P1, yb; rep from * to end, slip sts to other end of needle and take up Yarn A.
Row 8 With Yarn A *K1, yf, sl1 pwise, yb; rep from * to end, turn work and take up Yarn B.
Row 9 With Yarn B *K1, yf, sl1 pwise, yb; rep from * to end, then slip sts to other end of needle and take up strand of Yarn A.
Row 10 With Yarn A *sl1 pwise, yf, P1, yb; rep from * to end, then turn work and take up Yarn B.
Rows 11&12 As rows 7&8.
These 12 rows form the patt for Collar shaping.
Rep these 12 rows until short edge of Collar fits halfway across back neck, when slightly eased.
Leave these sts on a holder.
Return to held set of 48 (50: 52: 56: 58: 60: 64: 66) sts for Right Front, rejoin yarn to armhole edge.
Patt to end.
Row 1 (inc row) (Worked as row 1 of Double Knitting pattern, WS). With Yarn B, K1, yf, sl1 pwise, yb, K into front and back of next st, yf, sl1 pwise, yb, patt to end. Slip sts to other end of needle and take up Yarn A. (1 st inc’d)
Row 2 (inc row) With Yarn A, sl1 pwise, yf, P1, yb, sl2 pwise, yf, P into front and back of next st, yb, patt to end. Turn work, take up Yarn B. (1 st inc’d)
Row 3 With Yarn B, patt to last 6 sts, sl2 pwise, yf, P2, yb, sl1 pwise, yf, P1, yb. Slip sts to other end of needle and take up Yarn A.
Row 4 With Yarn A, patt to last 6 sts, K2, yf, sl2 pwise, yb, K1, yf, sl1 pwise, yb. Turn work, take up Yarn B.
Row 5 (inc row) With Yarn B, K1, yf, sl1 pwise, yb, K1, yf, M1A, yb, K1, yf, sl1 pwise, yb, M1B, yf, sl1 pwise, yb, patt to end. Slip sts to other end of needle and take up Yarn A, ready for row 2 of patt. (2 sts inc’d) .
Inc row 6 With Yarn A, sl1 pwise, yf, P1, yb, sl1 pwise, yf, P1tbl into next st, yb, patt to end. Turn work, take up Yarn B.
Row 7 With Yarn B *sl1 pwise, yf, P1, yb; rep from * to end, slip sts to other end of needle and take up Yarn A.
Row 8 With Yarn A, K1, yf, sl1 pwise, yb, turn work and take up Yarn B.
Rep the last 8 rows 3 times more. [64 (66: 68: 72: 74: 76: 80: 82) sts]
Work straight until same number of rows has been worked to shoulder shaping as Left Front and Back, ending at armhole edge with a row 4 of patt. .
Shaping the shoulder of the ladies knitted waistcoat
Break off yarns.
** Patt (Row 1) Patt 34 (34: 34: 38: 38: 42: 42: 42) sts, place rem 30 (32: 34: 34: 36: 38: 38: 40) sts on a holder for shoulder. Work rows 2–4 on these sts.
Shaping the collar of the ladies knitted waistcoat
Row 5 With Yarn B *K1, yf, sl1 pwise, yb; rep from * 9 (9: 9: 10: 10: 11: 11) times, slip sts to other end of needle and take up strand of Yarn A.
Row 6 With Yarn A *sl1 pwise, yf, P1, yb; rep from * 9 (9: 9: 10: 10: 11: 11) times, turn work and take up Yarn B.
Row 7 With Yarn B *sl1 pwise, yf, P1, yb; rep from * 9 (9: 9: 10: 10: 11: 11) times, slip sts to other end of needle and take up Yarn A.
Row 8 With Yarn A, *K1, yf, sl1 pwise, yb; rep from * 9 (9: 9: 10: 10: 11: 11) times, turn work and take up Yarn B.
Row 9 With Yarn B *K1, yf, sl1 pwise, yb, rep from * to end, slip sts to other end of needle and take up strand of Yarn A.
Row 10 With Yarn A *sl1 pwise, yf, P1, yb; rep from * to end, turn work and take up Yarn B.
Row 11 With Yarn B *sl1 pwise, yf, P1, yb; rep from * to end, slip sts to other end of needle and take up Yarn A.
Row 12 With Yarn A *K1, yf, sl1 pwise, yb; rep from * to end, turn work and take up Yarn B.
These last 12 rows from ** form the patt for Collar shaping.
Rep these 12 rows from ** until short edge of Collar fits halfway across back neck, when slightly eased.
Leave these sts on a holder.

Making up the ladies knitted waistcoat
Graft the shoulder seams together from front and back of work. Graft back collar seam together from front and back of work. Join collar to back neck. Darn in any loose ends.
Crocheting the edging of the ladies knitted waistcoat
This waistcoat knitting pattern uses a Double crochet trim. If you have not crocheted before, see our how to double crochet article for a complete step-by-step guide.
With 5mm crochet hook and RS of work facing, work one row of double crochet stitches around the outer edge of the waistcoat. Then, without turning the work, work one more row of double crochet into this first row of double crochet. This row should be reverse double crochet aka crab stitch. Learn how to crochet crab stitch.
Work backwards until you reach the start of the edging. Slip stitch into 1st chain and fasten off securely. Rep these instructions for both armhole edges.
Crocheting the ties of the ladies knitted waistcoat
For the optional ties, work 2 lengths of crochet chains, each approx. 70 stitch chain, then sew them in place on front edges, either at waist or at base of collar, so that you can fasten the waistcoat. Alternatively, you can fasten the waistcoat knitting pattern with a belt, as in our photograph.
Download the chunky waistcoat knitting pattern
We know many of you would like a version of this pattern colour coded up for sizes, and you’ll find that in this PDF download.
Click to download the waistcoat knitting pattern PDF.
Choosing your yarn for this waistcoat knitting pattern
We love how chunky yarn garments knit up quickly. With its clever double knitting technique, this chunky waistcoat will grow quickly on your needles too.
Plus there’s loads of fantastic chunky yarns available in a huge range of shades and fibre types, so it’s easy to find one to suit your own style. .
The best chunky yarns to knit with Gathered
If you like your yarns big and bulky, we think you’ll love Gathered’s pick of the best chunky yarns. Take a look and find the perfect yarn to use in your next project.