All products were chosen independently by our editorial team. This review contains affiliate links and we may receive a commission for purchases made. Please read our affiliates FAQ page to find out more.

How to make a Valentines Day banner

Learn how to make our quick and easy Valentine's Day garland and give your home some loving.

Try 6 issues of your choice of craft magazine from just £9.99

Published: March 24, 2021 at 10:00 am

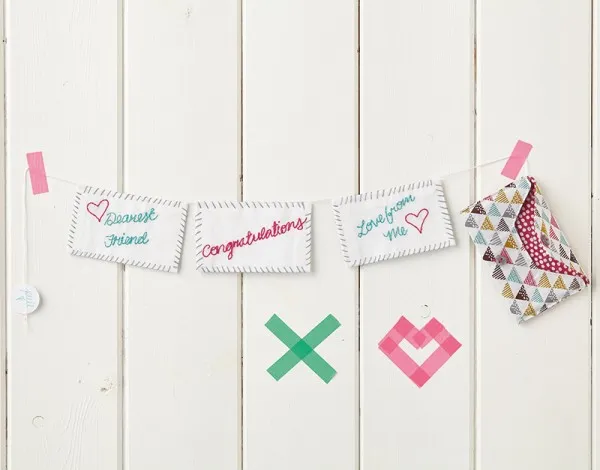
Send the most gorgeous snail mail ever with this exclusive envelope valentines banner by Sammy and H from Live it. Love it. Make it.

You just can’t beat the feeling of having a beautiful, carefully handcrafted package drop through your letterbox. This fabric envelope opens up to reveal a lovingly-embroidered string of letters emblazoned with hand-stitched messages – bunting with a difference! Tailor it to suit different occasions, such as Valentine’s Day, a new arrival or wedding celebration. Or if you want to add more letters, enlarge the envelope slightly to fit them all in.

We hope you enjoy making this one-of-a-kind valentines garland as much as we've enjoyed sharing it! If you love to make your own homemade decorations and garlands, you might also like our guide to how to make bunting.

Valentine's garland supplies

• Two A4 pieces of contrasting print cotton fabric (we used Petit Street collection by Wendy Kendall for Dashwood Studios) • Medium weight iron-on interfacing, 25cm (978in) • Erasable fabric pen • Two heart-shaped buttons • Embroidery thread in three colours to match your fabric (we used pink, teal and grey) • White cotton fabric, 25cm (978in) • Scrap of white felt • Round white stickers • Twine or white pearl thread • Sewing thread • Embroidery hoop • Scissors • Sewing machine • Embroidery needle • Darning needle

Finally, download our Valentines banner templates from Mollie Makes issue 41.

How to make an envelope Valentines banner

You will need:

  • Fabric
  • Thread
  • Scissors
  • Embroidery Thread
  • Needle
  • Embroidery hoop

Step 1

How to make bunting for Valentines Day step 1

Use the template from Mollie Makes 41 to mark out your envelope on the interfacing, then cut. Iron onto the back of your lining fabric.

Step 2

How to make bunting for Valentines Day step 2

Leaving a 1cm (3/8″) seam allowance, cut around the interfacing. Use this piece as a template to cut the outside of your envelope from your contrast fabric. Take into consideration any directional pattern.

Step 3

How to make bunting for Valentines Day step 3

Place your two fabrics right sides (RS) together and pin.

Step 4

How to make bunting for Valentines Day step 4

Sew around the edge of your envelope, using the interfacing edge as a guide. Leave a gap for turning, then turn RS out.


Step 5

How to make bunting for Valentines Day step 5

Cut out your felt label embellishments for the front of your envelope and stitch in place using embroidery thread.

Step 6

How to make bunting for Valentines Day step 6

Use a sewing machine to topstitch all around the envelope, giving a neat finish and sealing up the gap. Next, fold up the bottom and sew straight down the two short sides to create the pocket.

Step 7

How to make bunting for Valentines Day step 7

Using embroidery thread, hand sew one button onto the flap and the other onto the body of the envelope. Leave a long end of thread on the bottom button – use this to close your envelope by wrapping it in a figure of eight around both of the buttons.

Step 8

How to make bunting for Valentines Day step 8

Take more interfacing and iron it to the back of your white cotton fabric. Trace the letter template onto the fabric using a fading fabric pen. Place in an embroidery hoop, then trace (or free hand) your phrases onto the top section. Neatly back stitch over the words.

Step 9

How to make bunting for Valentines Day step 9

Cut out the letter shape and fold it in half. Take some more thread and hem stitch all the way around the letter. Repeat steps 8 and 9 for all the phrases you want to add.

Step 10

How to make bunting for Valentines Day step 10

Take some twine or pearl thread and, with a small knot in the end, thread it through the bottom corner of your envelope.

Step 11

How to make bunting for Valentines Day step 11

Thread twine through each letter top with a darning needle.

Step 12

How to make bunting for Valentines Day step 12

Once you’ve threaded all your letters, take two stickers and write PULL on them. Place them back-to-back over the end of the twine to make a tab, then insert all your ‘sheets’ into the envelope.

Whether you’re making the latest Mollie projects or one from the archive we’d love to see. Show and tell using #molliemakers on Instagram and Twitter or post it on our Facebook wall. Want to know what we’re up to? Check out our Pinterest page to see what keeps us curious.