How to make a DIY Easter basket

Choose from four different designs and make your own DIY Easter basket with our easy step-by-step tutorials and free easter basket templates!

Try 6 issues of any craft magazine for just £9.99

Published: March 16, 2023 at 9:00 am

Take your pick of Easter baskets with these four easy Easter basket tutorials and free Easter basket templates! Which one will you make?

Learn how to make an Easter basket for your little egg hunters this Easter with these four handy projects. The DIY Easter baskets can be crafted from any coloured or patterned card, but we’d recommend choosing a heavyweight cardstock to endure all the to-ing and fro-ing of an Easter egg hunt! Here's a top tip: Why not add a little shredded tissue paper to your baskets, to keep the Easter eggs nice and secure. How about attaching name tags to your baskets for added personalisation? Download your free Easter printables to decorate your Easter basket with!

These Easter baskets are super easy to make - simply download and print the Easter basket templates, trace onto card and patterned papers of your choice and assemble, following our easy Easter basket tutorial below. Once you’ve made the little basket, add a handle made from card or ribbon for your recipient to use on their egg hunt! Fancy making some Easter bunting or carrot-shaped gift boxes? Check out our tutorial on how to make easy Easter decorations!

Square Easter basket template (yellow polka-dot Easter basket)

Diamond Easter basket template (diamond-shaped Easter basket)

Want more free patterned paper? Take a look at our ever-growing collection of free patterned papers, there are lots to choose from and there are lots of different themes. We love these free lavender printables, or more general card making, let us show you how to make cards. We love seeing what you make with our free printable papers, so don’t forget to share your cards and papercraft projects with us on Facebook and Twitter, too!


Make this easy DIY Easter basket: Design #1

You Will Need

  • Green and pink card
  • Ribbon
  • Adhesive
  • Scissors

Step 1

Cut eight 1.5 x 19cm strips of green card for this Easter basket. Place four strips in a vertical row then take another strip and weave it horizontally over and under the other strips. Repeat with the three strips, alternating the weaves. Secure the middle strips.

Step 2

Fold each of the strips upwards to form the sides of the basket. Cut three 1.5 x 29cm pieces of pink card. Take one of the strips and weave it over and under one side of the basket. Add glue to secure the pink strip to the green strips. Repeat with the other pieces of card, alternating the weaving as you go. Fold the ends of the green strips over the top pink strip on the Easter basket edges and secure with glue.

Step 3

Attach a 28 × 0.5cm piece of green card to a 28 x 1cm piece of pink card. Attach either end of the layered strip to the sides of the Easter basket to form the handle. Tie some organza ribbon to form a bow around the Easter basket handle.


Make this easy DIY Easter basket: Design #2

You Will Need

Step 1

To create your Easter basket, first, download your free Easter basket template. Cut out the base from some white card (or any other colour if you prefer). Score along the fold lines using a scoring board and a bone folder for neat, crisp creases.

Easy DIY Easter basket – step 1

Step 2

Round the corners of your Easter basket template using a corner rounder punch if you have one, or round the corners with a pair of scissors. Cut along the cut lines shown on the template using sharp scissors or a craft knife.

Easy DIY Easter basket – step 2

Step 3

Trim nine squares each from two contrasting papers in the free easter printables, slightly smaller than the faces of the box so that they leave a thin border when mounted. Round one corner of four of each pattern using a corner rounder punch, or by hand with scissors.

Easy DIY Easter basket – step 3

Step 4

Stick the squares of paper onto your Easter basket base. Repeat on the other side for the second patterned paper. If you’re confident, use double-sided tape when positioning your panels, otherwise use wet glue to give you some ‘wiggle time’ before the glue dries.

Easy DIY Easter basket – step 4

Step 5

Start to assemble the Easter basket shape by folding and creasing along your score lines, folding up the sides and starting to push them gently into shape.

Easy DIY Easter basket – step 5

Step 6

Cut two circles from white card and patterned paper. Use a coin to draw around if you don’t have a circle die! Glue them together. Cut a strip of white card for the handle and mat a strip of slightly narrower patterned paper on top.

Easy DIY Easter basket – step 6

Step 7

Punch a hole through the sides of the basket and the handle (you can use an ordinary office punch if you don’t have a craft punch). Tuck the handle in between the layers on each side of the basket to hide the ends out of sight. If you are not using a brad, you can skip this step!

Easy DIY Easter basket – step 7

Step 8

Take the die-cut circle and punch a hole through it. Line up the holes on the die-cut circle, handle and basket then push a brad through the holes. Repeat on the other side. If you are not using a brad, simply glue to handle in place to conceal the join with your paper circle. Finally, fill your DIY Easter basket with delicious sweet treats for the big day – or just as a treat. Yum!

DIY easter baskets


Make this easy DIY Easter basket: Design #3
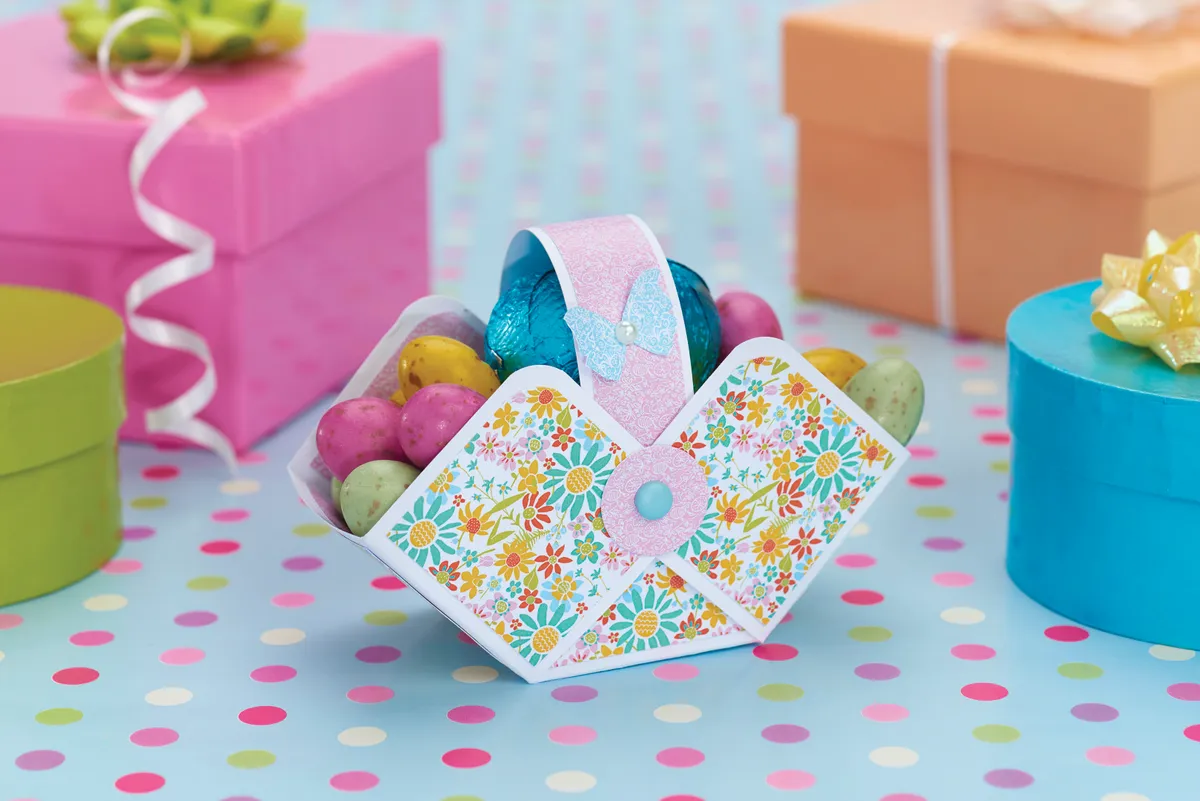
Perhaps you’re looking for a different style of Easter basket? This timeless design by Sarah-Jane Rae looks expensive – but it’s really just made out of brown packing paper! You’ve probably got some from all those Amazon deliveries we all get these days…

DIY Woven Easter basket copy

You Will Need

  • Brown packing paper, or Kraft paper
  • Ribbon
  • Adhesive
  • Scissors

Step 1

How to make an Easter basket – step 1

Flatten out some brown packing paper and then cut into sixteen 30 x 760mm strips. Fold each strip twice to make them approx 10mm wide and also more durable for weaving. Cut eight of the strips in half.

Step 2

How to make an Easter basket – step 2

Lay eight short strips together in a row, so they run vertically, then weave the other eight short strips across horizontally, starting at the centre to make a 110mm square base for your basket. Glue the first strip of the basket base at each overlap, using a dab of wet glue or a glue dot. Repeat as you weave but just at every fourth or fifth overlap to hold securely.

Step 3

How to make an Easter basket – step 3

Now weave four of the longer strips around the sides to create the ‘walls’ of your basket. Trim the excess protruding strips to 10mm, then fold over these ends to the inside and glue them into place.

When constructing the sides or ‘walls’, glue the first piece inside and then glue every four or five strips in. Use pegs to hold while the glue dries if using wet glue.

Step 4

How to make an Easter basket – step 4

Take three of the long strips, glue them together at the top and then plait together to create a handle. Trim and glue the ends to secure. Attach the handle to the inside of the basket, in the centre of each shorter side or ‘wall’.

Step 5

How to make an Easter basket – step 5

Take the last long strip and stick along the inside of the top edge of the basket to both strengthen the ‘walls’ and cover the trimmed ends and two handle joins.

Step 6

How to make an Easter basket – step 6

Decorate the sides with bows made from tulle and silk ribbon and fill your basket with shredded tissue and colourful foil-wrapped eggs, to eat!


Make this easy DIY Easter basket: Design #4

If you want the easiest Easter basket design, then this Easter basket is for you! It’s easy to make, there’s a free Easter basket template – so all you need to decide is which paper or card to use.

Papercraft easter baskets

You Will Need

Step 1

Use the free Easter basket template to transfer the basket shape onto some patterned paper and cut out. We’re using polka dot paper! Score the dotted lines, then assemble the basket, glueing the flaps to hold it all in place.

Step 2

Cut a 3 x 28cm strip of patterned paper – this will be the handle. Glue the ends to either side of the inside of the basket in a loop, forming the handle.

Step 3

Trim a border from patterned paper (we’ve chosen zig-zags) and attach it to the top of each side of the basket. Cut a flower from paper (or use a pre-made flower if you have any in your craft stash), and attach the flower to one side of the basket. Fill the basket with shredded tissue and nestle chocolate eggs in the tissue!

Crochet your container!

If you’re handy with a crochet hook, you could also try making our super-sweet Free Easter basket crochet pattern.

Fill your Easter basket full of fun!

Now that you know how to make a range of Easter baskets, the next decision is what to put in them! You can keep it classic and fill them full of tasty chocolate eggs, but you could always keep the crafting going and fill your basket with fun decorative eggs.

Egg decorating ideas for Easter

There’s so many ways to get creative with eggs! You’ll find a range of creative makes, from knitted Easter eggs to dip dyed eggs and even eggs with embroidery stitches in this list of 40 Easter egg decorating ideas from Gathered.