How to make mini notebooks

Learn how to make mini notebooks with Rachel Hazell's tutorial. They're perfect for making notes on the go!

Try 6 issues of your choice of craft magazine from just £9.99

Published: August 21, 2021 at 8:23 am

A new year calls for a fresh set of mini notebooks – clean, blank pages for dreaming big, starting over, or getting organised. Take time out this month for a bit of folding, stitching, and painting to create a neatly bound notebook set in a matching portfolio case. Each of the three books inside is bound using a variation of pamphlet stitch, which looks impressive but is so simple to do. Rachel Hazell's mini notebooks are perfect for throwing in your bag for on-the-go notes or for organisational bullet journalling.

To customise your bound notebooks, you could attach beads, tags, or feathers to the tail ends, add an affirmation to the cover of each book in loopy lettering, or personalise the portfolio with your initials. Add washi tape or little photos and notes for a scrapbook effect and treasure your mini notebook as a place of all your hopes and dreams.

Now over to Rachel! Let's learn how to make mini notebooks...

Materials

  • Five sheets of A4 copy paper, 80 or 100gsm
  • Three 15 x 37cm (6 x 145/8") strips of thick watercolour paper, 160gsm minimum
  • One 38 x 55cm (15 x 215/8") piece of thick watercolour paper, 160gsm minimum
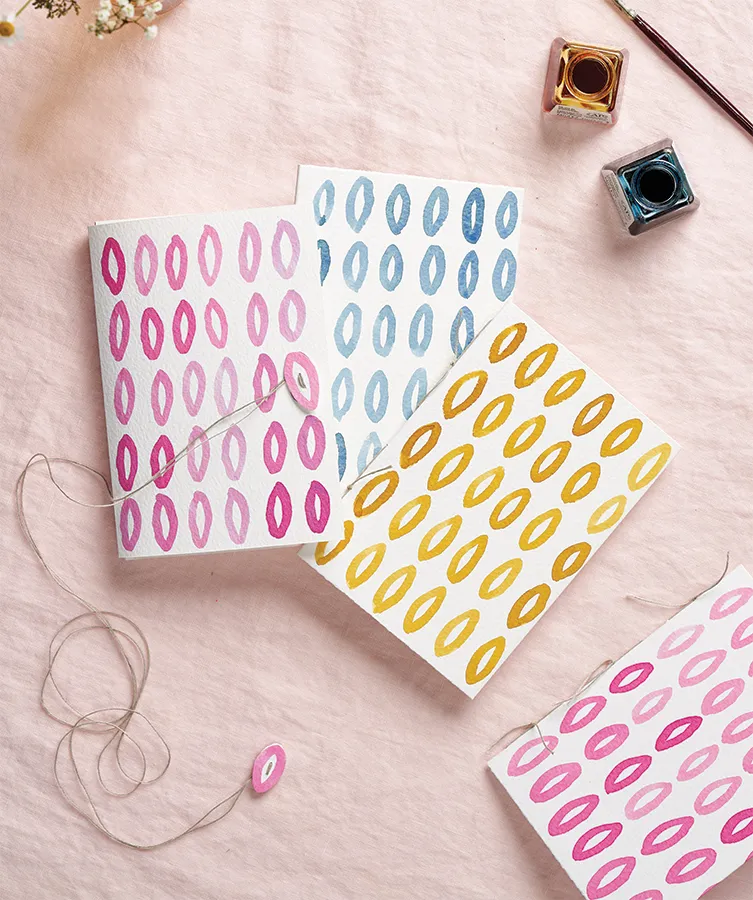
  • Watercolour ink or paint in blue, yellow and pink
  • Small paint brush
  • Metal ruler
  • Cutting mat
  • Craft knife
  • Sewing needle
  • Waxed linen thread
  • Bone folder (optional)

How to make mini notebooks

You will need:

  • Paper
  • Watercolour ink
  • Paintbrush
  • Ruler
  • Cutting mat
  • Craft knife
  • Sewing needle

Step 1

How to make mini notebooks 1

Cut the five A4 sheets in half along the width to create the notebook pages. Create a narrow spine by folding a 15 x 37cm (6 x 14 5/8") cover sheet almost in half, just 2mm short. Make a firm crease with a bone folder or your finger. Open out and repeat at the other end, giving neat parallel lines. Follow this step to make narrow spines on each of the three cover sheets.

Step 2

How to make mini notebooks 2Using a paint brush, watercolour inks or paints and the main image as a guide, paint the covers with inky patterns and leave to dry.

Step 3

How to make mini notebooks 3For each book, fold three sheets of the paper for the pages in half along the width and nest together. For Book One, use the templates from Mollie Makes issue 101 to mark three dots on the folded edge and pierce holes through the three sheets. Mark and pierce three holes down the centre of the spine on the cover too.

Step 4

How to make mini notebooks 4

Book One is made using three-hole pamphlet stitch. Starting at the middle hole, take the needle and thread from the outside to the inside, leaving a tail of at least 3cm (11⁄4") – hold onto this. Go up to the top hole and through it to the outside again.

Step 5

How to make mini notebooks 5

Next, miss out the middle hole, taking the needle back into the centre through the bottom hole, creating a long stitch down the spine, as shown.

Step 6

How to make mini notebooks 6Finally, come out through the middle hole, making sure the needle and thread and the tail are on opposite sides of the long stitch before tying a double knot. Trim the ends to roughly 3cm (11⁄4").

Step 7

How to make mini notebooks 7

Mark where the edge of the paper sits on the cover using your nail, then fold in the cover flaps.

Step 8

How to make mini notebooks 8

Book Two is bound by sewing two separate pamphlet stitches on the same spine. Make six holes using the template in issue 101, as per Step 3, then repeat Steps 4-6 in the top three holes. Tie off and trim the ends, then repeat with the remaining three holes to sew a second pamphlet stitch.

Step 9

How to make mini notebooks 9

Book Three has three pamphlet stitches down the spine. Referring to the diagram on the templates, make nine holes and repeat Steps 4-6 three times along the spine.

Step 10

How to make mini notebooks 10

To create the portfolio, lay the pile of books in the centre of the 38 x 55cm (15 x 215/8") sheet of watercolour paper. Use the template for reference but take the measurements from your own books. Start by drawing a rectangle around the books with a 1mm border on all sides.

Step 11

How to make mini notebooks 11

Next, pencil in the side walls of the portfolio, which will be the height of the books plus 2mm. This design has tiny tabs visible too. Now mark out two side flaps that are half the height of the base rectangle and two side flaps that are the full width of the base. Cut out the portfolio shape, then score the lines using a bone folder.

Step 12

How to make mini notebooks 12

Paint the outside of the portfolio with the same pattern used for the books. To fasten, make two paper buttons by painting oval shapes onto an offcut of the thick watercolour paper. Cut out, then cut a length of thread long enough to wrap around the case a few times. Sew through the centre of one button, push along to the middle of the thread length, then use the ends to sew the second button to one flap of the portfolio, using the main image as a guide. Place the books inside, fold in the flaps and use the thread to secure.

And you’re done! Three mini-notebooks complete ready for you to write in. If you enjoyed this tutorial make sure you check out our embroidered notebook tutorial and DIY bookbinding for more paper fun!