DIY Christmas candy cane decorations

Decorate your Christmas tree with these sweet treat candy cane decorations!

Try 6 issues of Love Patchwork & Quilting magazine for £9.99| SAVE 76%

Published: October 27, 2022 at 8:56 am

It's (nearly...) the most wonderful time of the year! Well, not really, but here at LP&Q we're getting the excitement levels up early by embarking on some quick Christmas crafts that really get us in a festive mood.

Start off with these sweet decorations by Kymona Tracey of Kreative Kymona (@kreativekymona) that you can stitch up in a dash: they're so simple to sew, and look good enough to eat! For a sustainable make, use up scraps from your stash, or go classic with festive red and white solids – either way, your Christmas tree will be thanking you for the makeover!

Once you've finished these candy canes and candy ribbons, head to issue 117 to stitch the lovely lollipop bauble and complete your set.

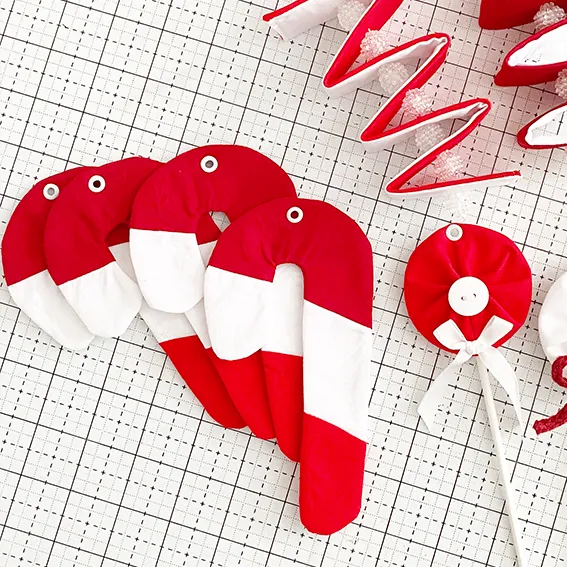
How to make DIY Christmas candy cane decorations

You will need

To make two (2) candy canes:

  • Red Fabric A: one (1) fat eighth
  • Red Fabric B: one (1) fat eighth
  • White fabric: one (1) fat eighth
  • Fusible Interfacing: one (1) fat eighth
  • Eyelets and Setter
  • Candy Cane Template

To make two (2) candy ribbons:

  • Red Fabric A: one (1) fat eighth
  • Red Fabric B: one (1) fat eighth
  • White fabric : one (1) fat eighth
  • Fusible Interfacing: one (1) fat eighth
  • White Embroidery Thread
  • Sixteen (16) Beads (8 per ornament)

Things to know before you start sewing

  • Seam allowances are ¼in unless otherwise noted.
  • RST = right sides together.
  • Solid fabrics are Kona Cotton Solids by Robert Kaufman Fabrics in Rich Red, Lipstick, and White
  • Your finished decorations should measure approximately:
    • Candy canes: 4in x 7in
    • Candy ribbons: 2½in x 6in

You will need:

  • Red Fabric A
  • Red Fabric B
  • White fabric
  • Eyelets and Setter
  • White Embroidery Thread
  • Sixteen Beads

Cutting out your DIY Christmas candy cane decorations

Step 1

From the red fabric A cut:

  • One (1) 2½in x 22in strip.

Step 2

From the red fabric B cut:

  • One (1) 2½in x 22in strip.

Step 3

From the white fabric cut:

  • One (1) 2½in x 22in strip.

Step 4

From the fusible interfacing:

  • One (1) 6¼in x 11in rectangle.

Step 5

Now it’s time to prepare your candy canes

Sew a Red Fabric A, Red Fabric B and white strip of fabric together, along the long edges, with the white fabric strip in the middle.

Press the seams flat, in the same direction.

Fold the sewn piece RST, to create a piece approximately 6½in x 11in. Pin to hold in place.

Step 6

Fuse the interfacing to the wrong side of the pieced fabric only on one side. Trace the candy cane on top of the interfacing using a fabric marker. You can fit two candy canes on the folded piece.

Fig A

Step 7

Now it’s time to sew!

Stitch along the traced candy cane line leaving an opening for turning.

Fig B

Step 8

To cut the candy cane out, use pinking shears to cut close to the stitch line without cutting into it.

Fig C

Step 9

Carefully turn the candy cane through the gap.

Fig D

Step 10

Use a point turner to push out the rounded edges. Hand stitch the opening closed with coordinating thread.

Step 11

To finish it off, use an eyelet setter to set an eyelet at the top of the candy cane.

Step 12

Repeat steps 7–11 to make the second candy cane.

hero img candy cane christmas decoration

Candy Ribbons

Step 1

Cutting out your candy ribbons

From the Red Fabric A cut:

  • One (1) 2in x 17in piece.

Step 2

From the Red Fabric B cut:

  • One (1) 2in x 17in piece.

Step 3

From the White fabric cut:

  • Two (2) 2in x 17in pieces.

Step 4

From the fusible interfacing:

  • Two (2) 2in x 17in pieces.

Step 5

Making the candy ribbons

Fuse a piece of interfacing to the wrong side of the Red Fabric A piece. Place the Red Fabric A and white fabric pieces RST and pin in place. Stitch along both long edges, leaving the short edges unstitched.

Candy Ribbion Fig A

Step 6

Turn the fabric right sides out, press the two opening ends inwards then stitch them close.

Candy Ribbon Fig B

Step 7

Every two inches, fold the fabric onto itself until you get to the end and clip in place.

Candy Ribbon Fig C

Step 8

Thread a large eye needle with coordinating embroidery thread. Create a knot on one thread strand and then thread on a bead.

Step 9

Push the needle through the center of the bottom of the folded fabric.

Once through the first fold thread another bead, before pushing the needle through the second fold.

Step 10

Continue adding beads between each fold until you reach the top.

To lock the last bead in place bring the needle and thread back through the bead from the bottom.

Step 11

To create a hanging loop, push the needle back down through the top bead, holding the thread to make a loop.

Keep holding the loop whilst pushing the needle through the fabric and into the second bead.

Knot the thread just below the second bead to hold in place.

Step 12

Repeat steps 6–12 with the Red Fabric B and the second white fabric piece to create a second candy ribbon.

Decorate your home with Christmas candy cane ornaments

These DIY Christmas candy cane ornaments will look fab hanging in your home this December. Hook your candy canes onto your tree, hang them along the banister or add them to your window for a festive display.

These candy canes and ribbons are really simple to sew and a great stash buster too! Grab your scrap fabrics, pop Mariah Carey on, and sew your way through the holiday season.

Sew more festive patterns with Gathered

If you’ve enjoyed sewing your DIY Christmas candy cane decorations then we have the article for you! Head over to our collection of the best Christmas sewing patterns which includes over 45 festive projects.