All products were chosen independently by our editorial team. This review contains affiliate links and we may receive a commission for purchases made. Please read our affiliates FAQ page to find out more.

Free cactus quilt patterns: how to paper piece patchwork succulents

Inspired by Heather Givans' new fabrics, Amanda Castor’s lush succulents are top of our make list! They're a great excuse to try foundation paper piecing too.

Try 6 issues of Love Patchwork & Quilting magazine for £9.99| SAVE 76%

Published: April 5, 2021 at 8:15 am

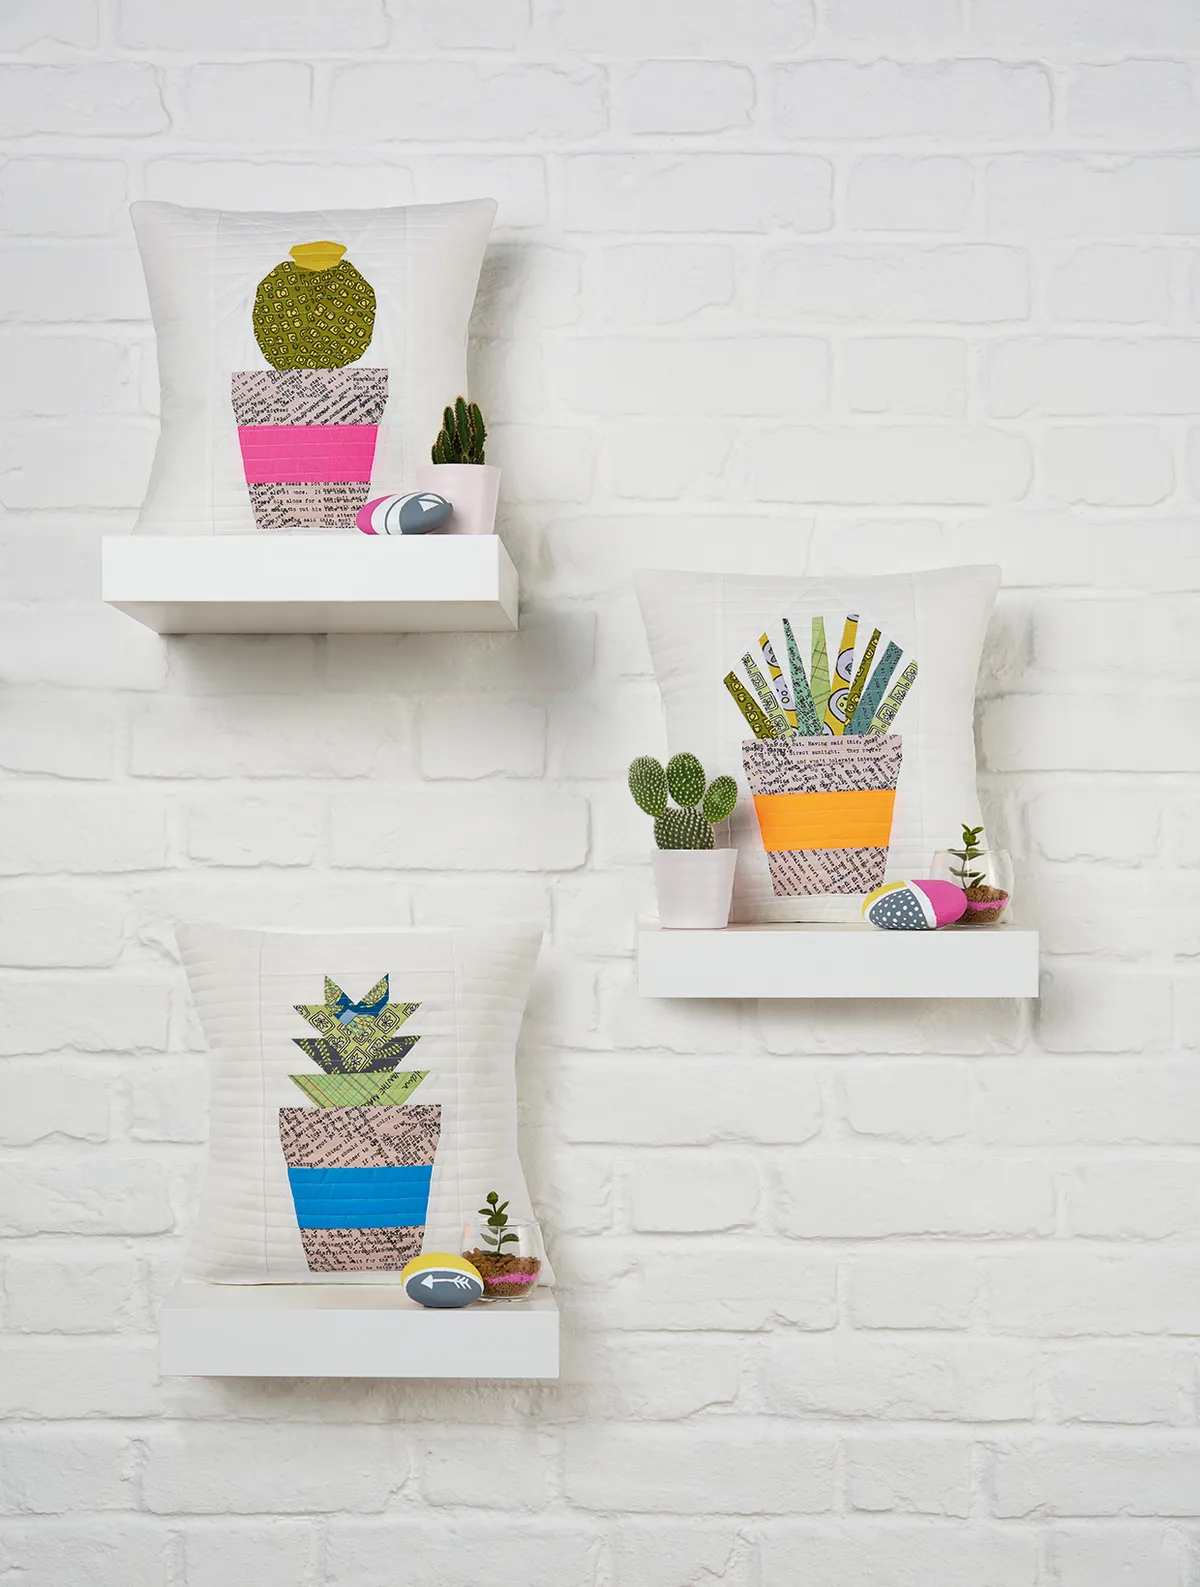
If you haven't discovered paper piecing patchwork yet, we've got the perfect project to get you hooked! With this clever technique, you'll transform the smallest of fabric scraps into a beautiful set of fabric succulents with our trio of free cactus quilt patterns! We've got free templates to help you sew a Pearl, Aloe and Agave design in patchwork. We love the neon bands that designer Amanda has used to piece her pots, but you can also easily adapt the fabrics you use to adjust the final effect. Try using a pale blue background fabric instead of white for a more summery look

We'll show you how to turn your finished patchwork succulents into DIY cushion designs, but our free quilt block patterns would work just as well as blocks combined into a larger plant-inspired quilt. Once you've pieced together your plants, quilt them with horizontal quilt lines for a modern look that will also help to soften the pieced seam lines and give the designs a more realistic look.

Never tried foundation paper piecing before? This really clever technique involves sewing small pieces of fabric, back to front, along the lines of a paper template. We promise, it will make sense and you'll marvel at the results you can achieve! Have a read of our beginner's guide to foundation paper piecing and check out our tips below. Take your time and concentrate – the biggest challenge for us when foundation paper piecing if we try sleepy sewing!

Or if the wizardry of back-to-front foundation piecing feels like a big leap for you and you're still new to sewing patchwork with a paper base, why not try English Paper Piecing hexagons to grow your confidence? It's a different technique but it's very soothing!

This project was designed by Amanda Castor for Love Patchwork & Quilting magazine.

Our top tips for foundation paper piecing

  • When cutting the fabric pieces, each piece should be cut larger than the area of the design it is to cover, with at least ¼in seam allowance all the way around. Before stitching, check that the fabric piece will cover the entire area of the design section by holding it up to a light source.
  • You will find it easier to cut your fabric pieces as you sew each block unit, to avoid confusing small pieces.
  • Remember that your pieces of fabric are always placed on the wrong (unprinted) side of the template, then you need to flip the whole thing over to stitch each seam line on the right (printed) side of the template.
  • Shorten your stitch length when foundation piecing, to make it easier to tear away the paper foundation later.
  • Make sure you sew exactly on the template lines to ensure that your units end up the correct size.
  • When two pieces are stitched together, fold the paper foundation out of the way to trim the seam allowance down to ¼in.

Free cactus quilt patterns

You will need

Makes all three (3) cushions

  • Text print for the pots, one (1) fat eighth
  • Three (3) neon-coloured fabrics for the pots, 3in x 6in rectangle of each
  • Various print scraps for piecing the plants, about ¼yd in total
  • White fabric for block backgrounds and cushion backs, 1½yds
  • Fabric for lining, three (3) 14in squares
  • Wadding – three (3) 14in squares
  • Three (3) cushion pads each 12in square
  • Foundation paper or thin printer paper for templates
  • Three (3) copies of Pot template
  • One (1) copy of Pearl template (below)
  • One (1) copy of Aloe template (below)
  • One (1) copy of Agave template (below)

Free succulents paper piecing templates

Download our cactus quilt patterns for foundation paper piecing

Fabrics used

We've used prints from the succulents collection by Heather Givens for Windham Fabrics, and neon solids are by Riley Blake. The beauty of foundation paper piecing is these designs will also work well with small scraps of fabric from your stash.

Finished size

  • 12in square approx

Notes

  • Seam allowances are ¼in throughout, unless otherwise noted.
  • RST = right sides together.
  • Fat eighth = 9in x 21in.
Cactus quilt patterns

You will need:

  • Fabric
  • Wadding
  • Cushion pads
  • Paper (For the foundation paper piecing)
  • Sewing machine
  • Basic quilting supplies

Cutting out

Step 1

From the white background fabric cut six (6) 3½in x 12½in rectangles (two for each cushion). These pieces are sewn to the sides of the pot/plant blocks once they are pieced. The fabric pieces for the succulent and pot blocks are best cut as you foundation piece the blocks (so foundation paper piecing is great for using up scraps).

Step 2

From the white background fabric cut six (6) 8in x 12½in rectangles (two for each cushion back).

Foundation paper piecing the quilt blocks

Step 1

Use the templates provided above to piece the pots and the succulent plants. Each paper-pieced block (succulent and pot) consists of multiple units (i.e. A-D). Each unit is pieced separately and then sewn together. Each unit is numbered to show the paper piecing order.

Paper piecing the pot block

Step 1

Place a piece of pot fabric for the first section (A1) right side up on the back of the template. Make sure it covers the entire A1 space with at least a ¼in seam allowance all around. Now place the piece of fabric for the A2 section (background fabric) RST with piece A1. Make sure that at least ¼in of fabric for section A2 overlaps the seam line into section A2. Pin in place.

Step 2

Turn the template over to its right side and sew along the seam line dividing piece A1 and A2 (through the paper and fabric layers). Remove the pins, fold the paper out of the way and trim the seam allowance to ¼in. Fold back the piece of fabric to cover section A2 and press. Follow the same steps as above for sections A3 and then A4 to finish this unit. Check each time to make sure you are using the correct fabric colour.

Step 3

Repeat the same process for units B, C and D (note that piece B1 is the neon fabric). When each unit is pieced, trim to the outer dotted line on the template – this will give you a seam allowance to sew the units together. Remove the foundation papers and press the units.

Cactus paper piecing pattern

Step 4

Sew the units together as shown in Fig 1. The assembled pot block should measure 6½in square. Repeat this process to create three pot blocks in total, using a different neon fabric for each pot.

Piecing the cactus blocks

Step 1

Using the same paper-piecing process, piece the units of each succulent plant block, taking care to place the correct fabric colour in the correct position. Once pieced, remove the papers and press.

Step 2

Sew the units together as shown (Figs 2, 3 and 4). The assembled blocks should measure 6½in square.

Patchwok succulents pattern

Assembling the cushion front

Step 1

With right sides together, sew a succulent block to a pot block and press the seam open.

Step 2

With right sides together, sew one 3½in x 12½in rectangle to each side of the potted plant (Fig 5). Press the seams towards the background fabric. Repeat this for the other two cushion fronts. This completes your three cushion fronts.

Quilting

Step 1

Make a quilt sandwich by layering up one cushion front (right side down), batting and lining fabric (right side up). Quilt as desired – we used straight line quilting at ½in intervals. Repeat this process with the other two cushions and then trim each one to 12½in square.

Patchwork cactus pattern

Making up the cushion cover

Step 1

Each cushion uses two cushion back pieces to make an envelope-style cover. Take two back pieces and hem one 12½in edge of each piece. Place one cushion front right side up with the two back pieces right side down (place hemmed edges toward the centre, where they will overlap). Using a ¼in seam, sew around all four sides. Clip the corners, turn right side out and press. Insert a cushion pad to finish. Make up the other two covers in the same way.

<DIAGRAM>

Adjust the size of your side pieces to create a cushion of a different size

About the designer

Amanda Castor is a self-proclaimed fabric addict who loves to sew, craft and most importantly quilt. Her favourite type of gift to give and receive is handmade. Amanda blogs about her adventures in fabric at www.materialgirlquilts.wordpress.com so pop on over now!

These cushion designs would also work well as blocks combined into a larger plant-inspired quilt.