Stitch a festive quilt with our free two color quilt block pattern!

Make your own festive, keepsake quilt with Lynne Goldsworthy’s tutorial. Stitching her free two color quilt block pattern is going to make you feel oh so Christmassy!

Published: November 1, 2022 at 9:03 am

Lynne’s two color quilt block pattern is the perfect Christmas quilt to cosy up under this winter.

Lynne’s put a twist on a traditional hand-pieced design and adapted it for machine sewing. The two color design and half square triangle pattern will make your Christmassy fabrics pop!

It can also be easily adapted. As Lynne said herself “the design is not exclusively a Christmas one! It could be made in other colours too and would make a lovely scrappy quilt.”

Whether you’re following in Lynne’s footsteps and making a two colour Christmas quilt or you’re choosing a more neutral palette, we can guarantee this quilt will be loved by all that see it.

Now it’s over to Lynne for the tutorial!

Your free two color quilt block pattern

Top tips for your two color quilt block project

  • The quilt seam allowances are ¼in, unless otherwise noted
  • Press all seams open, unless otherwise instructed
  • Press after each seam
  • Press all fabrics well before cutting
  • Click to get the templates for your two color quilt block (called Cranberries and Cream)
  • The print fabric Lynne used for her quilt is Cranberries and Cream’ by 3 Sisters, for Moda Fabrics.
This is how your two color block quilt will look when it's finished

Finished two color quilt block size

Your finished two color quilt block will measure approximately 72in x 72in.

You will need:

  • Dark red fabric (5-6 fat quarters)
  • Light red fabric (5-6 fat quarters)
  • Cream background fabric (3¾yds)
  • Binding fabrics (½yd)
  • Backing fabric (4½yd)
  • Batting (81inch squares)
  • Templates (27 2inch)

Step 1

Cutting out your fabrics

From the dark red fabrics

Cut as follows:

  • Nine 6¼in x width of fabric a strip of fabric cut from selvedge to centre cut in the case of a fat quarter (WOFQ) strips, subcut into eighteen 6¼in x 9¼in rectangles.
  • Six 5¼in x WOFQ strips, subcut into twelve 5¼in x 10in rectangles.
  • Four 2⅜in x WOFQ strips, subcut into thirty-two 2⅜in squares – then cut in half on the diagonal to yield two triangles.

Step 2

From the light red fabrics

Cut as follows:

  • Nine 6¼in x WOFQ strips, subcut into eighteen 6¼in x 9¼in rectangles.
  • Six 5¼in x WOFQ strips, subcut into twelve 5¼in x10in rectangles.
  • Four 2⅜in x WOFQ strips, subcut into thirty-two 2⅜in squares – then cut in half on the diagonal to yield two triangles.


Step 3

From the cream background fabrics

Cut as follows:

  • Five 6¼in x WOF strips, subcut into eighteen 6¼in x 9¼in rectangles.
  • Two 5¼in x WOF strips, subcut into eight 5¼in x 10in rectangles.
  • Four 2⅜in x WOF strips, subcut into sixty-four 2⅜in squares – then cut in half on the diagonal to yield two triangles.
  • Five 3in x WOF strips, subcut into sixty-four 3in squares – then cut in half on the diagonal to yield two triangles.
  • Eighteen 2¾in x WOF strips, subcut into one hundred and twenty eight 2½in, thirty-six 4½in and thirty-six 6¾in lengths.
  • Three 2½in x WOF strips, subcut into thirty-six 2½in squares.


Step 4

Cut the border fabric into seven 5½in x WOF strips. Sew end to end and cut into two 63in and two 73in lengths.

Step 5

​​Cut the backing fabric into two equal lengths and the binding fabric into seven 2½in x WOF strips.

Step 6

Making the half square triangles for your quilt

You will make the 2in half square triangles (HSTs) in sets of twelve, using one 2in half square triangle (HST) template and two 6¼in x 9¼in fabric rectangles per set.

You will make the 1½in HSTs in sets of sixteen, using one 1½in HST template and two 5¼in x ¼in fabric rectangles per set.

This will make the following sets:

  • Nine background/dark red sets of twelve 2in HSTs.
  • Nine background/light red sets of twelve 2in HSTs
  • Nine dark red/light red sets of twelve 2in HSTs.
  • Four background/dark red sets of sixteen 1½in HSTs.
  • Four background/light red sets of sixteen 1½in HSTs.
  • Eight dark red/light red sets of sixteen 1½in HSTs.

Step 7

Pin the two fabric rectangles to the back of one of the HST templates with the red fabrics right sides together and the background fabric next to the paper.

Quilt more festive projects!

If you’ve caught the quilting bug, then make sure you check out our round-up of the best Christmas quilt patterns.

Step 8

Shorten your machine stitch to 1.5 and sew along all the red lines.

Then rotary cut the template and fabric along all the blue lines.

Step 9

Trim off the corners on each triangle, along the green lines.

Press each HST unit open and remove the paper from the back of the HST units.


Step 10

Make sixty-four half star units using the 1½in HST units, the 2⅜in HSTs (triangles cut from 2⅜in squares) and the 3in HSTs (triangles cut from 3in squares).

Step 11

free two color quilt block pattern figures 1 2 3

Following the diagram above, sew into two (2) central rows using the 2⅜in HSTs on each end.

Sew those rows together, then sew the 3in background HSTs on the top and bottom. Trim as needed.

Top Tip for your two color quilt

Throughout this piecing, take care with the placement of the dark red and light red triangles and with the orientation of the HST units.


Step 12

free two color quilt block pattern figures 4-6

Make sixty-four A blocks by sewing together the half stars made at step 11, the 2in HST units, and the background 2½in x 2¾in rectangles, following the diagram above.

Will I have any leftover blocks/HSTs?

After making these sixty-four blocks, there will still be 2in HSTs left over. Most of these are used for the thirty-six B blocks, although you will also be left with some HSTs which are not needed.


Step 13

free two color quilt block pattern figures 4

First, sew the 2½in x 2¾in background rectangles to one side of sixty-four 2in background/dark red HST units and sixty-four 2in background/light red HST units (as shown above).

Step 14

free two color quilt block pattern figures 4-6

Sew the sixty-four 2in dark red/light red HSTs and sixty-four of the half stars (made in step 11) into a four-patch, as shown above.

Step 15

free two color quilt block pattern figures 7-9

Make thirty-six B blocks by sewing together the 2in HST units, the 2½in background squares and the 2¾in x 4½in and 2¾in x 6¾in background strips, following the steps above.

First, sew the HST units and the background 2½in squares into a four-patch (the first image).

Then sew the background 2¾in x 4½in strip to one side, then the 2¾in x 6¾in background strip to the adjacent side (the second and third image).

Step 16

Following the main Layout Diagram, sew the A and B blocks into ten rows of ten, then sew those ten rows together to assemble the quilt top centre.

Step 17

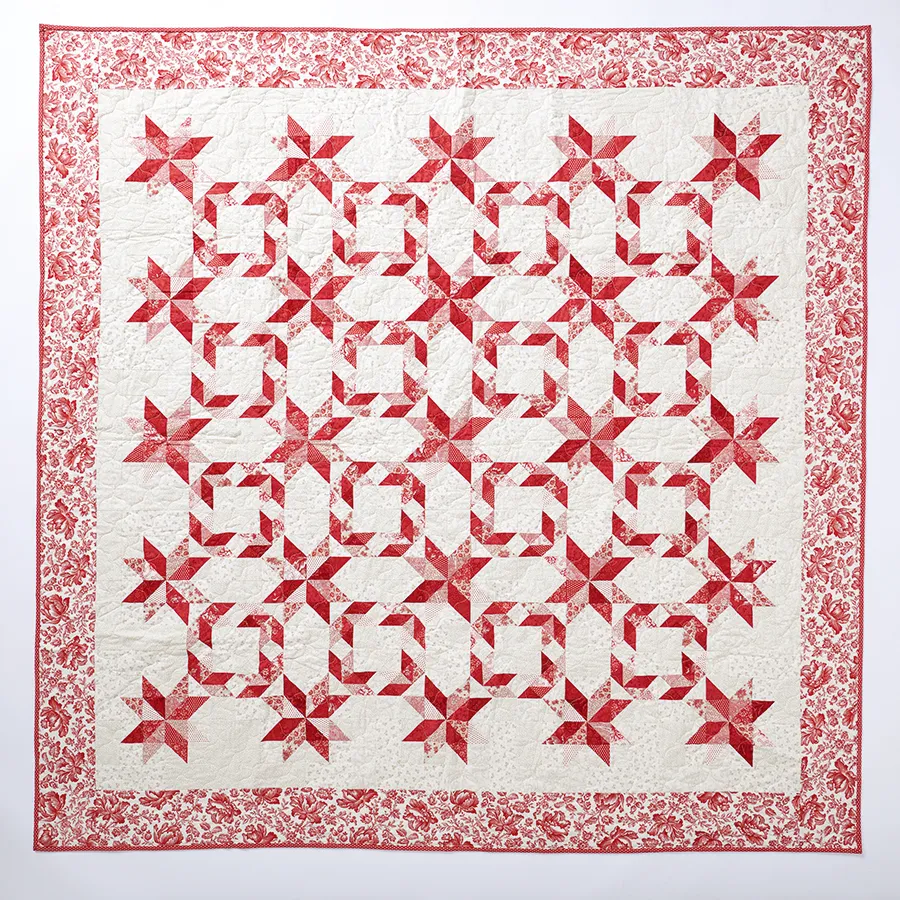
Sash the sides with the shorter border strips and the top and bottom with the longer border strips, to finish.

Step 18

free two color quilt block pattern close up of quilt

Quilting the two color quilt block pattern

Sew the two pieces of backing fabric together along the long sides using a ½in seam. Press seam open.

Step 19

Make a quilt sandwich, basting together the backing, batting, and quilt top. Lynne used Odif 505 spray for quick and easy basting.

Step 20

Quilt as desired. Lynne quilted a diagonal cross-hatch of wavy lines approximately 2in apart using a cream Aurifil 40wt thread on the front and back.

Step 21

Sew the binding strips end to end using diagonal or straight seams as preferred. Fold and press in half, wrong sides together, along the length. Bind the quilt taking care to mitre the corners.

Turn your two color quilt block into Christmas decor!

Lynne’s beautiful two color quilt block pattern makes cosy Christmas decor. The festive cranberry colours and warm fabrics make it ideal for snuggling up under with a hot chocolate.

Plus it’ll look fab thrown over the back of your sofa or spread over your bed for a touch of handmade decoration. All you need now is to pick a Christmas film to watch!

Make more Christmas quilting home projects with Gathered

You’ve got your cosy two color Christmas quilt, now you need a matching cushion! Stitch a matching Christmas patchwork cushion with our pattern.