Cutting Out
Step 1
From each of Fabrics A and B cut: Three (3) 6½in x 7½in rectangles. Use the Diamond template to trim to size.
Step 2

From each of Fabrics C and D cut:
Six (6) 4½in x 5in rectangles. Cut three (3) rectangles diagonally from left to right and three (3) diagonally from right to left to make Half-rectangle Triangles.
Step 3
From Fabric E cut:
Four (4) 1½in x 18½in strips (border).
Step 4
From Fabric F cut:
One (1) 8½in x 18½in piece (base).
Two (2) 5½in x 16in strips (handles).
Step 5
From Fabric G cut:
One (1) 12½in x 14½in piece (slip pocket).
Step 6
From Fabric H cut:
Two (2) 13½in x 18½in pieces (lining).
Step 7
From the interfacing cut:
One (1) 26½in x 18½in piece (outer).
Two (2) 5½in x 16in strips (handles).
One (1) 12½in x 7¼ in piece (slip pocket).
Making the handles
Step 1
Apply the corresponding interfacing to the wrong side of the handles.
Step 2
Fold one handle in half along the long edge, wrong sides together. Press. Open out and fold each raw edge in to meet the centre, wrong sides together. Refold the handle in half to enclose the raw edges and press. Topstitch around the outer edges to secure.
Step 3

Mark 2in from the short end of each side of the handle. Fold the handle in half lengthwise and sew between the two marks, backstitching at each end to secure your stitching.
Step 4
Repeat the process in steps 9–10 with the remaining handle piece to make the second handle.
Making the patchwork bag side panels
Step 1

Place a Fabric C Half-rectangle Triangle on opposite sides of a Fabric A diamond, centring so that the ends overlap equally each side, and stitch. Press away from the diamond. Repeat with two Fabric C triangles, cut in the opposite direction on the remaining sides of the diamond.
Step 2
Trim the block to measure 6½in x 7½in, making sure to centre the block, leaving at least a ¼in seam allowance outside each point.
Step 3
Repeat steps 12–13 with the remaining Fabric A and Fabric C pieces. Then repeat steps 12–13 using the Fabric B diamonds and Fabric D triangles. You will have a total of six blocks.
Step 4
Arrange two Fabric A/C blocks on either side of a Fabric B/D block and sew together along the long edges to make a 18½in x 7½in panel. Repeat with two Fabric B/D blocks either side of a Fabric A/D block.
Step 5
Sew a Fabric E border strip to the top and bottom of each pieced panel from step 15. Press the seams away from the diamond blocks to complete the two bag side panels.
Assembling the outer patchwork bag
Step 1
Place the Fabric F base piece right side up on your work surface, with the long edges positioned at the top and bottom. Arrange your panels from step 16 at the top and bottom, so the bottom edge of each panel is against the base piece. Sew the pieces in place to complete the outer bag panel.
Step 2

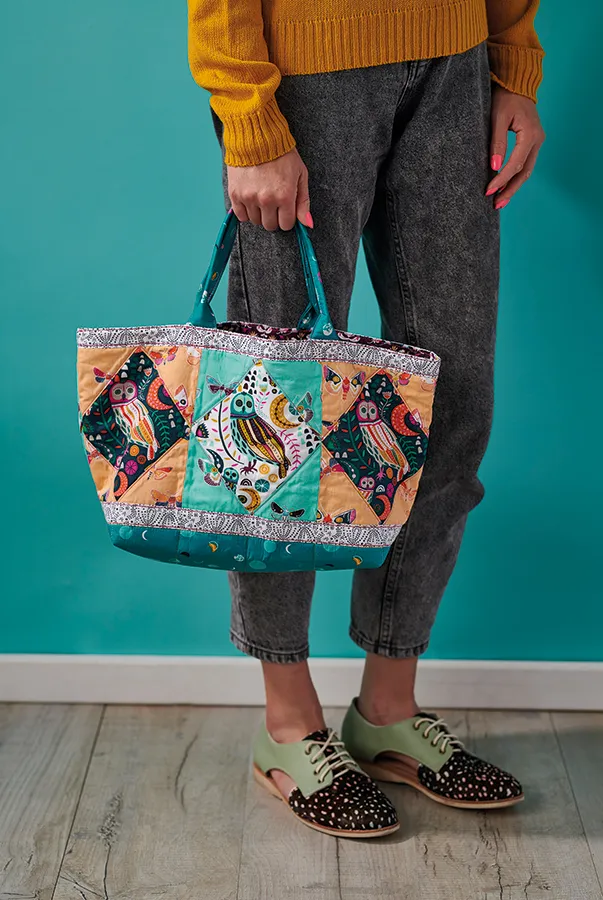
Apply the outer bag interfacing to the wrong side of the sewn panel from step 17. Then apply the fusible batting. Quilt as desired. Sonia echo quilted around the edge of the quilt blocks and border pieces.
Step 3

Mark 5 in from each edge along one diamond panel. Place a handle, aligning the outer edge of each end with one of the marks and pin in place. Baste within the seam allowance. Repeat on the other diamond panel to place the second handle.
Step 4
Fold the outer bag panel in half, carefully matching seams. Sew each side, backstitching at each end.
Step 5

Pinch the corner of the bag, so the side seam meets the bottom of the bag. Use a ruler to mark a line 3in from the corner of the bag. Sew along the marked line and trim, leaving a ¼in seam allowance. Repeat on the other corner.
Assembling the lining of the patchwork bag
Step 1
Apply the interfacing piece to the wrong side of your Fabric G pocket piece, aligning at one edge to cover half of the fabric.
Step 2
Fold the pocket piece in half, RST, so the folded piece measures 12½in x 7¼in. Sew around the outer edges, leaving an approx 6in gap along the long edge and backstitching at each end. Trim the corners and turn right side out. Push out the corners and press.
Step 3

Topstitch along the folded edge of the pocket. Note, your turning gap will still be open, and will be secured in the next step.
Step 4
Place one lining piece right side up on your work surface. Centre your pocket, placing it 3in from the bottom edge. Pin in place. Topstitch around the edge of the pocket, ensuring to catch the folded edge of the turning gap as you go.
Step 5
Place the two lining pieces RST. Stitch around the sides and bottom, leaving an approx 6in gap in the bottom for turning later. Backstitch at the beginning and end of each seam to secure.
Step 6
Box the corners of the lining as you did in step 21.
Finishing the bag
Step 1
Turn the outer bag right side out. Place inside the lining, RST, aligning seams and with the handles tucked down between the layers. Pin or clip around the top edge. Stitch around the top of the bag.
Step 2
Turn the bag right side out through the gap in the lining. Use ladder stitch to close the opening in the lining, then push the lining down inside the bag. Press around the top edge, then topstitch.
Step 3

Sew a rectangle around the handle end, pivoting with your needle down at corners. Pivot again to sew diagonally across to the opposite corner. Pivot to sew across the bottom again, going over your previous stitching line, then pivot to make the final diagonal. Backstitch to secure the thread.
Step 4
Repeat step 30 on the remaining handle ends to finish.