Cutting Out
Step 1
From each of the lime green, coral, light pink and mint green fabrics cut:
- Two (2) 4½in squares.
- One (1) 2½in square.
Step 2
From each of the teal and dark green fabrics cut:
Step 3
From the background cut:
- Nine (9) 4½in squares.
- Two (2) 2½in squares. Subcut in half on the diagonal to yield four (4) triangles.
- Four (4) 4½in x 8½in.
- Two (2) 10½in squares. Subcut in half on the diagonal to yield four (4) triangles.
Step 4
From the binding fabric cut:
Piecing the CST Units
Step 1

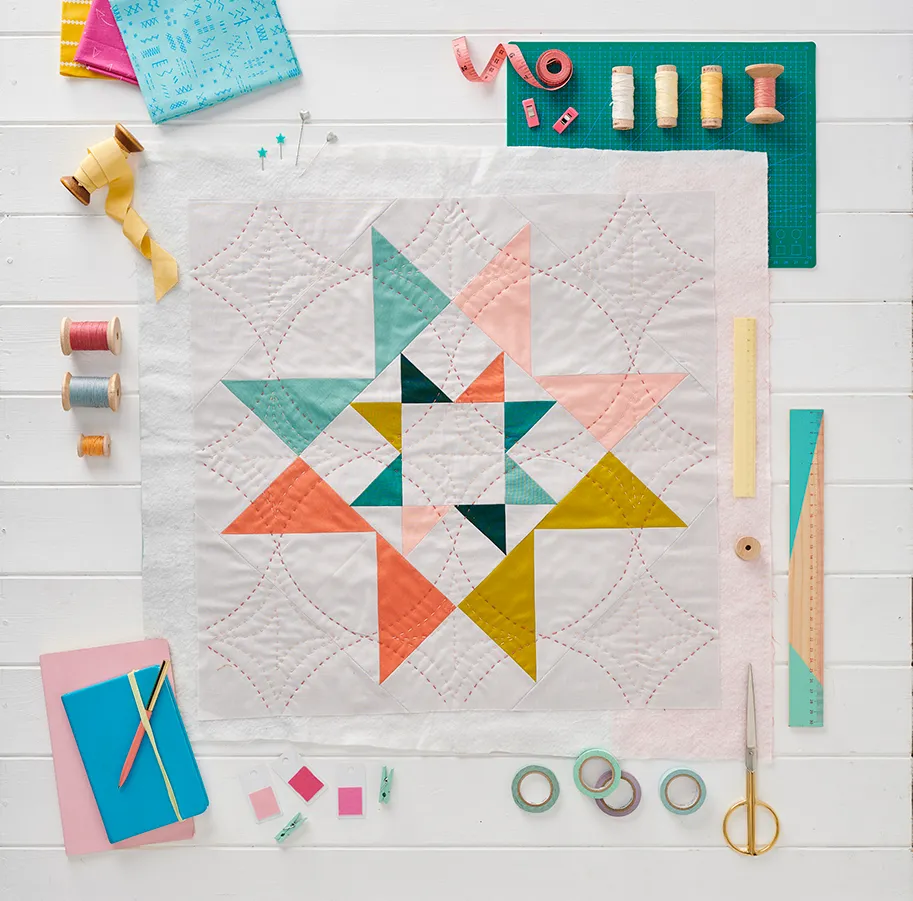
Take a background 4½in square and place a lime green 2½in square in the top left corner. Draw a diagonal line from the bottom left to top right on the reverse of the lime green square and sew across the drawn line. Trim, leaving a ¼in seam allowance and press open to make a Corner-square Triangle (CST). Repeat in the top right corner with a teal 2½in square (Fig 1).
Step 2
Repeat step 5 with the following colour combinations, to make three more CST units:
- Top left: coral, top right: dark green.
- Top left: mint green, top right: teal.
- Top left: light pink, top right: dark green.
Piecing the Flying Geese units
Step 1
Make four Flying Geese units using the background 4½in x 8½in pieces and coloured 4½in squares. For help with piecing Flying Geese units, check out our handy tutorial.
Assembling the quilt top
Step 1

Sew a 2½in background triangle either side of the teal/lime green CST unit, aligning one straight edge with the coloured CSTs (Fig 2). Repeat to sew a 2½in background triangle either side of the teal/mint green CST unit.
Step 2
Sew the last two CST units either side of a background 4½in square, along the CST edges.
Step 3

Arrange the two units from step 8½ at the top and bottom of the unit from step 9, matching seams to create a star (Fig 3). Turn the star 45-degrees and trim on-point to 8 in square. Align the 4¼in marks on your quilt ruler with the square centre.
Step 4

Join a 4½in x 8½in FG unit to the left and right sides of your star block. Sew a background 4½in square to either side of your remaining two FG units and join to the remaining sides of the star block, matching seams (Fig 4).
Step 5

Sew a background 10½in a triangle to each side of the mini quilt, carefully centering the triangles on the Flying Geese units (Fig 5). Rotate the mini quilt 45-degrees and square up to 20in, carefully centering the star.
Quilting and Finishing
Step 1
Press the quilt top and backing well. Make a quilt sandwich by placing the backing fabric right side down, the batting on top, then place the quilt top centrally and right side up. Baste the layers together using your preferred method.
Step 2
Quilt as desired. Anna hand quilted diagonal straight lines. Trim off the excess batting and backing fabric and square up the quilt to 20in square.
Step 3
Sew the binding strips together end-to-end using diagonal seams. Press the seams open. Fold in half lengthways, wrong sides together, and press. Sew the binding to the right side of the quilt, creating a mitre at each corner. Fold the binding over to the back and hand stitch in place to finish.