All the products we feature on Gathered have been chosen independently by our editorial team. We may get a small commission if you click on any products you see on this page. Learn more.

Stitch a cute mini quilt using the quilt as you go technique

Build up a quilt gradually using this eco-friendly quilt as you go method. Get started with our helpful guide!

Quilt as you go

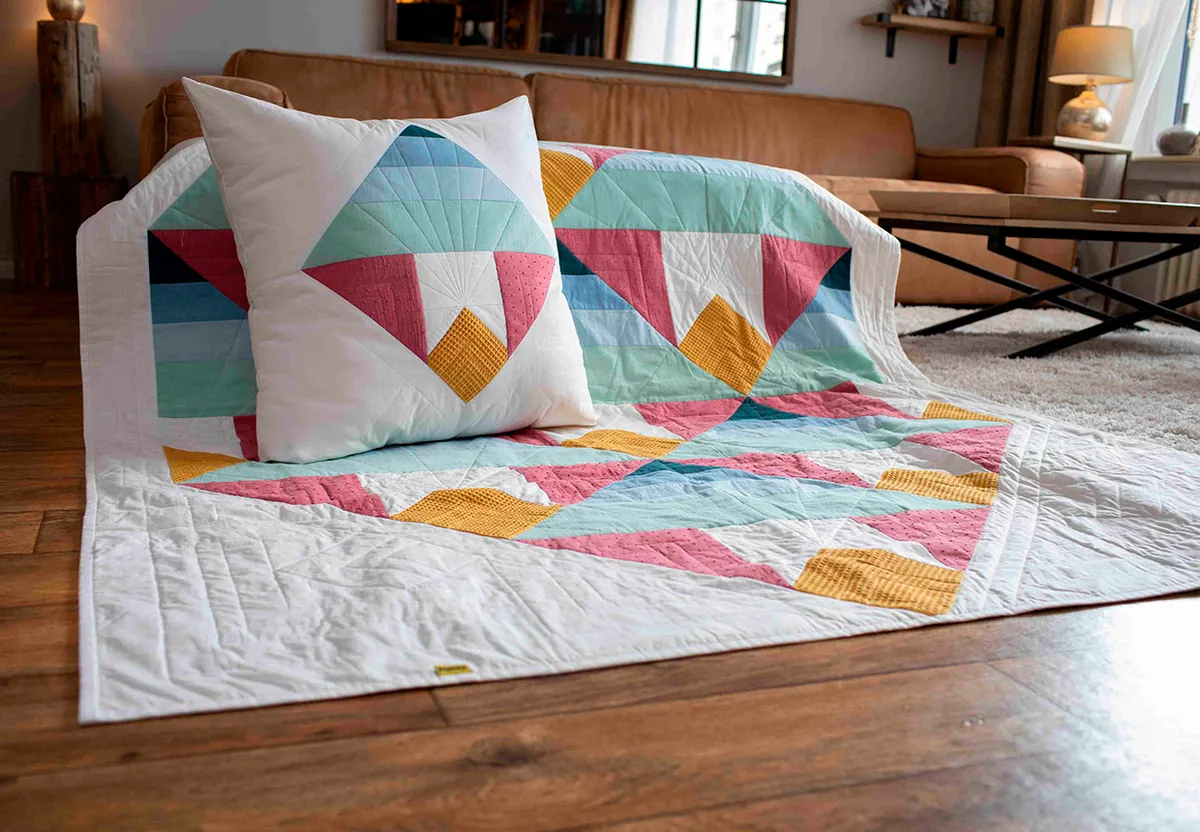
Quilt as you go is a brilliant quilting technique to try if you want to quilt more sustainably. It’s a great way to use up fabric and wadding left over from other projects.

If you like to do things in small steps, quilt as you go may just be your new favourite technique. Stitch your quilting lines as you build up your design, using individual blocks and off cuts of wadding.

This is a fantastic method for beginners to try because you quilt your blocks before assembling them, making the task a lot easier. You don’t need a long-arm quilting machine to quilt as you go either – a standard domestic sewing machine is perfect for this technique.

And the best bit? Your loose threads will be lost in the seams too, so no thread ends to bury!

We’ve created a fabulous mini quilt design to help you get to grips with the quilt as you go technique, but first you’ll need to choose the right wadding for the job.


Choose the right wadding for your quilt from Vlieseline

Vlieseline wadding

Wadding (or batting) is the filling that goes inside your quilt, forming a sandwich between the quilt top and the backing fabric. Adding wadding makes your finished quilt thick and cosy.

Wadding is sold in a variety of thicknesses and materials, so it’s worth doing your research to pick the correct kind of wadding for your project.

If you’re an experienced quilter, you’re likely to have encountered products from Vlieseline before. Vlieseline has a fantastic reputation for producing high-quality wadding and interlining options for all of your sewing and quilting projects.

They’re constantly reviewing their products to ensure they’re as environmentally friendly as possible, making use of natural fibres such as wool and cotton.

The company is committed to reducing their carbon footprint and creating products that help crafters to make sustainable choices.

Their range includes waddings made from renewable raw fibres including bamboo and soya. These natural materials are breathable, have a high moisture absorption capacity and won’t build up a static charge.

Many of the waddings below include scrim to give your quilt more stability and support. The scrim is lightweight and all the waddings feel beautifully soft to the touch.

In addition to waddings, Vlieseline also offers a variety of useful aids for patchworking such as a quickscreen triangle, quickscreen square and quilter’s grid.

Here are some recommended Vlieseline waddings for your quilt as you go project:

Bamboo mix wadding

Bamboo is an incredibly sustainable material: it grows rapidly and the plant will regenerate after harvesting. It also requires less water and pesticides than other plants that are used to manufacture textiles.

Vlieseline’s bamboo mix wadding is naturally antibacterial, breathable and soft. It has a luxurious feel and a very smooth texture.

This wadding is made from 47% bamboo and 46% cotton with polypropylene scrim. It’s available in 244cm width.

Find out more about Vlieseline bamboo mix wadding.

Soya mix wadding

If you’re looking for super-soft, eco-friendly wadding then soya mix is a fantastic choice. Made with extremely soft natural fibres, soya mix wadding has a beautifully smooth finish. It feels more luxurious than most traditional waddings too! Soya fabric is sometimes called “vegetable cashmere” because of its silky texture.

This soya mix wadding is a blend of natural and synthetic fibres, combining the best qualities of both. It has the soft texture and moisture absorption of soya, while the synthetic fibres are anti-crease and help the material to dry more quickly.

Soya regrows quickly, making it a great material for sustainable fabrics.

Vlieseline’s soya mix wadding is made up of 50% soya and 50% cotton with polypropylene scrim. It’s available in widths of 152cm.

Learn more about Vlieseline soya mix wadding.

Cotton mix wadding

This high-quality cotton mix wadding from Vlieseline is made from 80% cotton, so you’ll get all of the comfort of cotton paired with the durability and stability of polyester.

Cotton is very breathable, making it the perfect wadding for your next quilting project! It also holds its shape well, so you don’t need to worry about fibre migration.

This wadding contains a high percentage of cotton (80%), blended with 20% polyester. It’s available in widths of 244cm and 300cm with a polypropylene scrim.

Discover Vlieseline’s cotton mix wadding.

100% bleached cotton wadding

When working with lighter fabrics it’s a good idea to choose a bleached wadding as this won’t show through the outer layers of fabric.

This 100% bleached sew-in cotton wadding has been specially designed for use with lighter coloured fabrics. It’s also lightweight, so this is an excellent choice if you don’t want your finished quilt to feel too bulky.

It’s available in a 244cm width with a polypropylene scrim.

Take a closer look at Vlieseline’s 100% bleached cotton wadding.


How to quilt as you go

Get the hang of the quilt as you go technique by making a simple Log Cabin block! From there we’ll show you how to stitch your blocks together.

Then you can put your new skills into practice by making a love mini quilt.

Advertisement

You Will Need

  • Selection of blue and low volume fabrics
  • Wadding (Four 8in squares)
  • Binding fabric (one (1) fat eighth)
  • Backing (14in square)
  • Sewing machine
  • Iron

Total time:

Making a block

Step 1

Cutting the wadding

Cut a piece of wadding approx 1½in larger than the finished block size you want to achieve. Fold in half vertically and crease to mark the centre. Repeat this to crease horizontally. This will mark the centre of the wadding.

Step 2

Position the wadding and quilt in place

Take a square of fabric and place right side up in the centre of the wadding.

Quilt in place as desired. Kate quilted vertical lines on her square, outlining the striped pattern of her fabric (Fig A).

Quilt as you go fig A
Fig A

Step 3

Start adding strips

Cut a strip of fabric to the same length as the quilted square (it’s ok if it’s slightly longer).

Place the piece RST with the quilted square and sew together using a ¼in seam (Fig B).

Quilt as you go fig B
Fig B

Press the fabric away from the centre and quilt in place (Fig C).

Quilt as you go fig C
Fig C

Step 4

Turn the block

Turn the wadding, so the strip you just added is at the bottom.

Cut another strip to size and place RST with the quilted centre (Fig D).

Quilt as you go fig D
Fig D

Sew, press and quilt the strip in place, as you did in step 3.

Step 5

Keep building the log cabin pattern

Continue adding strips around the centre, quilting each piece as it is joined to the block and making sure that you keep working in the same direction (Figs E–F).

Quilt as you go fig E
Fig E

Quilt as you go fig F
Fig F


Step 6

Centring your block

Once you have reached the desired size for your block, square up, carefully centring the block.

Make sure to cut ½in larger than the finished size to account for your joining seam allowances.

How to join quilt as you go blocks

Step 1

Adding binding and trimming the wadding

To join the quilt as you go blocks together, place lines, or add more decorative layers of quilting.

Trim off any excess backing fabric and then finish your quilt with binding as you normally would. RST and sew using a ¼in seam, as you normally would.

Then, carefully trim away the wadding from the seam allowance on each side (Fig G).

Quilt as you go fig G
Fig G

Press seams open (Fig H).

Quilt as you go fig H
Fig H

Step 2

Basting the layers together

To finish, place your backing fabric wrong side up.

Place the pieced and quilted top centrally and right side up on top of the backing fabric.

Baste the two layers together.

Step 3

Joining the backing to the quilt top

Stitch through all the layers to join the backing to the quilt top. You can stitch in the ditch along the main seam lines, or add more decorative layers of quilting.

Trim off any excess backing fabric and then finish your quilt with binding as you normally would.


How to make a love mini quilt using the quilt as you go method

Step 1

Use the chart below to assemble your quilt blocks.

Quilt as you go chart

Cutting out the “L” block

From the blue fabrics cut:

  • One (1) 1½in x 3½in (4).
  • One (1) 1½in x 4½in (5).

From the low volume fabrics cut:

  • One (1) 2½in square (1).
  • One (1) 1½in x 2½in (2).
  • One (1) 1½in x 3½in (3).
  • One (1) 1½in x 4½in (6).
  • Two (2) 1½in x 5½in (7 and 8).
  • One (1) 1½in x 6½in (9).

Step 2

Cutting out the “O” block

From the blue fabrics cut:

  • One (1) 1½in x 2½in (2).
  • Two (2) 1½in x 3½in (3 and 4).
  • One (1) 1½in x 4½in (5).
  • One (1) 1½in x 4½in (6).
  • Two (2) 1½in x 5½in (7 and 8).
  • One (1) 1½in x 6½in.

Step 3

Cutting out the “V” block

From the blue fabrics cut:

  • One (1) 2½in x 4½in (Flying Geese).
  • Two (2) 1½in x 2½in (2 and 3).

From the low volume fabrics cut:

  • Three (3) 2½in squares (1 and Flying Geese).
  • One (1) 1½in x 4½in (5).
  • Two (2) 1½in x 5½in (6 and 7).
  • One (1) 1½in x 6½in (8).

Step 4

Cutting out the “E” block

From the blue fabrics cut:

  • One (1) 2½in x 3½in (1).
  • One (1) 1½in x 3½in (3).
  • One (1) 1½in x 4½in (4).

From the low volume fabrics cut:

  • One (1) 1½in x 3½in (2).
  • One (1) 1½in x 4½in (5).
  • Two (2) 1½in x 5½in (6 and 7).
  • One (1) 1½in x 6½in (8).

Step 5

Making the “L” and “O” blocks

Follow steps 1–5 of the ‘Making a block’ section of the tutorial to make the ‘L’ and ‘O’ blocks, referring to Figs 1–2 for fabric placement and sewing the strips in numerical order from 1 to 9.

Step 6

Sewing the “V” block

Make a flying geese unit as follows. Take the blue 2½in x 4½in piece and place a low volume 2½in square RST at one end.

Draw a diagonal line on the wrong side of the square.

Sew directly along the marked line, trim a ¼in seam allowance and press the unit open.

Repeat for the other corner (Fig 3).

If you’ve never used this technique before, check out our flying geese guide for more tips.

Make the ‘V’ block, referring to Fig 4 for fabric placement.

Begin with piece 1 just above the centre, using the quilt as you go method.

Add strips 2 and 3, then add the Flying Geese unit. Continue with strips 5–8.


Step 7

Assembling the “E” block

Make the E block, referring to Fig 5 for fabric placement.

Begin with piece 1 just below the top, using the quilt as you go method.

Continue adding the strips in numerical order.

Finishing your quilt as you go project

Step 1

Trimming the blocks

Trim each of the quilt as you go blocks to 6½in square, carefully centering the blocks.

Step 2

Arranging the blocks

Arrange the blocks in a four-patch referring to the photography for placement.

Join the blocks together and add the backing fabric as in steps 1–3 of the ‘Joining blocks’ section of the tutorial.

Step 3

Binding your completed quilt

Cut three 2½in strips from your binding fabric and join end-to-end using diagonal seams.

Press the seams and press in half lengthways, WST.

Use to bind the mini quilt.

Quilt as you go

Advertisement

Why the quilt as you go technique is ideal for beginners

If you’re new to quilting, quilt as you go is a very handy technique to add to your repertoire. Using this method, you can build a quilt gradually and in a much more manageable way.

There’s no need to buy a long arm quilting machine to quilt as you go, as you’re simply quilting a block at a time. A standard domestic sewing machine will do the job!

Quilt as you go is also ideal for anyone who wants to quilt more sustainably, as you can easily use up scraps of fabric from past quilting projects.

You can boost your green credentials by choosing a sustainable wadding for your quilt too!

Find the perfect Vlieseline wadding for your next quilting project

Whether you’re making a quick quilt as you go project or getting ready to stitch an heirloom quilt, choosing the right wadding for the task is an important step.

Vlieseline has a wonderful range of waddings to choose from, including many sustainable options such as bamboo and soya. Explore Vlieseline’s wadding range to find the right one for your next project!