Cutting out
Step 1
Trace the templates provided (see our DIY stocking template) onto card: the Stocking template (cut two templates – one to the lower edge and one to the top edge), the Reverse Appliqué template and the Heel and Toe templates. Cut out the templates carefully.
Step 2
Use the shorter stocking template to cut one piece from the stocking outer fabric, then flip the template over and cut a second piece (the two pieces will be mirror images). Repeat this process with the lining fabric.
Step 3
Use the longer stocking template to cut two pieces of interfacing and two pieces of fleece, flipping the template over so that you have mirror image pieces, as before.
Step 4
From your chosen print fabric cut four (4) pieces 2in x 7½in, for the stocking tops. Set aside the remaining fabric for the heel and toe pieces.
Step 5
From the fabric scraps cut four (4) 1½in squares for the centre of the star motif. Cut four (4) 2in squares and then cut them each in half along the diagonal.
Step 6
From the white fabric cut four (4) rectangles 2½in x 1½in and four (4) 1½in squares.
Pi
Step 1
Start by making the four-patch centre. Take two 1½in squares (cut from fabric scraps) and stitch together (Fig a) then repeat with the remaining two squares. Press the seams in opposite directions, and then stitch together to form a four-patch square (Fig b). Press the centre seam open.

Step 2
To make the flying geese units for the star points, take one of the white fabric rectangles and, working on the right side of the fabric, measure 1⁄4in from the long side and 11⁄4in in from the short side and mark this point (Fig c). Use a quilting ruler and line up this dot and the top corner of the rectangle on the first 1⁄4in line on the ruler. Draw a line to create a triangle shape (Fig d). Repeat on the other side of the rectangle.
Step 3
Place one of the print triangles right sides together with the rectangle, with the long edge of the triangle against one of the lines you have drawn (Fig e). Sew with a 1⁄4in seam, taking care not to stretch the long edge of the triangle (Fig f). Fold, press and trim off any excess print fabric – don’t trim anything from the white rectangle (Fig g).
Repeat with another triangle on the other side of the rectangle (Fig h).

Step 4
Repeat this process with the other rectangles and triangles.
Step 5
To assemble the block, stitch two of the flying geese units to either side of the central square. Press the seams towards the centre of the block.
Step 6
Stitch the 11⁄4in white squares to the two short edges of the remaining flying geese units. Press the seams towards the white squares (Fig i).
Step 7
Stitch the three rows together and press the two final seams open.
Adding heel and toe appliqué
Step 1
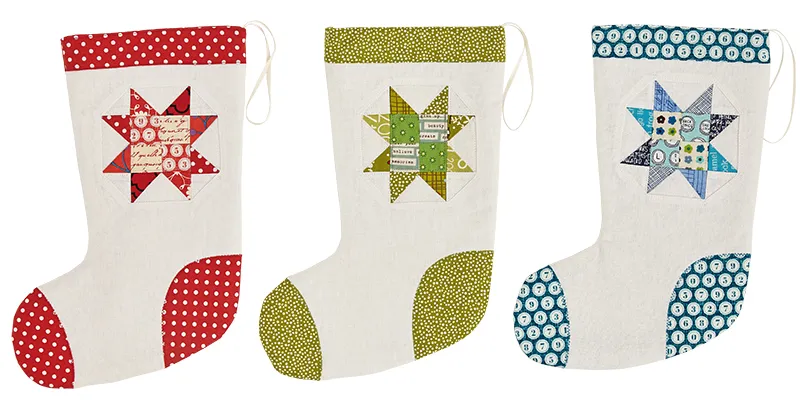
Trace round the heel template on to the paper side of the piece of Fusible web. Flip the template over and trace again to create a mirror image tracing. Repeat this process with the toe template. Roughly cut out the four fusible web pieces leaving about ¼in around the edge. Press the fusible web pieces on to the wrong side of the heel and toe fabric and then cut out neatly on the traced line. Peel off the backing paper and fuse in position on the two stocking outer pieces, using the photographs below as a guide.
Adding the stocking top
Step 1
Place a stocking top piece right sides together at the top of a stocking outer piece. Pin, stitch and then press the seam towards the top of the stocking (Fig j). Repeat with the other outer stocking piece and for the two lining pieces. Use the larger stocking template to trim all four stocking pieces to shape.
Stitching the reverse appliqué
Step 1
Apply the lightweight interfacing to the back of the stocking lining pieces, following the manufacturer’s instructions. Apply fusible fleece to the outer stocking piece that you want to be at the back.
Step 2
Cut a piece of freezer paper 6in square. Place the reverse appliqué template in the middle of the paper and trace around it. Cut out the octagon shape in the middle and discard it (Fig k). Place the freezer paper, shiny side down, on the wrong side of the stocking front. Position it centrally, with one of the cut-out edges positioned 3⁄4in below the seam line of the stocking edging. Temporarily stick the freezer paper into place by ironing it. Mark a line on the stocking about 1⁄2in inside the freezer paper cut-out (Fig l).
Step 3
Cut out the fabric within the line you’ve marked. Snip the fabric at all the angles between the fabric edge and the freezer paper (but not through the freezer paper). Fold back the fabric to the edge of the freezer paper template and press thoroughly to create a sharp edge (Fig m). Remove the freezer paper. At this stage you could use a little bit of fabric glue to hold the folded fabric in place whilst you position the star.

Step 4
Place the patchwork star on a work surface, right side up, and place the stocking on top, also right side up. Line them up so the star is nicely positioned in the hole you have made. Pin the star into position, and if you want to, use a little dab of fabric glue to hold it in place (Fig n).
Step 5
Working on the right side of the stocking, stitch around the edge of the star to secure it. Trim off the excess star fabric on the back of the stocking outer.
Quilting and finishing
Step 1
Now apply the other piece of fusible fleece to the front section of the stocking. Quilt the star however you like. Use a small machine zigzag stitch to topstitch the edge of the toe and heel appliqué on both the stocking outer pieces. If you like, you can also put a line of straight stitching close to the bottom edge of the stocking tops.
Step 2
Put the stocking outer pieces right sides together and stitch together. Repeat for the stocking lining pieces, stitching with a generous 1⁄4in seam and leaving a 5in turning hole in the back seam of the lining section. Clip and notch the curves of the stocking sections as indicated (Fig o). Press the stocking inner and outer very thoroughly.
Step 3
Fold an 8in piece of ribbon in half. Align its raw edges with the top edge of the stocking outer on the back seam and pin in place (Fig p).
Step 4
Turn the lining section of the stocking inside out and tuck the outer section inside the lining, so that the two sections are right sides together with the ribbon sandwiched between them. Stitch around the top of the stocking. Turn the stocking right way out through the hole in the lining and stitch up the turning hole. Press the top seam thoroughly and then topstitch the top edge of the stocking to finish off.