Free children's apron pattern

Sew your own kiddies apron with Kirsty Hartley's sunshine pattern!

Try 6 issues of your choice of craft magazine from just £9.99

Published: November 6, 2022 at 8:12 am

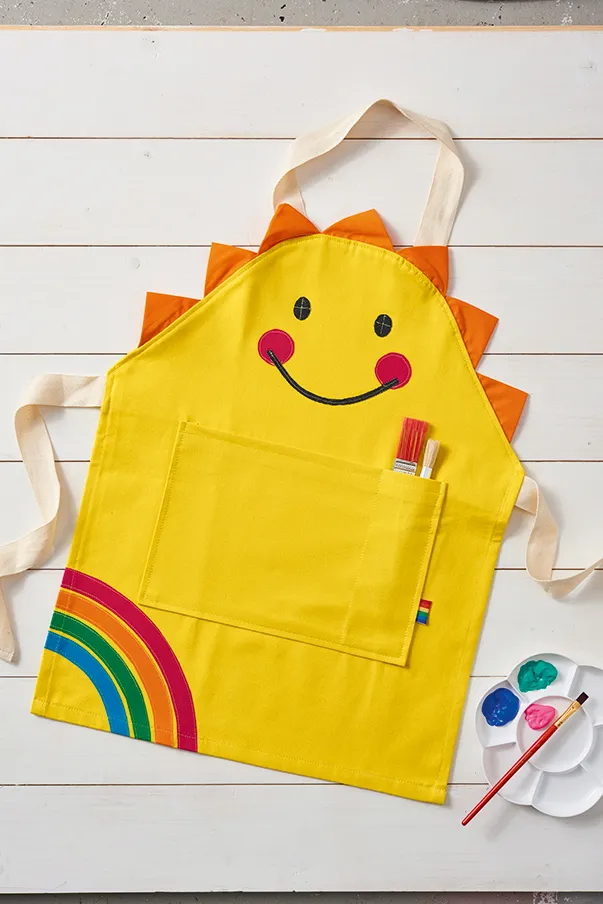
Mini makers will craft up a storm in Kirsty Hartley’s cheery apron! Kids love getting messy, and in this bright, smiley apron they can express their creative side as much as they like, without you having to wash paint/glue/cake mix out of their clothes after. Not only will this cheery sew keep them clean, they’ll look like a little ray of sunshine wearing it.

It’s a one-size-fits-all pattern designed for one- to four-year olds, but you can adjust the sizing by adapting the templates if your child is older or taller. And, for a personal touch, appliqué their name onto the pocket using scrap fabric. We’ve used a sturdy cotton canvas for a robust make that’ll wash well, but you could swap it for an oilcloth fabric to keep your little Picassos paint-proof.

If you enjoy sewing this children's apron then check out our other patterns for kids. We have everything from how to make a dragon costume to a patchwork baby ball DIY!

You will need

  • Yellow cotton canvas fabric, 50cm (19¾")
  • Cotton webbing tape, 150cm (59⅛"), 3cm (1¼") wide
  • Fusible interfacing
  • Orange cotton fabric, 1 fat quarter
  • Scrap fabrics in red, blue, green and black
  • Yellow sewing thread
  • Templates from Mollie Makes issue 78

If you’re new to sewing, you might find it helpful to take a look at some of our beginner guides. Head over to our sewing for beginners, how to use a sewing machine, sewing kits for beginners and best sewing machines for beginners guides before you get started.

Free children's apron pattern

You will need:

  • Yellow cotton canvas fabric
  • Cotton webbing tape
  • Fusible interfacing
  • Orange cotton fabric
  • Scrap fabrics
  • Yellow sewing thread

Step 1

Free children’s apron pattern step 1

Using the templates, cut a main apron piece, a pocket piece and a facing piece from the yellow fabric, adding a 1.5cm (⅝") seam allowance all around.

Step 2

Cut the cotton webbing into three 50cm (19¾") pieces to form the neck strap and two ties.

Step 3

Fold one long edge of the pocket piece to the wrong side (WS) by 1cm (⅜"). Fold over again by 1cm (⅜"), press, then sew in place. This will form the top opening of your pocket.

Step 4

Press the remaining pocket edges to the WS by 1cm (⅜"). Pin to the right side (RS) of the main apron piece, RS up, using the template diagram as a guide. Sew around the sides and bottom, 0.5cm (¼") in from the edge, leaving the top of the pocket open. If you want to divide the pocket into two sections, sew an additional vertical line, 7cm (2¾") in from the right side of the pocket.

Step 5

Free children’s apron pattern step 2

Fold over one short end on a cotton webbing piece by 1cm (⅜"). Fold over to the same side by 1cm (⅜") again, then sew in place. Repeat with another webbing piece – these will form the two ties.

Step 6

Fold the bottom long edge of the facing piece to the WS by 1cm (⅜"), press, then sew in place.


Step 7

Free children’s apron pattern step 3
Free children’s apron pattern step 4

Following the manufacturer’s instructions, iron the fusible interfacing to the WS of the scrap fabrics. Cut out the face and rainbow pieces from the corresponding fabrics using the templates, then peel off the backing and position them onto the apron piece, using the template diagram as a guide.

Step 8

Free children’s apron pattern step 5
Free children’s apron pattern step 6

Press the appliqué shapes in place, then topstitch around each shape, 2mm (⅛") in from the edge.

Step 9

Pin the two short ends of the neck strap to the RS of the apron, using the template diagram as a guide, and aligning the raw edges. The loop of the strap should hang down across the face detail.


Step 10

Free children’s apron pattern step 7

To make the sun’s rays, cut seven 10cm (4") squares of orange fabric. With WS facing, fold one square in half along the width and press. Take the folded corners down to the centre of the long raw edge to create a triangle shape, then press again. Repeat with the remaining six squares of fabric.

Step 11

Free children's apron pattern step 8

With RS facing, pin the triangles around the top of the apron piece as shown, aligning the raw edges. Start by positioning one triangle centrally at the top, then work your way out along either side. Sew the rays and the neck strap in place, 0.5cm (¼") in from the edge.

Step 12

Free children's apron pattern step 9

Pin the raw short edges of the ties to the RS of the apron, using the template diagram as a guide, and aligning the raw edges. With RS facing and, again, aligning the raw edges, pin the facing piece to the apron piece. Sew around the outside, 0.5cm (¼") in from the edge, securing the ties as you go. Turn through to the RS and press.

Step 13

Free children's apron pattern step 10

To hem the bottom and sides of the apron, fold the edges over to the WS by 1cm (⅜") and press in place. Fold over by 1cm (⅜") again, press, then sew in place. Press the completed apron to finish.

Free children’s apron pattern

We hope you’ve enjoyed sewing our free children’s apron pattern. For more fun kids’ sewing projects check out our how to sew a cute DIY baby mobile and how to make a hooded baby towel tutorials.