All products were chosen independently by our editorial team. This review contains affiliate links and we may receive a commission for purchases made. Please read our affiliates FAQ page to find out more.

Fix your clothes: How to sew on a patch!

Give your broken garments a new lease of life by learning how to sew on a patch by hand.

6 issues of Simply Sewing magazine for £14.99|Save 78%!

Published: June 27, 2023 at 8:55 am

Start your sustainable sewing journey by learning how to sew on a patch! This essential mending technique will allow you to easily fix your favourite garments. Patches can also add some unique style to your items.

In this tutorial, we’re going to show you how to sew on a patch by hand and how to make your own patch from fabric.

Alternatively, you can purchase patches online and use this method to attach them to your clothes. Always read the instructions first as some patches are designed to be ironed on as opposed to sewn on.

We’ve chosen an oval shape for our patch, but if you’d like something different, opt for another shape such as stars, triangles or diamonds. The whole family will want elbow patches on their jackets once they’ve seen yours.

Keep reading to learn how to sew on a patch and remember you can use this technique to fix any clothing items – not just denim jackets!

sewing projects shot in the studio

How to sew on a patch by hand

You will need:

  • Faux suede fabric or any fabric of your choice for the patch
  • Thread to match the fabric (ours is Gütermann polyester col. 650)
  • Needle
  • Scissors and cutting mat
  • Iron
  • Pins
  • Air or water erasable pen
  • The garment you want to fix

Step 1

Creating your fabric patch

How to sew on a patch by hand step 1

Create and cut out a template for your desired elbow patch shape using some card (in this case an oval).

Place it on the wrong side (WS) of the fabric and draw around it four times with the erasable pen, leaving a gap between each one.

Cut out the four ovals 1cm (⅜in) outside the drawn line. This will be your seam allowance when you stitch them together.

Step 2

How to sew on a patch by hand step 2

Pin two oval pieces right sides (RS) together, then stitch along the drawn line leaving a gap for turning the patch RS out.

Either use pinking shears or cut around the oval, clipping curves.

Don’t cut the turning gap though.

Turn RS out and press. Repeat with the other two ovals.

Step 3

How to sew on a patch by hand step 3

Once you’ve turned the oval RS out, you can then sew the gap closed.

Use a small, neat slip stitch through both edges using matching thread so that your stitches don’t show up.

Repeat with the other oval.

Step 4

Lining your patches on your garment

How to sew on a patch by hand step 4

Put on your denim jacket and mark, with a pin, the centre of where your elbow comes on one sleeve.

Take off the jacket and measure to mark this same point on the other sleeve.

Match up the centre point of the oval patches with the mark on your sleeves and pin them in place.


Give your garments a makeover

Now you’ve mastered how to sew on a patch why not try your hand at visible mending? It’s another fun way of fixing your clothes.


Step 5

How to sew on a patch by hand step 5

It’s worth trying on your jacket again at this stage to make sure you are happy with how the patches look.

If you feel they are slightly out of place then it’s easy to move and re-pin them.

Once they look right, tack both of your patches in place ready to attach them with blanket stitch.

Step 6

How to sew your patches on by hand

How to sew on a patch by hand step 6

Draw around the edge of the patch with an erasable pen, then draw another line 5mm (¼in) from the edge of the patch.

Take your needle out through the sleeve on the drawn line then in through the patch line 5mm (¼in) away to the right, then come out through the sleeve again.

Step 7

How to sew on a patch by hand step 7

This forms your first stitch – make sure the thread is under your needle.

Sew around the whole of the patch in the same way. Every now and then lay your work flat in front of you to check your stitches are evenly spaced.

Step 8

How to sew on a patch by hand step 8

To finish a row of blanket stitches, place your needle back into the jacket close to the last place where your thread emerged.

Pull the thread through to the back of the jacket and secure it by working through a few stitches on the back.

Step 9

How to sew on a patch by hand step 9

You will need to use more than one length of thread for stitching.

Start a new thread by coming up through the same place that you finished the last stitch.

Step 10

How to sew on a patch by hand step 10

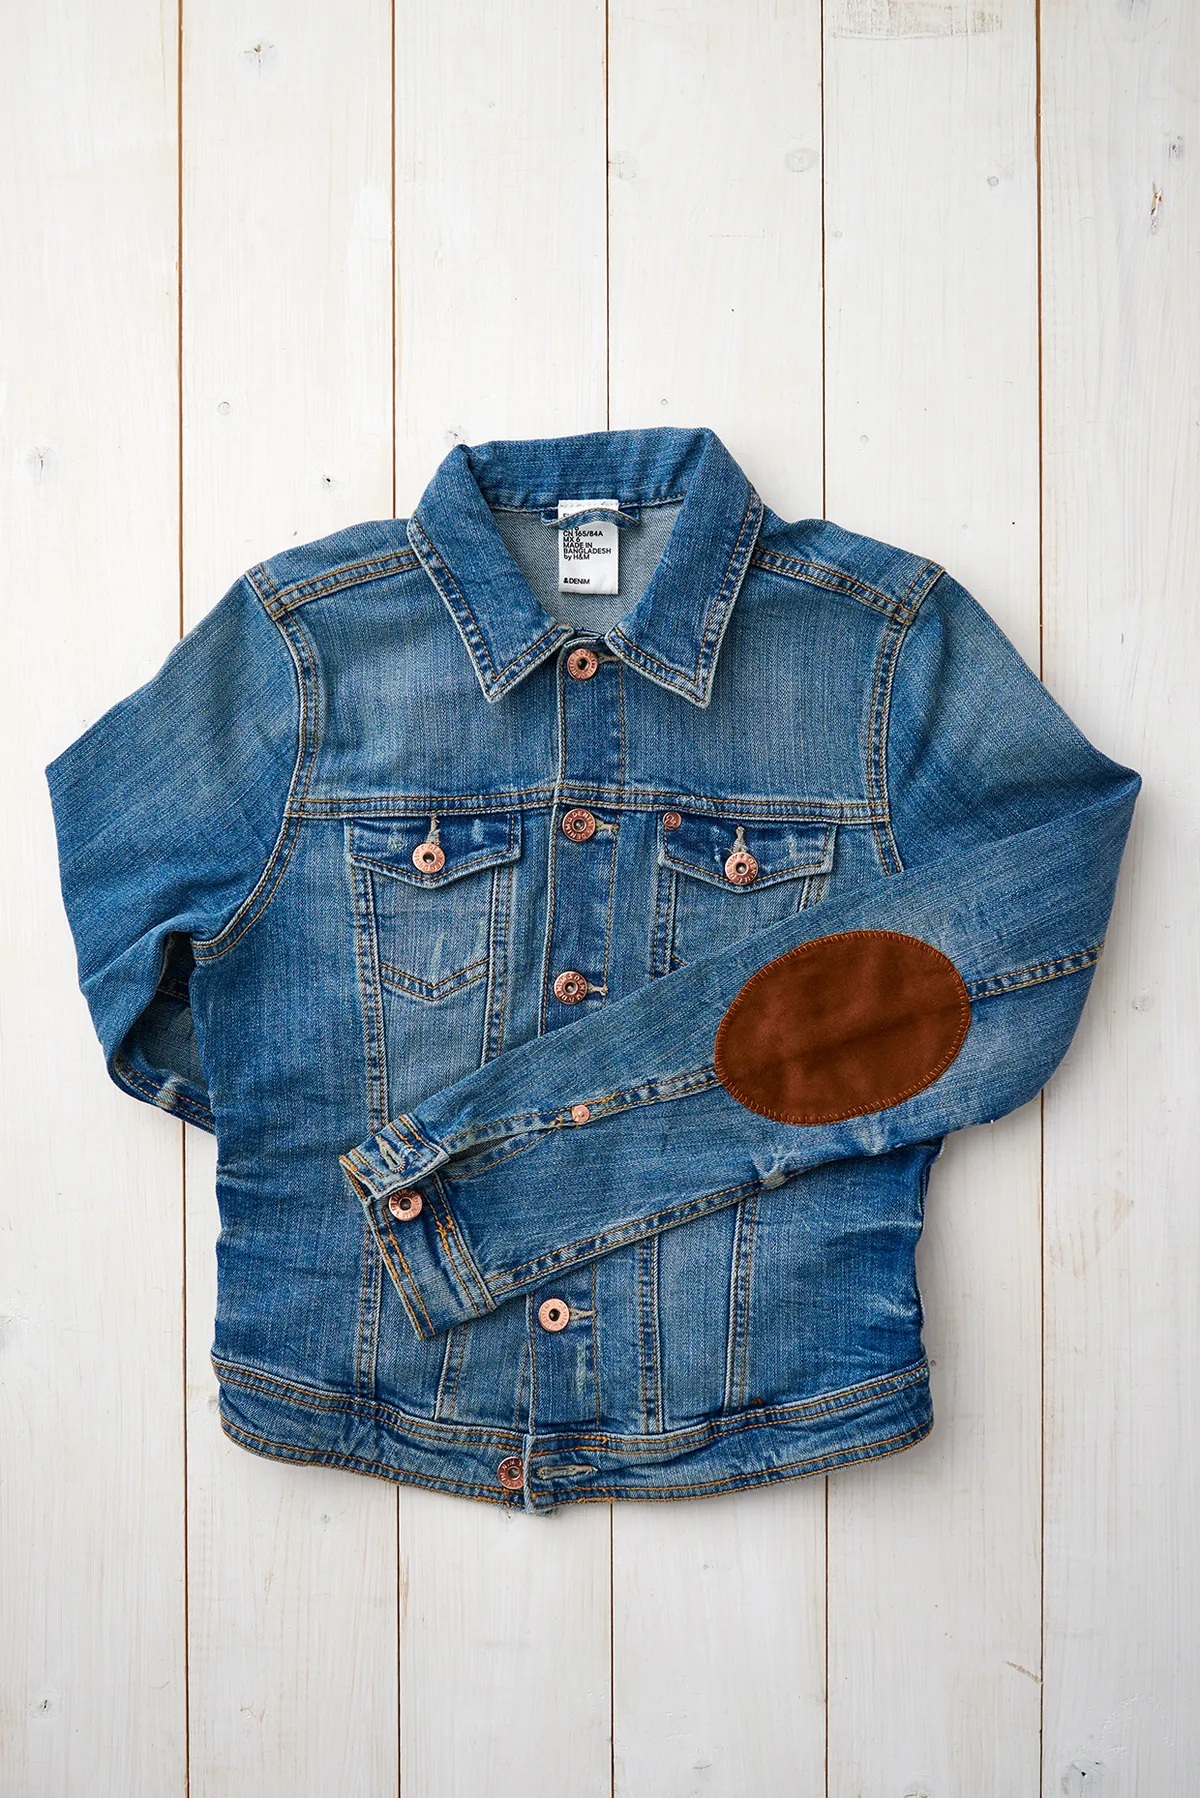
Your patches will look like this once they’re finished.

Use a matching thread or, if you want to make the stitches stand out, use a contrasting colour.

Model Nicki wearing blue and white stripy top against white T&G wall with leather patches

Patch up your clothes with ease!

Once you’ve learned how to sew on a patch by hand you really can fix anything. From jackets and jeans to coats and tops, patches can be used to cover stains, holes and marks of all sizes.

Customise your patch to your heart’s content. Use up fun fat quarter fabrics, or scrap material or design your own applique patch to add to your garments. Let your creativity loose and fix your clothes in a way that’s unique to you and your style.

Discover more mending techniques with Gathered

Continue your sustainable sewing journey with our how to mend clothes article.

It covers everything from how to sew a hole to sashiko mending!

visible mending