When you're first learning how to crochet, it's not always going to be smooth sailing. It can take a while to find your flow and learn how to relax with your hook and crochet comfortably, and this can lead to some crochet problems. If your crochet isn't looking quite right, then some of these crochet tips for beginners and troubleshooting techniques will help you to figure out where you're going wrong.
In this crochet troubleshooting article we're going to look at some of the most common crochet problems that catch out beginners, with crochet tips and links to tutorials to help you solve those problems. Remember that we all have to start somewhere so don't be put off if you're struggling, and once you know about these common crochet problems they'll quickly become second nature and you'll be hooking up a storm before you know it! If you're completely new to crochet and struggling with the basics, you might find our beginners guide to crochet and our video below helpful.
If you're looking for a specific crochet tip, you can use these handy links to jump to our answers, or you can read through at your own leisure and learn all of our crochet tips for beginners!
- My crochet chains are twisting around
- my crochet chains are too tight
- my crochet chains are too loose
- why does my first row of crochet stitches look wrong?
- Why aren't my double crochet sides straight?
- Why aren't my treble crochet sides straigh?
- Why does my crochet curl
- How do I change yarn?
- How to I change colour in crochet?
- How do I weave in my crochet ends?
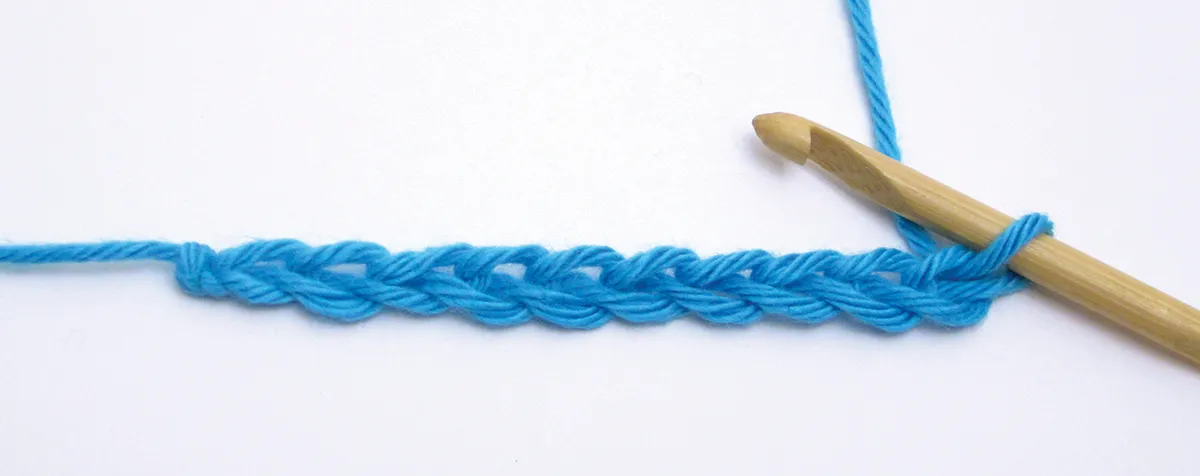
Why don't my crochet chains look right?
Learning how to crochet chains is the first thing that everyone will need to master when learning how to crochet, and don't worry if yours don't look perfectly neat first time - it takes a bit of practice. Here's a couple of different aspects that might be giving you trouble with your chains.
My crochet chains are twisting around
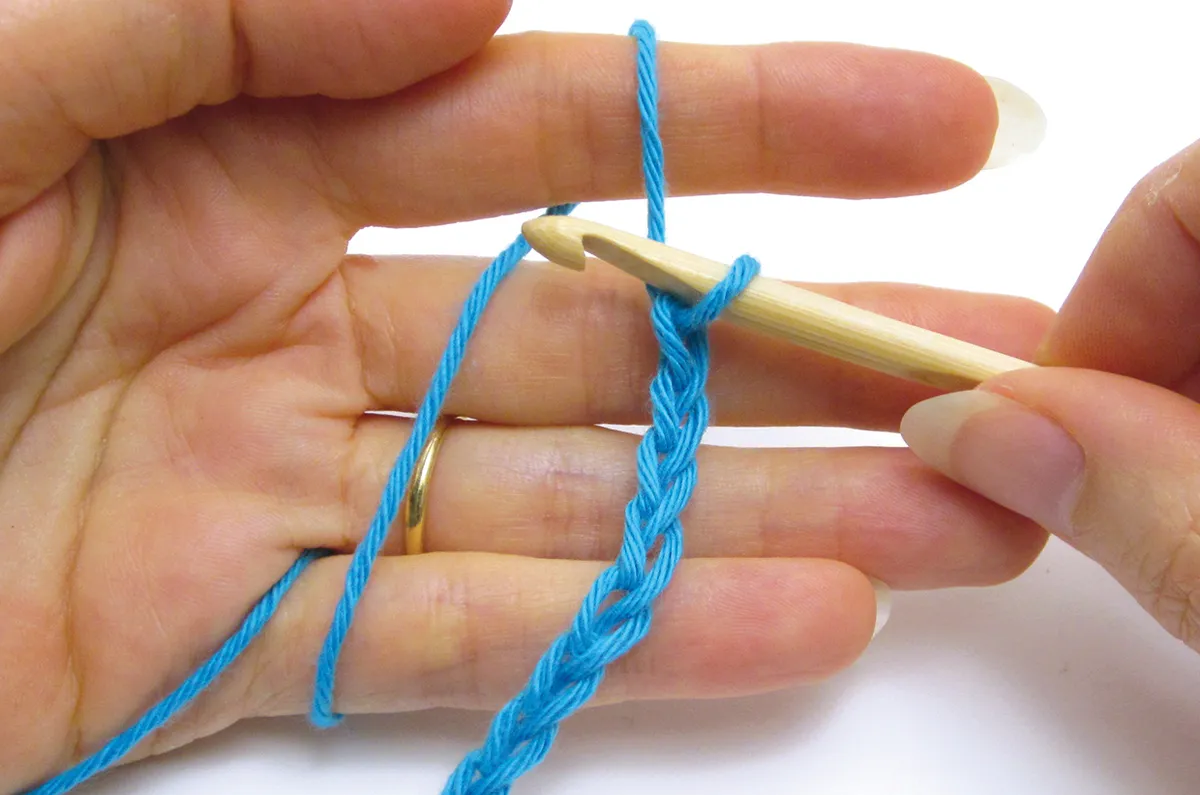
This is perhaps one of the most common problems when beginners first try chains. Crochet chains should look like a neat row of sideways 'V' shapes all on the same side, but sometimes your chain will look twisted and your V's will be on different sides. This is normally a result of your tension changing and your chains being either too tight or too loose, which we'll cover next.
Occasionally crochet beginners can struggle with the direction that you wrap your yarn around your hook to make chains, and if you accidentally switch directions this can also create twists and kinks in your chains. This can prove tricky for some people to understand, as the majority of crocheters actually twist their hook around the yarn rather than physically wrapping the yarn around the hook. If you are looking from the base of your hook, the yarn should always be going around anti-clockwise. Another way of thinking of it is that the yarn starts at the bottom, goes towards the back of the hook, over the top of the hook towards the front, then back down to the bottom where you then catch it with the hook
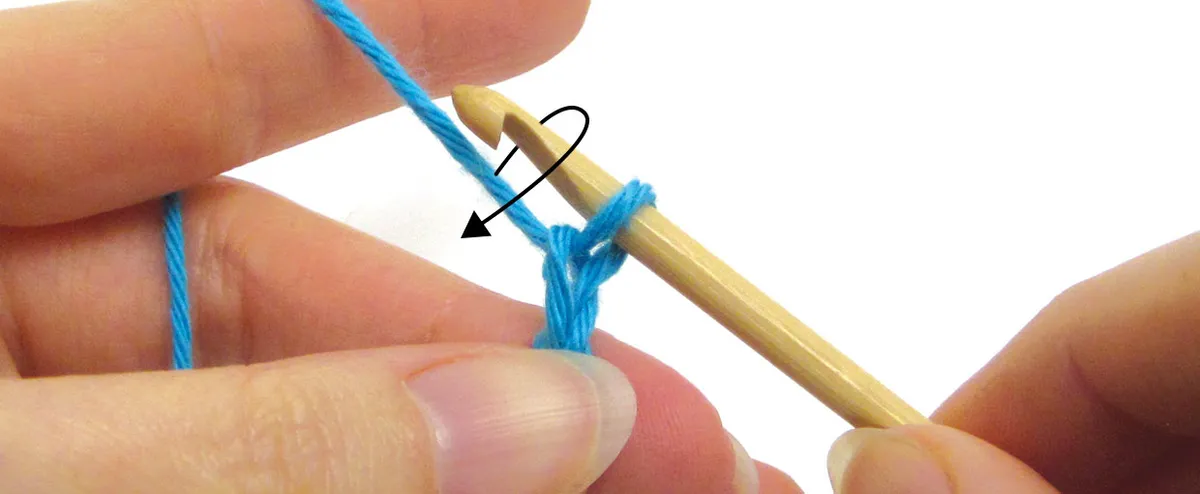
My crochet chains are too tight
One of the biggest challenges in crochet is getting your tension right, so if your chain stitches look odd then it’s probably a tension issue. Some crocheters encounter problems because they’re not relaxed enough and this results in a tension that’s too tight. If you're struggling with this, it's worth taking a look at our guide on how to hold a crochet hook and yarn.
If your tension is too tight then your active loops will grip too close to the hook, as shown below. This will make the loops really stiff and difficult to move off the hook.
The resulting chains will be really small, which will make it quite difficult for you when you try to pull the next loop through this loop. It will also give you problems when you start working stitches into the chains, because it will be difficult to insert the hook into them.
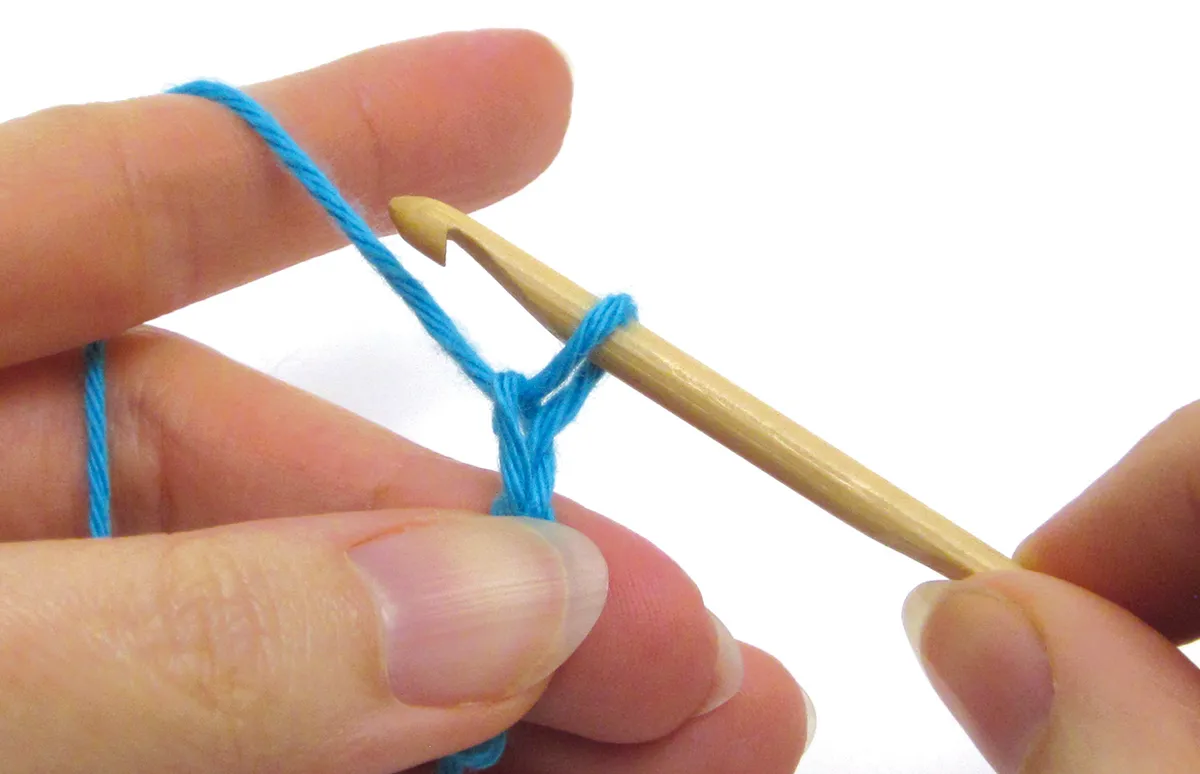
To solve this problem, try unwrapping the working yarn from some of the fingers on your non-hook hand – this is your left hand if you’re holding the hook in your right hand. This should create less tension on the yarn and you’ll be able to loosen the active loops so that they sit further away from the hook, but with a little bit of a gap, as shown here.
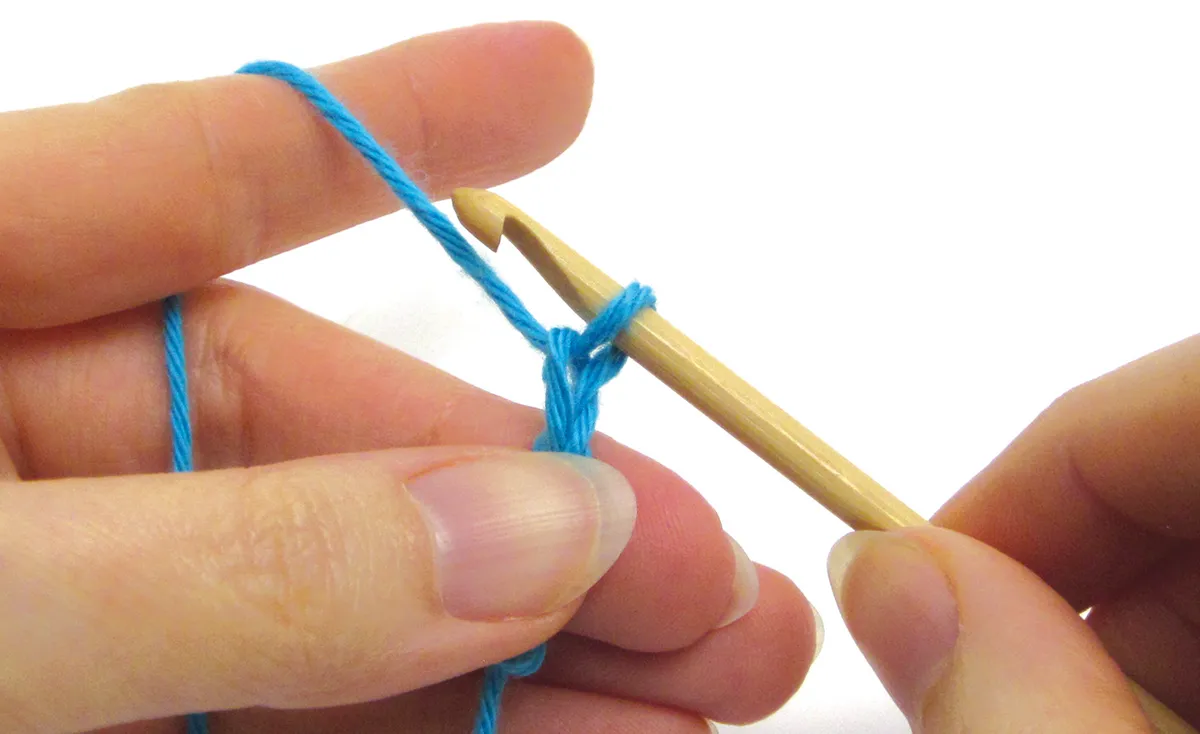
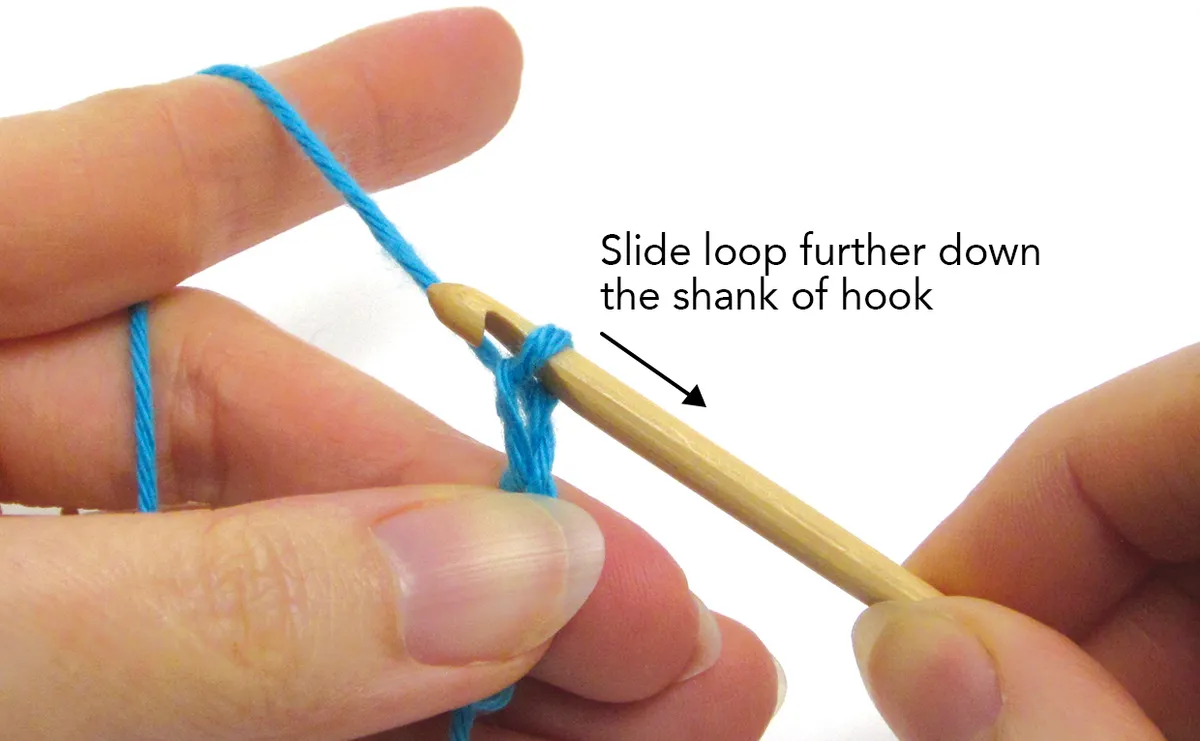
Another common problem that results in tight chains is if you hold your active loops at the neck of the hook. To solve this problem, you need make sure you make the loops at the wider shank of the hook.
If you still have trouble with a tight chain, here's one of our favourite crochet tips. Try switching to a hook that’s a bit bigger than the one you’d usually use for your yarn. For example, we’ve been using a DK yarn and a 4mm hook for this workshop. Switch to a 5mm hook and you’ll see that even with a tight tension, you will create larger chains.
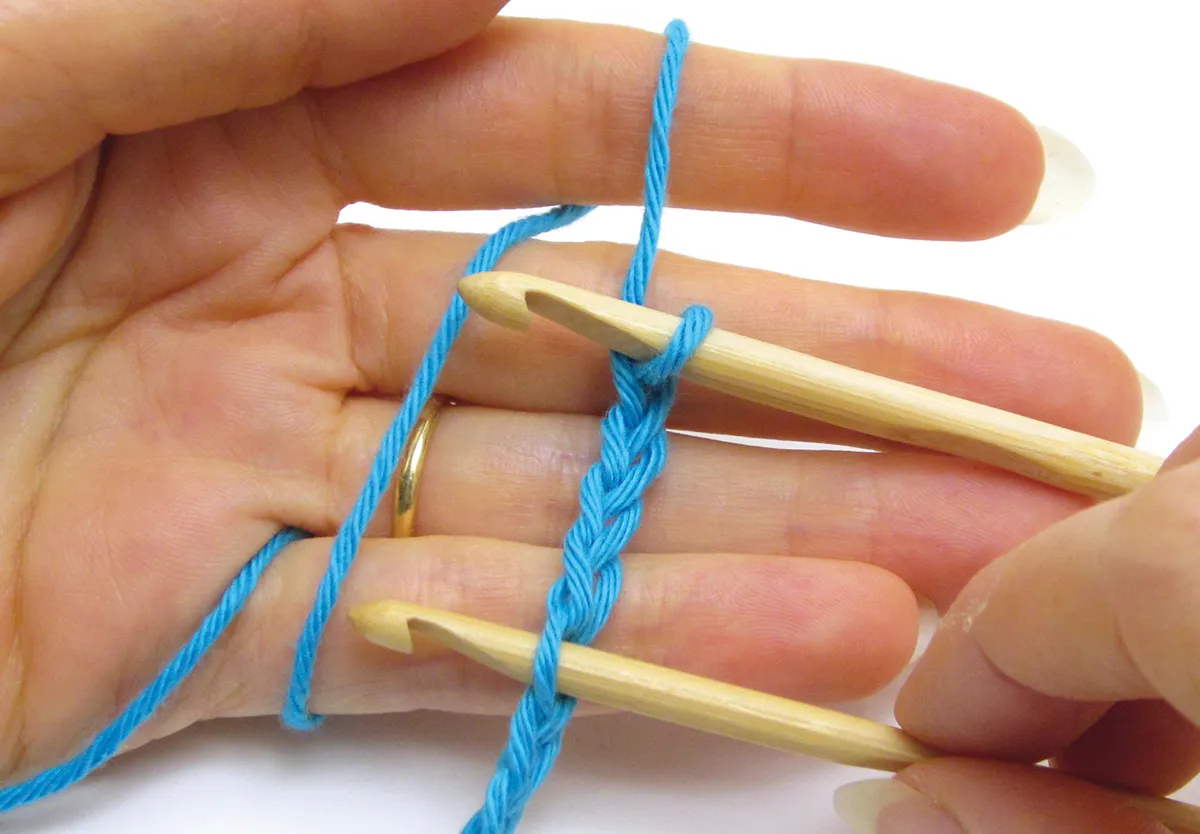
If you’re not sure whether the chains you’ve made are the right size, try doing a little test. Let go of the larger 5mm hook and try inserting your 4mm hook into the chains you’ve made. The hook should fit into the chains fairly easily yet each chain should also be reasonably snug around the hook.
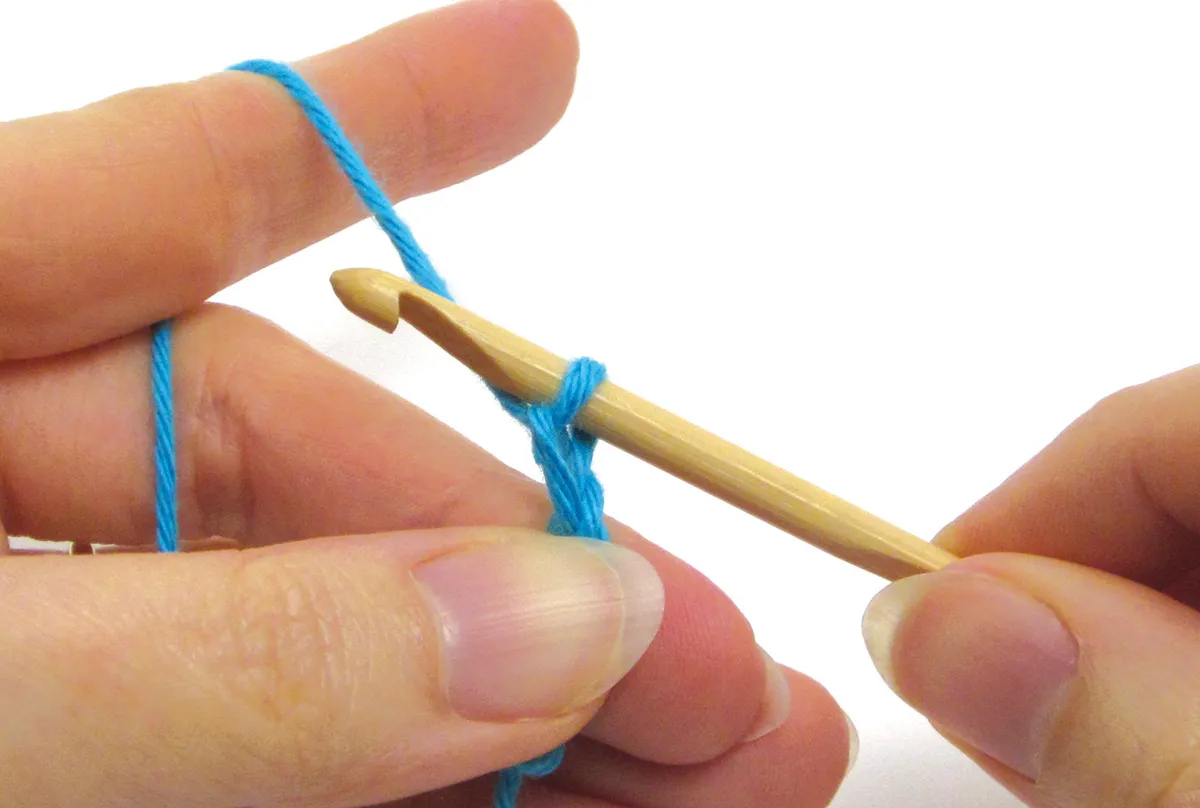
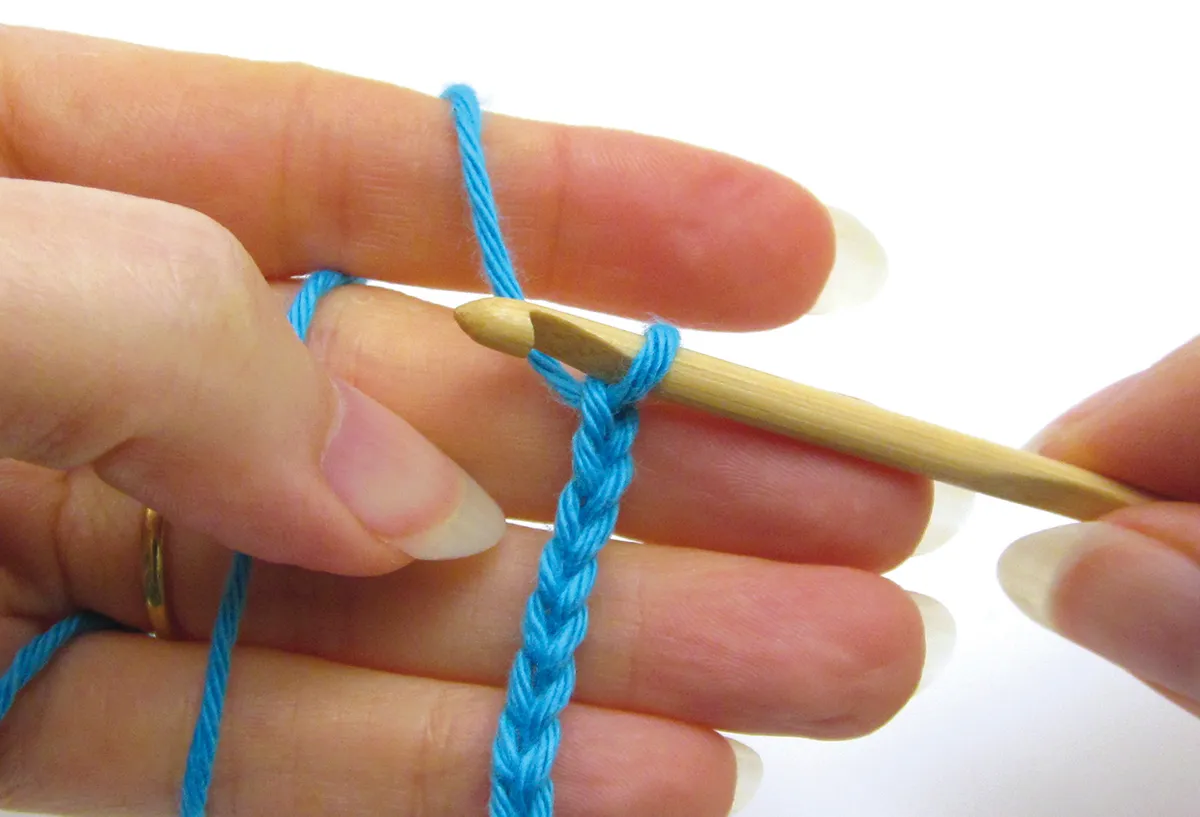
My crochet chains are too loose
Some new crocheters have trouble with a different problem and that’s a loose tension. Here’s how to solve that issue.
If your tension is too loose then your active loops will sit too far away from the hook, as shown below. This will make the loops difficult to control on the hook and...
...the resulting chains will be really big, which will look messy when you start working stitches into the chains.

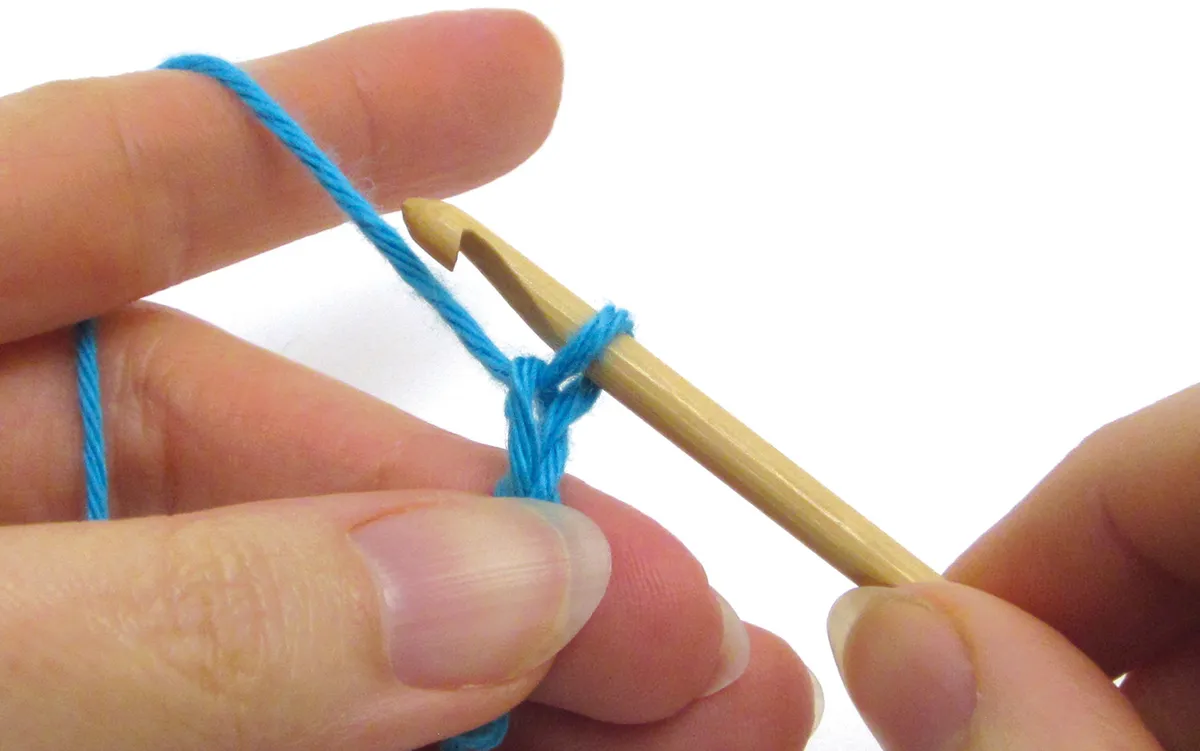
To solve this problem, try wrapping the working yarn around more of the fingers on your non-hook hand – this is your left hand if you’re holding the hook in your right hand. This should create more tension on the yarn and you’ll be able to tighten the active loops so they sit near the hook, but with a little bit of a gap, as shown here.
Crochet tips for straight edges
Now that you've got your crochet chains perfected, the next stumbling block that many new crocheters come across is their edges not being straight. This is normally down to two factors - tension and missing stitches! This can affect both your bottom width edge as well as your side edges. We'll take a look at why this might be happening so that you can get your crochet looking perfect! In this first part we'll be looking at crochet tips for straight edges using double crochet (dc) stitches, and if these are new to you check out our how to double crochet tutorial.
Why does my first row of crochet stitches look wrong?
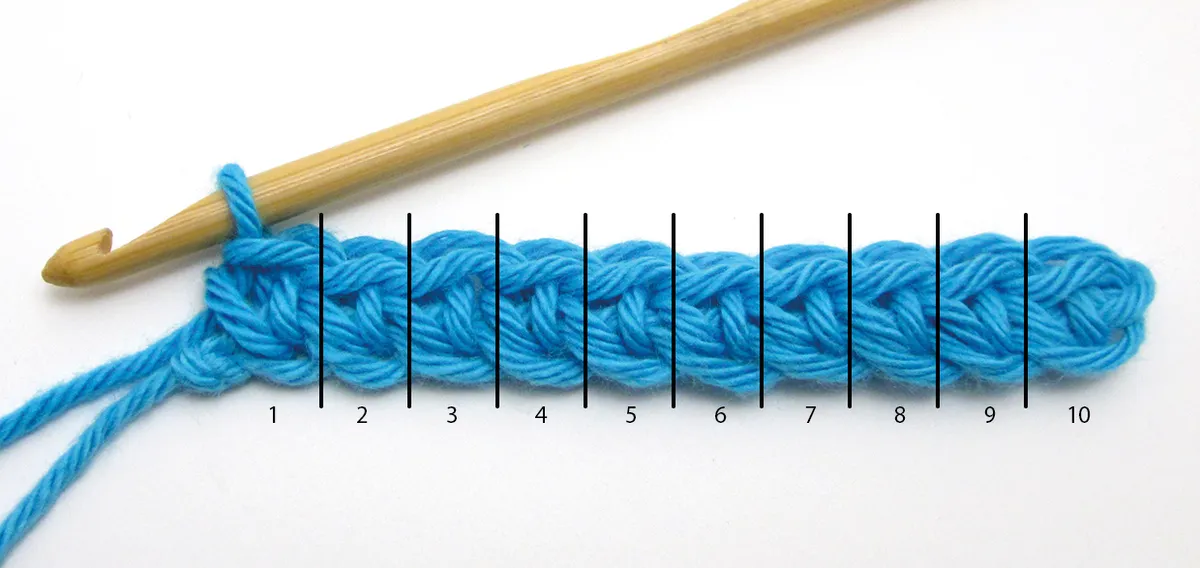
Here is an example of a correct first row of 10 dc stitches, which has been worked into 11ch (remember that dc stitches require an extra 1ch for the turning ch). You can check by counting each little ‘v’ shape along the side of the fabric or count each plaited chain-like shape along the top.
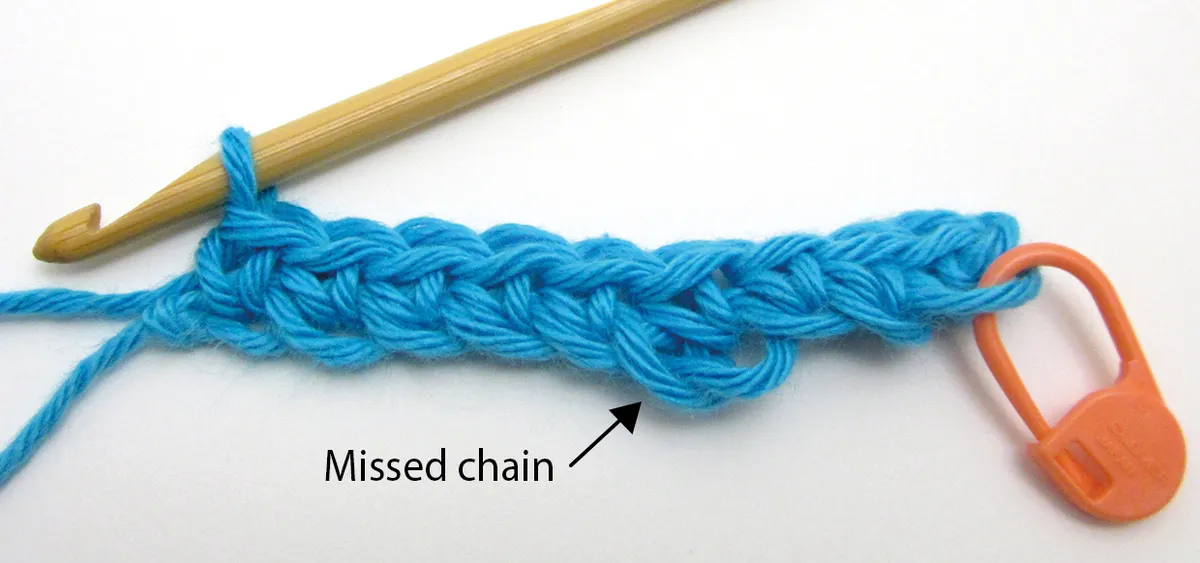
The most common problem you may encounter when making the above practice row is to accidentally skip a chain. It’s easily done and here, we’ve missed a chain so we’ve only got 9 dc. There’s only one solution – you’ll have to remove the hook and pull on the yarn to undo your work, until you reach the skipped chain. This shows why it’s so important to count your stitches at the end of each row – if you don’t discover the error until the next row, you’ll have more to undo!
Another common issue is working tight stitches, which will pucker the chain, creating baggy-looking loops at the bottom edge, as shown below. Tight stitches will also be shorter than they should be, causing sizing problems – for example, 5 standard rows might usually measure 5cm, but 5 tight rows might only measure 3cm. To solve this problem, try to relax your tension – unwrap the working yarn from some of your fingers and make sure you make the loops at the shank of the hook, not the neck.
Crocheting with a consistent tension is vital for creating a neat fabric, so get this right early on so that it doesn’t hold you back. An inconsistent tension means uneven stitches, like below – some are tight and short, others are looser and taller. If your first row looks like this, don’t worry – the fact is that every new crocheter’s first row looks like this! The key to getting things looking neater is PRACTISE, until hooking stitches feels comfortable, familiar and consistent.
Why aren't my double crochet sides straight?
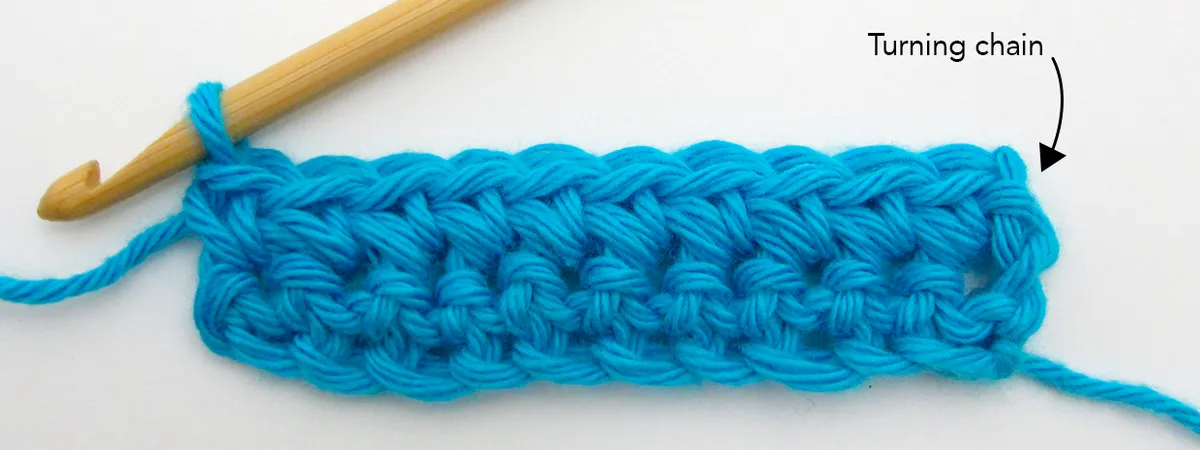
The other area where your crochet edges might look wrong are your side edges. This again can be a case of missing stitches so make sure you keep count of your stitches like in the example above. However, uneven edges can also be down to missing or incorrect turning chains.
For dc rows, the standard instruction is to make one chain (ch1) at the start of each row - or if you are working your first row into chains, this is why you skip your first chain and make your first stitch into the second chain. This is the turning chain (t-ch), which has a vital role in making sure your rows are neat and straight. The t-ch is a way of raising the hook up to the right height required for the height of stitches you’re going to make. Double crochet is the smallest standard stitch so we only need to make one chain, and with double crochet stitches this DOES NOT count as a stitch. For a taller stitch like treble crochet, we’d have to make three chains to get up to the right height (we'll go into more detail on this below).
Once you’ve made the t-ch, you can work dc stitches as normal. Here’s what your finished row of dc stitches will look like – each dc is neatly at the same height, from the first stitch to the last, and that’s thanks to the t-ch.
If you don’t work the t-ch (it’s easy to forget!), the first dc is much harder to work and the finished row will look more like this – that first dc is too low, which is creating a slope at the start of the row. It doesn’t look like much now, but if you repeated this error on every row, it soon adds up to a big problem.

Why aren't my treble crochet sides straight?
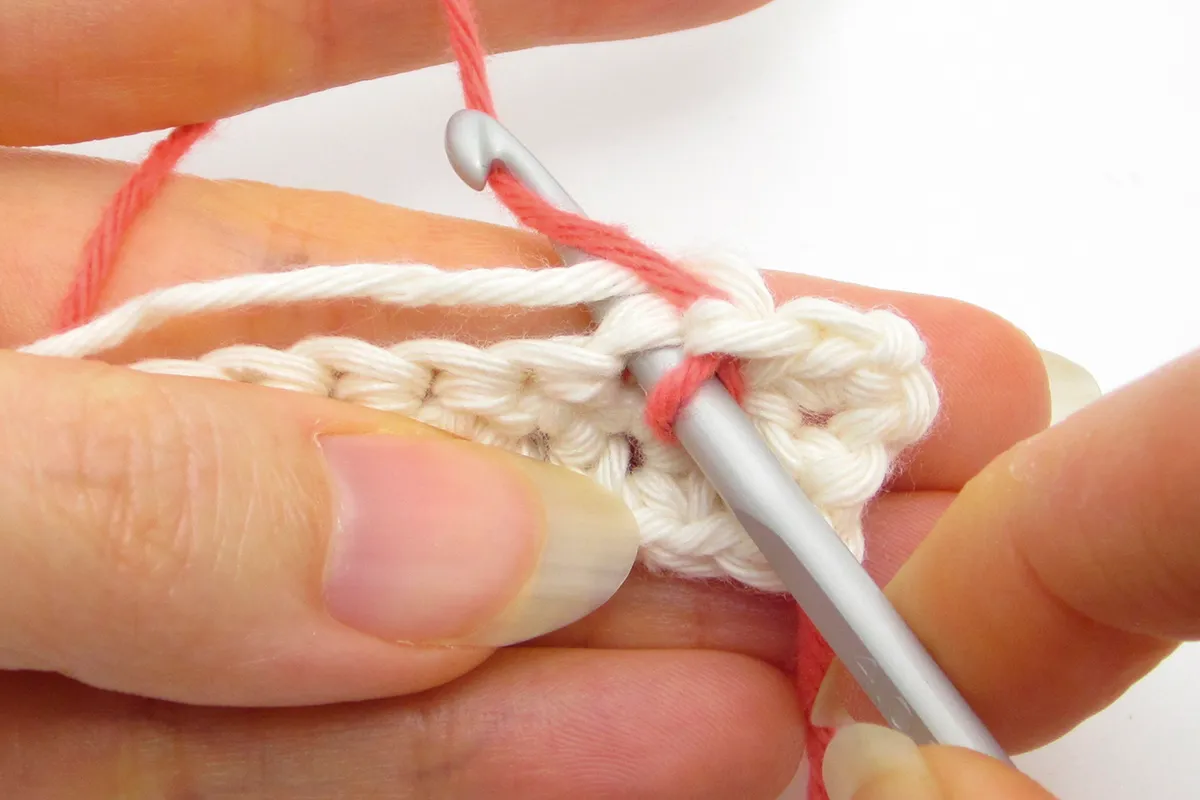
Many beginner crocheters struggle with their side edges when first learning how to treble crochet. If your side edges are coming out uneven when working with treble crochet stitches (or any other stitch that is taller than a dc), then this may be because of your turning chain. With a treble crochet stitch, you make a turning chain of ch3 to give you the height of your treble stitches. With treble crochet this ch3 turning chain counts as your first stitch, so you need to account for this when making your first actual treble stitch.
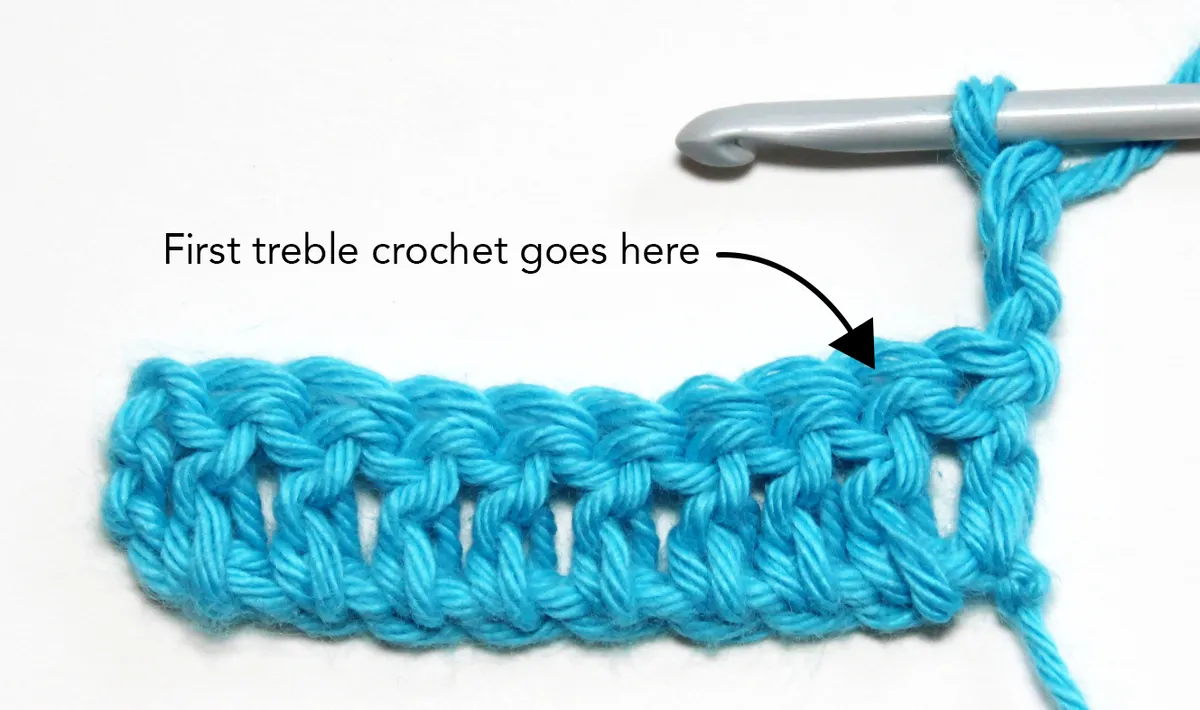
So when you make your first actual treble stitch, you need to skip that first stitch at the base of your turning chain, and instead treble crochet into the second stitch along. If you make a treble crochet in the first stitch, you are effectively making an increase due to the turning chain counting as a stitch. There will be a more obvious gap when you do this correctly and it will look like it's leaning across a bit, but this will be remedied when you come to working the next row - which we'll cover next.
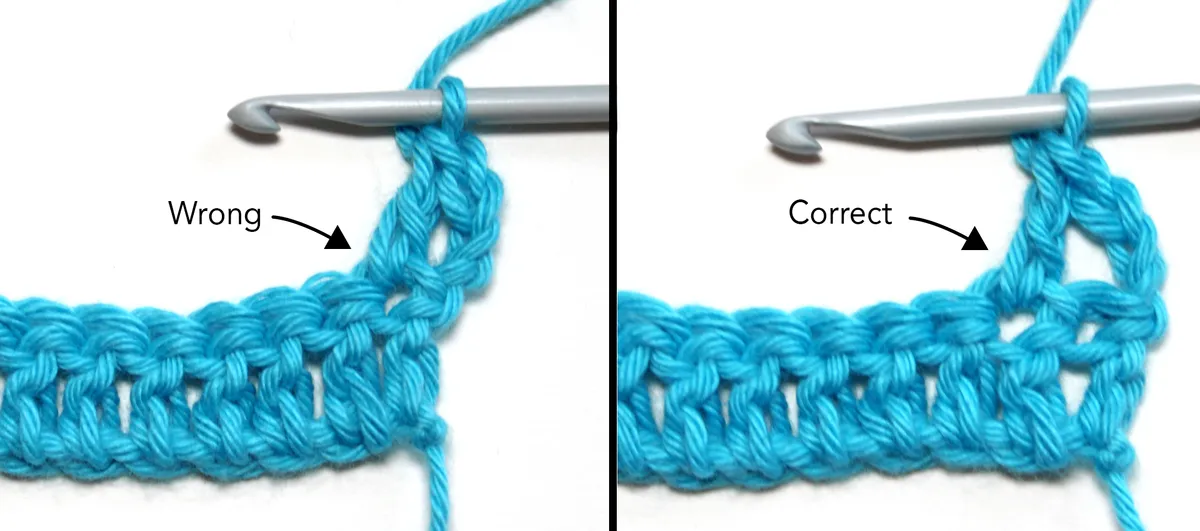
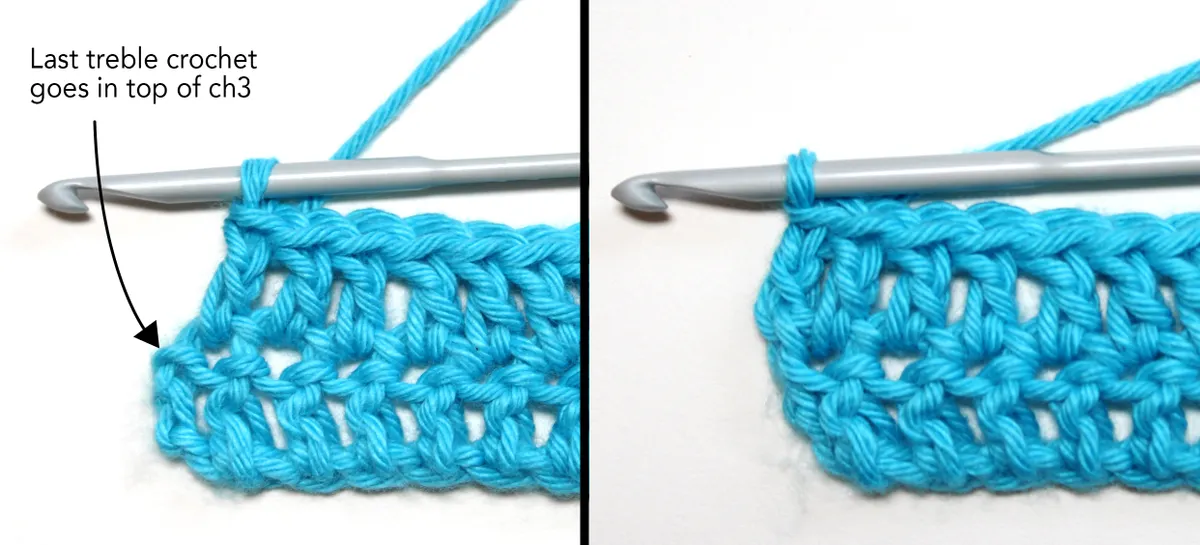
When you come to the end of a treble crochet row, it can be quite easy to miss your last stitch. As the ch3 turning chain counts as a stitch, you need to work your final treble crochet stitch of the row into the top of this ch3 turning chain. If you neglect this step, your stitch count will decrease with each row. When you work your last stitch into the turning chain, it will also help to make the turning chain stand up a bit more evenly and will help reduce the obvious gap.
Why does my crochet curl?
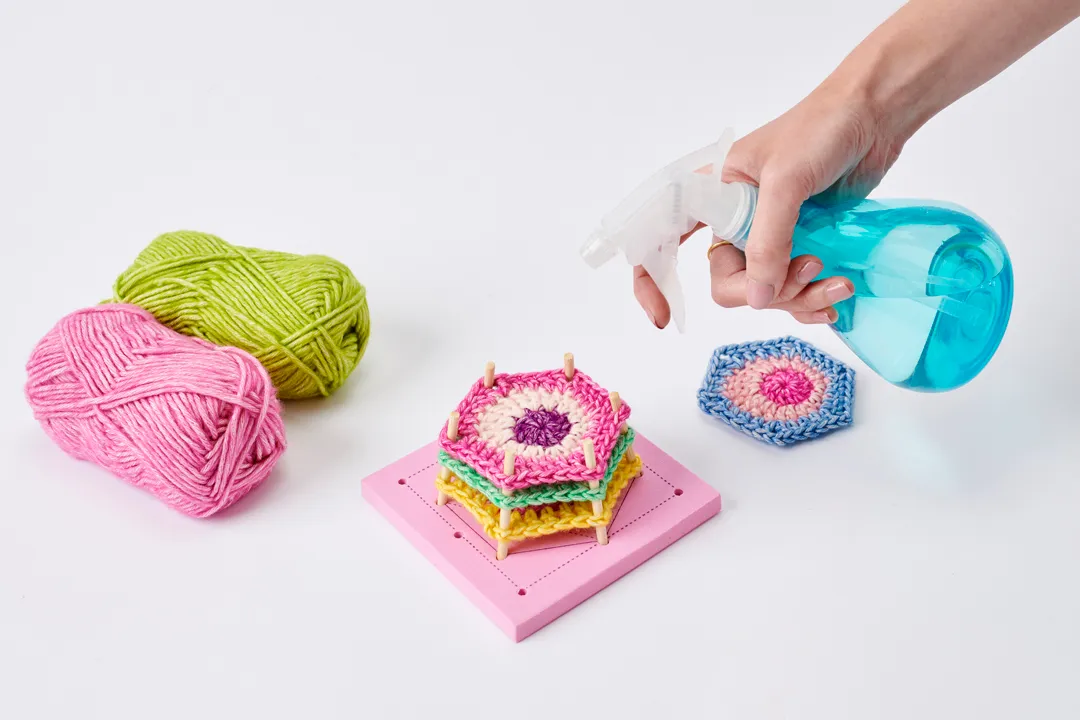
When you make your first piece of crochet fabric, especially for the first row or two, you might notice that it's curling and not lying flat. Normally this will reduce a bit as you make more rows, but it can be a result of your crochet tension being a bit too tight (especially with your crochet chains as we've covered above). That said, a bit of curling is natural and even experienced crocheters will encounter a small amount of natural curling. The main way of fixing this is to block your crochet, which is a process where you pin out and dampen your crochet fabric - by getting the yarn wet it will help to relax the fibres. And even if you've followed our steps above on crochet tips for straight edges, blocking will help to get those edges looking even neater! You can find out more in our guide on how to block your crochet using a blocking board.
How do I change yarn?
There's a few reason's you might want to change yarn when crocheting - maybe you're ran out of the yarn you're using, or perhaps you want to change colour? Whatever your reason, it's surprisingly simple - just check out our guide on how to join yarn and change colours in crochet.
When in comes to changing yarn, there are a few crochet tips for beginner that will help. Firstly, it might be tempting to just tie a knot between your two yarns and keep on crocheting, but it's far better to do a proper crochet join. This is not only because you will be able to feel any knot on your finished crochet fabric, but also as when you cut your yarn tails when you've finished, a simple knot it more likely to come undone as the fabric moves and stretches than a proper crochet join would.
The same goes for if you find a knot in the middle of your yarn ball (it's annoying but it does happen). Again it can be tempting to just keep on crocheting, but you will regret it when you can feel that ugly knot in the middle of your crochet stitches. It's always better to cut the knot out and rejoin the yarn properly. There are also a few ways to seamlessly join two pieces of yarn together, using the felted join or Russian join techniques, you can find more information and picture guides on how to do these in our How to join yarn in knitting tutorial.

How do I change colour in crochet
When it comes to changing colours in crochet, you can use the basic crochet join method above for most beginner crochet projects. But what about if you want to use lots of colours, or change colours at lots of different places? This is where you will want to learn how to do crochet colourwork. There are 3 main techniques for crochet colourwork - Fair Isle, Intarsia and Tapestry crochet. They all use the same basic joining method as above, but the three techniques have different options of what to do with your different yarns in between your colour changes. Tapestry crochet is also a good way of learning one of our favourite crochet tips for beginners, where you work your new stitches over the piece of yarn you just changed from - this is a useful skill to know in general when changing yarns, as it helps to secure your join and hide your yarn end.
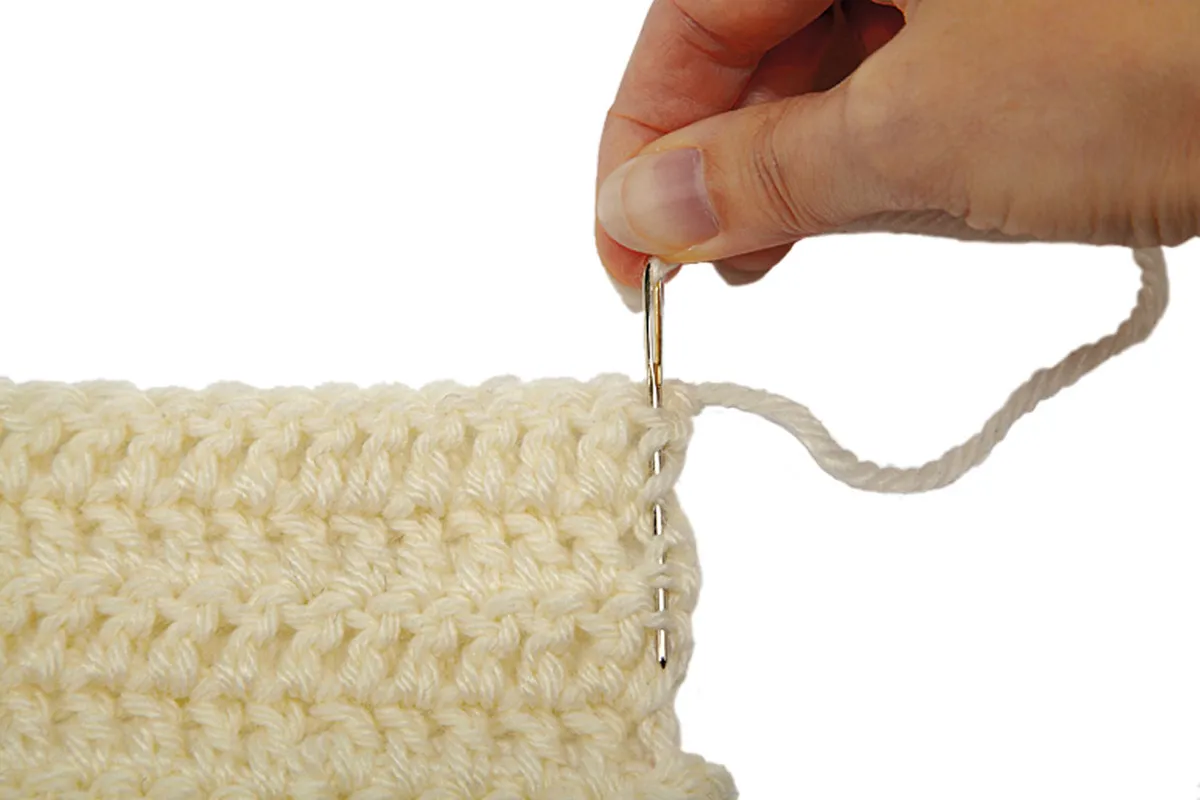
How do I weave in my crochet ends
When you get to the end of your crochet project, you'll need to know how to fasten off crochet and weave in your crochet ends. When it comes to crochet tips for weaving in ends, there's a few things to keep in mind. The point of weaving in your ends is that you don't want them to unravel - remember that your crochet is probably going to get stretched and manipulated, so if you haven't woven in those ends properly they can work themselves loose. It's important to weave your ends back and forth a few times, going through different areas of stitches, and you can try going over the same places to try and lock your end in place. It might be tempting to add a knot just to make it super-secure, but this shouldn't be necessary if you've woven in your ends effectively, your fastening off should be the only knot you need. When you decide your end is secured and you're happy to cut your yarn close to your crochet, if you give your crochet a little stretch this will help the remaining bit of end where you've cut slip into your crochet and hide away!
We hope these crochet tips have helped solve your beginner crochet problems, and it's important to remember that everybody finds it a bit confusing at first. Keep persevering and practicing, and don't forget that we've got loads of handy tutorials to help you in our how to crochet section.
