How to crochet a pin cushion

Keep your pins safe by learning how to crochet a pin cushion with Emma Birer's free tutorial. She'll show you how to turn her crochet pin cushion pattern into a craft staple that will never leave your side.

Try 6 issues of your choice of craft magazine from just £9.99

Published: June 16, 2021 at 9:00 am

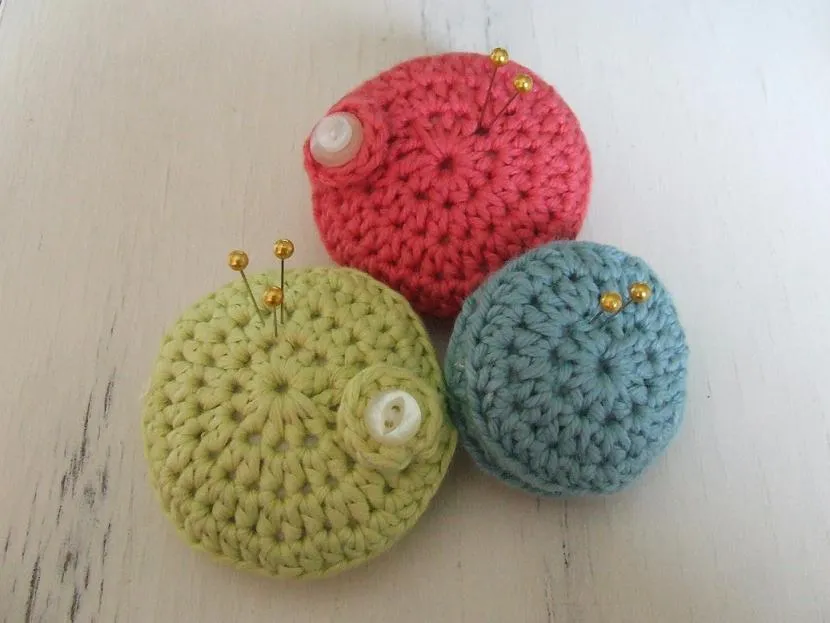
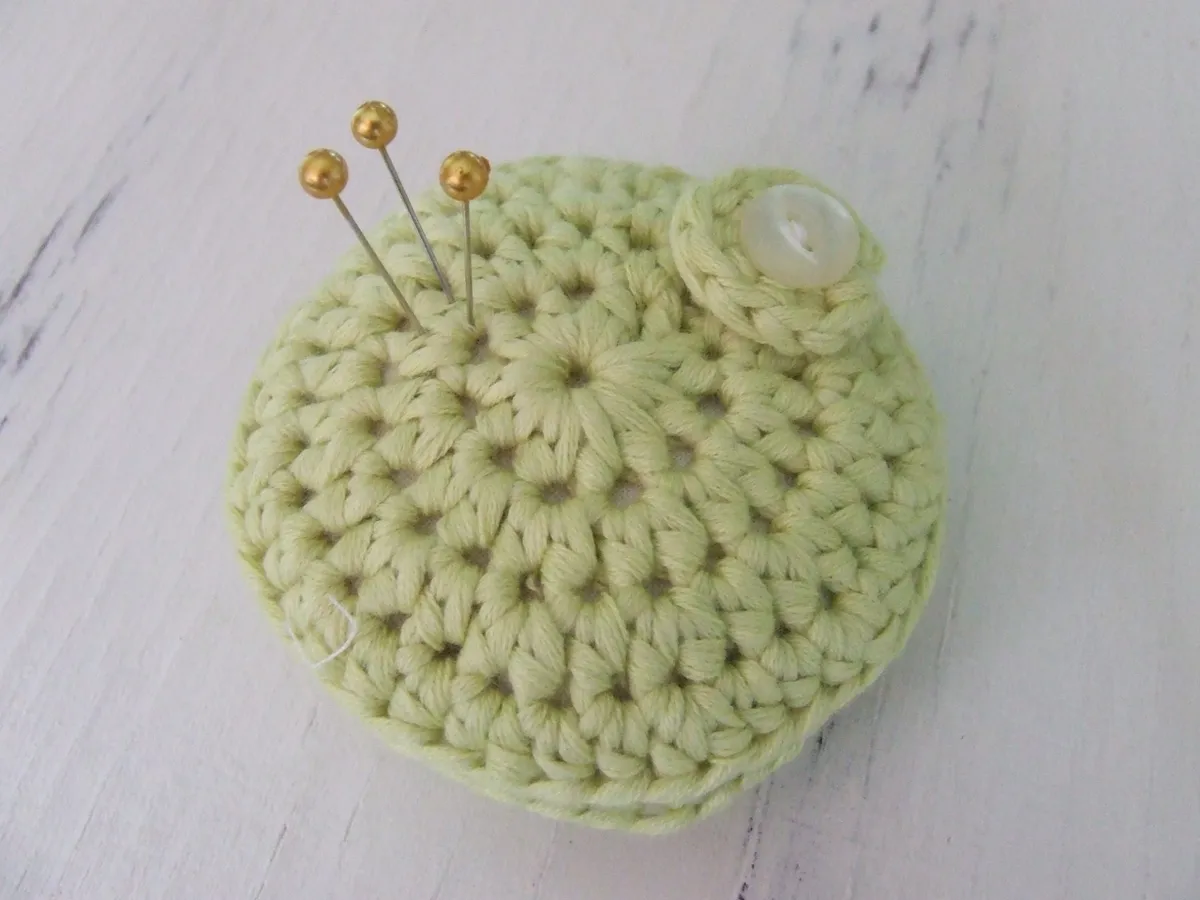
There’s nothing more lovely than a round crochet pin cushion. They look adorable, they’re the perfect size to sit in the palm of your hand and they're oh so handy! We use our crochet pin cushion every day no matter the project we're working on because there really is nothing worse than pricked fingers. We invited Emma Birer of Daffodils and Snowdrops to share her crochet pin cushion pattern with our Mollie Makers so that you could all experience the joy of a round pin cushion. This is a great project for beginners too as it uses very few materials and follows a simple pattern.

If you're new to crochet and would like to make Emma's pin cushions then we have a few useful guides for you. First up check out our crochet for beginners guide which covers all the techniques you'll need. Then we'd recommend heading to our best crochet hooks round up to find your new tool and lastly once you've mastered these pin cushions head to our crochet kits for beginners for more fun and simple projects.

Read on to find out how to make your pin cushion…

Meet Emma Birer from Daffodils and Snowdrops. She’s here to show you how to make your crochet pin cushion that will become your new BFF when stitching, crocheting and sewing.

As a bit of a crochet addict, I would love to share with you one of my very own crochet how to's. It is quite a simple project, and great for beginners! You could try making the pin cushion in other yarn types and colours to give a different overall look. I’ve made mine in a woolly DK yarn by Debbie Bliss. But you could also try a cotton DK yarn too. Enjoy!

Emma Birer from Daffodils and Snowdrops

You will need

  • 4mm crochet hook
  • Yarn: Debbie Bliss DK
  • 1 vintage button

Abbreviations

ch Pass hook under yarn and catch yarn with hook, draw yarn through loop on hook (repeat to chain).

htr Yarn over, insert hook into stitch, yarn over, draw back through stitch (3 loops on hook), yarn over, draw yarn through all 3 loops on hook (1 loop remains on hook).

ss Insert hook into stitch, yarn over, draw loop back through stitch and loop on hook.

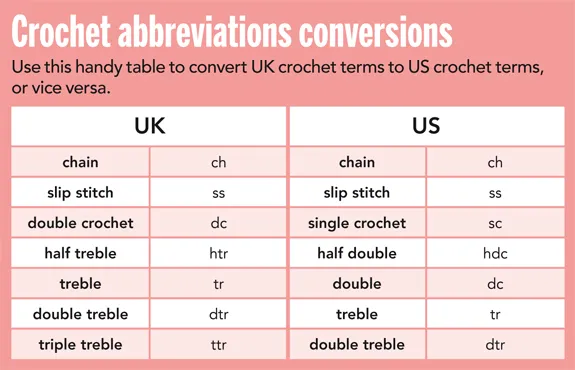
You can find a full list of all abbreviations we use in our abbreviations and conversions guide. This pattern is written in UK terminology but you can easily convert it to US terms using this handy chart.

How to make a crochet pin cushion

You will need:

  • Yarn
  • Crochet hook
  • Button

Step 1

To begin, ch4 and join with a ss to form a ring. ch2, and work 10htr into the ring (as in picture below).

ss into second chain of your initial ch2 to join (11 stitches around the outside of your circle).

How to crochet a pin cushion step 1

Step 2

ch2 (see picture below) 1htr into first stitch, then 2htr into next 10 stitches.

ss into second chain of your initial ch2 to join (22stitches around the outside of your circle).

How to crochet a pin cushion step 2


Step 3

This is what your circle should now look like (below). If you struggled with making your circle read our how to crochet in the round tutorial.

ch2, 1htr into first stitch 1htr into next stitch, 2htr into next stitch, repeat (ending with a 1htr).
ss into second chain of your initial ch2 to join (33stitches around the outside of circle).

How to crochet a pin cushion step 3

Step 4

Your circle should now look like this…

ch2, 1htr into first stitch 1htr into next stitch, 1htr into next stitch, 2htr into next stitch, repeat (ending with a 1htr) ss into second chain of your initial ch2 to join (44stitches around the outside of circle)

To finish, snip yarn, pull through loop on hook to fasten.

Repeat these instructions to make the other half of your pin cushion.

How to crochet a pin cushion step 4

Step 5

Once you have your two sides, go on to make the pin cushion lining.

How to crochet a pin cushion step 5

Step 6

Take a piece of plain fabric and roughly trace around the shape of one of your crochet circles. Cut two of these (with a small seam allowance) and sew together, leaving an opening for stuffing.

How to crochet a pin cushion step 6

Step 7

Turn inside out (raw edged on inside) and stuff (packing your stuffing tight) to create your pin pad. Hand sew the opening closed. And there you have the inner pad for the inside of your pin cushion.

How to crochet a pin cushion step 7

Step 8

Now you can join your two crochet circles. You can do this by sewing with a matching thread or crochet together as explained below. Place together your two circles (right sides together).

Working in the outside loops, push your hook through two of your outside loops and draw your yarn through both loops… You will now have a loop on your hook.

How to crochet a pin cushion step 8

Step 9

Then working from right to left… Push your hook through the next two outside loops, yarn over, pull back through both loops and the loop on your hook… Repeat this step working your way around the circles, leaving an opening big enough to allow to push your pin pad inside. To finish, snip yarn, pull through loop on hook to fasten.

How to crochet a pin cushion step 9

Step 10

Next turn the right way and insert your pin pad. Then, using a matching coloured thread, carefully stitch up the opening.

How to crochet a pin cushion step 10

Step 11

You can then decorate your pin cushion with mini crochet flowers, vintage buttons or whatever takes your fancy. I added a mini crochet circle with vintage button to mine…

How to crochet a pin cushion green with pins

That looks so sweet, Emma. Thanks so much for sharing your crochet pin cushion pattern with us. We think a set of these in coordinating colours would make a very cute display, maybe on a small thrifted saucer to show them off. For more fun crochet projects check out our free granny square patterns and our free amigurumi crochet patterns – you’ll find some real cuties in there!