
Ripple crochet pattern: How to crochet chevron cushions
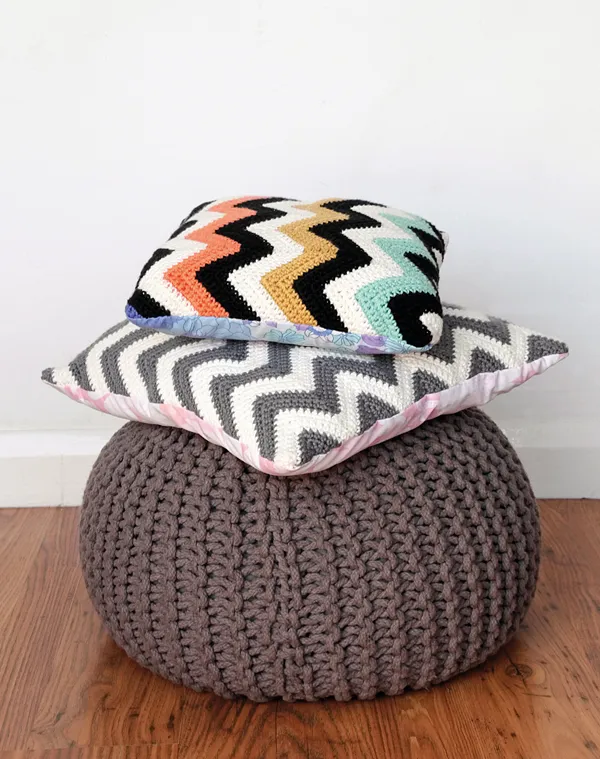
Bring that sought-after ripple crochet look into your living room with Kath Webber’s how to crochet chevron cushions tutorial. This exclusive chevron pillow pattern is just beautiful and we're huge fans! Whether you're wanting to add a splash of colour to your sofa, desk chair, or bed, her ripple crochet pattern is the one for you.
- Must-know crochet stitches and how to do them
- How to crochet a triangle
- 25 free crochet borders and crochet edging patterns
Kath shows you how to crochet these ripples but it's up to you what colour you'd like to make your cushions. We know some makers would prefer the monochrome look and if that's you then never fear. Simply follow Kath's pattern with grey and white yarn. There's no rules when it comes to crochet!
If you're a crochet newbie then make sure you check out our crochet for beginners guide along with our round up of the best crochet hooks. They'll teach you all the basic you need to make these chevron cushions.
Materials
- Rowan Handknit Cotton, 100% cotton, 50g/85m per ball or any worsted weight yarn
- For the multicoloured chevron cushion
- 1 ball of Tangerine Dream (337)
- 1 ball of Ochre (349)
- 1 ball of Seafarer (318)
- 1 ball of Ecru (251)
- 1 ball of Black (452)
- 1 ball of Violet (353)
- For the monochrome chevron cushion
- 2 balls of Ecru (251)
- 2 balls of Slate (347)
- 4mm (UK 8, US G/6) crochet hook
- Scissors
- Tapestry needle
- For the multicoloured chevron cushion
- 30cm (12″) square cushion pad or soft toy stuffing
- For the monochrome chevron cushion
- 40 cm (16″) square cushion pad or soft toy stuffing
- Vintage fabric for backing
- Matching thread
Tension
20 stitches across and 20 rows in double crochet make up a 10cm (4″) square
Abbreviations
You can find a full list of all abbreviations we use in our abbreviations and conversions guide. This chevron cushion pattern is written in UK terminology but you can easily convert it to US terms using the guide.
How to crochet chevron cushions
Multicoloured crochet cushion
Foundation: Using ecru yarn, ch79 to begin.
Row 1 (RS): 1 dc in second ch from hook, miss 1 st. *1 dc into each of the next 8 sts, 3 dc into next st, 1 dc into each of the next 8 sts, miss 2 sts. Repeat from * to last 2 sts, miss 1 st, 1 dc in last st. Turn.

Row 2: Working into the top two loops of the stitch (rather than in between the stitches), ch1 (does not count as a st), 1 dc into first st, miss 1 st. *1 dc into each of the next 8 sts, 3 dc into next st, 1 dc into each of the next 8 sts, miss 2 sts. Repeat from * to final 2 sts, miss 1 st, 1 dc into last st. Turn. Row 2 is the pattern and is repeated throughout.
Rows 3 and 4: Continue in ecru, then work four rows of the following colour sequence – black, seafarer, ecru, black, ochre, ecru, black, tangerine dream, ecru, black, violet, 48 rows in total. Break yarn and fasten off, weaving in all ends.

To change colours, cut the yarn, leaving a tail of 10cm. Leaving the loop on the hook, grab the new yarn with the hook and draw through the loop. Pull the tail end of the previous colour tight, locking the loop down into the stitch.
To weave in the ends as you go, hold the tail ends of both colours at the back of the work, just behind the top of the stitch on the previous row. Holding the tips of the tail ends with your yarn hand, work the next row as before, capturing the tail ends as you make each stitch. Continue this for around 8-10 stitches so that the ends are secure.
Monochrome crochet cushion
Foundation: Using slate yarn, ch98 to begin.
Row 1 (RS): As multicoloured cushion.
Row 2 onwards: As multicoloured cushion.
Work first 4 rows in slate before changing to ecru yarn for the next 4 rows, then alternate between ecru and slate every 4 rows.
Work 60 rows in total. Break yarn and fasten off, weaving in all ends as with multicoloured cushion. If you need a bit of help with finishing your chevron cushions then use our how to fasten off crochet tutorial.
Making up your crochet chevron cushions

Using the bottom ‘dips’ of the chevrons as a guide, measure and cut a piece of fabric the same size as your completed crochet piece.
Carefully pin the fabric and crochet pieces together, RS facing then stitch the three straight sides together. Turn RS out and add toy stuffing or insert the cushion pad. Sew the fourth side together by hand using a slip stitch.

Fill your home with crochet cushions
Whether you're giving your home a seasonal update, or just fancy switching up your soft furnishings, you'll find loads of inspiring patterns in our roundup of top crochet pillow patterns.

