Create colourful felt baubles for a modern Christmas

Make your own embroidered felt decorations to add a burst of colour to your Christmas. Choose from a trio of fun designs or stitch all three!

Try 6 issues of Love Embroidery magazine for just £9.99| SAVE 77%

Published: October 21, 2023 at 7:00 am

Go bright, bold and beautiful this festive season with these fabulous felt decorations by Heather Nugent.

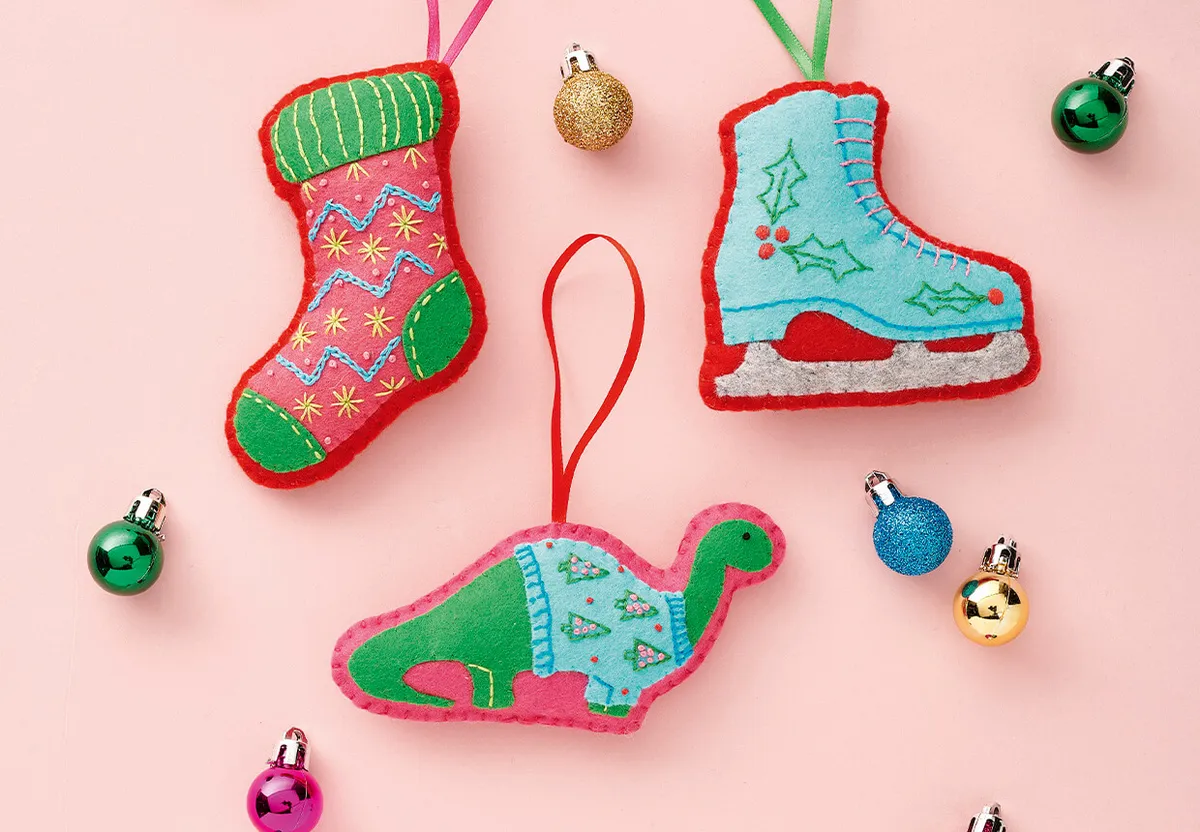
There’s a trio of lovely designs to choose from; a holly-adorned ice skate, a festive stocking and a cute dinosaur in a chunky jumper.

In this project, you’ll stitch onto felt which you’ll then cut out and assemble into your decorations. It’s a beginner-friendly tutorial and we’ll walk you through each step in detail! Plus you’ll find some helpful images to follow along with.

This fun festive project will give your Christmas tree a homemade look! Plus, it’ll be a delight to bring them out year after year!

This project was designed by Heather Nugent and first published in Love Embroidery issue 19. Sign up to our embroidery newsletter to receive more beautiful embroidery patterns every week.

Looking for more stitching inspiration? Check out our free embroidery patterns for lots more ideas.

What stitches will I need?

Are you looking for more tips and tricks to improve your stitching? Check out our embroidery stitch library.

Free template for the felt decorations

Top tips before you start stitching your felt baubles

  • Use two strands of thread throughout the design unless otherwise stated.
  • Use thinner tracing paper, which is easier to tear away.

How to make a felt bauble: Step-by-step tutorial

felt baubles

You will need:

  • Felt fabric (10x20cm light blue, 30x20cm pink, 30x20cm red, 10x20cm green, 10x5cm grey)
  • Stranded cotton (1 skein each of black, blue, light blue, green, light green, grey, pink, light pink and red)
  • 3mm wide ribbon (25cm long, green, pink and red)
  • Toy stuffing
  • Basic embroidery kit

Step 1

Transfer the designs to felt

Transfer the designs from the templates onto the felt using your preferred
method.

We pinned tracing paper templates onto the felt.

Our felt colour choices:

  • The skate blade on grey.
  • The skate boot and dinosaur’s jumper on light blue.
  • The dinosaur and stocking heel, toe and cuff on green, and the stocking on pink.

felt-baubles-Step01

Step 2

Adding stitches to the green felt pieces (the dinosaur and the stocking)

On the green felt, work a French Knot in three strands of black for the dinosaur’s
eye.

Then, use Backstitch in light green to mark the leg lines on the dinosaur and the lines on the stocking cuff.

Finally, work Running Stitch in light green for the lines on the toe and heel pieces of the stocking.

felt baubles-Step02

Step 3

Add stitching to the pink felt pieces (the stocking)

On the pink felt, work the zigzag in Chain Stitch using light blue.

Add the stars in Straight Stitch using light green.

Stitch the dots as French Knots using light pink.

felt baubles-Step03


Step 4

Stitching onto the blue felt (skate boot and jumper)

On the light blue felt, use Backstitch in green for the holly leaves on the boot
and the trees on the jumper.

Work Backstitch in blue for the tongue and sole of boot, and the cuffs of the jumper.

Stitch the holly berries on the boot using Satin Stitch in red.

Lastly, work French Knots on the jumper in light pink for the tree baubles and in red for the dots.

felt baubles-Step04

Step 5

Cut out all of your felt pieces

Cut out all the elements, being careful not to snip through any of your stitching.

Gently tear away the tracing paper – use tweezers to remove small bits.

Step 6

Tack the layers of felt together

Use whipstitch in a matching colour to tack the layers of felt together.

Then, tack them to your backing felt – the dinosaur on pink, and the skate and stocking on red. Stitch the laces on the skate using Whipped Backstitch in light pink.

felt baubles-Step05

Step 7

Sew the baubles together and add your finishing touches

Trim around the edges, leaving a 5mm border, then cut out matching pieces of felt.

Tack loops of ribbon to the top of the back of each bauble.

Then, sew the fronts and backs together using blanket stitch in matching colours, leaving a 3cm gap.

Stuff each bauble and then close the gap using Blanket Stitch.

felt baubles-Step06
felt baubles

Made Christmas homemade with felt baubles

These felt decorations will add a splash of colour and quirkiness to your home this Christmas. They’re easy to make, and a fun festive project to work on in the darker evenings.

Keep the Christmas embroidery coming!

We have plenty more festive embroidery if you are looking for more inspiration! If you love bright and bold colours take a look at this vibrant embroidered stocking.

christmas tree embroidery – stocking