All products were chosen independently by our editorial team. This review contains affiliate links and we may receive a commission for purchases made. Please read our affiliates FAQ page to find out more.

How to embroider jeans with a vintage floral design

Breathe new life into a pair of jeans by adding a simple pocket flourish for an on-trend summer festival look with this gorgeous design by Jenny Billingham.

Try 6 issues of Love Embroidery magazine for just £9.99| SAVE 77%

Published: May 7, 2023 at 7:00 am

Grab your favourite pair of jeans and your embroidery kit! We’ll show you how to give your jeans an on-trend summer festival look.

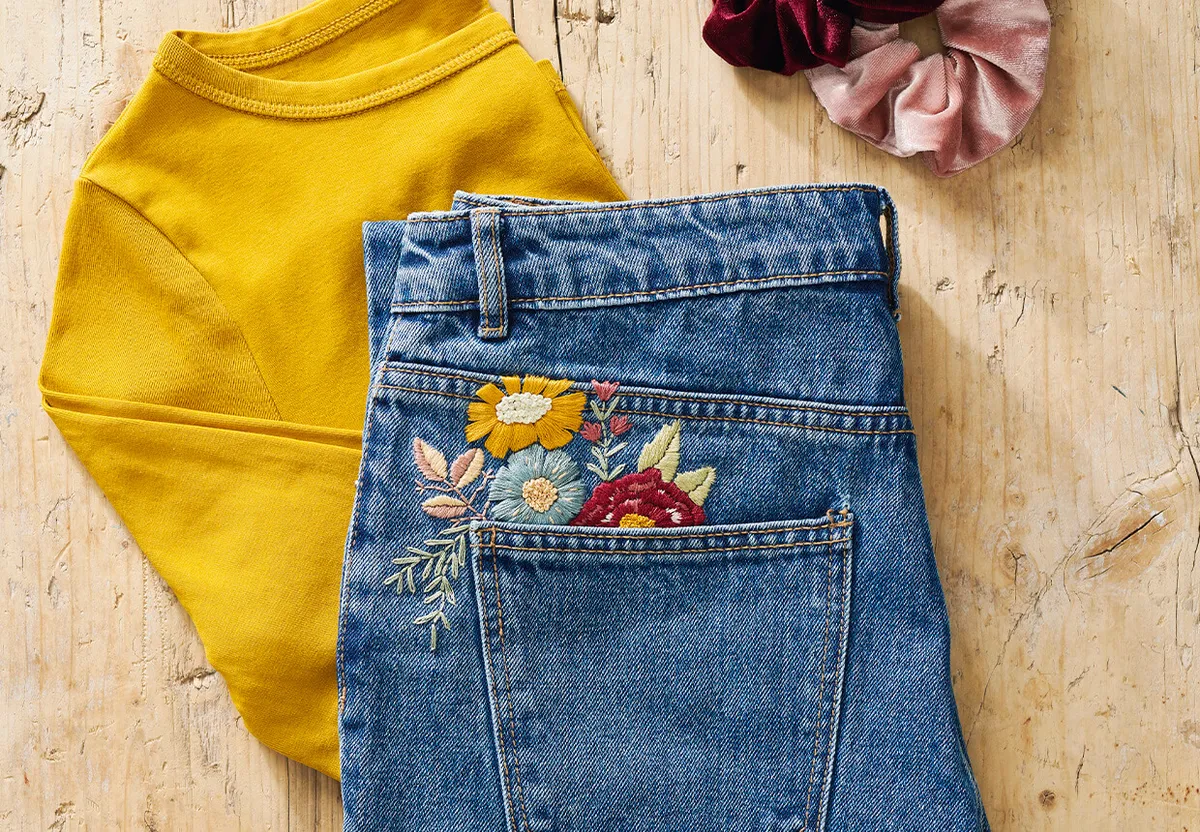
This floral design is packed full of vintage charm and will add a whole new dimension to your jeans! It’s simple to stitch, and much cheaper (and satisfying) than buying pre-embroidered items.

Denim embroidery: What denim can I embroider on?

We’ve chosen to stitch this design on the back pocket of a pair of stonewashed, vintage-style jeans which complement the subtle hues of the flowers.

You’re not limited to jeans, however, you can stitch this on any denim piece: think denim jackets, skirts and shorts.

For more on embroidery on clothes, check out our guide.

Where should I place the pattern on my jeans?

We’ve chosen the back pocket because it looks cute! It would also work well on the front of the upper leg, or the bottom of the leg near the ankle. If you want to do symmetrical patterns, simply flip the design and stitch it on the opposite side. For example, you could stitch both back pockets.

Top tips for embroidered jeans

Choosing an embroidery needle for denim

Embroidering on denim is slightly different than linen, it’s thicker and more rigid. Try these Chenille needles from Hobbycraft, which are sharper, thicker and have a bigger eye than a standard needle.

Choose suitable embroidery thread for denim

Ensure you use a high-quality washable embroidery thread. This means your work will stay looking fresh even after being washed. You can also use a thread conditioner if it looks a little ragged.


How to embroider jeans

For this design, we’ll guide you through the process step-by-step. If you need extra help with the stitch types, we have guides for those too! Find everything you need below including materials, stitches and your free template.

This embroidered jeans project was designed by Jenny Billingham and was originally published in Love Embroidery issue 16. Get your digital edition and discover the rest of the issue.

What stitches will I need?

Looking for more tips and tricks to upgrade your stitching? Check out our embroidery stitch library.

What materials do I need?

embroidered jeans main image

You will need:

  • Your choice of denim jeans, shorts or a skirt
  • Stranded cotton
  • Embroidery hoop
  • Water-soluble stabiliser
  • Basic embroidery kit

Step 1

Mount your jeans in an embroidery hoop

Begin by mounting the denim in a hoop, making sure the area you’re stitching on is central in the hoop. Take care not to overstretch the fabric as this can distort the finished design.

Top tip: Remove your denim from the hoop in between stitching sessions to avoid ‘hoop burn’ and try not to stretch the fabric too much in the hoop.

Step 2

Trace your design onto the jean pocket

Trace the design from the template onto a water-soluble stabiliser and then carefully cut around the design. Stick the stabiliser above the pocket.

Top tip: To stitch two pockets, flip the design.

embroidered jeans – step 1

Step 3

Work the large leaves on the rose

Use three strands of olive green to work the larger leaves on the rose in Satin Stitch.

Work both sides separately, creating a gap down the middle, and angle your stitches to follow the shape of the leaf.

Step 4

Lazy Daisy stitch for the leafy sprigs

Now, for the leafy sprigs. Backstitch the stems and add Lazy Daisy Stitch leaves to the stems using three strands of pale green.

embroidered jeans – step 2

Step 5

Pink flowers!

Then, work three Lazy Daisy Stitches for the pink flowers using six strands of deep pink.

Step 6

Stitch the medium leaves

For the medium leaves, use three strands of rose gold and honey to fill each leaf with Satin Stitch.

Step 7

Backstitch the stems

Then, use Backstitch to add the stems in three strands of rose gold.

Step 8

Work the rose in Satin Stitch

For the rose, work the petals in Satin Stitch using three strands of maroon, then add highlights of deep pink and pale pink.

embroidered jeans – step 3

Step 9

Fill the rose

Fill the centre of the rose with French Knots using three strands of mustard.

Step 10

Work the daisy

Moving onto the daisy, work the petals in Satin Stitch using six strands of mustard. Then add French Knots to the centre using six strands of cream.

embroidered jeans – step 4

Step 11

Stitching the blue flower

For the blue flower: fill the petals with Satin Stitch using three strands of blue. Then work French Knots in the centre using six strands of honey for the outer knots and three strands for the inner knots.

Then, still using honey, add a few Straight Stitches to the petals, following the angle of the stitches.

embroidered jeans - blue flower

Step 12

Wash your work

Now, gently wash away the stabiliser, check that all the threads are secure at the back, and leave to dry.

embroidered jeans - finished

Wear your embroidered jeans with pride!

Isn’t it satisfying to update your clothes with unique embroidery? It’s an excellent way to breathe life into old clothes and give them a second chance. Goodbye fast fashion!

Don’t let the embroidered denim stop there

Now you’ve embroidered a pair of jeans, it doesn’t have to stop there! Update your wardrobe with embroidery for a modern fresh look.

We have a fabulous guide to embroidered Converse, which is a lovely way to brighten up your kicks.

embroidered shoes main