Love is in the air! Create your special someone a DIY Valentines card and show them how much they mean to you. With our three simple DIY Valentines cards inspiration, you won't be short of romantic ideas, all of these designs are interactive too making them a real treat to open.
Handmade cards with an interactive element always have an added ‘wow’ factor and give so much joy to the recipient. Plus, they’re huge fun to make! Here we show you how to make three cards for Valentine’s Day each using different folds and techniques. They might look complex but it’s actually a lot simpler than you might think to make these special cards. Both all the design could easily be customised with your choice of sentiment or image to suit any occasion.
If you like these tutorials on DIY valentines cards, you might like to try some of our other categories of kinetic cards, here on Gathered. Why not try this double slider card, or how about this fabulous penny slider card? We love this invisible slider card!
If you’re in a crafty mood, why not check out the best glue gun and best die-cutting machine. Thinking about buying a craft printer? Check out our review of the best printer for card making.
We love seeing what you make, so don’t forget to share your craft projects with us on Instagram, Facebook or Twitter, too!
Below you'll find three fabulous DIY valentines cards to choose from, see the image below for a preview of the designs and you can click the link below to jump to your favourite design and find out how to make a valentines card:
Jump to your favourite design:
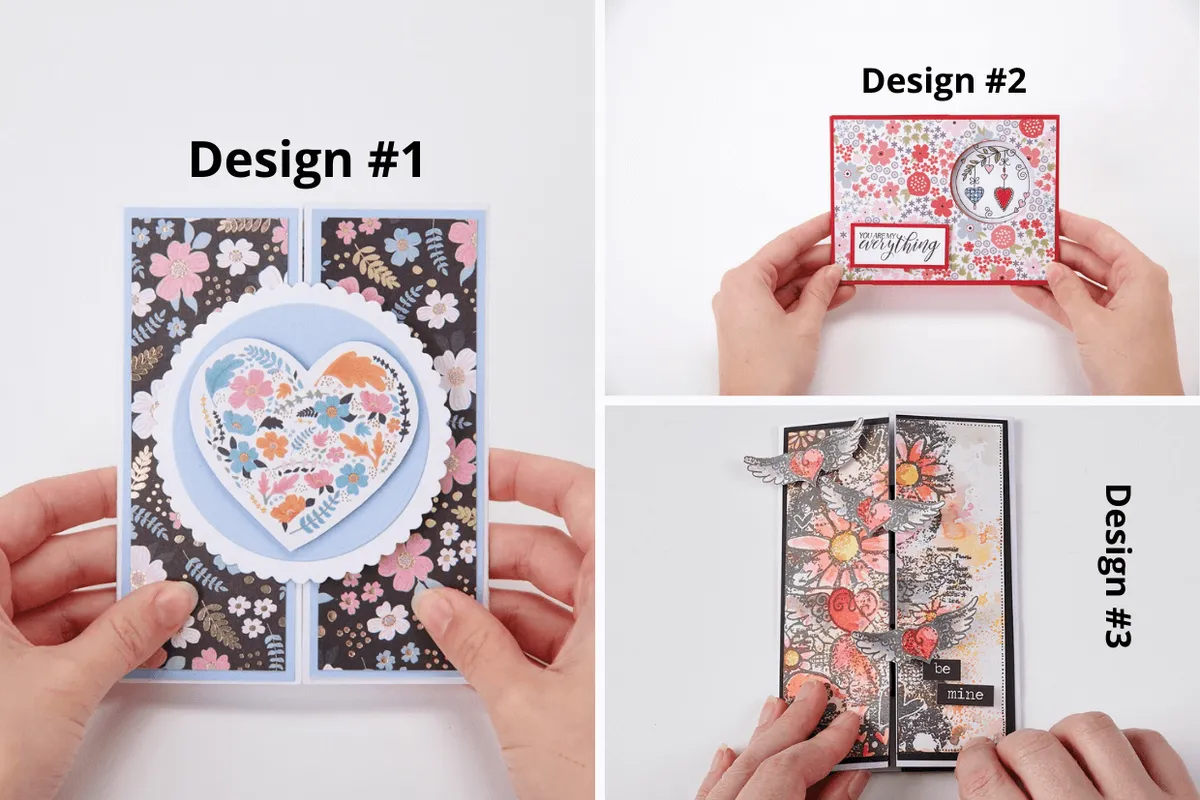
- Design #1 DIY Valentines card - magic shutter card
- Design #2 DIY Valentines card with secret message
- Design #3 DIY Valentines card with hidden message
DIY Valentines cards
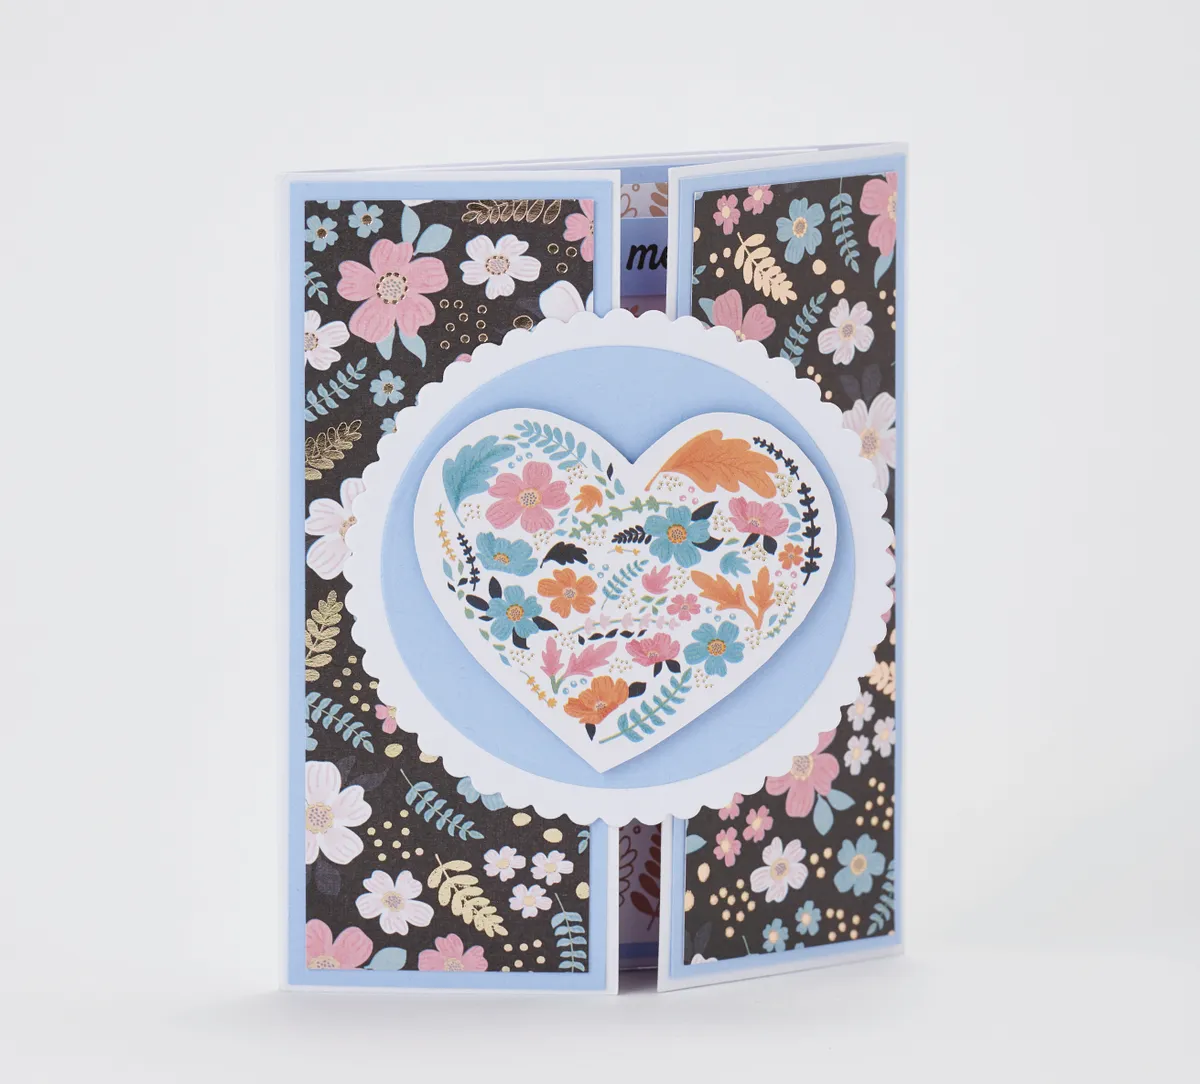
How to make a Valentines card - magic shutter card - design #1
Clever assembly and lots of layers are all it takes to create this magic shutter card! Read on to find out how to make a valentines card.
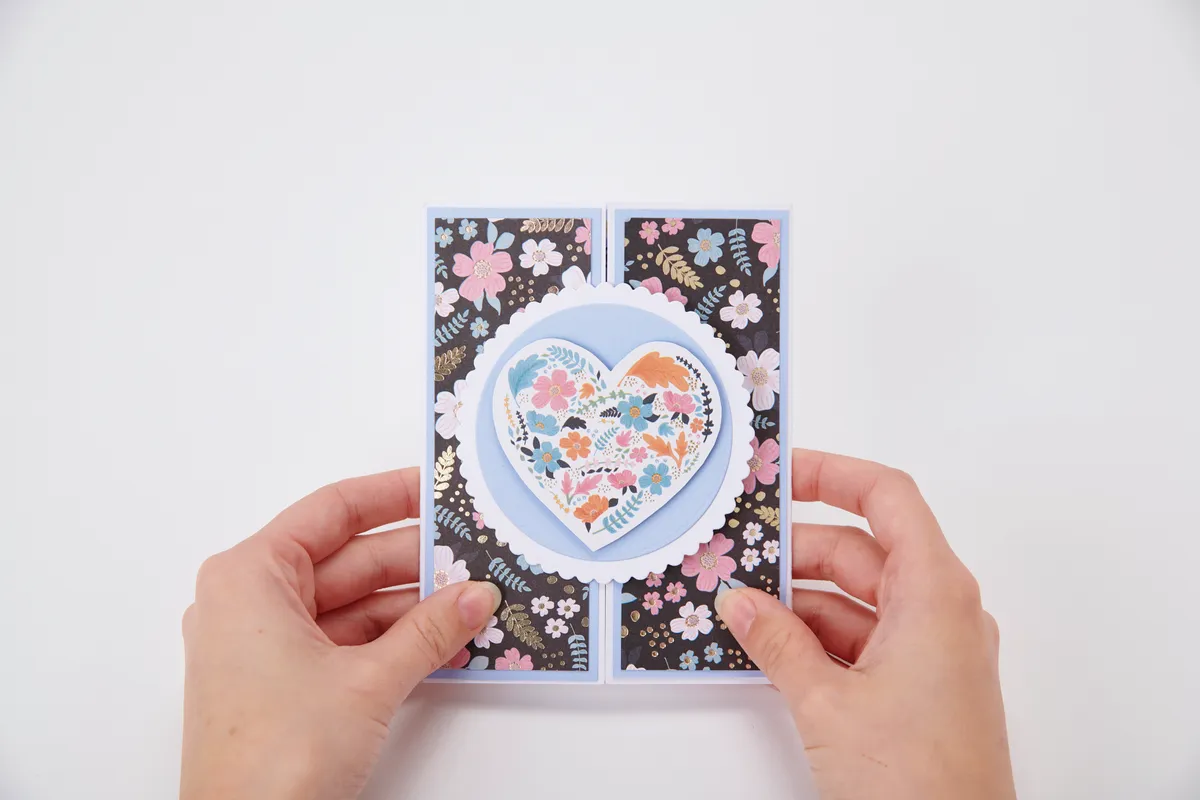

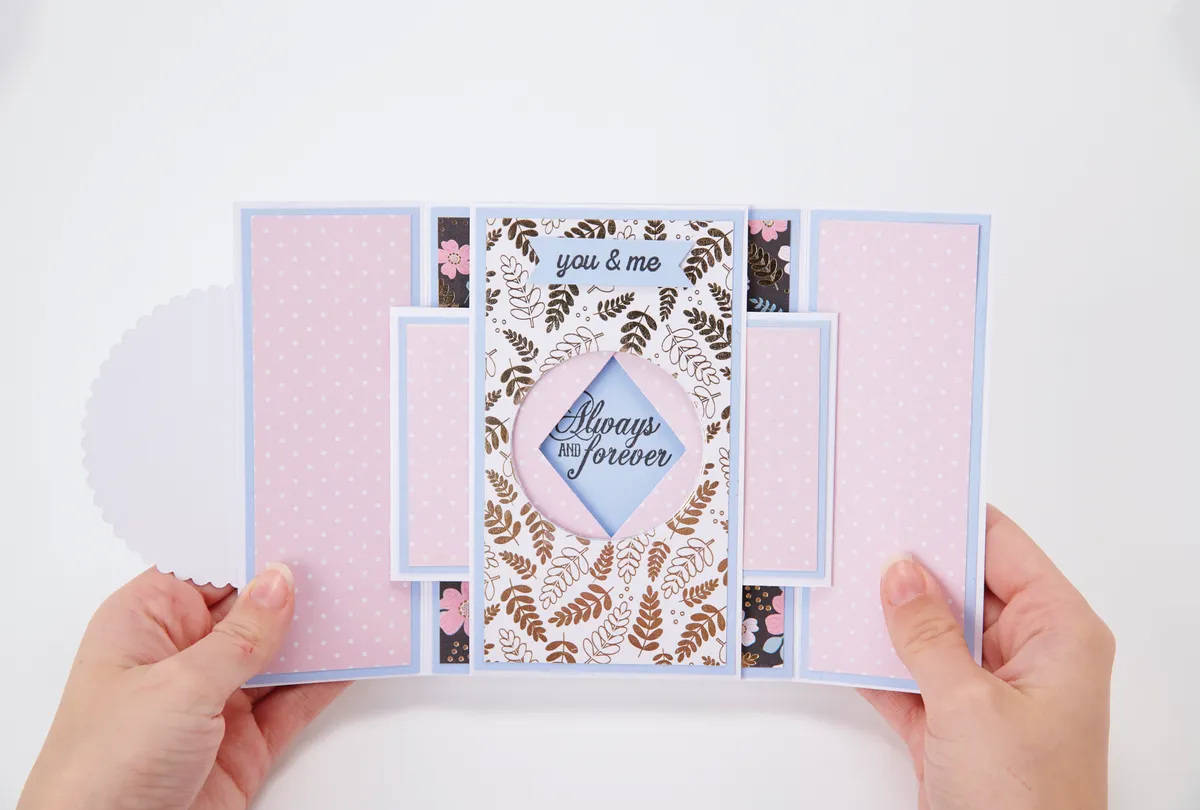
This card design is guaranteed to surprise and amaze the recipient! Simply open back the gatefold panels of the card to reveal the magic window nestled within the centre. A basic gatefold card base is magically transformed by attaching a flap to the inside of each of the side panels and an aperture panel over the top. When the card is shut the flaps will hide the secret sentiment, then, as the card is opened the sentiment under the circle aperture is slowly revealed as the wings are pulled away. The magic shutter card is slightly more complex than the peek-a-boo card but, yet again, it really is a lot easier to make than it looks.
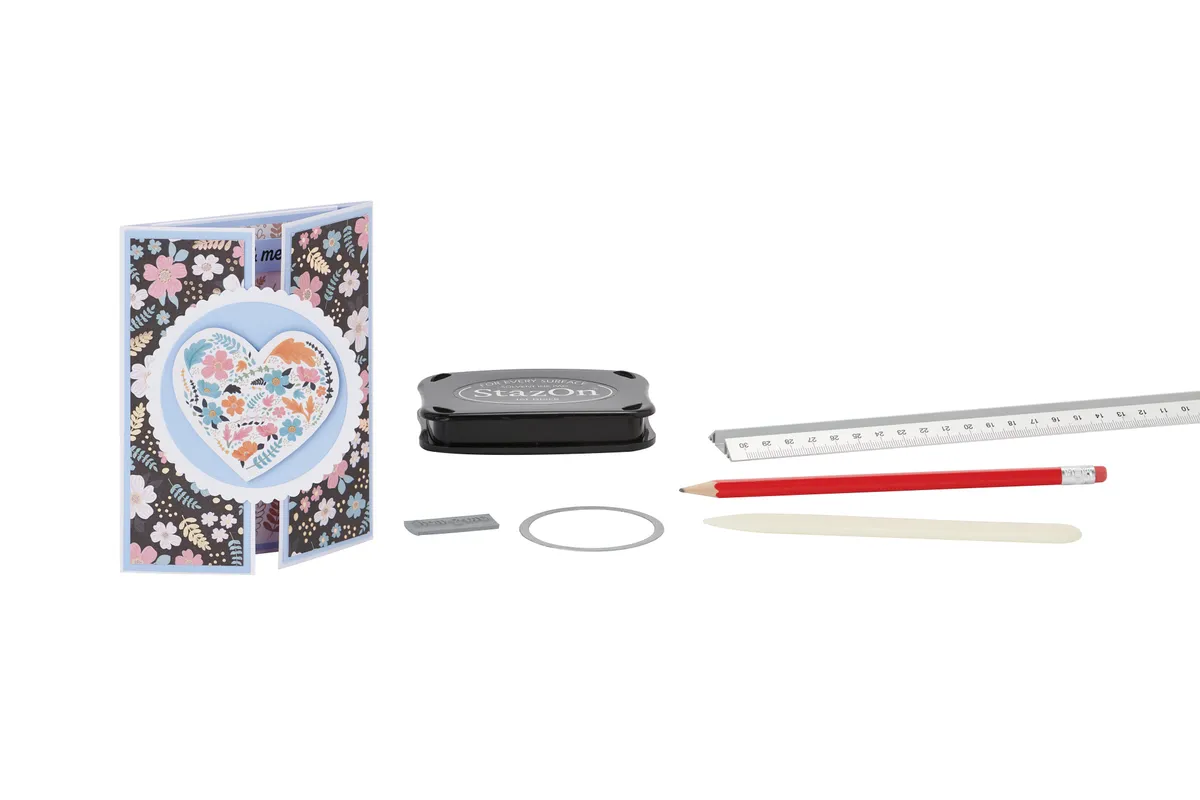
You will need
- Basic card kit
- Blue and white card
- Patterned paper
- Stamps
- Nesting dies – scalloped and straight-edged circles
- Ink pad
- Heart-shaped die
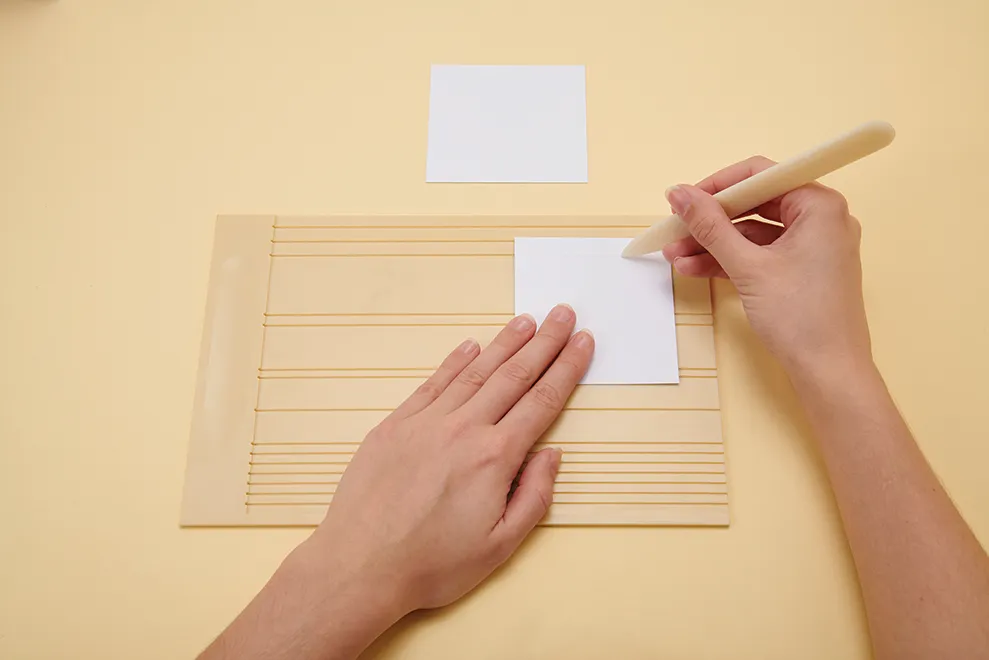
Step 1
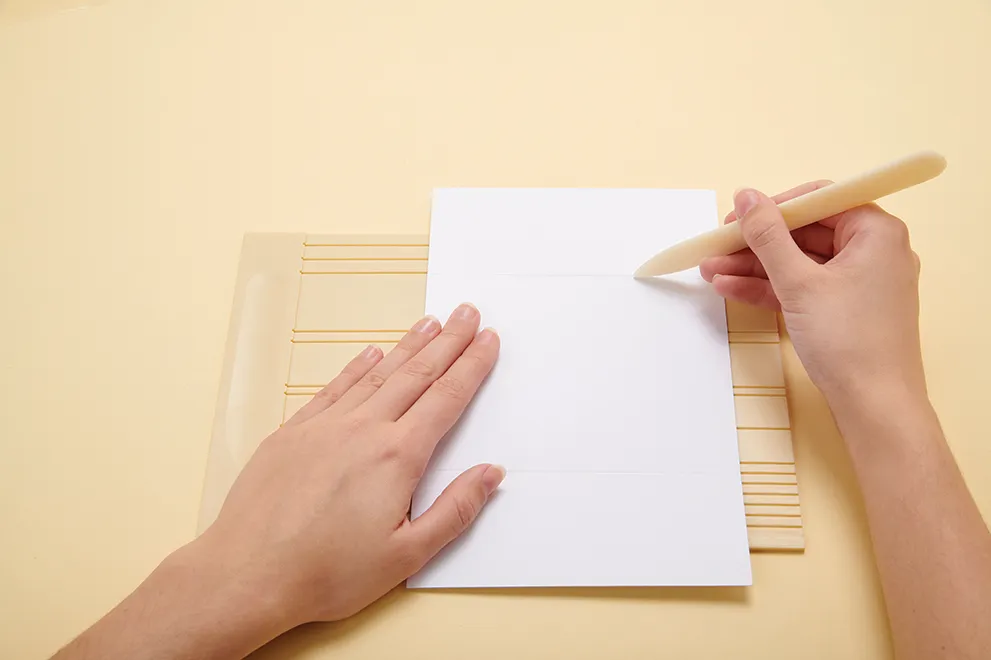
Cut a 22 x 14cm piece of white card. Score at 5.5cm from each end. Fold each side along the score lines so that the sides meet in the middle to form a gatefold card base.
Step 2
Cut two pieces of floral patterned paper to measure 4.5 x 13cm, and two 5 x 13.8cm pieces of blue card. Layer the floral on the blue, then attach to the two side panels of the card base.
Step 3
Open out the card base. Cut two pieces of patterned paper to measure 4.5 x 13cm, layer onto 5 x 13.8cm pieces of blue card and attach to each of the inside side panels.
Step 4
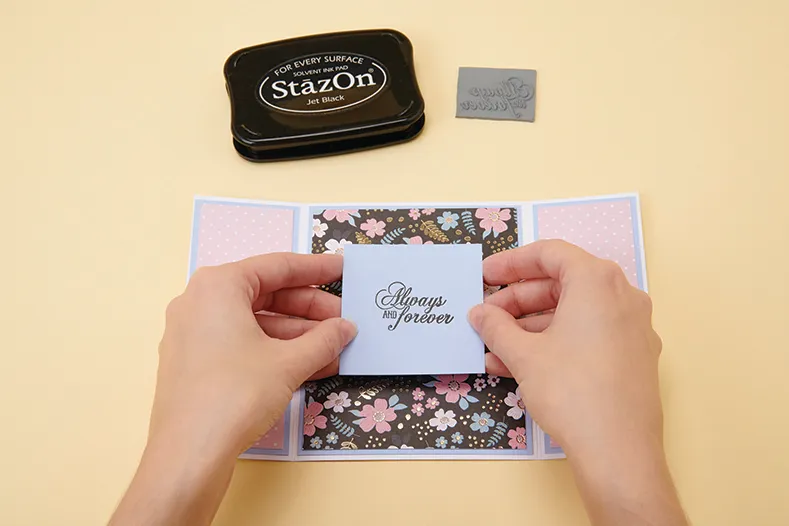
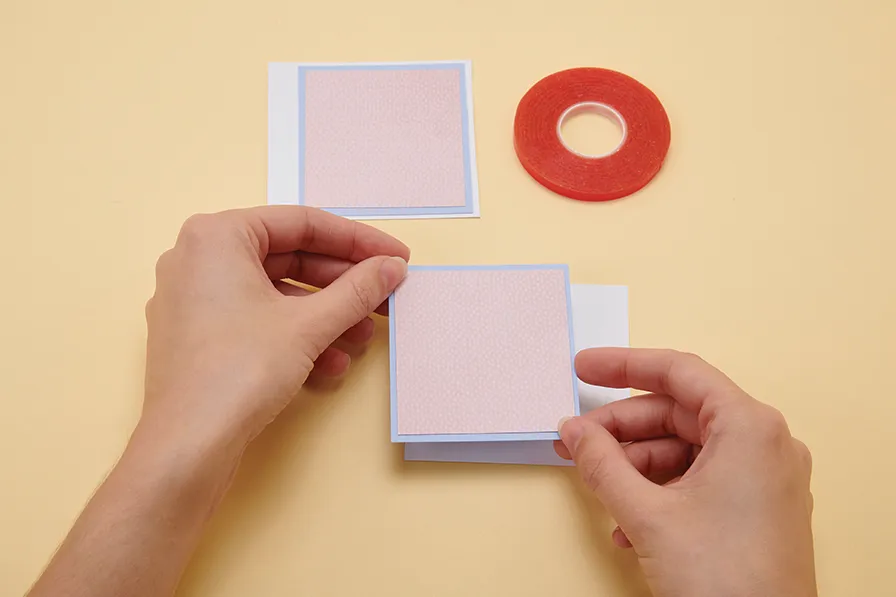
Cut some patterned paper to 10 x 13cm. Layer on 10.5 x 13.8cm of blue card. Attach to the centre inside panel. Stamp a sentiment (we've gone for Always & Forever) on a 7cm square of blue card and stick it in the centre.
Step 5
Cut two pieces of white card to 8 x 8.5cm. Score and fold 1cm from the left side of one to make the left side flap. Score and fold 1cm from the right side of the other piece for the right flap.
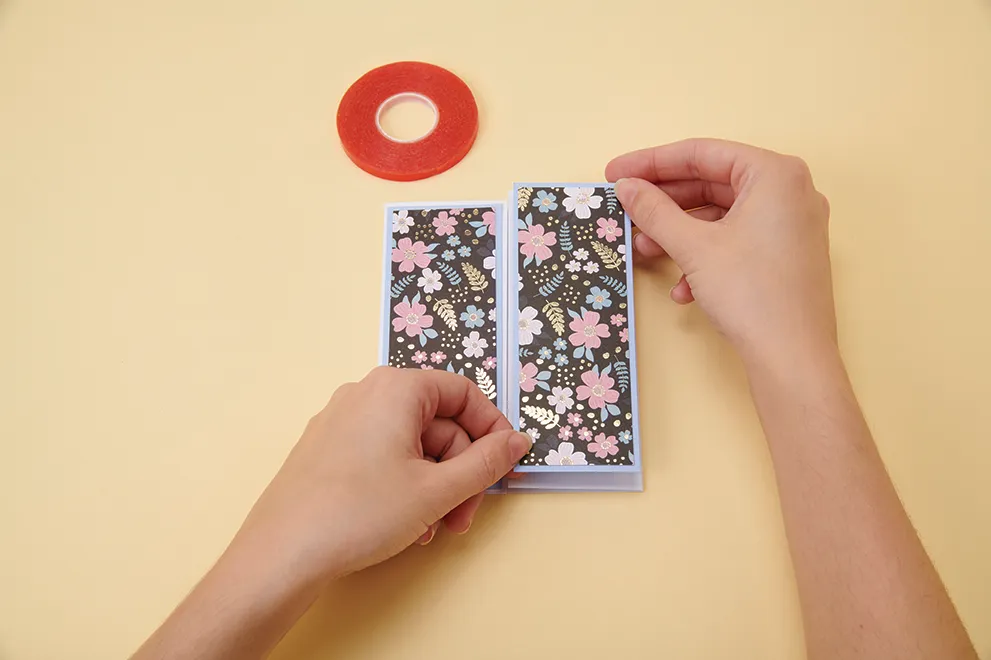
Step 6
Cut two pieces of 7 x 6.5cm patterned paper. Layer onto 7.5 x 7cm pieces of blue card and attach to each of the side flaps. Draw a vertical line 3.2cm from the edge opposite the flaps.
Step 7

Mark the central point on the line – this should be 4cm in. Working inwards, cut from the corners to the marked centre point to form a fishtail shape on each piece.
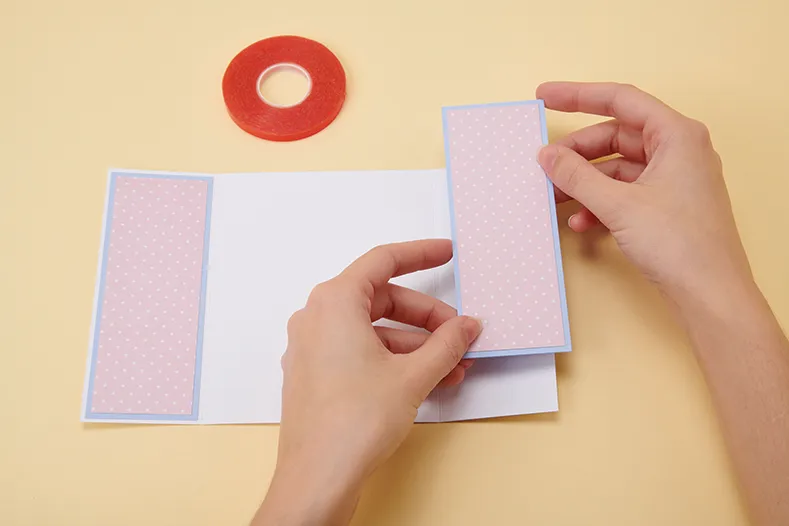
Step 8
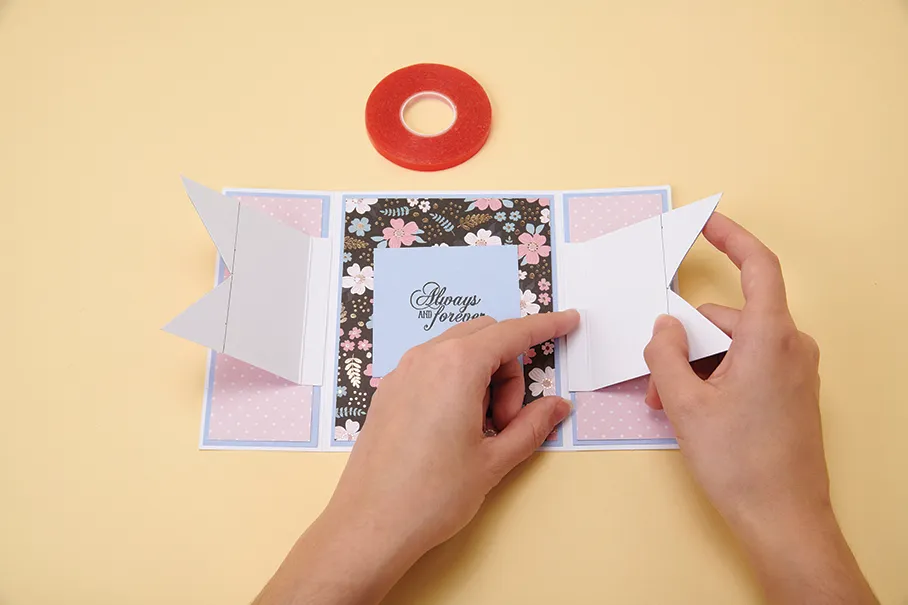
On the right side, measure 2.8cm down. Attach the right tab to the right panel, lining the edge with the fold. Repeat on the left. Arrange the fishtail points to interlock.
Step 9

Cut white card to 8x16cm. Score at 1cm and 15cm and fold in. Layer with a 7 x 13cm piece of patterned paper, mounted on blue card. Place a 5.5cm circle die 4cm from the top and die cut.
Step 10
Stick the top flap centrally inside the card in line with the top edge of the card base. Stick the other flap along the lower edge so the panel sits over the interlocking fishtail tabs.
Step 11
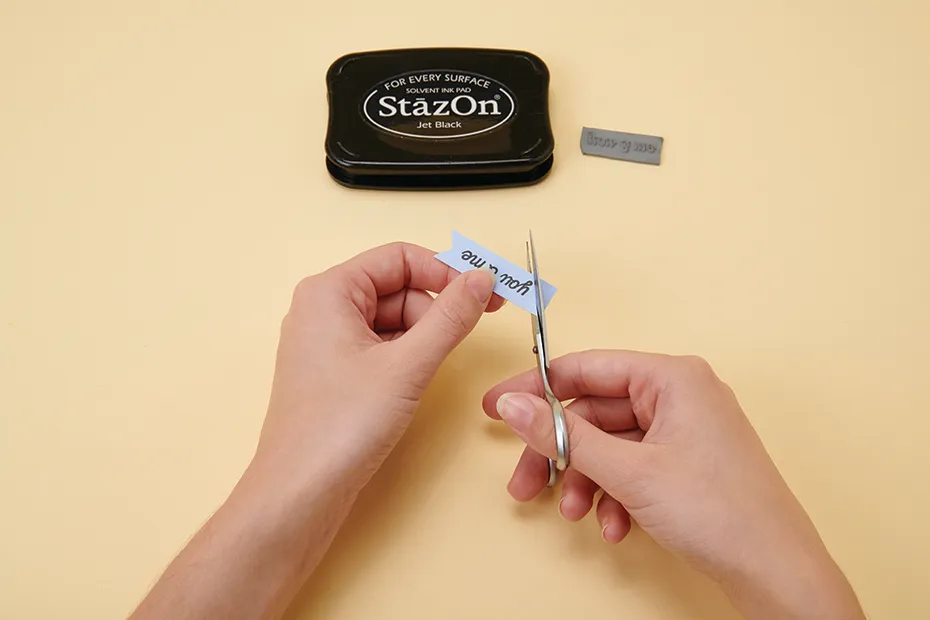
Stamp a sentiment onto some blue card and snip into each side to form a fishtail shape. Attach on the inside panel of the card with sticky foam pads, near to the top edge.
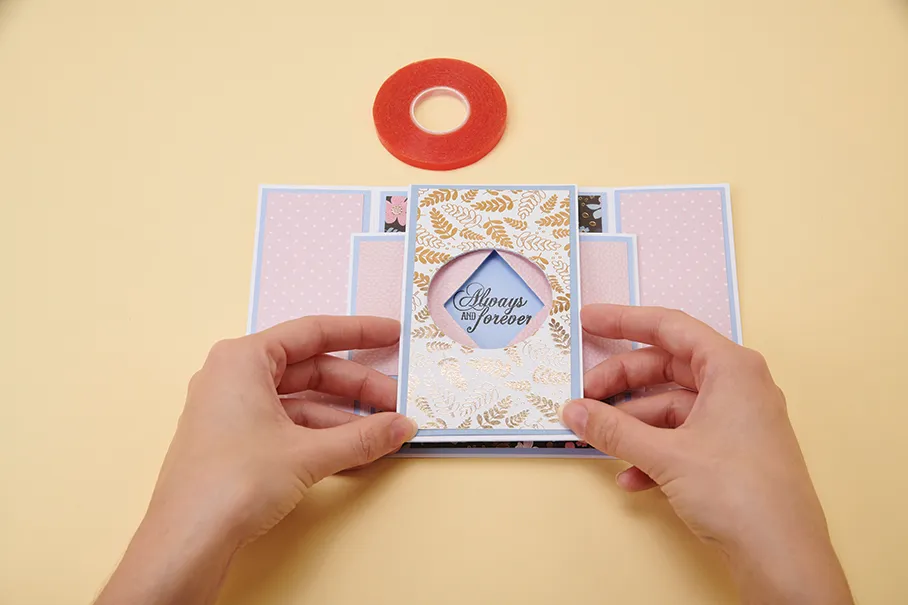
Step 12
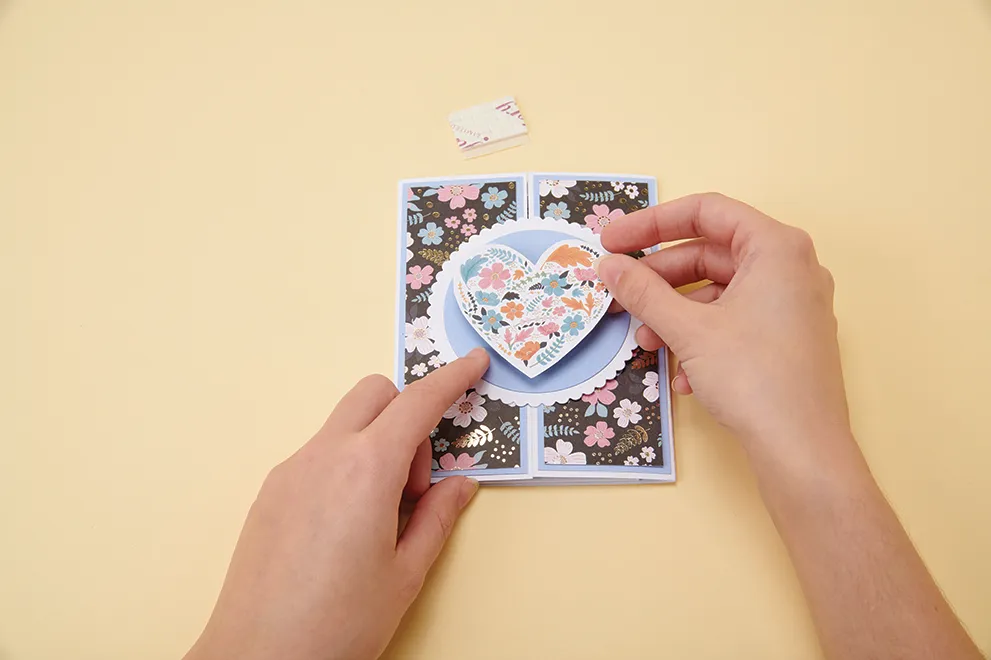
Cut a heart from the patterned paper, attach it to a 7.5cm circle of blue card with sticky foam pads and layer it on an 8.7cm white scalloped circle. Attach to the left panel of the gatefold.
How to make a Valentines card with secret message, design #2


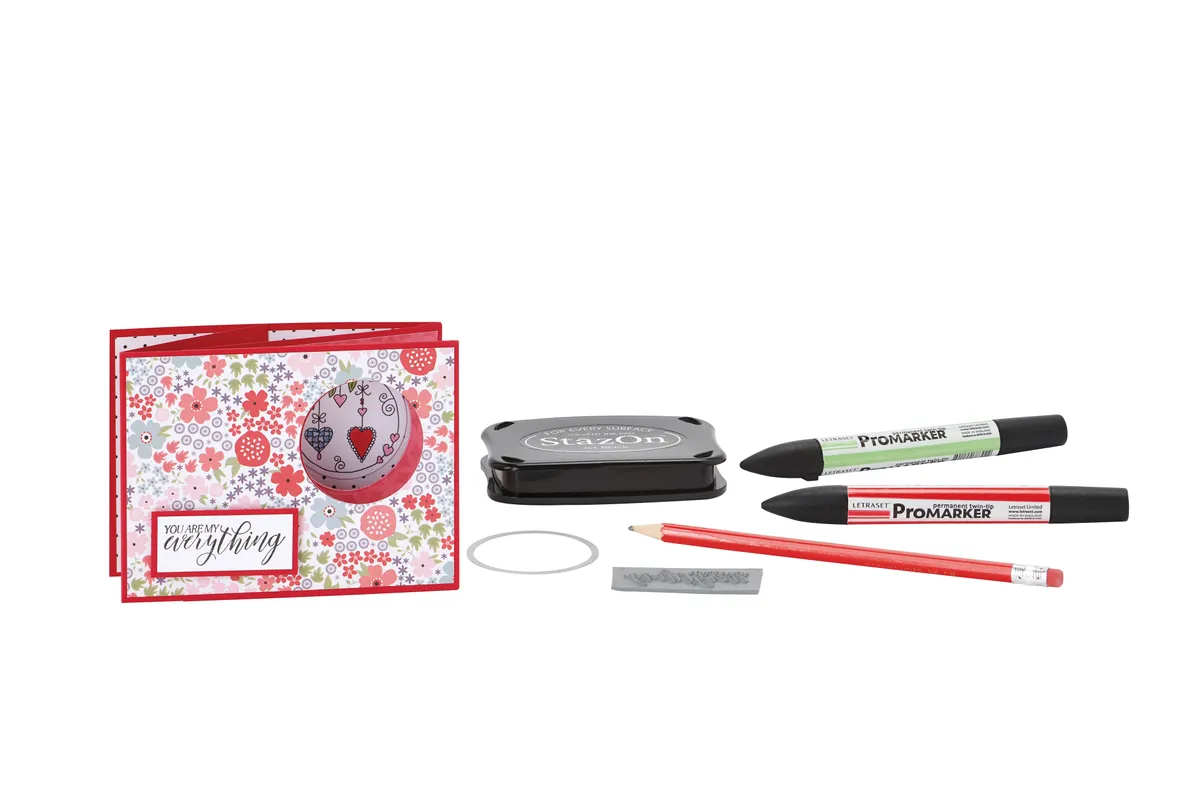
You will need
- Basic card kit
- Red and white card
- Patterned paper
- Stamps
- Circle dies
- Ink pad
- Alcohol markers
Step 1

For the front panel (panel a), cut some card to measure 20.5 x 10cm and score at 13.5cm. For the centre panel (panel b) cut to 14.5 x 10cm and score at 13.5cm For the back panel (panel c) cut to 10 x 22cm and score at 11cm (i.e. fold in half)
Step 2

Layer a 13 x 9.5cm piece of floral patterned paper over the front panel (panel a) - this is the front of your card. Open up the front panel (panel a) and lay it on top of the back panel (panel c), with the short side of the front panel on the left-hand side.
Make sure the top right-hand corners of the back and the front panel line up. At this point, the back panel should be folded in half, with the opening on the right-hand side.
Die-cut an aperture in the top right of the card, going through all three layers at once. For this example, I’m using a 4.5cm diameter circle die. You may have to do several passes in your die cutting machine to go through all 3 layers. Try and position your die approximately 1.5cm from the top, and 1.5cm from the right edge.
You are aiming to cut an aperture in the front panel and both sides of the back panel.
Step 3
Cut two patterned papers to 10.5 x 9.5cm and stick them inside the centre panel. If you haven't done so already, fold the central card panel (panel b) at 13.5cm, creating a 1cm tab.
Just a note here - there is no die-cut hole in the centre panel (panel b).
(There is no picture for this step)
Step 4

Fold the back panel at the 13.5cm scored line. Decorate as you please! To join your cards together, adhere the centre panel (panel b) to the reverse of the back panel (panel c) along the right-hand side of the back panel.
Step 5

Fold the front panel along the scored line. Place onto the centre panel so that the apertures all align and the smaller folded side is between the centre and back panels. Then adhere the front panel (panel a) to the back panel (panel c) along the front right-hand edge.
Step 6

Stamp or print an image - we've gone for a heart image, and colour. Stamp the sentiment onto some white card. Circle die cut both. Shut the card and stick the heart image into the aperture so it attaches to the back panel. Make sure the short flap of the front panel is tucked between the back and the centre panels.
Step 7

Fully open the card so the inside of the front panel moves into the aperture. Glue in the sentiment. Stamp a second sentiment onto some white card. Attach to the front with foam pads.
You've finished! We hope you enjoyed creating this fun valentines day card, and we're sure your significant other will adore it.

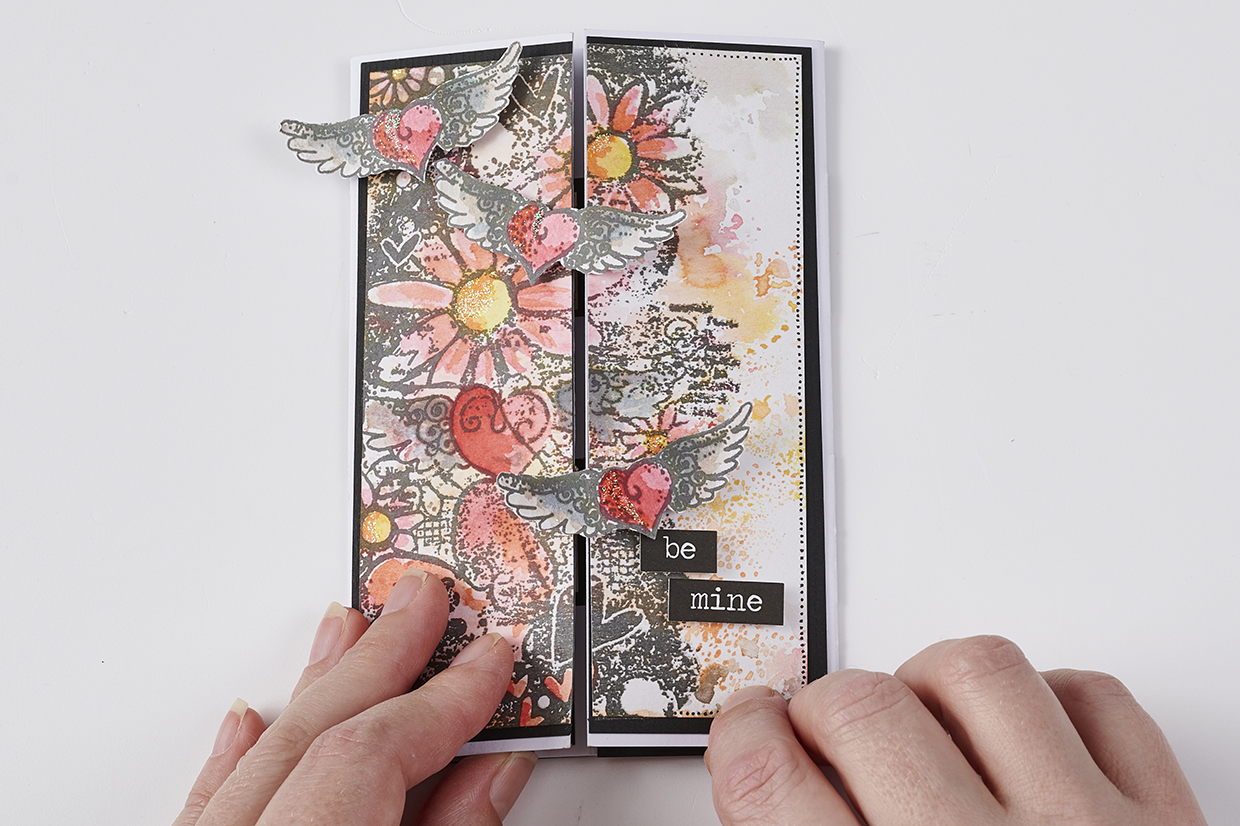
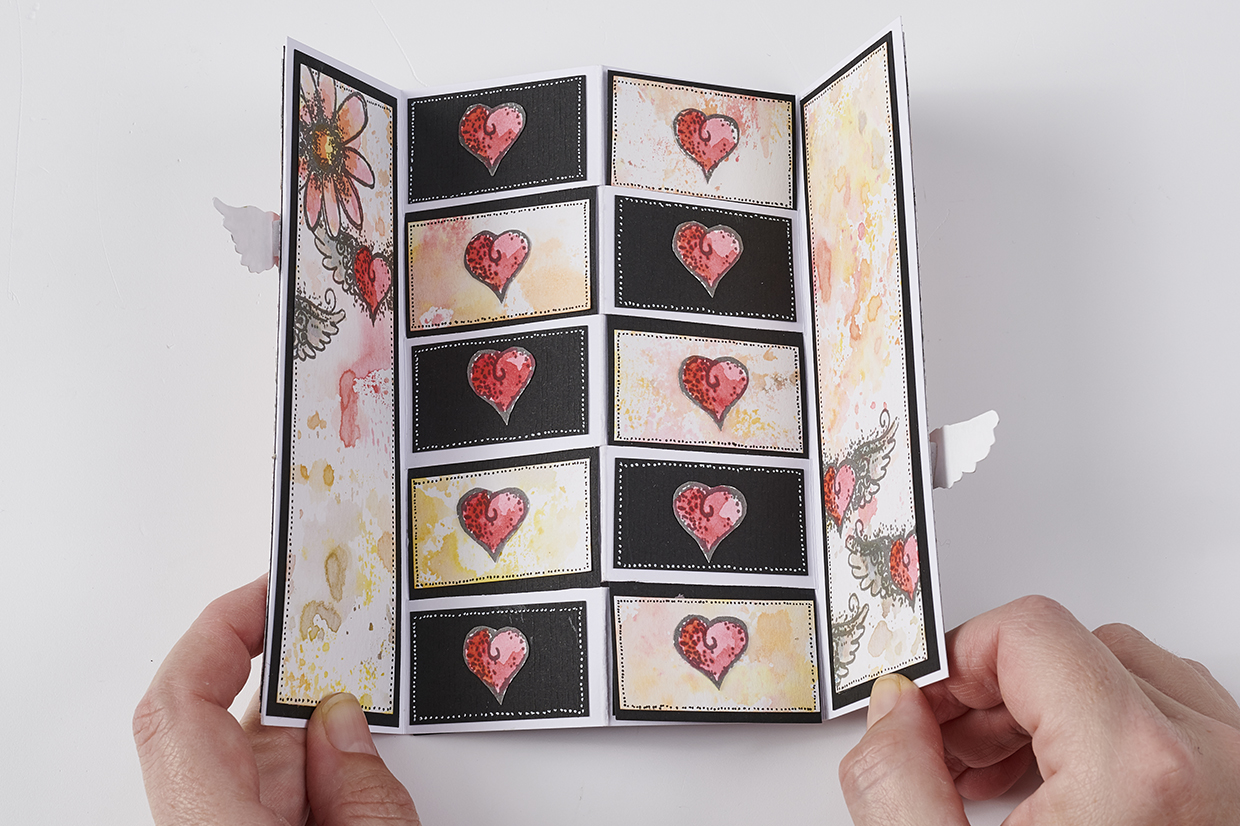
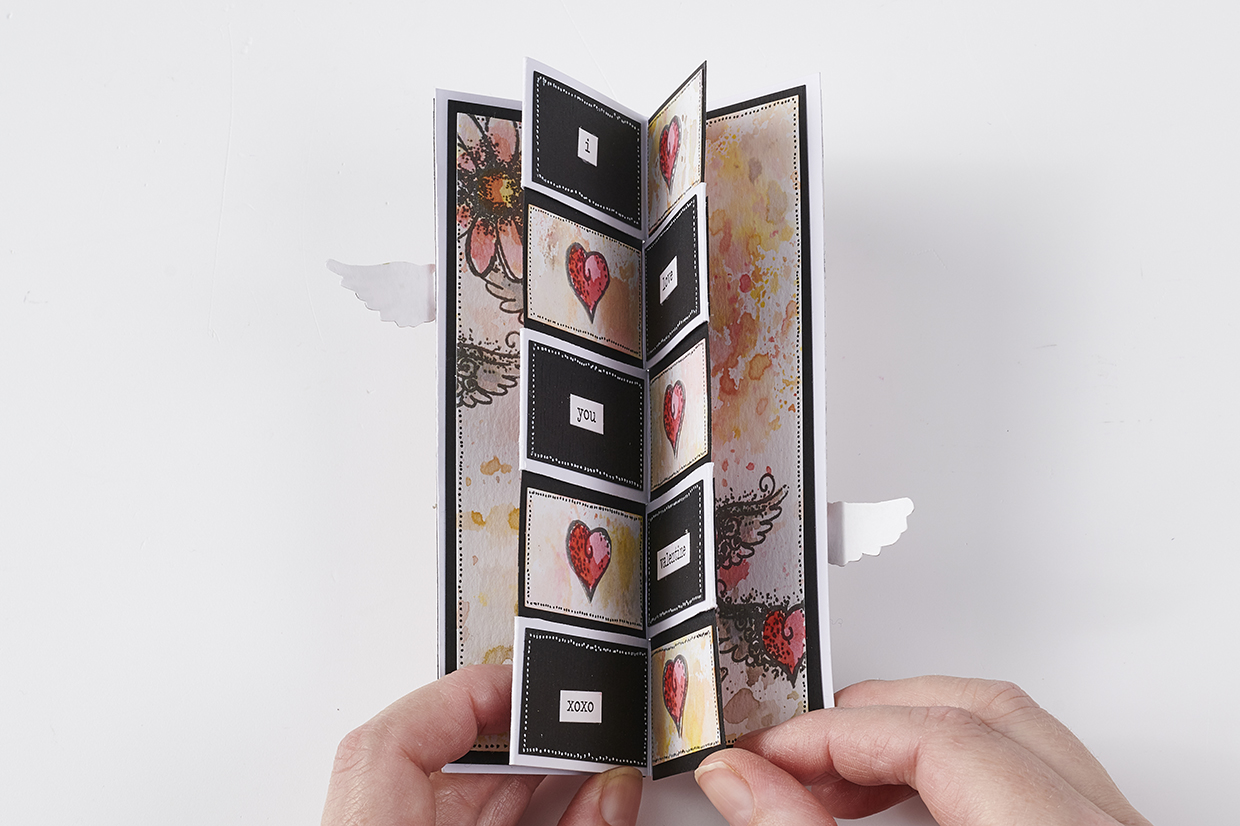
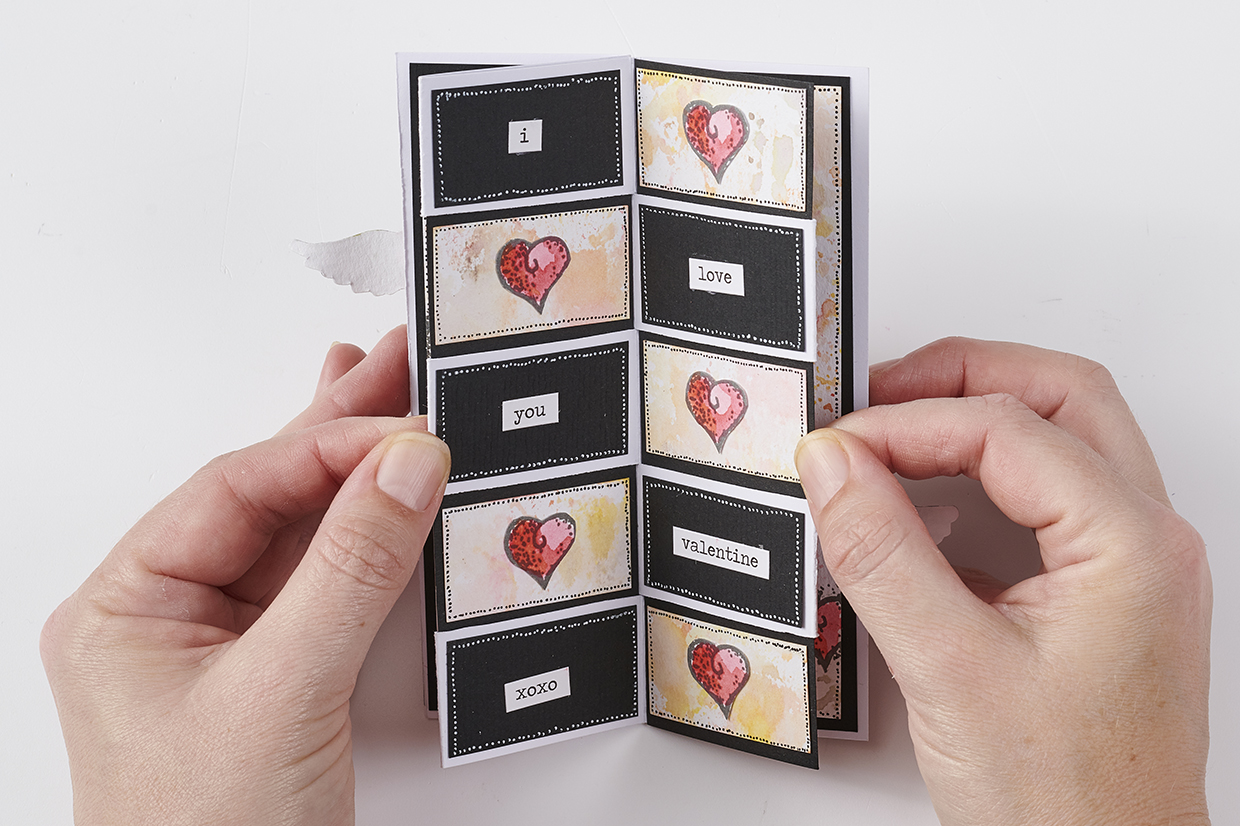
How to make a Valentines card with hidden message, design #3
This clever card is interactive. Use the template and our tutorial to make a card that folds out to reveal a secret hidden message. Follow our step by step to make the Valentines design we show here, or watch our tutorial video to see how the card fold is made, and decorate as you wish for any occasion
You will need:
To make the card base
- Your free template
- Card in 2 contrasting colours
- Craft knife, ruler and cutting mat
To decorate the card as we have done
- Stamps to Inspire - Queen of Hearts Collage and Queen for the Day Collage, from Polkadoodles
- Archival Ink - Watering Can, from Paper Artsy
- Tim Holtz Idea-ology Chitchat Stickers - Big Chat, from Buddly Crafts
- Gel pens in black and white
- Iridescent glitter glue
- Distress Inks - Stormy Sky, Ripe Persimmon, Spun Sugar, Festive Berries, Worn Lipstick, Dried Marigold, Scattered Straw, Squeezed Lemonade, Pumice Stone