Step 1
First, download the SVG or PDF files to make your own Christmas Garland.
SVG Files*: How to make a Christmas Garland, sleigh
SVG Files*: How to make a Christmas Garland, reindeer
PDF files: How to make a Christmas Garland PDF files
*For the SVG files, the image will open in a new window – this is not a mistake, this is how it is supposed to be.
If you are using a PC, right-click and “save as”. Choose a location on your PC to save, and click “save”. The image will save to your PC as an SVG file, which you can import into Brother Canvas.
If you are using a Mac, press “control” on your keyboard + click the mousepad at the same time (this is the same as right-clicking on a PC). Choose a location on your Mac to save, and click “save”. The image will save to your Mac as an SVG file, which you can import into Brother Canvas.

Step 2
Use the templates to cut out all the shapes from coloured card. Using the traditional method simply download the PDF and use to trace the shapes on to card.
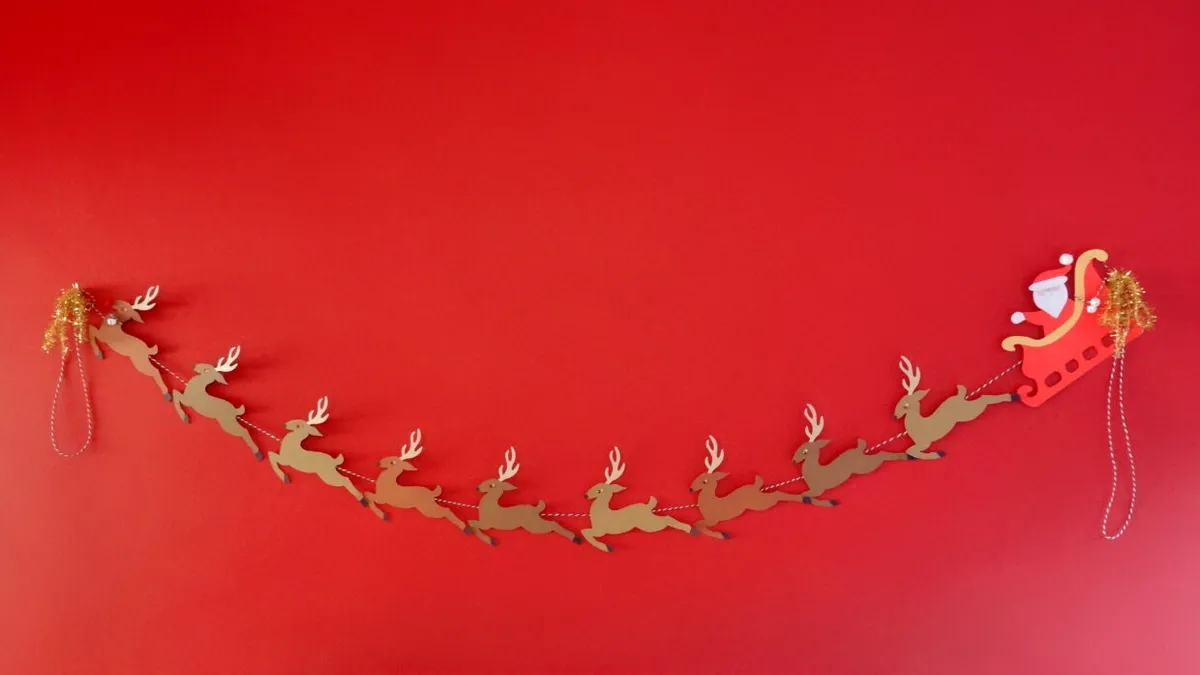
Cut Santa Sleigh from red cardstock.
These simple base shapes can be used as they are to create a garland, or you can use the provided layering shapes to add the details as follows:
- Cream card – 9 x antlers, 9 x deer eye
- Black card – 9 x pairs of hooves, 8 x deer nose
- Yellow card – sleigh trim
- Pink card – Santa face
- White card – beard, moustache, hat trim, hat bobble, glove
- Reindeer shapes – 9 from brown cardstock, For variety, use three different shades and cut three of each.
If you are using a Brother ScanNCut machine, scan them into your Brother ScanNCut machine. Alternatively, send or download the SVG cutting files to your machine.

Step 3
Using a clear drying glue, attach the antlers, hooves and an eye to each of the nine deer. Attach noses to eight of the deer (Rudolph will have a different nose later!)

Step 4
Optional, add a pale brown or orange adhesive gem to each of the deer’s eyes.

Step 5
Line up and glue yellow sleigh trim onto the sleigh.

Step 6
Line up and glue Santa’s beard onto his face and then onto the main sleigh piece. Attach hat trim, hat bobble and glove to hand.


Step 7
Add some pale blue adhesive gems as eyes (or you can use the provided cutting shapes to cut eyes from blue card if preferred)

Step 8
Glue a small red pompom onto one of the deer (this one will be Rudolph!) and a white pompom to Santas hat, if desired.

Step 9
Assemble your Christmas Garland. Turn over the red-nosed deer (Rudolph) and add a line of thin red liner tape (or glue gun if preferred) across the back of the deer’s body. Take a roll of twine, (allowing some to overhang to create hanging loops) and adhere the twine across the tape, pressing firmly to secure.
Alternatively, place a small piece of tape over the twine to secure your sleigh and reindeer.


Step 10
Take another deer and turn over, so still working on the reverse and repeat, adding a line of tape as before, pressing firmly to secure.
Continue adding deer in the same way, evenly spacing them out, until you have attached all nine of the deer (if you are creating a single long garland, alternately you could split it into two smaller garlands).

Step 11
Attach the sleigh in the same way, adding a line of red liner tape and pressing down firmly to secure. Ensure you leave an overhang of twine before cutting it, to provide enough for hanging loops.

Step 12
To add extra detail and a fun element, thread two small white jingle bells onto some twine and attach them to the sleigh. Add another bell threaded onto twine around Rudolph’s neck if desired.


