Autumn applique cushion: Fall Applique Designs

Spruce up your Autumn decor with Jo Avery's gorgeous fall applique designs!

6 issues of Today's Quilter magazine for just £9.99|Save 76%

Published: October 28, 2021 at 8:16 am

The latest in our series of seasonal cushions, Jo Avery is here to teach you how to make her fall appliqué cushion that's full of the warm colours and pleasing leaf shapes that characterise this season. Her fall appliqué designs are pretty, easy to sew and make the perfect Autumnal project. The orange, yellow and magenta fabrics add warmth and brightness to the design and we just love it. Her cushion pattern was originally from issue 14 of Todays Quilter. Pick up a copy of their latest issue for more seasonal quilting projects. Now it's over to Jo and her fall applique designs!

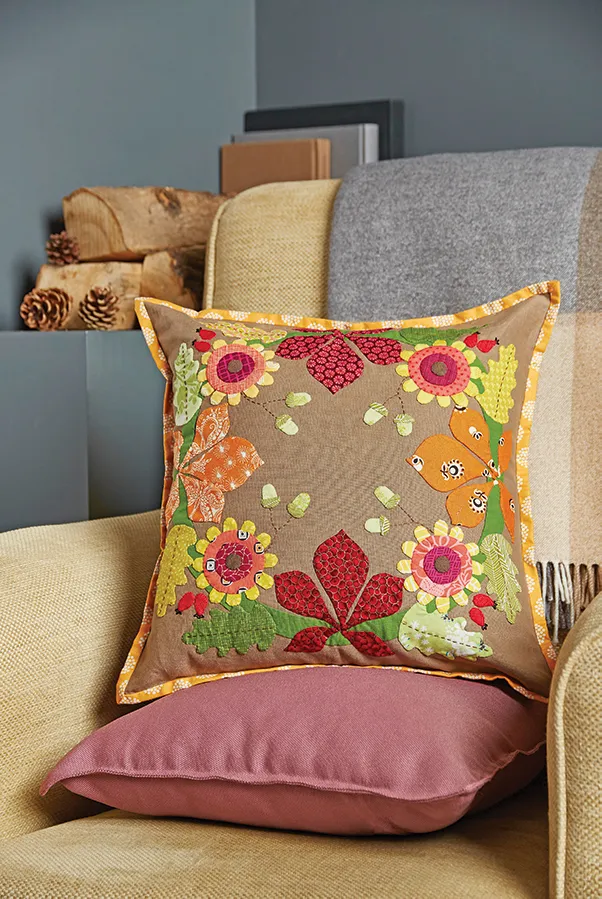
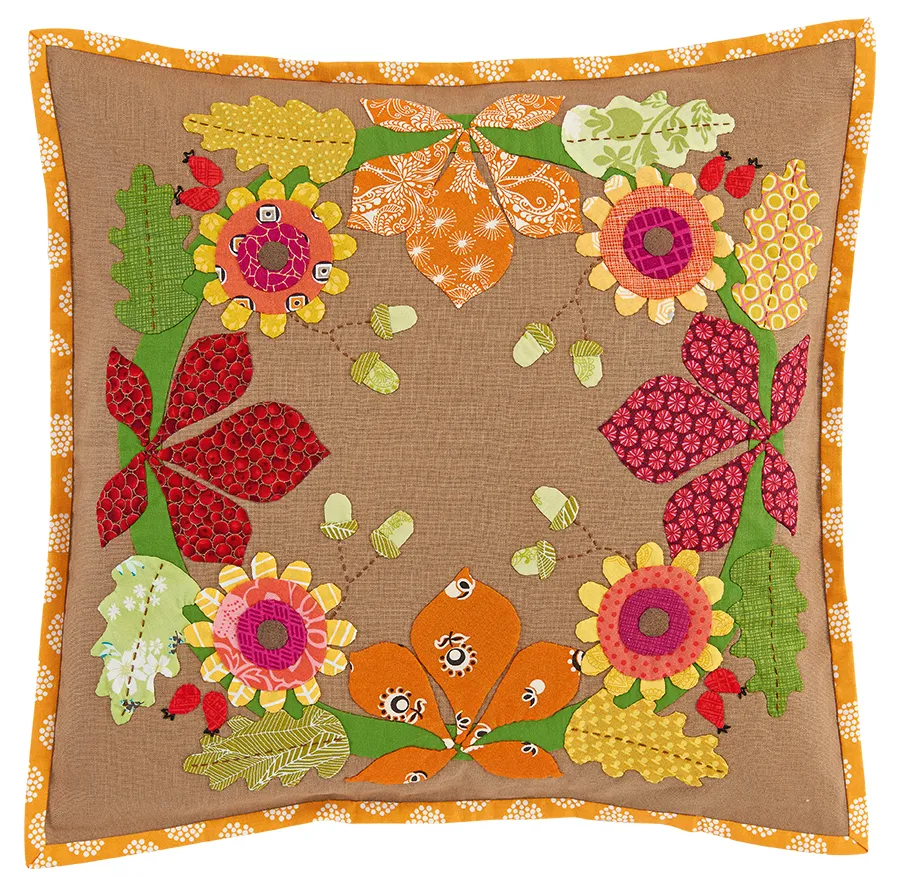
Autumn is all about faded glory as the colours leach away and become more muted. But there is still much beauty to be had, and for many this is their favourite time of year. I knew this design had to focus on leaves, so I chose a real show-stopper, the horse chestnut for the star attraction, and emphasised the rich oranges and reds of late autumn. 
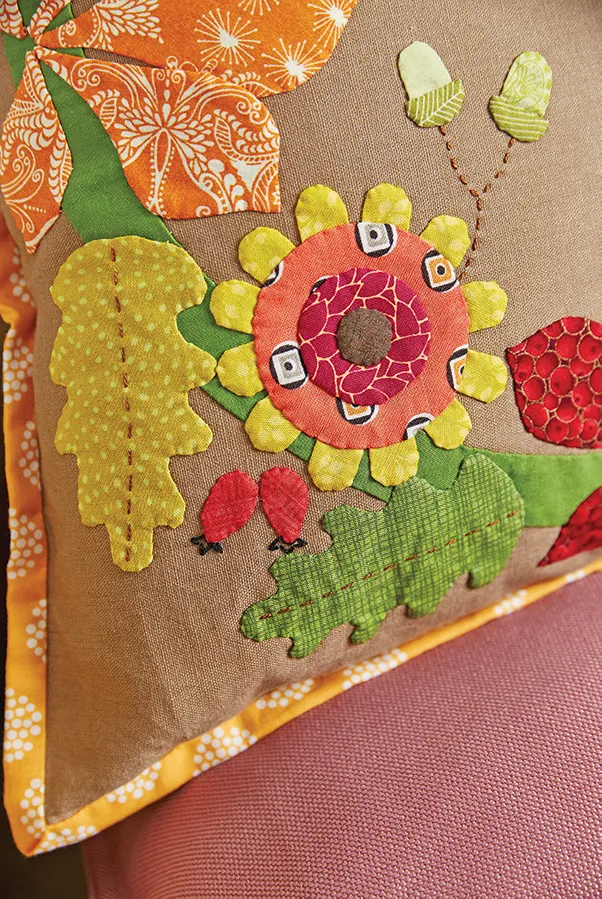
The oak is one of the last trees to turn and therefore I could justify a few green leaves among the warmer colours. I knew there had to be at least one flower, so I chose the showy chrysanthemum and was especially thinking of the variety with petals that change colour from the centre out. I couldn’t resist adding the acorns and rose hips, small details in the design yet so important for the wildlife in the winter ahead.

Autumn applique cushion Fall Applique Designs
Autumn applique cushion close up Fall Applique Designs

You will need

  • Background and backing – half a yard of linen or linen mix fabric
  • Green fabric for stem – 15in square
  • A variety of orange and red fabrics for horse chestnut leaves – 12in x 14in in total
  • A variety of green and yellow fabrics for oak leaves and acorns – 10in square in total
  • A variety of yellow fabrics for chrysanthemum petals – 8in square in total
  • Scraps of coral, magenta, brown and red fabrics for chrysanthemums and rose hips
  • Pencil/removable pen
  • A small amount of brown and black perle cotton 8 thread
  • Binding fabric – 5in x WOF
  • Iron-on interfacing – approx. 10in square
  • Cushion pad – 16in
  • Applique templates (see Templates page issue 14)

Finished size

16in square

Fall Applique Designs cushion flay lay

Notes

  • We used Essex Linen in Taupe by Robert Kaufman for the background and backing.
  • All seam allowances are ./₁₆in.

Jo's Technical Tip

I find wetting my needle helps when turning my fabric under while appliquéing. But be careful putting needles in your mouth, try having a small damp sponge near to you while sewing.

If you're new to quilting don't worry. Head over to our quilting for beginners guide for expert help and discover the best sewing machine for quilting with our round-up.

Fall applique designs

You will need:

  • Fabric
  • Pencil
  • Cotton
  • Binding fabric
  • Iron-on interfacing
  • Cushion pad

Cutting out

Step 1

From the background fabric cut one (1) 17in square and two (2) pieces measuring 12in x 17in, put these two pieces aside for your backing

Step 2

Using your paper templates cut out the following pieces:

  • Fold your square of stem fabric into four and use template A to cut one large ring.
  • Four (4) horse chestnut large leaves from orange/red fabric using template B.
  • Eight (8) horse chestnut medium leaves from orange/red fabric using template C.
  • Eight (8) horse chestnut small leaves from orange/red fabric using template D.
  • Eight (8) oak leaves from green/yellow fabric using template E.
  • Forty-eight (48) chrysanthemum petals from yellow fabric using template F.
  • Four (4) circles from coral fabric using template G.
  • Four (4) circles from magenta fabrics using template H.
  • Four (4) circles from brown fabric using template I.
  • Eight (8) acorns from green fabric using template J.
  • Eight (8) acorn cups from green fabric using template K.
  • Eight (8) rose hips from red fabric using template L.

Tips for appliqué preparation

Step 1

There are many ways to tackle needleturn applique, I will be sharing a number of different methods over the course of this year-long project. This month we try iron-on interfacing for difficult shapes like the oak leaves.

Cut a 2½in x 4in piece of iron-on interfacing and the same from your chosen fabric. Trace the leaf shape onto the matt side of the interfacing using the inner dashed line of your oak leaf template (E).

Carefully cut out the leaf shape.

Place interfacing shiny side down on to the wrong side of your fabric.

Fall Applique Designs Fig 1

Press lightly from the fabric side (Fig 1). Make sure your iron is not too hot or it will melt the interfacing.

Fall Applique Designs Fig 2

Cut around the leaf shape leaving a 316in seam allowance. Very carefully snip into all your inner curves almost but not quite up to the interfacing (Fig 2).

Fall Applique Designs Fig 3

Pin in place and begin needleturn applique as before (Fig 3). You should find it much easier to get the exact shape of these difficult curves with the interfacing template to guide you. If you like this method you can try using it for all your pattern pieces here.

Making the cushion

Step 1

First trace the pattern on to the 17in background square using a pencil or removable pen such as a Pilot Frixion pen (which irons away). Fold the fabric square in half twice to crease a centre cross guideline. Trace the quarter circle pattern onto your fabric square one quarter at a time, using the folded lines as a guide. If you can’t see the pattern lines easily through the fabric try taping to a window, your computer screen with the light turned up or go over the pattern lines with a thicker pen. The pattern is just a guide and does not need to be too accurate.

Step 2

Fall Applique Designs Fig 4

Begin by appliqueing the stem ring in place. Pin or tack in place then stitch down using a tiny neat slip stitch and matching thread (Fig 4), turning under the raw edges. Be careful not to stretch the fabric where it is cut on the bias.

Step 3

Fall Applique Designs Fig 5

Pin your large horse chestnut leaf in place and stitch down as before, you will need to snip the slight curves a little. Stitch down the medium horse chestnut leaves either side making sure their stems nestle together. Add the small leaves as before to finish (Fig 5).

Step 4

Now add the oak leaves. You will need to snip these at all the inner curves before pinning down. You might like to try the interfacing method as described in the Tips for Applique section. If so add interfacing before you snip. Pin leaves in place and stitch as before.

Step 5

Fall Applique Designs Fig 6

Once all the leaves and stems are in place, start stitching down the petals of each of the four chrysanthemums (Fig 6).

Step 6

To make the three chrysanthemum circles make a paper template using the inner seam allowance line from your circle template. With the wrong side of your matching fabric circle towards you and using a double thread, knot securely then sew a small neat running stitch all the way around and at the halfway point of your seam allowance. Place the paper template in the centre and gently draw up stitches and secure your thread. Press from both sides. Carefully pop the paper piece out and your circle is ready to stitch down.

Step 7

Fall Applique Designs Fig 7

Once prepared, stitch the coral, magenta and brown circles one on top of the other over the chrysanthemum petals (Fig 7).

Step 8

Pin then stitch the acorns in place, followed by the acorn cups. Lastly applique the rose hips.

Step 9

Fall Applique Designs Fig 8

Using your brown perle cotton sew a running stitch along the stem lines joining acorns to garland. Sew lines of running stitches along the centre of the acorn leaves (Fig 8) (optional). Using black perle cotton sew some small backstitches at the top of the rose hips as indicated on the pattern. Press finished applique to remove any pen lines.

Finishing the cushion

Step 1

Take one of your pieces of cushion backing fabric and turn over a ½in twice on one of the 17in sides. Pin and then sew in place to hem. Repeat with the other backing piece. Press.

Step 2

Fall Applique Designs Fig 9

Lay the cushion front, right side down. Lay the two back pieces on top, right sides up and overlapping. Pin and then sew these layers together very close to their edges, less than ¼ in (Fig 9).

Step 3

Fall Applique Designs Fig 10

Prepare the binding by cutting two strips each measuring 2½in wide and then sewing these into one long length. Fold along the full length, wrong sides together and press. Use to bind the cushion (Fig 10). Insert cushion pad.

We hope you’ve enjoyed making Jo’s fall applique designs. For more fun quilt projects check out our round-up of quilt kits for beginners and our free English paper piecing templates