Cutting Out
Step 1
Choose nine (9) patterned FQ fabrics, and from each cut the following:
- Four (4) 5in squares for the flower petals.
- Four (4) 1¾in squares for the flower centres.
- One (1) 1½in x 9½in strip for the stalks.
- One (1) 4½in square for the leaves.
Step 2
From the six (6) remaining patterned FQ fabrics, cut the following:
- An assortment of twenty-six (26) 4½in squares for the leaves.
- One (1) 5¾in square from each fabric, all cut in half diagonally twice, for the X blocks.
Step 3
From the leftover patterned fabrics, cut the following:
- Four (4) 4⅞in squares, cut in half diagonally once for the butterfly top wings.
- Four (4) 2⅞in squares, cut in half diagonally once for the butterfly centres.
- Four (4) pairs of 3⅜in squares for the bottom butterfly wings.
- Eight (8) pairs of 2½in squares for the middle border corners. Ninety-six (96) 2½in x 4½in rectangles for the middle border strips.
Step 4
From the background fabric, cut the following:
- Five (5) 2in x 42in strips, pieced end to end and subcut into two (2) 2in x 48in strips and two (2) 2in x 45½in strips, for the inner border.
- Six (6) 2½in x 42in strips, pieced end to end and subcut into two (2) 2½in x 56½in strips and two (2) 2½in x 60½in strips, for the outer border.
- Seven (7) 2½in x WOF strips for the binding.
- One-hundred-and-eight (108) 1¾in squares for the flower corners.
- Fifty-four (54) 2in squares for the leaf corners.
- Four (4) 1½in x 4½in rectangles for Leaf blocks 1 and 2.
- Four (4) 2½in x 4½in rectangles for Leaf blocks 1 and 2.
- Four (4) 3½in x 4½in rectangles for Leaf blocks 1 and 2.
- Two (2) 2½in x 4½in rectangles for Leaf block 3.
- Two (2) 3½in x 4½in rectangles for Leaf block 3.
- Four (4) 4⅞in squares, cut in half diagonally once for the butterfly top wings.
- Twelve (12) 2⅞in squares, cut in half diagonally once for the bottom butterfly wings.
- Four (4) pairs of 3⅜in squares for the butterfly bottom wings.
- Eight (8) 1in x 8in strips for the sides of the butterfly blocks.
- Eight (8) 1in x 9½in strips for the top and bottom of the butterfly blocks.
- Six (6) 5¾in squares, each cut in half diagonally twice, for the X blocks.
Technical Tip
There are a lot of patterned fabrics and small pieces in this quilt. To help you identify them as you sew, keep them in separate piles as you cut, and label them clearly. Quilt clips are very useful for this!
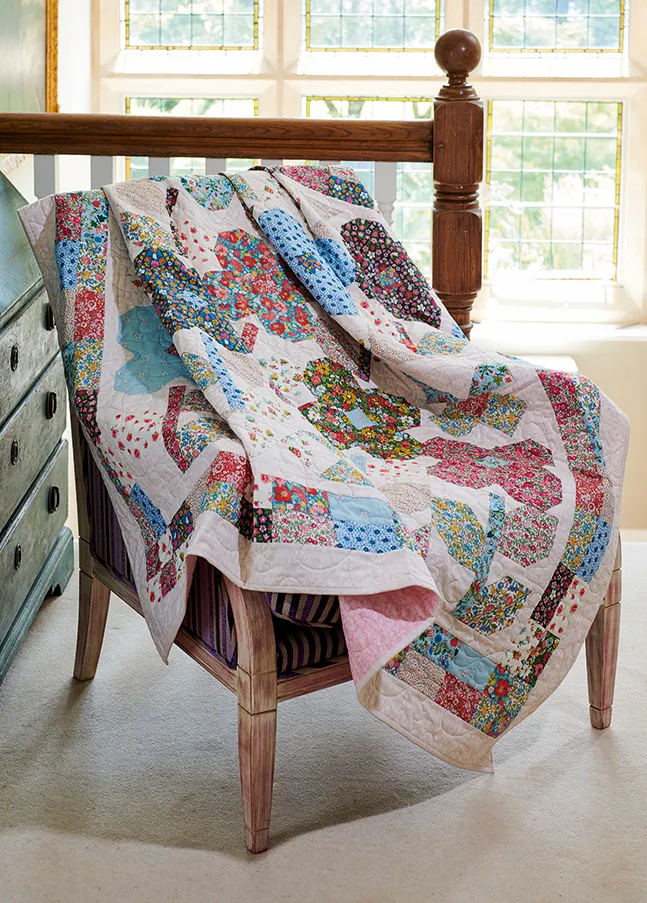
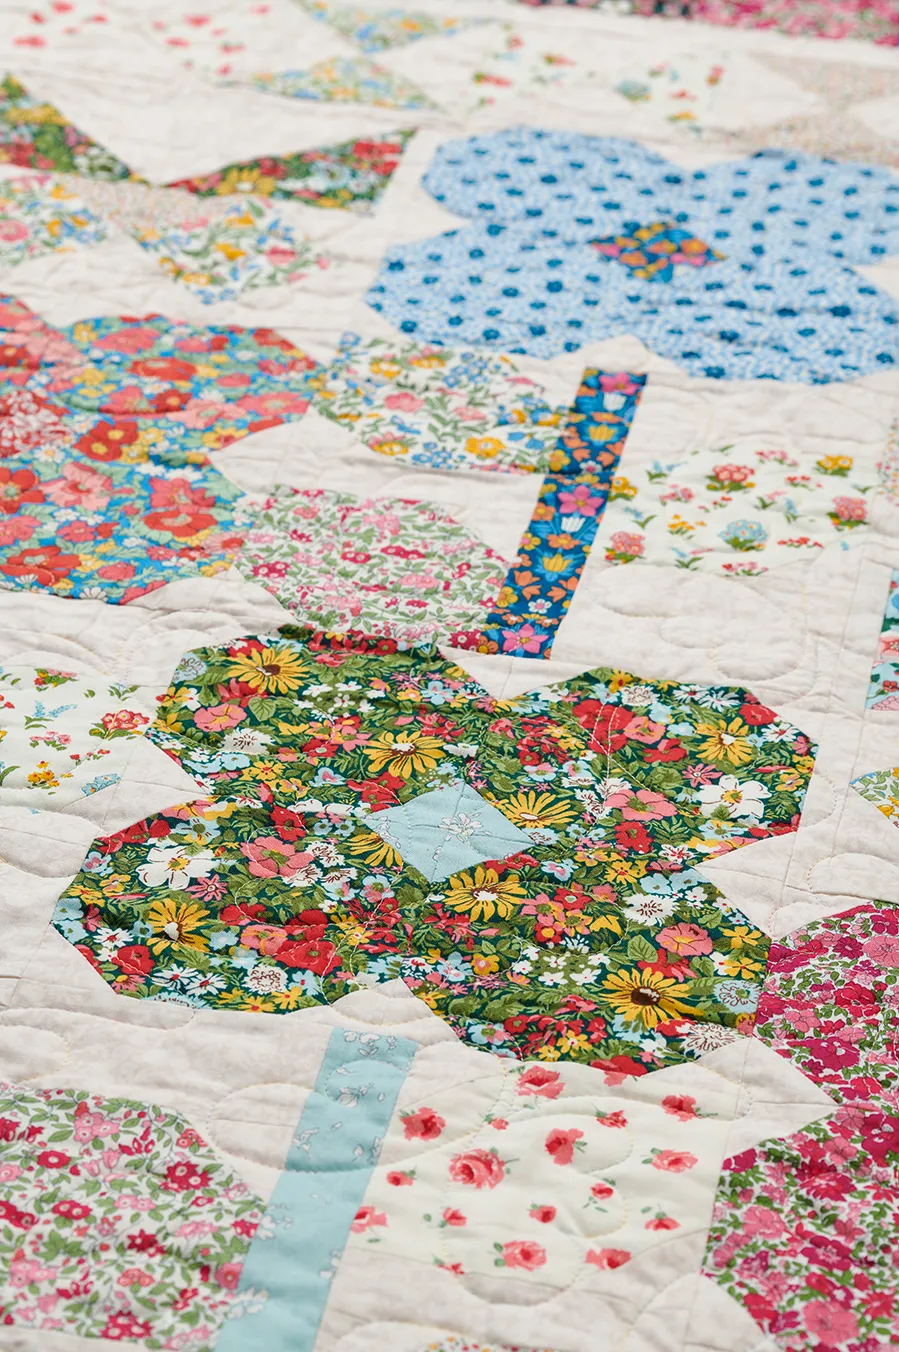
Making a Flower Head block
Step 1

Draw a diagonal line on the wrong side of twelve (12) 1¾in background fabric squares and four (4) matching 1¾in patterned squares. Pin them face down in the corners of four (4) matching 5in patterned squares, as shown in Figs 1A to 1D.
Step 2
Stitch just outside the pencil line towards the outer edge of the square on each corner. Trim a ¼in seam from the outer edge of each pencil line. Press back.
Step 3

Sew four (4) squares together to complete a Flower Head block, as shown in Fig 2. Make nine (9) blocks in total.
Making the leaves
Step 1

Draw a diagonal line on the wrong side of two (2) 2in background fabric squares. Pin them face down in the bottom left and top right corner of a 4½in leaf square, as in Fig 3. Stitch, trim and press, as in Step 6. Make thirteen (13) of these, in total.
Step 2

Draw a diagonal line on the wrong side of two (2) more 2in background fabric squares. This time, pin them face down in the top left and bottom right corner of a 4½in leaf square, as in Fig 4. Stitch, trim and press as before. Make thirteen (13) of these, in total.
Making Leaf block 1
Step 1

Referring to Fig 5, for the lefthand side of the Leaf block 1, sew a 1½in x 4½in background strip between two (2) left facing leaves.
Step 2
For the right-hand side of the block, sew a 2½in x 4½in background strip to the top of a right facing leaf and sew a 3½in x 4½in background strip below it.
Step 3
Sew both sides of the block to a 1½in x 9½in stalk strip. Press well. Make four (4) Leaf block 1s in total.
Making Leaf block 2
Step 1

Referring to Fig 6, for the right-hand side of Leaf block 2, sew a 1½in x 4½in background strip between two (2) right facing leaves.
Step 2
For the left-hand side of the block, sew a 2½in x 4½in background strip to the top of a left facing leaf and sew a 3½in x 4½in background strip below it.
Step 3
Sew both sides of the block to a 1½in x 9½in stalk strip. Press well. Make four (4) Leaf block 2s in total.
Making Leaf block 3
Step 1

Referring to Fig 7, sew a 2½in x 4½in background strip to the top of a left facing leaf. Sew a 2½in x 4½in background strip to the top of a right facing leaf.
Step 2
Sew a 3½in x 4½in background strip below each leaf. Sew both sides of the block to a 1½in x 9½in stalk strip, to make Leaf block 3. Press well.
Making the Butterfly blocks
Step 1

Using the background and patterned triangles previously cut from the 4⅞in squares, sew together as in Fig 8A and Fig 8B to create the top butterfly wings.
Step 2

Using the background and patterned triangles previously cut from the 2⅞in squares, sew two (2) opposite triangles to a 3⅜in square, press and then add the remaining triangles as in Fig 9A and Fig 9B, to create the bottom butterfly wings.
Step 3
Stitch the top and bottom butterfly wings together in pairs, then stitch the pairs together to make the Butterfly block.
Step 4

Sew the 1in x 8in background strips to the sides of block and the 1in x 9½in background strips to the top and bottom, as in Fig 10. Make four (4) Butterfly blocks in total. Press well.
Making the X blocks
Step 1
Using the background and patterned fabrics previously cut from the 5¾in squares, sew two (2) small triangles together to make a larger triangle. Repeat to make a second larger triangle.
Step 2

Sew the two (2) large triangles together to make an X block (Fig 11). Press the seams open. Make twelve (12) X blocks in total.
Step 3

Sew into pairs, alternating the direction of each pair as shown in the Quilt Layout. Make six (6) pairs of X block strips.
Assembling the quilt centre
Step 1

Lay out all the blocks, as shown in Fig 12. Sew together in columns, pressing the seams from top to bottom in columns 1, 3 and 5, then from bottom to top in columns 2 and 4.
Step 2
Sew the columns together, nesting the seams where possible. Press well.
Inner border
Step 1
Sew the 2in x 45½in background strips to the sides of the quilt centre, and the 2in x 48in background strips to the top and bottom. Press.
Middle border
Step 1

Sew a pair of 2½in patterned squares together to make a corner block, as in Fig 13. Make four (4) corner blocks in total.
Step 2

Sew two (2) 2½in x 4½in rectangles together to make a square, as in Fig 14. Make 48 of these squares in total.
Step 3
Stitch twelve (12) squares made in step 29 together in a strip, as shown in the Quilt Layout. Make four (4) strips. Sew a strip to each side of the quilt centre.
Step 4
Sew a corner block to each end of the two (2) remaining strips. Sew these to the top and bottom of the quilt centre.
Outer border
Step 1
Sew the 2½in x 56½in background strips to the sides of the quilt. Then sew the 2½in x 60½in strips to the top and bottom of the quilt. Press well.
Quilting and finishing
Step 1
Layer the quilt top centrally on top of the batting and backing fabric. Pin or baste together using your preferred method.
Step 2
Quilt as desired, by hand or machine. When the quilting is finished, trim away the extra batting and backing even with the quilt top.
Step 3
Sew the background fabric binding strips together end to end, using diagonal seams. Press the seams open. Fold in half lengthways with wrong sides together, and press. Use your favourite method to bind the quilt.