Free pumpkin quilt pattern
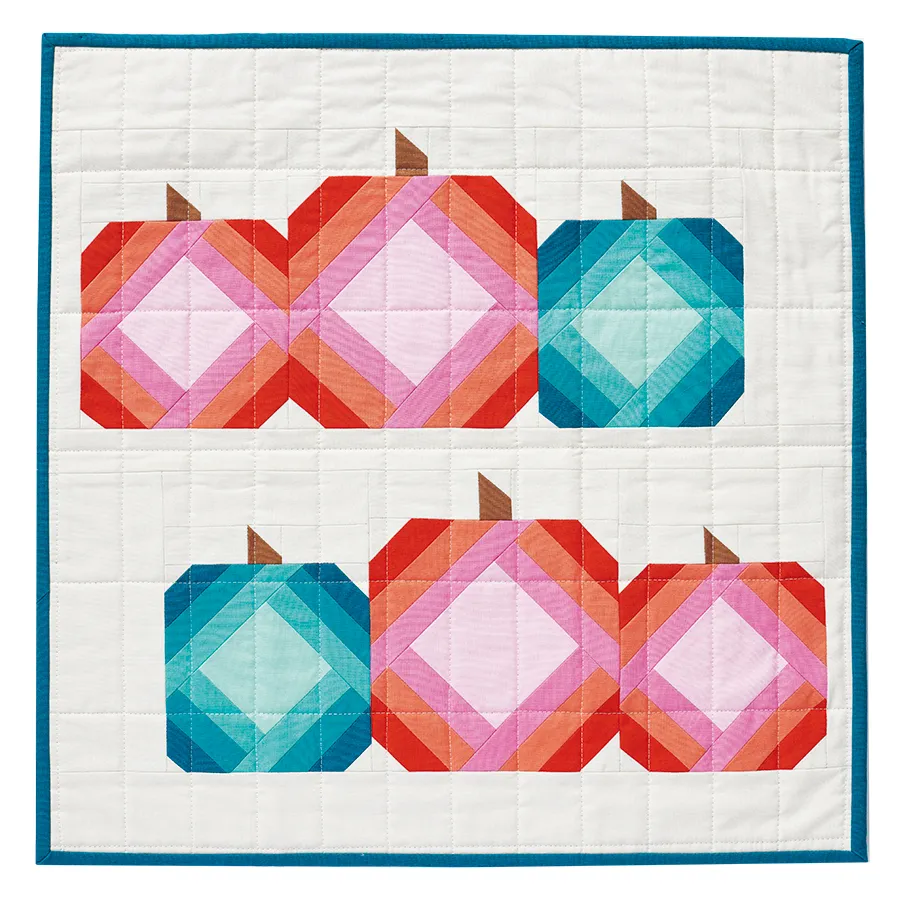
Modern, cute and perfect for Halloween, Amanda McCabe has created the loveliest pumpkin quilt pattern just for you. This modern mini quilt puts a fun twist on the traditional Log Cabin quilt in rich ombré shades of orange and blue. It's fun Autumn decor without the spook!
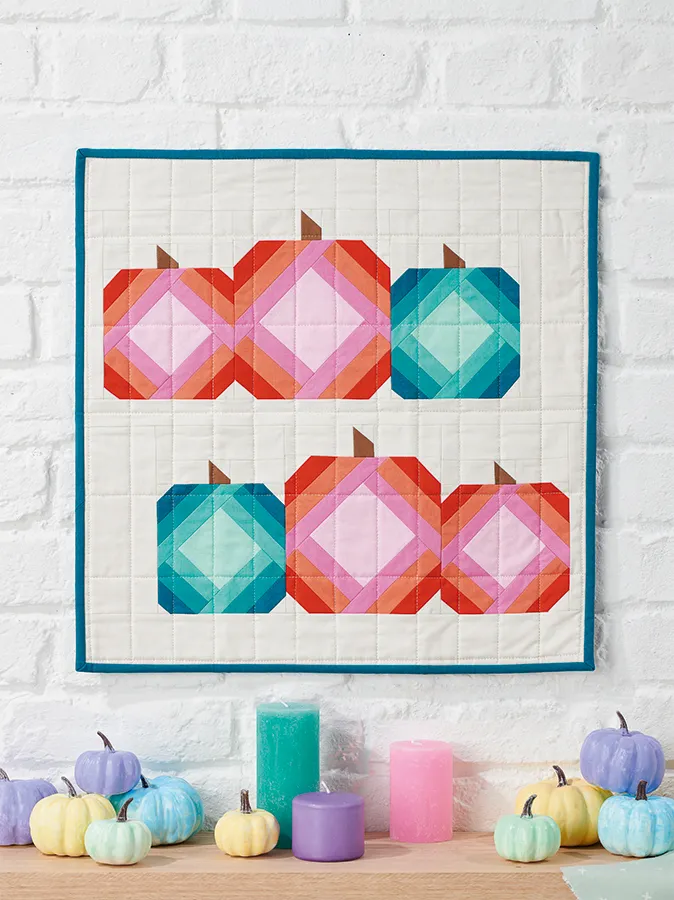
These pumpkins can be made from fabric scraps which makes this a perfect stash buster project. Raid your fabric scraps to create the perfect ombre palette. For more fun autumn projects check out our autumn applique designs and our autumn craft ideas.
Spooky season
Looking for something scarier? Get inspired and check out the best Halloween quilting patterns.
If you’re new to the world of quilting don’t worry. We have a beginner’s guide to quilting as well as a how to use a sewing machine tutorial.
Free pumpkin quilt pattern
You will need
- Light pink (Petal): one (1) fat quarter
- Medium pink (Candy Pink): one (1) fat quarter
- Coral (Nectarine): one (1) fat quarter
- Orange (Flame): one (1) fat eighth
- Mint (Aruba): one (1) fat eighth
- Aqua (Pool): one (1) fat eighth
- Light teal (Jade Green): one (1) fat eighth
- Dark teal (Glacier): one (1) fat eighth
- Brown (Earth): one (1) fat eighth
- Background (Bone): ⅜yd
- Binding fabric: ¼yd
- Batting: 27in square
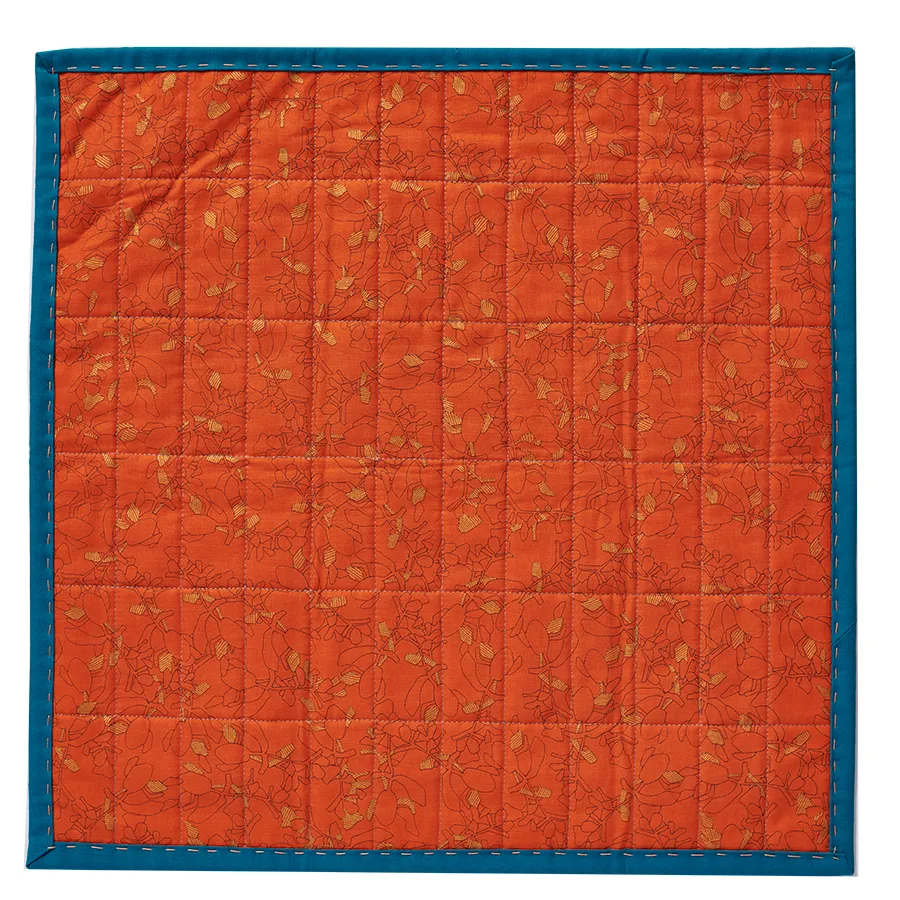
- Backing fabric: ¾yd
Finished Size
19in square
Notes
Seam allowances are ¼in throughout. Press seams to one side.
- RST= right sides together.
- WOF = width of fabric.
Fabrics Used
Solids are Kona Cotton Solids by Robert Kaufman (robertkaufman.com) in Bone, Petal, Candy Pink, Nectarine, Flame, Aruba, Pool, Jade Green, Glacier and Earth. Find the full shades of Kona Cotton Solids at woolwarehouse.co.uk
Backing fabric is Orangeade from Collection CF by Carolyn Friedlander.
Cutting Out
| Background fabric: | Amount: |
| (A) 1¼in squares | 16 |
| (B) 1½in squares | 8 |
| (C) 2½in x 1⅜in | 8 |
| (D) 1¾in x 5¼in | 4 |
| (E) 3in x 1⅝in | 4 |
| (F) 3¼in x 7⅜in | 2 |
| (G) 1¾in x 7⅜in | 2 |
| (H) 2⅜in x 20in | 2 |
| (I) 1½in x 20in | 1 |
| (J) 1¼in squares | 6 |
| Light pink fabric: | Amount: |
| (K) 5½in squares | 2 |
| (L) 6½in squares | 2 |
| Medium pink fabric: | Amount: |
| (M) 3⅞in squares | 8 |
| (N) 4½in squares | 8 |
| Coral fabric: | Amount: |
| (O) 3in squares | 8 |
| (P) 3½in squares | 8 |
| Orange fabric: | Amount: |
| (Q) 2⅛in squares | 8 |
| (R) 2½in squares | 8 |
| Mint fabric: | Amount: |
| (S) 5½in squares | 2 |
| Aqua fabric | Amount: |
| (T) 3⅞in squares | 8 |
| Light teal fabric | Amount: |
| (U) 3in squares | 8 |
| Dark teal fabric | Amount: |
| (V) 2⅛in squares | 8 |
| Brown fabric | Amount: |
| (W) 1⅜in x 1¼in | 4 |
| (X) 1⅝in x 1¼in | 2 |
You will also need to cut three sections of Binding fabric: 2½in x WOF (width of fabric)
Piecing the pumpkin centres
Step 1
Begin by piecing a large pumpkin centre. Gather one N, P, R and B square. Mark a diagonal line on the wrong side of each square.
Step 2

Place the N square in one corner of an L square, RST. Sew along the marked line, trim ¼in from the line and press the corner open. Repeat one at a time with the P, R and B square in the same corner (Fig 1).
Step 3

Repeat steps 12–13, working on one corner at a time to add the stripes to all four corners of the L piece (Fig 2). Trim to the pumpkin centre to 6¼in square, carefully centring the unit.
Step 4

Repeat steps 12–14 to make a second large pumpkin centre. Then use the same process to make two small pumpkin centres using the pink/orange squares and the two small pumpkin centres using the blue/green pieces. Refer to Fig 3 for the position of the pieces for each unit. Trim each small unit to 5¼in square.

Sweet but scary
Combine pretty pastels with a shocking skull in our Free sugar skull quilt pattern.
Piecing the stems
Step 1

Take one J square and draw a diagonal line on the wrong side of the fabric. Place in the top right corner of X, sew along the marked line, trim and press the corner open. Sew an E piece to either side to make one large stem unit (Fig 4). Repeat to make a second large stem unit.
Top Tip: Once you've made one pumpkin unit, try chain piecing the rest of them to speed up the process
Step 2

Repeat the process in step 16, sewing a J corner to the top of W. Then sew a C piece to either side to make a small stem unit (Fig 5). Repeat to make four small stem units.
Assembling the pumpkin quilt top
Step 1

Arrange the pumpkin centres and stems, referring to the Layout Diagram. Sew the stems to the tops of each pumpkin centre. Then sew a D piece to the top of each small pumpkin.
Step 2
Sew the pumpkins together in two rows. Join a G and F piece to the sides, referring to the Layout Diagram for which side to sew each piece. Join the two rows with an I piece in between. Then sew H to the top and bottom. Square up the top to 19in square, carefully centring, to complete the quilt top.
Quilting and finishing
Step 1
Press the quilt top and backing well. Make a quilt sandwich by placing the backing fabric right side down, the batting on top, then place the quilt top centrally and right side up. Baste the layers together using your preferred method.
Step 2
Quilt as desired. Amanda quilted a grid of straight vertical and horizontal lines. Trim off the excess batting and backing fabric and square up the quilt.
Step 3
Sew binding strips together end-to-end using diagonal seams. Press the seams open. Fold in half lengthways, wrong sides together, and press. Sew the binding to the right side of the quilt, creating a neat mitre at each corner. Fold the binding over to the back of the quilt and hand stitch in place to finish.


Frightening fabrics
If you're looking to make your fabric stash a bit scarier, check out these amazing Halloween fabrics.
Enjoy Halloween with your pumpkin quilt
At just 19in square this mini pumpkin quilt is a quick project that would make a great Halloween decoration... or you can always use it to cover your eyes when those scary movies are on!
Fall in love with fall quilts
If you're looking for more fabulous quilts that are perfect for autumn, check out our pick of the best fall quilt patterns.