All products were chosen independently by our editorial team. This review contains affiliate links and we may receive a commission for purchases made. Please read our affiliates FAQ page to find out more.

How to make a baby play mat and DIY baby book

Sew your own perfect padded mat for little ones with Manda McGrory’s easy-to-sew design for a simple mini quilt and play mat – complete with the sweetest DIY baby book to match!

Try 6 issues of Love Patchwork & Quilting magazine for £9.99| SAVE 76%

Published: June 28, 2021 at 8:09 pm

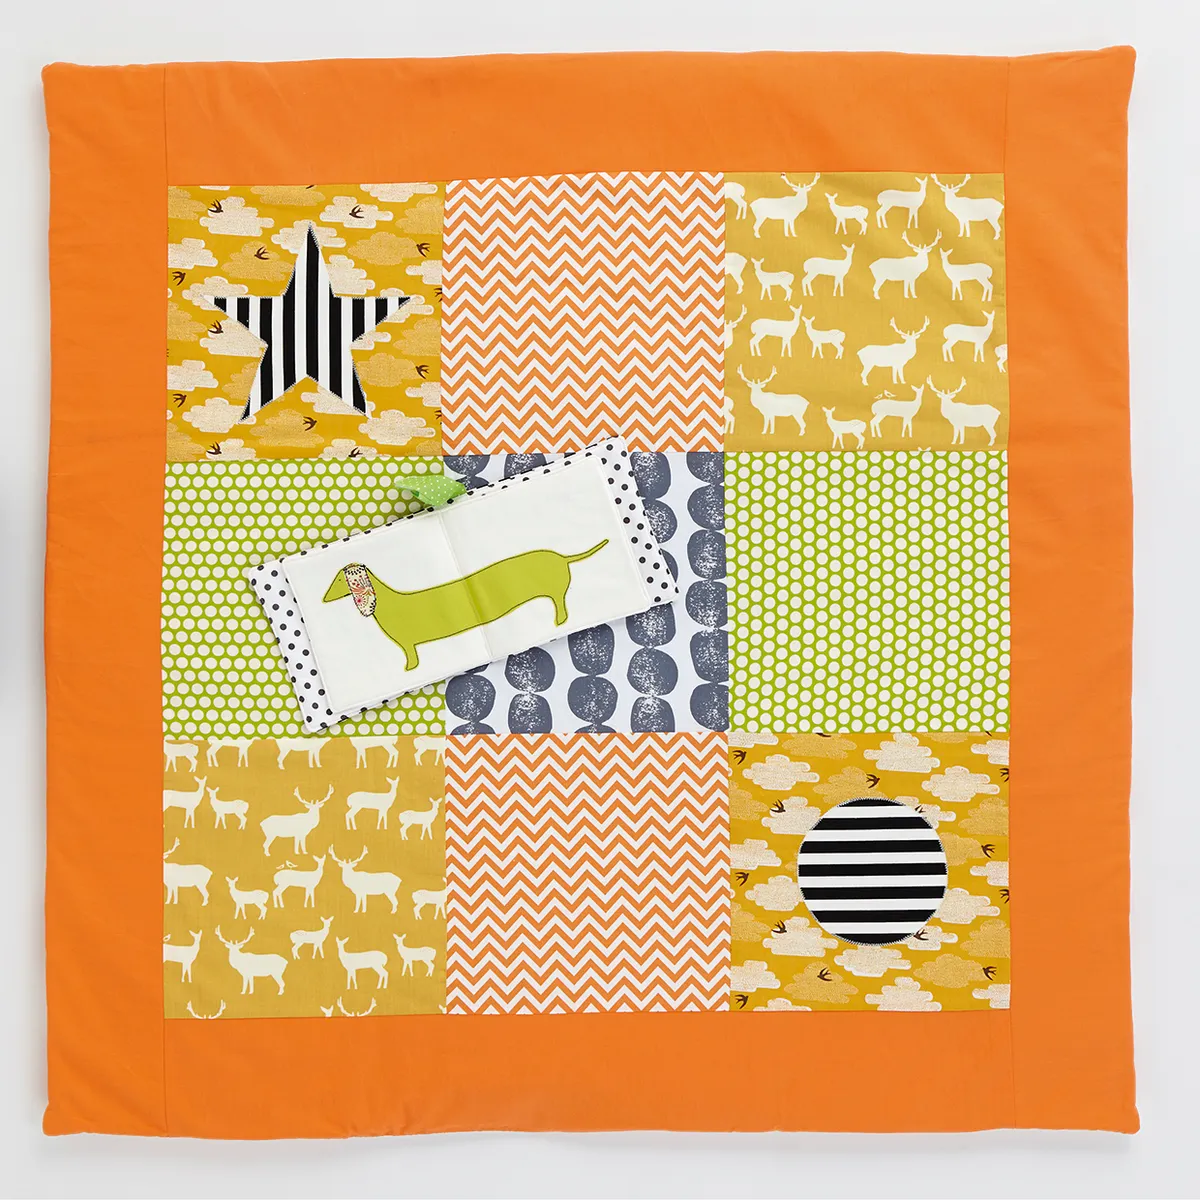
Welcome new arrivals into your life, or the lives of your friends and family, with this super sweet and simple sewing project. We'll show you how to make a DIY play mat, step by step, then stitch a sweet baby book for tiny tots to play with while they're rolling around on their new party mat!

You can easily switch up the finished look of this project by tweaking the fabric choices to complement a nursery colour scheme. Ditch baby blues and pinks for a pop of colour like we've done, go classic with pastel tones or bold and bright with jungle fabrics. There are so many beautiful baby fabrics out there this is a joy to personalise.

Practicality is key when you're making for little ones so opt for more durable, medium-weight fabrics (Manda has used Ikea fabrics for her play mat backing and baby book cover – as let's face it these will need to be able to withstand chewing or spills. This is also a great excuse to practise your appliqué – layer up fabrics for sweet appliqué motifs with our free downlodable baby appliqué templates,

Manda McGrory writes popular lifestyle blog www.treefalldesign.typepad.com, and designs utterly gorgeous children’s clothing and accessories. This project was first featured in Love Patchwork & Quilting magazine.

New to quilting? Check out our guides to quilting for beginners and our really handy guide to how to appliqué. For more modern quilt designs, dive into our favourite quilting trends round-up.

How to sew a baby quilt

Materials

For the play mat

For the DIY baby book

Finished sizes

  • Play mat – 38in square
  • DIY baby book – 6in x 7in approx (closed book)

Notes

Seam allowances are ¼in, unless otherwise stated.

Free new baby appliqué templates

Download Manda's Free baby shapes appliqué templates (PDF)

How to make a baby play mat and DIY baby book

You will need:

  • Fabric (See materials needed)
  • Ribbon
  • Wadding
  • Sewing machine
  • Thread
  • Scissors (Or a rotary cutter and cutting mat)
  • Wool wadding
  • Sew-on velcro
  • Fusible web

Assemble the play mat top

Step 1

From four of the fat quarters cut two (2) 10in squares. From the remaining fat quarter cut one (1) 10in square for the playmat centre.

Step 2

From the border fabric cut two (2) 5in x 29in and two (2) 5in x 38in strips.

Step 3

Position the central square right side up. Fold your ribbon in half and place on top – this will be the loop that your fabric book attaches to once complete. Position with the raw edges in line with the left edge of the fabric and the loop toward the centre of the block (Fig a). Baste in place.

How to make a baby play mat figure A

Step 4

Add the appliqué pieces to your squares using the star and circle template. See the Raw Edge Appliqué tip box at the bottom of this tutorial for more information.

Step 5

Arrange all nine (9) squares as desired. With right sides facing, sew together into three rows of three (Fig b). Sew the rows together to complete to DIY play mat top.

How to make a baby play mat figure B


Step 6

Sew the two shorter border strips to the top and bottom edge of the play mat. Add the longer strips to the sides (Fig c).

How to make a baby play mat figure C

Finishing the play mat

Step 1

Lay the quilt batting on a flat surface, then (after pressing if necessary) lay the play mat backing face up on top of the batting. Place the pieced play mat on top of the quilt backing, right sides facing. Pin.

Step 2

Using a ¼in seam allowance, start stitching, making sure you sew a few stitches backwards and forwards. Then stitch around all four sides of the playmat, leaving an 8in gap, again making sure you tie off the stitches at the end (Fig d).

How to make a baby play mat figure D

Step 3

Turn right side out and using matching thread, slip stitch the turning gap closed by hand.

How to make a DIY baby book

Making the DIY baby book cover

Step 1

Cut your batting into one (1) 6½in x 14in and one (1) 6in x 12in piece.

Step 2

Place the striped fabric right side up. Take the piece of ribbon and fold in half, then match the folded edge of ribbon to the top edge of the fabric, in the centre. Baste in place (Fig e).

How to make a baby play mat figure E

Step 3

Place the striped fabric and the spotty fabric right sides together. Place the 14in piece of batting on top.

Step 4

Starting with a backstitch, stitch around all four sides, leaving a 2in gap for turning the right way out, making sure you backstitch at the end too.

Step 5

Turn right side out and press gently with an iron, turning in the raw edges of the gap.

Step 6

Top stitch around all four edges, close to the edge and making sure you catch the gap, to close it.

Step 7

Fold each piece of white cotton in half and press so that you can see the two separate ‘pages’.

Step 8

Create your animals for each page using fabric scraps and fusible web. Apply to your fabric pages. See the tip box on Raw Edge Appliqué for more information.

Step 9

Add hand stitched eyes to finish the animals.

Step 10

Place the first page face up on a flat surface, with the remaining page on top, right sides together. Then place the wool batting on top.

Step 11

Using a ¼in seam allowance, stitch around all four sides, leaving a 2in gap for turning.

Step 12

Turn the right way out and carefully topstitch around all four sides, close to the edge, making sure to close the turning gap in the process

Step 13

To join the book cover and pages together, place the cover with the spotty side up, on a flat surface. Place the pages on top, with the hot dog facing up, in the centre of the cover.

Step 14

Stitch along the fold in the centre of the book, to create a spine. Stitch a further two lines, close to either side of the centre line.

Step 15

To finish the ribbon, fold the ends of the ribbon, wrong sides together and press gently.

Step 16

Cut a 1in piece of sew on Velcro to the width of the ribbon and sew on, covering the folded ribbon end. Repeat on the other end of the ribbon.

DIY baby book step by step

Tips for raw edge appliqué

  • Trace the template onto the paper side of the fusible web and roughly cut out.
  • Iron the fusible web onto your fabric, leaving the paper in place. Cut out along your drawn line.
  • Peel the paper off your shape and arrange on the background fabric. When you are happy with the position, press in place. Repeat these steps to add several layers of fabric, like we did on the dog, and elephant. For the fox you may want to position a few pieces at a time to get the right alignment.
  • Secure the edges of the fabric with stitching. We used a zigzag stitch around our large playmat pieces. For the book we used a straight stitch in a dark thread, to look like pencil lines.


This website is owned and published by Our Media Ltd. www.ourmedia.co.uk
© Our Media 2023