How to sew a patchwork flag banner

This geo patchwork banner by Clare Youngs is bright, fun and the perfect summer scrap-busting project to use up even the teeniest of fabric off-cuts that you just can't bear to throw away in case you need them 'one day'.

Try 6 issues of Love Patchwork & Quilting magazine for £9.99| SAVE 76%

Published: March 24, 2021 at 9:13 pm

Bring traditional bunting bang up to date with these DIY geo flags by Clare Youngs. We'll show you everything you need to know to learn how to make your own flag banner from simple half square triangles of your favourite fabric sraps with this step-by-step tutorial. This quick-sew project is the perfect beginner sewing project if you're looking to try patchwork, or an easy make for more experienced makers who have been hoarding all those beautiful off-cuts of fabric from previous projects and don't know what to do with them.

This project was first published in Love Patchwork & Quilting magazine and is one of our all-time favourite quick patchwork makes here on Gathered. If you're in the mood for flying the DIY garland flags, you might also like our more traditional guide for How to make bunting. And if you're looking to treat yourself to some new stash, take a peek at our round-ups of our favourite sewing kits for beginners and quilt kits for beginners.

Half square triangles bunting pattern

How to make a flag banner tutorial

Finished size

14cm deep x 4m long approx

You will need:

  • Plain fabrics (each at least 16cm square) (14)
  • Patterned fabrics (each at least 16cm square) (14)
  • Bias binding (for hanging bunting (ready-made 2cm/¾in wide linen was used)) (4m)
  • Quilter's quarter (not essential but useful)

Cutting out

Step 1

Draw out a 16cm square on a thick piece of card and cut it out. Use this template and a rotary cutter to cut out fourteen 16cm squares of plain fabric and fourteen 16cm squares of patterned fabric (Fig 1).

How-to-make-patchwork-bunting-fig-1

Making the half square triangles

Step 1

With right sides together place one plain square and one patterned square together. Using a pencil or air-erasable pen and ruler, draw a diagonal line from one corner of the square to the opposite corner (Fig 2). Draw two more lines, each one parallel and ¼in (6mm) away from either side of the central line. Use a quilter’s quarter rule for this or measure it with a ruler.

How-to-make-patchwork-bunting-fig-2

Step 2

Sew along each of the lines next to the central line. Use a rotary cutter or scissors to cut through the two pieces of fabric along the central line (Fig 3). This will give you two Half-Square Triangle units (square units each made up of two triangles).

How-to-make-patchwork-bunting-fig-3

Step 3

Press the seam of the half-square triangle units towards the darker triangle (Fig 4). Trim off the dog ears (the little bit of fabric sticking out at the end of the seam) and square up. Repeat steps 2–4 to make half-square triangle units from all of your remaining squares of fabric.

How-to-make-patchwork-bunting-fig-4

Sewing the flags

Step 1

Lay out all the units to see which way round and in what order you would like to place them and then pair them up. Put each pair right sides together, with edges aligned and a pin on the three sides to be sewn the top of each flag is left open (Fig 5).

How-to-make-patchwork-bunting-fig-5

Step 2

Taking one pair at a time and using a ¼in (6mm) seam, sew all around the three sides (Fig 6). Trim across the two sewn corners, turn right way out and press. Repeat with all of the flags.

How-to-make-patchwork-bunting-fig-6

Sewing the flags to the binding
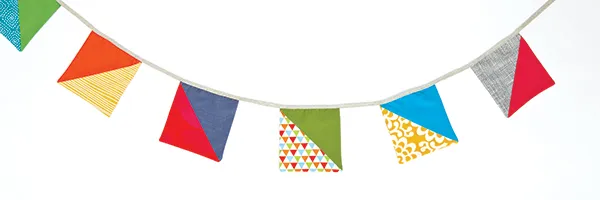
Step 1

Place a flag on the table. Open out the bias binding and with right sides together pin the binding to the top of the square, aligning the two raw edges (Fig 7). Start the first square 45cm along the binding.

Step 2

Pin the remaining flags to the binding, spacing them at about 10cm intervals (Fig 8). Now sew a seam along the crease of the binding to secure the flags to the binding.

How-to-make-patchwork-bunting-fig-8

Step 3

To finish, fold the bias binding in half and over the top of the squares. Pin in place and then sew a seam all along, 2mm up from the bottom edge of the binding to secure all the flags (Fig 9).

How-to-make-patchwork-bunting-fig-9

Your flag banner is finished and ready to make over gardens, parties, living rooms and just about anything you want it to!

finished fabric bunting

[pullquote quote="It’s quicker to carry on sewing along the crease of the binding in the space between the flags (even though you’re not attaching anything), than to sew each of the flags in place individually." /]