Basting your hexies
Step 1
Cut out a paper hexagon and a fabric hexagon using the respective templates. Pin your paper template to the wrong side of the fabric (or use a dab of basting glue to hold in place).
(This is our fave technique because you can reuse the papers over and over!)
Step 2
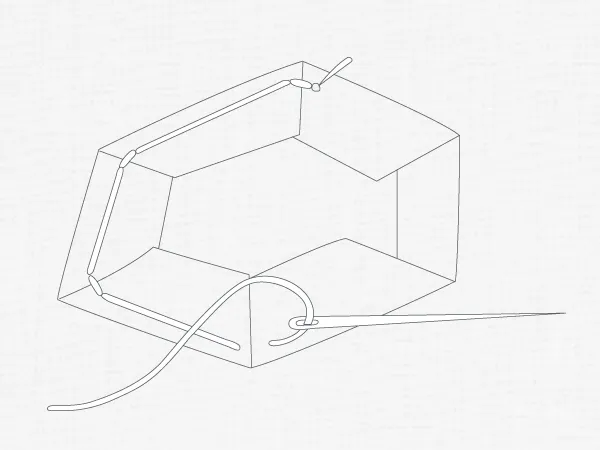
Fold down each edge of fabric around your paper template, finger pressing as your go. Tack each of the folds in place at the corners, one at a time, taking care to stitch through fabric but not the paper.
Step 3
Press with a hot dry iron to fix the shape and give nice crisp edges.
Cutting out
Step 1
For binding, cut two (2) 2½in x WOF strips from each of Fabric A and Fabric E. Cut one (1) 2½in x WOF strip from Fabric B.
Step 2
Cut and prepare one-hundred and thirty-two (132) 2in hexagons. We used hexagons in the following colours:
■ Fabric A – twenty-five (25)
■ Fabric B – twenty-seven (27)
■ Fabric C – twenty-eight (28)
■ Fabric D – twenty-six (26)
■ Fabric E – twenty-six (26)
Step 3
In the same way, cut out and prepare sixteen (16) 1in hexagons. We used hexagons in the following colours:
■ Fabric A – four (4)
■ Fabric B – two (2)
■ Fabric C – five (5)
■ Fabric D – five (5)
Step 4
Also cut out and prepare eighteen (18) 1½in hexagons. We used hexagons in the following colours:
■ Fabric A – six (6)
■ Fabric B – five (5)
■ Fabric C – three (3)
■ Fabric D – four (4)

Piecing the quilt top
Step 1
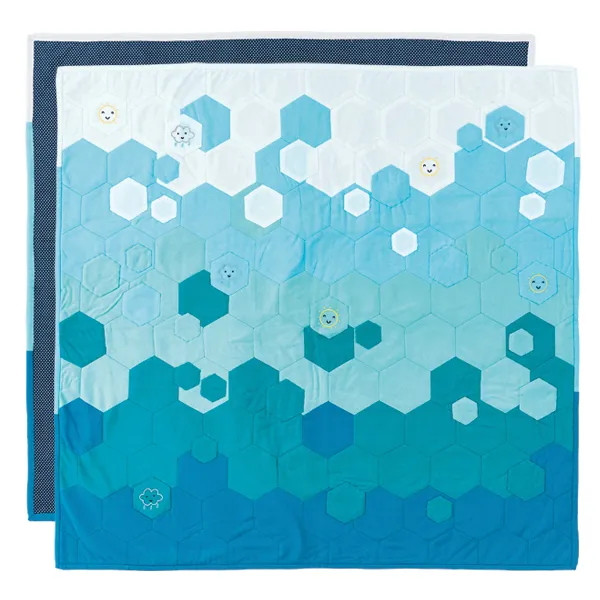
Piece your quilt top in rows of eleven, as we did or re-arrange into hexagon flowers, if you prefer.
Lay out your 2in hexagons and piece into rows of eleven (11) hexagons (Fig 1). To piece the hexagons, place two right sides together. Work a whip stitch along one edge of the hexagons, knotting off your thread at each end. As you work, be careful to only stitch through the fabric, catching a few threads of each hexagon.
Step 2
Piece the rows to create the quilt top. Place the first two hexagons right sides together, and stitch together as before. When you reach the next edges to be sewn, you may need to fold one of the previous hexagons to line up the edges. Keep working in this way to piece all twelve rows.
Step 3
Give your quilt top a press front and back. Gently remove the paper pieces from all the hexagons.
Step 4
Position the smaller pieced hexagons on the quilt top, referring to the quilt picture or choosing your own layout, and pin in place. Appliqué in place using a ladder stitch.
Finishing the quilt
Step 1
Create a quilt sandwich with the quilt top, batting and quilt back, and fuse the layers together. Because we used a double sided fusible fleece, we left our project unquilted. You could also add some quilting along rows of hexagons or around your embroidered pieces. Once you’ve finished any quilting, square up your quilt.
Step 2
To create the multicolour binding, sew your two Fabric A strips end to end, using a straight seam. Trim to 60in. Repeat with your Fabric E strips. Sew your Fabric B strips to either side of the Fabric E strip, then sew the Fabric A strip to one end. Press the binding in half, and use to bind your quilt, starting about 7in from the top on the right side, starting with the Fabric B end of the strip.