Cutting Out
Step 1
From the white fabric cut:
- One (1) 2¾in x 24in.
- One (1) 7¾in x 24in
- Two (2) 2½in x 24in (lining facing).
- One (1) 9¾in x 5½in.
- One (1) 5in x 5½in.
- Two (2) Template A.
From the blue fabric cut:
- Two (2) 1¾in x 24in.
- Two (2) 4¾in x 24in.
From the green fabric cut:
- Two (2) 1¼in x 24in.
- Two (2) 3in x 24in.
From the orange fabric cut:
- Two (2) 1in x 24in.
- Two (2) Template B.
From the yellow fabric cut:
From the lining fabric cut:
- Two (2) 16½in x 24in (lining).
- Four (4) 5in x 9in (pockets).
From the handle trim cut:
From the fusible interfacing cut:
- Two (2) 4in x 8in (pockets).
- One (1) 2in square.
From each of the foam interfacing and batting cut:
Prepare the handles
Step 1
Cut the rope into two 30in long pieces. Fold each piece in half and mark the centre. Fold each handle trim piece in half along the width and mark the centre.
Step 2
Match the centre of each trim piece with the centre of a rope piece. Wrap the trim around the rope, bringing the long edges of the trim together. Use a few dots of glue to hold in place. Clip in place and allow to dry.
Step 3

Using a zipper foot, topstitch along the edge of the trim, as close to the rope as possible. Backstitch at each end to secure.
Make the pockets
Step 1
Take one pocket piece and fuse the interfacing to the wrong side, centring the interfacing, and following the manufacturer’s instructions. Place RST with a second pocket piece. Pin or baste in place.
Step 2
Sew around the outer edge of the pocket, along the edge of the interfacing, which will use an approx ½in seam allowance. Leave a turning gap in the centre of one long edge, which will become the bottom of the pocket.
Step 3

Clip the corners, and trim the seam allowance to approx ¼in. Turn the pocket right side out through the turning gap. Carefully press the edges, turning the raw edges of the turning gap to the inside. This gap will be closed when the pocket is applied to the lining.
Step 4
Repeat steps 13-15 with the remaining pieces to make a second pocket.
Make the lining
Step 1
Sew a facing piece to the top of each lining piece. Press the seam toward the facing. Topstitch just above the seam allowance along the facing.
Step 2
Fold each lining piece in half along the width and finger press to mark the centre. Repeat with each of the pockets. Place one pocket on each lining piece, approx 5in from the top, matching the centre marks. Make sure the turning gap is at the bottom of the pocket. Pin or baste in place.
Step 3
Topstitch along the sides and bottom of the pocket, pivoting at the corners and backstitching at the beginning and end to reinforce. Mark a line along the centre of each pocket. Stitch along the marked line, backstitching at each end to divide the pockets.
Step 4

Fuse the 2in square of lining to the wrong side in the centre of the facing, using your centre crease mark as a guide. Attach the male half of the snap in the centre of the interfacing following the manufacturer’s instructions. Save the other half of the snap to attach at the end of the bag construction.
Step 5
Place the two lining pieces RST. Sew around the sides and bottom, leaving an approx 8in turning gap along the bottom edge, and backstitching at the beginning and edge of each seam.
Step 6
Cut a 3in square from each of the bottom corners. Working one corner at a time, bring the bottom seam up to meet the side seam, aligning the raw edges at the corner. Sew along the raw edges backstitching at each end to box the corner.
Make the front
Step 1
Take one template A and template B piece, and finger press in half to mark the centre of the curves. Place RST, pinning the centre marks and ends. Ease the fabric between these points and pin.
Step 2

Sew along the curve. Press the seam open, then trim to 5½in square.
Step 3

Repeat steps 23–24 with the second template A and B pieces. Sew the two pieces together, matching the seam, to create a half circle.
Step 4
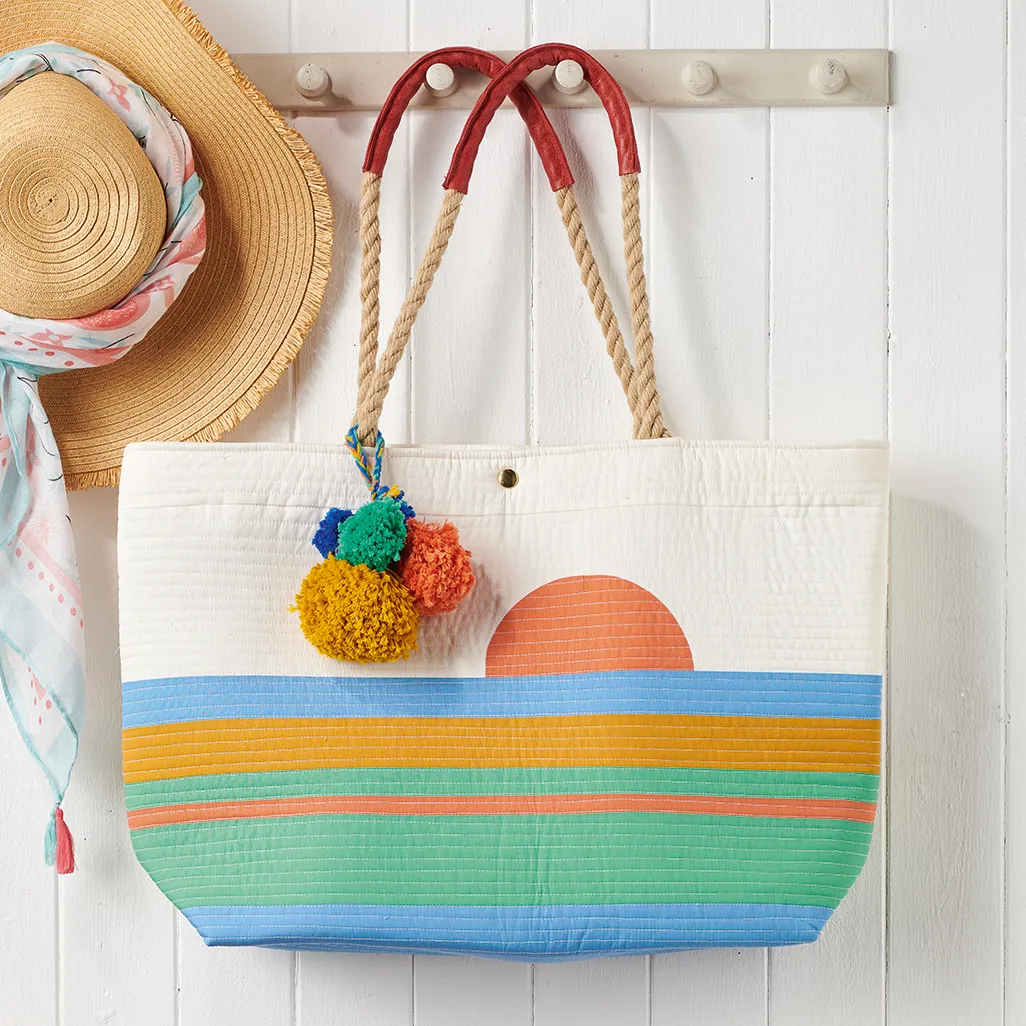
Sew the white 5½in x 9¾in piece to the left side of the half circle unit, then sew the 5in x 5½in piece to the right side. Trim to 24in wide, trimming evenly from each side. Sew the 2¾in x 24in piece to the top
Step 5

Join the coloured fabric strips along their lengths, referring to Fig 1 for placement. Then sew the pieced half circle unit to the top to complete the bag front.
Step 6
Baste the bag front on top of a piece of batting. Quilt as desired. Debbie quilted horizontal lines ⅜in apart. Trim away excess batting.
Step 7
Place the quilted front on top of a piece of foam interfacing. Machine baste around the outer edge, approx ⅛in from the edge. Trim away the excess foam.
Make the bag outer
Step 1
Repeat steps 26-29 to make the bag back, using the white 7¾in x 24in piece instead of the pieced half circle unit in step 26.
Step 2

Take one handle and fray approx 1in of each end, allowing the fibres to lie flat. Measure 7in from each side of the bag front. Align the ends of the handle with these marks, allowing the rope to extend over the edge approx ¾in. Baste in place. Repeat with the other handle on the bag back.
Step 3
Place the bag front and back pieces RST, matching seams. Sew around the sides and bottom, backstitching at the beginning and end of each seam. Box the bottom corners following step X.
Finish the bag
Step 1
Turn the lining right side out and put inside the bag outer, RST. Match seams at the side, and make sure the side with the snap is against the back of the bag. Pin or clip around the top.
Step 2
Sew around the top, going slowly over each of the handle ends. Turn the bag right side out through the gap in the lining.
Step 3
Close the turning gap using a ladder stitch. Push the lining down inside the bag, and press the tope edge carefully, making sure the facing is completely on the inside. Topstich around the top edge.
Step 4
Hand stitch the lower edge of the facing to the inside of the bag, making sure your stitches only go through the foam layer of the bag outer so they don’t show on the outside
Step 5

Mark where the male half of the snap meets the bag front. Then install the other half to the front of the bag through all layers, following the manufacturer’s instructions
Make the pompom charm
Step 1
Make four pompoms in different sizes and colours, using a pompom maker or a piece of card. When tying the pompom, leave a long tail, approx 20in long.
Step 2

Gather the pompoms and arrange so they hang at different levels. Braid the tales together and knot off. Loop the braid around one handle, stitch the ends of the braid together and trim. For a more in-depth tutorial head over to our how to make a pom pom DIY.