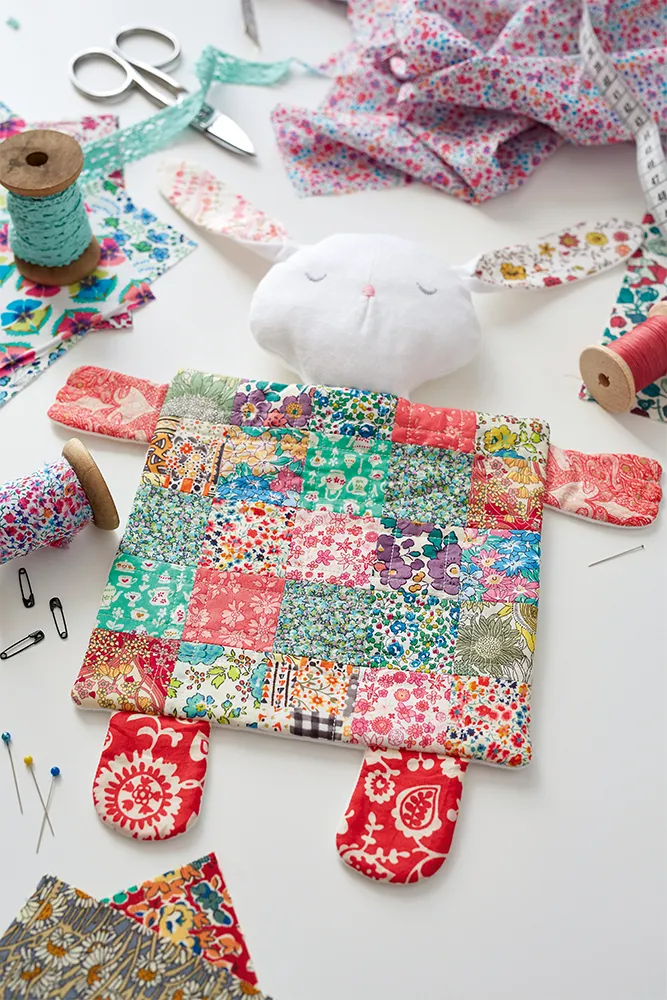
Step 1
Cutting out your baby comforter
From the flannel cut one 8½in square for the body back, two heads and two ears.

Fold the flannel WS together and use the foot and paw templates to cut two mirror image pieces of each.
Step 2
From the batting cut:
- Two 8½in squares.
- Two feet.
- Two paws.
Step 3
Cut twenty five 2in squares from the charm squares (two 2in squares from eleven charm squares and three 2in squares from one charm square) for body front.
Step 4
From the remaining charm squares, cut as follows. From two squares, cut one ear each.
Fold one square in half and cut using the foot template for two pieces cut as mirror images.
Fold the last square in half and cut using the paw template, for two mirror image pieces. Use a leftover scrap to cut one tail piece.
Step 5
Preparing the bunny comforters body!
Arrange the twenty five 2in squares in five rows of five.
Step 6
Sew the block together by first sewing the rows and then join the rows together to complete the block for the patchwork body front.
Step 7
Place one body batting piece on the WS of the body back and baste together with a ⅛in seam around the outside edge. Position the tail, 2in from bottom in the centre of the square, on RS of body back and temporarily hold with a small amount of glue stick. Sew around the outer edge using a zig zag stitch.
Step 8
Place the second body batting piece on the WS of patchwork body front. Baste the batting in place with your preferred method (stitching, pinning or using basting spray).
Step 9
Quilt in your preferred design. We quilted ¼in to the side of each seam line.
Step 10
Sew a seam ⅛in from the edge along the top of patchwork body front. This will protect the patchwork seams when the bunny body front and back are joined and then turned right side out. Trim batting.
Step 11
Now it's on to your bunny's ears and feet!

Place one print ear RS together with one flannel ear. Sew together leaving the bottom edge open. Clip notches in the curved edge, being careful to remain within the seam allowance, turn right side out and press. Repeat for the second ear.

Fold in the side edges of one ear, towards the bottom and sew ⅛ in from bottom edge to secure. Repeat for the second ear, folding across from the other side first so that ears become mirror images of each other.
Step 12

Taking one set of foot pieces, position them as shown – place the batting on the table, place the flannel on top, right side facing up, then place the print piece right side facing down.
Sew together leaving the straight edge open. Clip notches in the curved edge, being careful to remain within the seam allowance, turn right side out and press. Repeat for second foot.
Step 13
Sew each paw together as you did for the feet – layering batting, flannel and print pieces in the same way, sewing around the curved edges, clipping, turning right side out and pressing.
Step 14

On each paw sew a set of ½in lines at the two indented paw curves. Sew over the same line 3 or 4 times to emphasise and suggest fingers.
Step 15
Now let's go back and finish quilting the bunnies body
Place the feet along the bottom edge of the patchwork body front with print side of feet RS down, position each foot 1in from side edge with raw edges aligned.

Place the paws along the side with the print side of paws RS down, position each paw 1in from top edge with raw edges aligned.
Step 16
Place the flannel body back RS together with patchwork body front and pin in place, being careful to pin paws and feet in correct position. Sew around outside edges leaving a 2½in gap at the centre of the top edge (for turning and joining head). Turn right side out and press.
Step 17
Let's stitch the bunny's head!

Pin the v-shaped seam on one head piece RS together and sew together. Make a small snip within the seam allowance at bottom of seam to allow it to be pressed open and gently press from WS and then RS.

Repeat for the second head piece.
Step 18
Mark the position and shape of eyes and nose on RS of one head piece and machine sew or embroider the features. We positioned our nose 1½in from the end of the seam line and the eyes ¼in up and 1in out from the nose (each eye ⅓in long). We used decorative stitching on our sewing machine with grey thread for the eyes and pink thread for the nose.
Step 19

Mark the position of the bunny ears on RS of the front head piece by measuring 1in down along the face seam and then horizontally to each side of the head.
Place an ear on each marked point with print side RS together with front head piece, slightly overlapping the outer edge of the ears.
Place the back head piece on top RS together and pin in place being careful to pin ears in the correct position – then tuck the tips of the ears out of the way of the seam allowance.
Sew around the outside edge, leaving the bottom edge open for turning.
Clip notches in the curved edge, turn right side out and press.
Step 20

Stuff the bunny head. Ours is lightly stuffed so that the bunny stays soft and squishy. Sew a seam ⅛in from the bottom of the neck to hold the stuffing in place.
Step 21
Finally, let's piece your bunny together!
Position the bunny’s neck into the opening in the body, pin carefully in place and sew together with a slip stitch.
We doubled our thread, stitched together twice and carefully tied off the ends to ensure that the bunny will withstand lots of cuddling!