Cutting Out
Step 1
From Fabric A (Grellow) cut:
Three (3) 2 1/2in x WOF strips. Subcut: two (2) 2 1/2in x 9 1/2in strips, three (3) 2 1/2in x 6 1/2in rectangles, two (2) 2 1/2in x 4 1/2in pieces and two (2) 2 1/2in squares.
Step 2
From Fabric B (Brt Pink) cut:
- Three (3) 2 1/2in x WOF strips. Subcut: three (3) 2 1/2in x 9 1/2in strips, three (3) 2 1/2in x 6 1/2in rectangles, two (2) 2 1/2in x 4 1/2in pieces, two (2) 2 1/2in squares.
Step 3
From Fabric C (Robin Egg) cut:
- Three (3) 2 1/2in x WOF strips. Subcut: two (2) 2 1/2in x 9 1/2in strips, three (3) 2 1/2in x 6 1/2in rectangles, two (2) 2 1/2in x 4 1/2in pieces, two (2) 2 1/2in squares.
Step 4
From Fabric D (Snow) cut:
- One (1) 2 1/2in x WOF strip. Subcut one (1) 2 1/2in x 9 1/2in strip, two (2) 2 1/2in x 4 1/2in rectangles.
Step 5
From the Backing and Envelope Pieces Fabric cut:
- One (1) 18 1/2in square backing piece.
- Two (2) 12 1/2in x 18 1/2in envelope pieces.
Step 6
From the Batting cut:
Step 7
From the Binding fabric cut:
- Three (3) 2 1/2in x WOF strips.
Piecing Unit 1
Step 1
Place two (2) 2 1/2in x 9 1/2in fabric A pieces on either side of one (1) 2 1/2in x 9 1/2in fabric B piece and sew on the long side. Press seams. 
Step 2
Subcut two (2) 4 1/2in x 6 1/2in units.

Step 3
Repeat the past two steps for the following fabric pairings:
Piecing Unit 2
Step 1
Place one (1) fabric A 2 1/2in square with one (1) 2 1/2in x 4 1/2in fabric D rectangle piece, RST, and sew. Make two units. Press seams.

Step 2
Trim unit to 2 1/2in x 6 1/2in if needed. Trim excess off from the fabric D piece.

Step 3
Repeat the last two steps to make two units of each for the following fabric pairings:
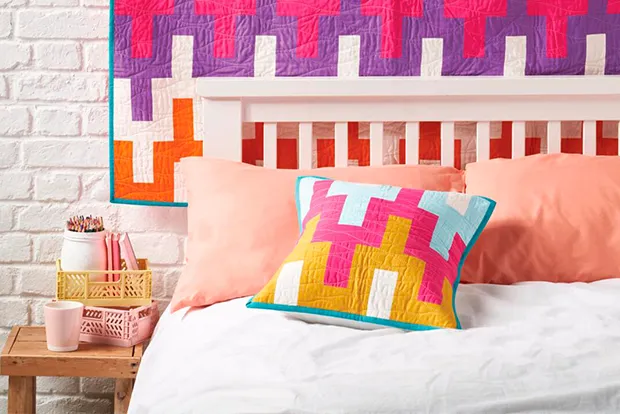
Assembling the cushion
Step 1
Referring to the layout diagram below, beginning with Row one, sew (1) 6 1/2in square unit to (1) 2 1/2in x 6 1/2in unit, alternating each unit placement.

Step 2
Each row will begin with a 6 1/2in square unit and end with a 2 1/2in x 6 1/2in rectangle piece. Press seams.
Step 3
Sew the rows together to complete your pillow top. Pin at seams to match. Press seams.
Finishing your cushion
Step 1
Make a quilt sandwich by laying the backing fabric wrong side up, then batting and pillow top right side up. Baste and quilt as desired.
Step 2
Trim excess backing and batting and square up your pillow top. Prepare the envelope pieces by folding 1/2in on the long side of the piece and press.
Step 3
Fold the pressed edge over 1/2in one more time, press and stitch along the edge to create a finished edge.
Step 4
Lay the quilted pillow top right side down and place the two backing pieces right sides up with the finished edges overlapping in the middle of the pillow and the raw edges, lining up with the raw edges of the pillow top.
Step 5
Baste all around the pillow. Join the binding strips together with a diagonal seam. Trim and press seam.
Step 6
Once strips are sewn together, trimmed and pressed, fold in half wrong sides together and press flat to create your binding. Sew binding to the back or front of the pillow, lining up raw edges.
Step 7
Once the binding is sewn to the pillow, fold it over and either machine or hand stitch the binding to finish off the edges of the pillow.