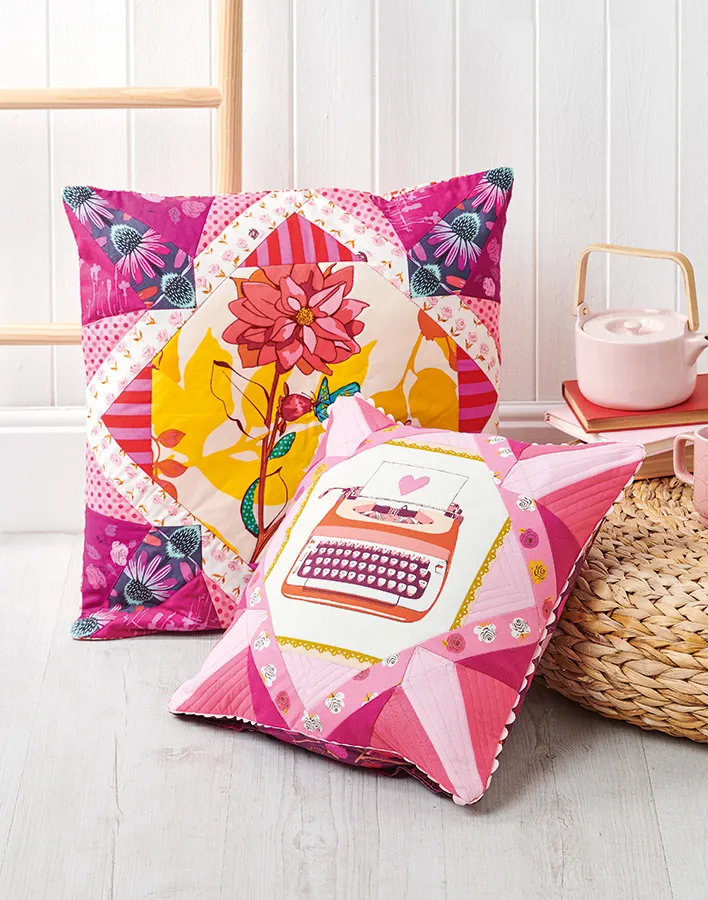
Making the first cushion cover - typewriter cushion
Cutting Out
Step 1

From the large scale print fabric cut:
- One (1) 10½in square, centring the main motif.
Step 2
From the light pink solid fabric cut:
- Four (4) 2¾in x 5in (2A–5A).
- Four (4) 1¾in x 3in (1B, 1C, 1D, 1E).
- Four (4) 3in x 5¾in (1F, 1G).
Step 3
From the medium pink solid fabric cut:
- Eight (8) 3½in x 5¼in (2F, 3F, 2G, 3G).
Step 4
From the dark pink print fabric cut:
- Eight (8) 1¾in x 6½in (2B, 3B, 2C, 3C, 2D, 3D, 2E, 3E).
Step 5
From the purple solid fabric cut:
- Eight (8) 2¾in x 4½in (4F, 5F, 4G, 5G).
Step 6
From the backing fabric cut:
FPP the templates
Step 1
Before Foundation Paper Piecing, shorten your stitch length on your sewing machine to approx 1.5. This will make tearing off the paper later easier.
Step 2
On the unprinted side of the Section A template, place a small dot of washable glue in the centre of Section 1A. Place the corresponding fabric piece on top, right side up, ensuring the whole of Section 1A is covered, plus at least ¼in all the way around the edges.
Step 3
Turn your template back over and fold along the solid line between Sections 1A and 2A. Trim the edge of the fabric to ¼in beyond the folded paper, being careful not to cut into the paper.
Step 4
Unfold the template, place the Section 2 fabric piece right side down on top of the Section 1 piece, matching up raw edges on the side where Sections 1 and 2 will be joined and making sure that when folded back along the seam line, Section 2 will be covered by the fabric plus at least ¼in all around. Pin into place.
Step 5
With the printed side of the template facing up, sew along the line between Sections 1A and 2A, starting and ending 2–3 stitches beyond the printed line. Press the fabric open.
Step 6
Repeat step 9 to trim the fabric ¼in beyond the line between Sections 1A and 3A. Add the 3A fabric following steps 10–11. Continue piecing the rest of the template Section A in the same way, adding the remaining fabric sections in numerical order.
Step 7
Piece all of the remaining templates, following steps 8–12. Once all sections are complete, trim along the outer dotted line.
Making the block
Step 1

Sew Section B to one side of Section A, making sure the triangle point of Section B points to Section A. Remove the paper from the seam allowance only, and press the seam open (Fig 1).
Step 2

Join Sections C and D to the top and bottom of Section A, then join Section E to the remaining side, removing paper and pressing seams as in step 14 (Fig 2).
Step 3

Join each Section F to opposite sides of the block, carefully matching the seams. Then join Section G to the remaining sides (Fig 3).
Step 4
Press the block. Remove the paper from the back of the block, carefully tearing along the seam lines to finish the cushion front.
Finishing the cushion
Step 1
Press the cushion front well. Layer the cushion front on top of the batting, right side up. Baste the layers together.
Step 2
Quilt the layers together as desired. Julianna quilted straight lines, echoing the seams of her piecing. Trim away excess batting and square up the cushion front.
Step 3
Pin the ricrac trim around the outer edge of the cushion, turning under the raw edges at the ends. Baste in place.
Step 4
Press under ½in along one long edge of a backing piece. Repeat to enclose the raw edge, then topstitch in place to form the hem. Repeat the process to hem the other backing piece.
Step 5
Layer the backing pieces onto the cushion front, with right sides together. Align the raw edges at the sides, with the hemmed edges overlapping in the centre to form the opening.
Step 6
Sew around the outer edge of the cushion and carefully snip into the corners. Turn right side out and neatly press to finish.
Making the second cushion cover - Floral cushion
Step 1

You will need
Large cushion
Large scale print: at least 12½in square
Stripe print: one (1) fat eighth
Navy print: one (1) fat eighth
White print: one (1) fat eighth
Purple print: one (1) fat quarter
Pink print: one (1) fat quarter
Backing fabric: ½yd
Batting: 21in square
One (1) copy each of the Large Cushion FPP template Sections A–E
Two (2) copies each of the Large Cushion FPP template Sections F–G
Ricrac trim (optional): 2¼yds
Finished Size
19½in square
Cutting Out
Step 1
From the large scale print fabric cut:
- One (1) 12½in square, centring the main motif.
Step 2
From the stripe print fabric cut:
- Four (4) 3½in x 6in (2A–5A).
Step 3
From the navy print fabric cut:
- Four (4) 2in x 3½in (1B, 1C, 1D, 1E).
- Four (4) 3½in x 7in (1F, 1G).
Step 4
From the white print fabric cut:
- Eight (8) 2in x 8in (2B, 3B, 2C, 3C, 2D, 3D, 2E, 3E).
Step 5
From the purple print fabric cut:
- Eight (8) 4½in x 6½in (2F, 3F, 2G, 3G).
Step 6
From the pink print fabric cut:
- Eight (8) 3½in x 51/2in (4F, 5F, 4G, 5G).
Step 7
From the backing fabric cut:
Making the cushion
Step 1
Follow steps 7–23 of the small cushion instructions. Note, Julianna did not use ricrac on the large cushion. If you are not using ricrac, skip step 20.