Sew-fun dog quilts! 3 free Foundation Paper Piecing Patterns
Sewing your own FPP pups with Juliet Van Der Heijden's three free quilting patterns. These adorable minis look fab on their own but can be combined into a trio for total puppy power! Test your Foundation Paper Piecing techniques to make a set of matching fabric hounds.
FFP dog quilt pattern: Download the templates for all three projects
The templates for this fun FPP project are full-size, so all you need to do is print and cut.
Foundation paper piecing patchwork dogs patterns
Some of these templates have had to be split across pages, so double-check them against the layout diagrams in the magazine when piecing them together.
Foundation Paper Piecing (FPP) tips
- Remove papers in reverse order – starting with the final sections sewn and working back to the beginning.
- Remember that the marked side of the foundation (the side you will be stitching) is the reverse of the finished block.
- To check fabric placement, increase your stitch length and baste two sections together before you sew. Large stitches are easy to remove if you need to sew the seam a second time. If you're happy, sew the seam directly on top of the basting, using your standard FPP short stitch.
If you're looking for more advice, head over to our how to do Foundation Paper Piecing guide.
FPP dog quilt pattern: How to make the boxer dog quilt
You will need
- Background fabric: 5/8yd
- Body fabric: ¼yd
- Ear fabric: one (1) 3in square
- Batting: 24in square
- Backing fabric: 24in square
- Binding fabric: 1/8y
- One paper copy each of Templates A–J
Finished size
20in square approx
Layout diagram

Preperation
Step 1
Template J is provided as two sections and the paper pieces need to be joined before you start stitching. To do this, position the pieces on top of each other so that the dashed lines on each piece match up, and then glue them in place. Hold the template up to the light to check that everything is aligned.
Piecing the sections
Step 2
Take template A and use it as a guide to cut a fabric piece for section 1, referring to the layout diagram to see which fabric to use. Place the fabric right side up on the unprinted side of your template against the section marked ‘1’.
Ensure that the fabric covers the whole of section 1 plus at least ¼in all around. Pin in place, making sure that the pin is clear of the seam line between sections 1 and 2.
Step 3
Cut a piece of fabric for section 2. Place right side down on fabric 1, matching up the raw edges on the side where sections 1 and 2 will be joined and making sure that when folded back along the seam line section 2 will be covered by the fabric, plus at least ¼in all around.
If you are unsure of your placement, place a pin along the seam line and gently fold the fabric back to ensure that the whole of section 2 is covered (remember to take this pin out before you sew). You can hold your templates up to a light source to check fabric placement.

Step 4
Turn the pieced section over so that it is printed side up and stitch on the marked line between sections 1 and 2, extending the stitching by a few stitches at each end of the seam line.
Step 5
Fold the pieced section away from the seam and trim to ¼in. For the smaller sections, you may need to trim the seam allowance to 1/8in. Fold the pieced section back, turn the work over to the fabric side, flip section 2 open and press.
Step 6
Continue working in this way in numerical order until all of the sections have been added to the template.
Step 7
Press the pieced section and then trim to size on the marked outer line.
Step 8
Piece the remaining templates (B–J) as described in steps 2–7.
Making the mini quilt top
Step 9
Join the pieced sections together in the following order, referring to the layout diagram for placement:
- A to B;
- C to D;
- AB to CD;
- E to F;
- G to H;
- GH to I;
- EF to G–I;
- E–I to J;
- A–D to E–J.
Step 10
Remove the paper templates from the quilt top by tearing carefully along the seam lines, then press.
Quilting and finishing
Step 11
Make a quilt sandwich by placing the backing fabric right side down, the batting on top, then the quilt top centrally and right side up. The backing and batting are slightly larger than the quilt top. Baste the layers together using your usual method.
Step 12
Quilt as desired – Juliet used a walking foot to quilt concentric spirals, starting at the centre and working outwards.
Step 13
Trim the excess batting and backing level with the mini quilt top edges.
Step 14
From the binding fabric cut two (2) 2¼in x WOF strips and join end-to-end using a diagonal seam. Press the seam open, then fold in half lengthwise, WST, and press.
Step 15
Sew the binding to the right side of the quilt, folding a mitre at each corner. Before completing your stitching, neaten the short raw end of the starting piece and insert the ending piece into it. Fold the binding over to the back of the quilt and then hand stitch in place to finish.
FPP dog quilt pattern: How to make the Scottie dog quilt
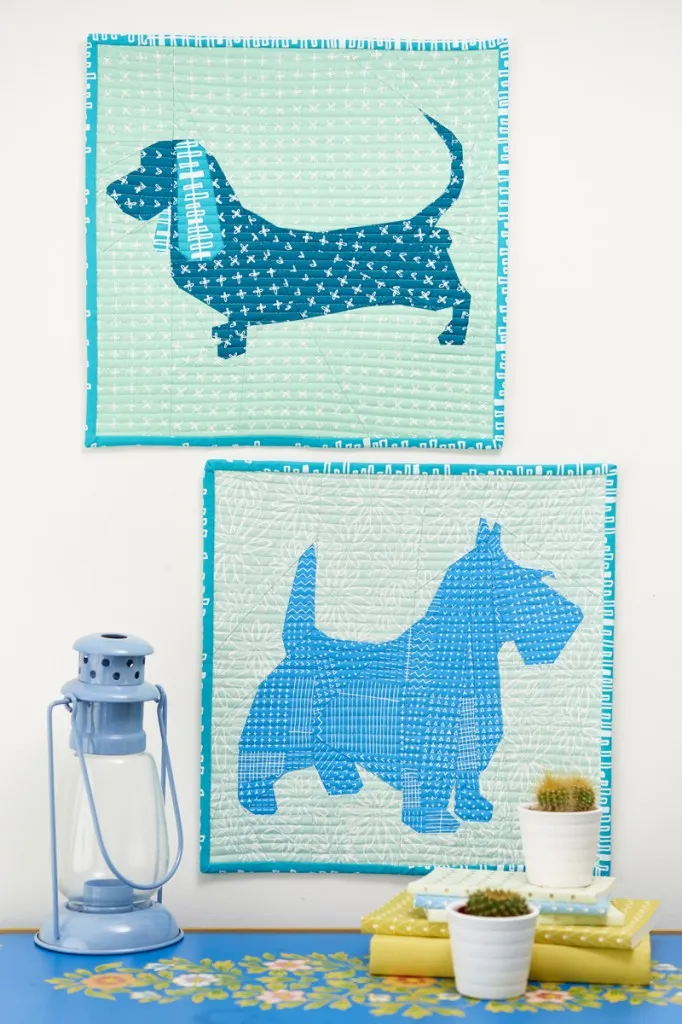
This sweet Scottie dog might just be the team's fave – he's bursting with character!
You will need:
- Background fabric: ¼yd
- Body fabric: ¼yd
- Batting: 18in square
- Backing fabric: 18in square
- Binding fabric: 3/8yd
- One paper copy each of templates A–J
Finished size
- 14in square approx
Layout diagram

Piecing the sections
Step 1
Piece foundations A–J as described in steps 2–7 above.
Making the mini quilt top
Step 2
Join the pieced sections together in the following order, referring to the layout diagram for placement:
- A to B;
- AB to C;
- A–C to D;
- E to F;
- A–D to EF;
- G to H;
- A–F to GH;
- I to J;
- A–H to IJ.

Step 3
Remove the papers from your mini quilt top by tearing carefully along the seam lines, then press.
Quilting and Finishing
Step 4
Complete your mini quilt as in steps 11–15 above. The Scottie Dog mini was quilted with horizontal straight lines.
FPP dog quilt pattern: How to make the Basset Hound dog quilt

You will need
- Background fabric: ¼yd
- Body fabric: 3/8yd
- Ear fabric: 5in square
- Batting: 18in square
- Backing fabric: 18in square
- Binding fabric: 1/8yd
- One paper copy each of Templates A–J
Finished size
- 14in square approx
Layout Diagram

Piecing the sections
Step 1
Piece foundations A–J as described in steps 2–7 above.
Making quilt top
Step 2
Join the pieced sections together in the following order, referring to the layout diagram for placement:
- A to B;
- C to D;
- CD to E;
- F to G;
- H to I;
- FG to HI;
- F–I to J;
- C–E to F–J;
- AB to C–J.
Step 3
Remove the papers from your mini quilt top by tearing carefully along the seam lines, then press.
Quilting and Finishing
Step 4
Complete your mini quilt as in steps 11–15 as above. The Basset Hound mini was quilted with horizontal straight lines.
Capture your pup's beauty with FPP
We absolutely adore these dog quilting patterns. The Boxer, Basset Hound and Scottie dog make a lovely trio or can be made individually, depending on your favourite. They'd make an especially great gift for dog owners of these breeds.
Caught the paper piecing bug?
Why not give English Paper Piecing a go too? We've got a bumper set of free hexagon templates to get you started.