How to make pom pom santa sacks

Learn how to make pom pom santa sacks for your kids this Christmas with Amy Phipps' free tutorial!

Try 6 issues of your choice of craft magazine from just £9.99

Published: November 1, 2021 at 11:00 am

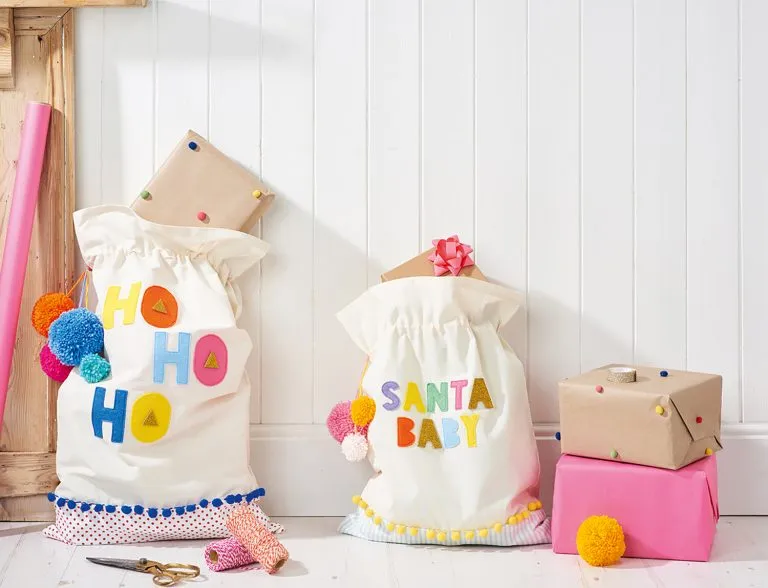
Make sure Santa knows exactly where to leave your gifts with Amy Phipps’ pom pom-tastic sacks! If you think this year’s presents deserve more than being stuffed inside a pillowcase or carrier bag on Christmas morning, up your game and have a go at making these colourful drawstring pom pom santa sacks. They're a great stash buster project (use leftover material, felt and yarn to make your Santa sacks extra colourful) and won't break the bank - crucial at the most expensive time of the year! Combining simple sewing machine skills, decorative appliqué lettering and a liberal helping of easy-to-make pom poms they’re a thoughtful way to add a handmade touch to your Christmas gift-giving this year. Plus they're super sustainable as you can bring them out year after year (wrap the presents inside with handmade wrapping paper for extra eco-points!) We have an in-depth how to make a pom pom tutorial here on Gathered as well as loads of free Christmas embroidery motifs for you to embroider onto your DIY Santa sacks to give them an extra edge.

Once you've sewn your Santa sacks why not craft some handmade pressies? A little reindeer or snowman softie will look adorable peeking out the top! Get the kids involved with your Christmas crafting with our collection of Christmas crafts for kids, it's full of easy DIY projects you can make with them. But now it's over to Amy who is going to show you how to make santa sacks...

You’ll need

  • Two pieces of calico fabric for the large sack, 42 x 60cm (16½ x 2358“)
  • Two pieces of patterned fabric for the large sack, 42 x 15cm (16½ x 6″)
  • Two pieces of calico fabric for the small sack, 42 x 45cm (16½ x 1734“)
  • Two pieces of patterned fabric for the small sack, 42 x 12cm (16½ x 4¾”)
  • Pom pom trim, 1m for each sack
  • Ribbon, 80cm (31½”) for each sack
  • Coordinating thread
  • Yarn needle
  • Different coloured scrap felt
  • Erasable fabric marker
  • Fabric glue
  • Paint brush
  • Pom pom makers in various sizes
  • Yarn

How to make pom pom santa sacks

If you're new to sewing make sure you check out our best sewing machines for beginners guide and our range of tutorial which will teach you how to sew like a pro!

You will need:

  • Fabric
  • Pom Pom makers
  • Felt

Step 1

How to make pom pom santa sacks step 1

With your calico fabric right side (RS) up, place the pom pom trim along the seam allowance at the bottom with pom poms facing inwards. Tack in place.

Step 2

How to make pom pom santa sacks step 2

With RS facing, place your patterned fabric on top of the calico fabric and pom pom trim, aligning the raw edges that are both the same length. Pin in place.

Step 3

How to make pom pom santa sacks step 3

Sew together along the length of the pom pom tape, making sure you keep the pom poms on the inside. Repeat Steps 2-3 with the remaining pieces of calico and patterned fabric, minus the pom pom trim.

Step 4

How to make pom pom santa sacks step 4

Place front and back pieces with RS together and sew up both sides of your sack, matching the seams where plain and patterned panels meet. Zigzag stitch over the outer seam area to strengthen. Sew along the patterned open edge to close the bag, then zigzag stitch over the seam area as before.

Step 5

How to make pom pom santa sacks step 5

Fold the open top edge of the sack to the wrong side (WS) by 0.5cm (¼”) and press. Fold over the top edge to the WS again by 1cm (3/8″) and sew in place.

Step 6

How to make pom pom santa sacks step 6
How to make pom pom santa sacks step 7

Take a length of plain or patterned ribbon, fold the raw edge under, and pin to a side seam on the WS of your sack, 8cm (4¾”) down from the top edge. Continue to pin in place along the width of the sack, then when you reach the seam you started at, cut, fold the raw edge under and pin in place on the reverse of the seam.

Step 7

Sew along the top and bottom edges of the ribbon all the way round the width of the sack to create a channel for your drawstring, then thread through a length of yarn for the drawstring. Make a small hole in one of the side seams along of your drawstring channel, and thread the two yarn ends through to the RS of the sack.

Since you’ve got your sewing machine out and have finished your DIY santa sacks why not make some of our other super cute sewing patterns for beginners? Learn how to make a face mask and check out our free rabbit sewing pattern and start on your new project today.

Step 8

How to make pom pom santa sacks step 8

Turn the sack RS out and press along the seams. Draw your chosen letters onto the different coloured felt pieces using an erasable marker, cut out, then position and pin in place in your sack. Appliqué the letters on using straight stitch and matching thread.

Step 9

Make a selection of pom poms in different sizes for each sack following the pom pom maker instructions, and thread onto the ends of your drawstring with a needle. Tie securely, and trim off any excess yarn to finish.

We hope you’ve enjoyed learning how to make pom pom santa sacks. Tag us in some pics of your santa sacks on Instagram using #molliemakers. For more festive tutorials check out our Christmas crafts section which includes Christmas quilt patternsChristmas knitting patterns and lots of free Christmas decoration crochet patterns for you to choose from.