DIY t-shirt printing

DIY t-shirt printing at home is a lot easier than you might think! Find out how with our step-by-step guide

Try our magazines – get 6 issues from just £9.99!

Published: July 7, 2022 at 6:00 am

Screen printing is a brilliant technique that I explored very early in my design education. I loved how you could create your own printed fabrics and wall papers then whip yourself up a quick statement t-shirt. Although professionally you would need to use big machines and chemicals, I’m going to show you a way of printing without all that fuss.

There are lots of screen printing kits on the market which are easy to search for in google. Once you have the tools you will be able to use this print method using a small space at home on a dining table.

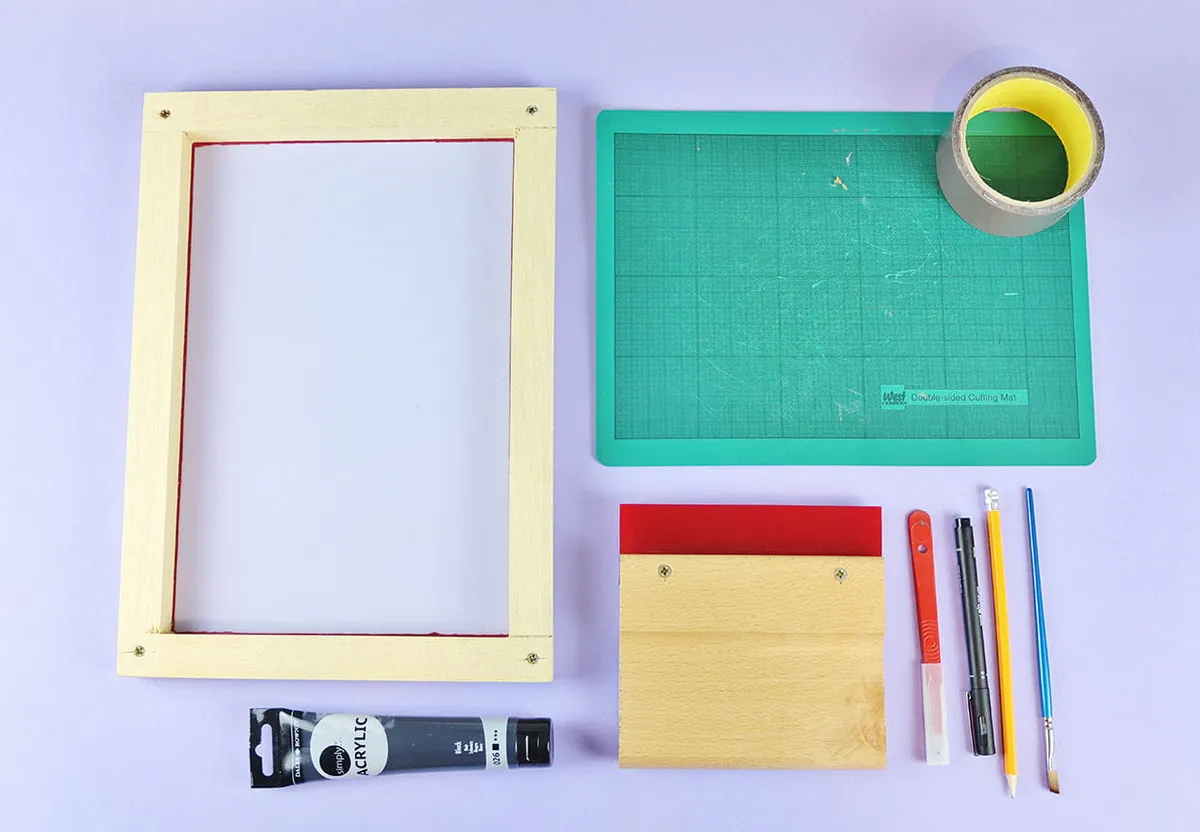
For home use, I recommend using a wooden screen because you’ll be washing up in either your bathroom or kitchen sink which could be scratched if using an aluminium screen.

Screen printing is a technique which involves pulling ink through a fine mesh to reveal a printed design. You can print onto fabric or paper with just a change in the type of ink used. The inks you use are different so if printing onto fabric, check that it is a screen printing ink for fabric and likewise for paper if working on paper.

Tips for choosing designs

Look for inspiration online, or look up hashtags. Words like:

  • Retro Scandinavian printed textiles
  • Screen printed textiles
  • Silhouette printed textiles
  • Geometric prints

When cutting out your stencil and if you accidentally slice too far while making your cuts don't worry. These can be easily fixed with a small piece of masking tape.

Shirt printing DIY tips and advice

What to do if your prints are patchy

Possibly not enough ink on the screen when beginning to print. Add more ink to what you already have. This time be generous. Remember whatever you don't use can always be scooped up and put back into your paint pot.

You may have let the ink dry into your screen mesh which causes blockages. If this happens you'll need to wash your screen. Use the tiniest bit of washing up liquid in some warm water or spray on an all purpose kitchen cleaner. Gently (taking care not to push or make a hole in the mesh) scrub the affected area to remove dried on ink. Sometimes the ink will stain the mesh so it may still look blocked even though its not. One way to check is to hold the screen up to the light to check the mesh has no remaining blockages and then dry with paper towels or a hair dryer.

Tip: make sure your screen is completely dry before using it again with a fresh colour or stencil. If you're not sure if it is dry enough use your hair dryer just to lightly speed up the drying process.

Bleeding or smudged images

If you find that your image has an uneven edge as if the ink has bled causing a smear or smudge on the print, it maybe because you did too many pulls of ink or your screen may have moved slightly as you were pulling the squeegee. It might look like ghosting, when you can see two outlines of your design. When pulling the ink through your screen keep one hand on your screen and the other on the squeegee

Cleaning up

Once you’re finished with printing everything can be washed with warm soapy water. Use the coarse side of a washing up sponge or washing up brush to remove semi dried areas.

Never let the ink dry on to your screen mesh always wash while the ink is wet. This limits the possibility of getting a blocked screen which is annoying and can affect the quality of future print projects.

Read on to learn how to make your own silk screen t-shirts…

Looking for more screen printing projects to try? Make your own DIY tablecloth, try our DIY screen printing tea towels project or have a go at making this bee DIY cushion. If you want to stock up on ink before you start this project, take a look at our best screen printing ink guide.

You will need:

  • Wooden screen frame
  • A squeegee
  • Screen printing ink for fabric
  • Roll of brown tape or masking tape
  • A spatula or spoon to scoop out ink
  • Sheets of stencil paper or ordinary copy paper
  • Something to print onto
  • Craft knife
  • Ruler
  • A pencil
  • Baby wipes/tissue
  • Hair dryer
  • Iron
  • Extra paper to design and draw
  • Cutting mat
  • Plain paper scrap for blotting ink
  • greaseproof paper
  • Paintbrush

Step 1

Print off the stencil template and begin the process of cutting out the design using a craft knife and cutting mat. You can place the print out on top of stencil card and cut through both paper and card to create a reusable stencil. Use a bit of masking tape to secure the two papers so they don’t start moving while cutting.

DIY t-shirt printing step 1

If you are creating your own image, I recommend keeping it bold and simple like the one in this project. Just remember the cutting out by hand can take time so don’t be too intricate when designing at first. I would paint or draw my design in black ink. Once printed all black areas of the design will be printed in your chosen colour ink.

DIY t-shirt printing step 1a

Step 2

Position your stencil on the screen and secure it to the screen using either masking tape or brown tape. I do prefer masking tape because its easier to remove during clean up and if you want to reuse the stencil masking tape is easier to remove saving the paper from tearing.

DIY t-shirt printing step 2

Step 3

Lay your t-shirt on the table. You may want to give it an iron before starting. I strongly recommend placing a piece of card or grease proof paper inside of the t-shirt to protect the other side of the fabric. This creates a barrier so ink doesn’t bleed through to the other side of the t-shirt. Position your screen with stencil design attached how you’d like it to be printed mesh side down onto the t-shirt.

DIY t-shirt printing step 3

Step 4

Using a spatula or spoon scoop out a generous amount of ink along the top of your design. It’s better to have a really generous amount than less because it means you won’t run out of ink whilst printing. Any excess can be scraped up and put back in your ink pot to use again.

DIY t-shirt printing step 4

Step 5

Place your squeegee on your screen above the ink you’ve spread out. Hold your squeegee at a 45° angle applying a good firm pressure (don’t be too heavy handed though). Remember you are not spreading butter. Your free hand will be holding the screen in place to ensure it doesn’t move.

DIY t-shirt printing step 5

Step 6

Now, with the squeegee firmly in hand, pull the ink down the screen towards you and back up again. Remember the more you pull the ink across the screen the more ink will be applied to the print surface. I recommend pulling ink twice or three times. Make sure you check that all the areas of the design are covered.

DIY t-shirt printing step 6

Step 7

Once your pulls are complete carefully place your squeegee down (you can scrap any excess ink on the squeegee just to minimise mess). With clean hands carefully lift your screen starting at one end. Use one hand for lifting the screen and the other for holding the fabric down.

DIY t-shirt printing step 7

Step 8

Check the design before its complete and touch up any areas missed during printing with a paint brush.

DIY t-shirt printing step 8


Step 9

Voila! You just screen printed your design!

DIY t-shirt printing step 9

You’ve finished! We hope you enjoyed our shirt printing DIY project. Have lots of fun coming up with your own original designs!

If this project has given you a taste for printmaking, you may also enjoy our lino printing for beginners guide or our block printing for beginners guide.

DIY t-shirt printing