All products were chosen independently by our editorial team. This review contains affiliate links and we may receive a commission for purchases made. Please read our affiliates FAQ page to find out more.

DIY screen printing tea towels

Try your hand at screenprinting with Jane Foster’s retro DIY screen printing tea towels.

Try 6 issues of your choice of craft magazine from just £9.99

Published: April 11, 2021 at 8:16 am

DIY screen printing tea towels

Ever fancied giving screenprinting a go, but didn’t know where to start? Well, now you can learn from the best – illustrator, textile designer, and all-round screenprinting expert Jane Foster.

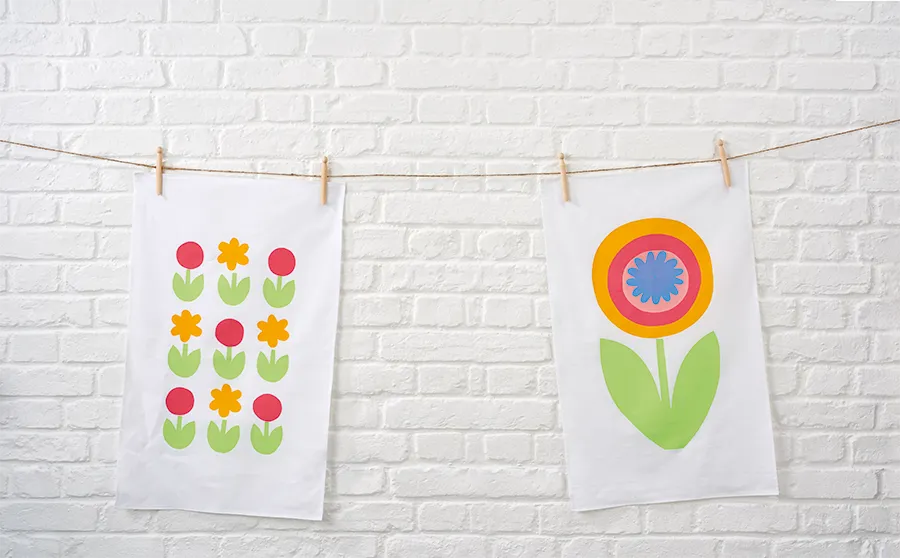
Known for her bold designs and 60s-inspired colour palette, Jane’s created two kitsch-cool motifs in her iconic retro style, and put together a step-by-step guide to transferring them onto a tea towel.

Beginners will only need the most basic kit to get going: a silk screen, a squeegee and ink, all of which you can find online. Screen printing isn’t an exact science, so you might find you’ll need to add more layers to get better coverage, or vary the pressure with which you pull the ink through the mesh. But, like with most crafts, the more you practise, the better you’ll get.

This project was created by Jane for Mollie Makes magazine – for more easy-make craft projects and creative inspiration, subscribe to Mollie or click here to find out more.

You can find lots of tips and advice in our screen printing for beginners guide. Want to try lino printing? Take a look at our linocutting for beginners guide or learn about block printing with our block printing for beginners guide.

Materials

DIY screen printing tea towels

You will need:

  • Screen printing kit
  • Screen printing ink
  • Teal towels (2)

Step 1

DIY screen printing tea towels step1Using the template from issue 80 of Mollie, trace the outside of the flower head onto a sheet of newsprint paper, labelling the paper ‘yellow’.

Step 2

Repeat Step 1 with the two remaining circles, the flower, and the large flower stem, labelling each separate piece of paper with the relevant colour as you go.

Step 3

DIY screen printing tea towels step2

Place the sheet of paper marked ‘yellow’ onto the cutting mat and carefully cut out the circle – this will be the first stencil. Mark the paper ‘yellow’ again, then repeat with the remaining pieces of paper to create five stencils in total.

Step 4

DIY screen printing tea towels step2

Lay the silk screen flat on the table with the wrong side (WS) of the screen facing up. Place your stencil for the yellow colour right side (RS) down onto the mesh, then carefully tape the paper down. You’ll need to ensure it remains completely flat, with the circle being the only area that shows through the screen.

Step 5

DIY screen printing tea towels step4

Place a tea towel onto your table – you may want to cover the table first. Lay the silk screen on top, RS up, positioning the circle over the area you want to print. The base of our circle sat roughly halfway up the tea towel. Spoon some of the yellow ink across the top of your screen, making sure it covers the width of the circle.

Step 6

DIY screen printing tea towels step5

With the ink underneath the blade, pull the squeegee down the length of the screen, so the ink covers the circular hole. Use quite a bit of pressure as you do this, then repeat another four times, always pulling the squeegee down the screen in the same direction.

Step 7

DIY screen printing tea towels step6

Carefully ease the screen away from the fabric, keeping the fabric flat. If you want to print more than one, repeat Steps 5-7 with the other tea towels.

Step 8

DIY screen printing tea towels step7

Scrape off any remaining ink from the screen and squeegee, and place it back in the pot. Peel off the paper stencil, then wash the screen thoroughly on both sides using a sponge. Gently dry with an old towel, then wash and dry the squeegee and spoon.

Step 9

Stick a coloured dot in the middle of the printed yellow circle. Tape your pink stencil to the screen as in Step 4, then lay the screen on top of the tea towel, aligning the dot with the centre of the circular hole. Spoon some of the pink ink across the top of the screen, again, covering the width of the circle. Repeat Steps 6-8.

Step 10

DIY screen printing tea towels step9Repeat the process to print the pale pink circle, pulling the squeegee down at least eight times to cover over the previous darker colours. Remove the coloured dot, then repeat again to print the blue flower at the centre, pulling the ink down roughly six times.

Step 11

DIY screen printing tea towels step11To print the flower stem, add a coloured dot to the bottom of the flower head. Repeat the printing process with the stem stencil, using the dot to help align the top of the flower stem with the bottom of the flower head.

Step 12

DIY screen printing tea towels step12

Heat fix the tea towels by placing a plain piece of fabric over the design and pressing with a steam iron. The printed tea towels can then be washed at 40°, and are best left to dry naturally.

Flower pattern

Step 1

Repeat Steps 1-3 to create a stencil for each of the three colours.

Step 2

Using the green stencil, repeat Steps 4-8 to print the flower stems. Once dry, add coloured dots to the tops of the stems.

Step 3

Repeat Steps 4-8 to print the yellow flowers, then again to print the pink flowers, using the dots to align the flower heads.

Step 4

Repeat Step 13 to heat fix the finished tea towel.

We hope you’ve enjoyed learning to screenprint! Make a bunch of these DIY screen printing tea towels and give them to your pals. If you’re now looking for a new craft to try check out our rug making kits for beginners and our punch needle kits.

More screen printing to try

You’ll find plenty of inspiration and advice on how to use  screen printing right here on Gathered! Explore the technique in our screen printing for beginners article and discover the kit you need to produce your own screens and look after them well in our screen printing kit buyers guide. Looking for some screen printing inspiration? Try this DIY screen printing tea towels project or have a go at this screen printing tutorial and make a bee cushion. The cushion project shows a great alternative method of screen printing which makes use of Mod Podge to block out your design.