All products were chosen independently by our editorial team. This review contains affiliate links and we may receive a commission for purchases made. Please read our affiliates FAQ page to find out more.

How to make your rainbow card kit with thread tassels

Let your stitches shine in this empowering rainbow card with cool tasselled edging, using the pattern featured in The World of Cross Stitching issue 323 (September 2022). We’ve got three bonus sentiment charts for you and an easy tutorial on how to make a tassel fringe out of thread.

6 issues of The World of Cross Stitching magazine for £9.99|Save 75%

Published: July 6, 2022 at 9:20 am

Stitch Fiona Baker's colourful rainbow pattern using the kit gifted with print editions of The World of Cross Stitching issue 323 (September 2022), or use your own fabric and threads following the chart inside the magazine.

If you’re new to cross stitch, check out our complete guide for beginners before you start.

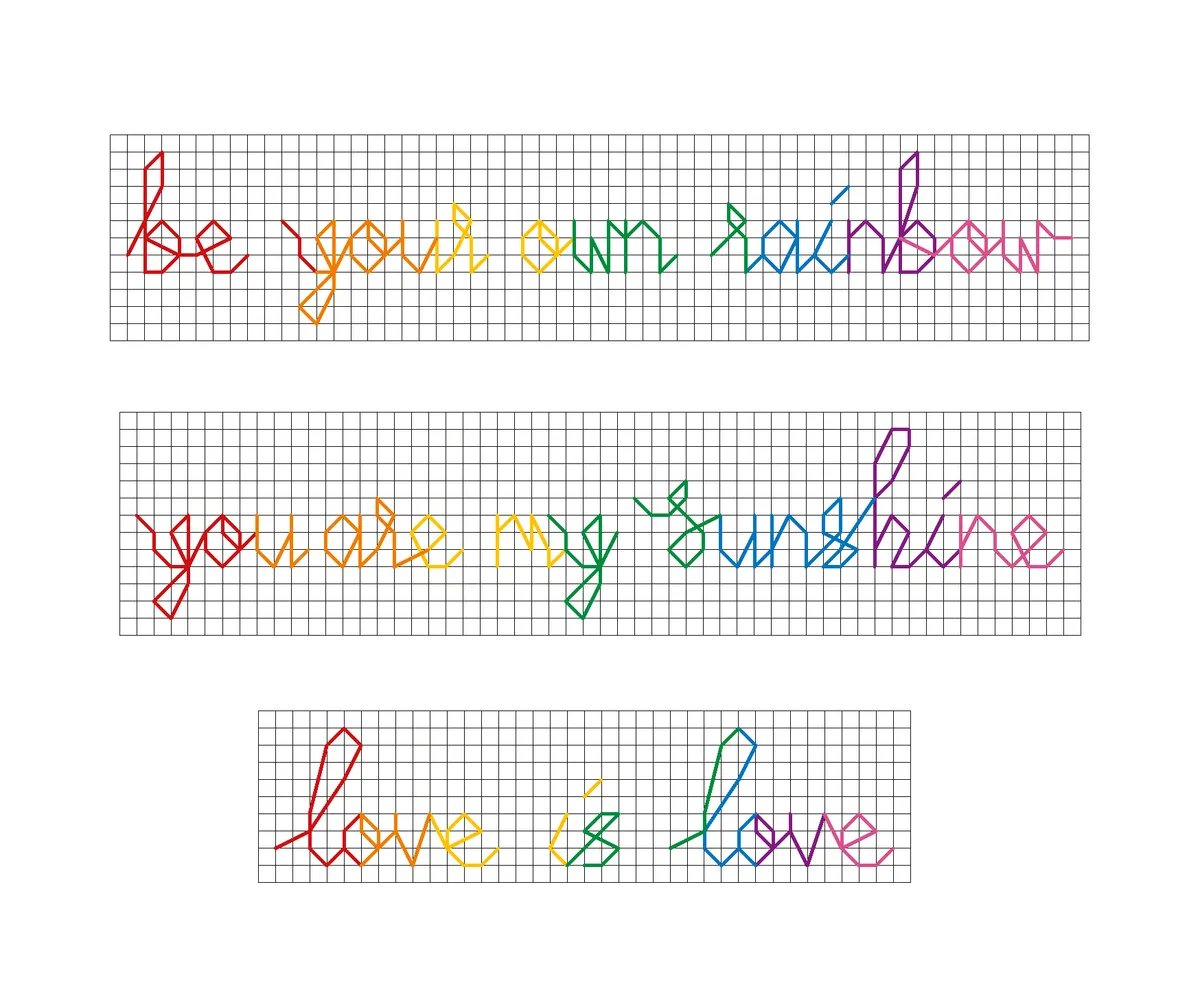
Three bonus rainbow card greetings to stitch

The chart in The World of Cross Stitching issue 323 comes with the sweet sentiment ‘let your light shine’, which is great for all sorts of occasions and recipients.

We’ve also got three bonus greetings, designed by Fiona Baker, to swap with the one on your card if you prefer - you should plot your chosen greeting out to ensure it is positioned centrally above the rainbow before you begin stitching:

Create a tassel fringe with thread

We’ll show you just how easy it is to add a pretty tasselled fringe to your completed cross stitch. You’ll just need extra coloured threads as used in the design, then follow our simple step-by-step tutorial to make your own fringe.

You will need:

  • Aida
  • Stranded cotton
  • Tapestry needle
  • Embroidery scissors

Step 1

Cross stitch your rainbow and chosen greeting following the chart and key in the magazine, or the choices above. When complete, thread your needle with two strands of cotton, then secure it at the back of the fabric on the bottom edge of the matching colour arch of the rainbow. Then bring the needle up through the fabric to the front, through one of the holes on the bottom row of stitches.

Make Thread Tassels Step 01

Step 2

Leave a loop of approx. 4cm (1½in) of thread on top of your stitching, then take your needle back down through the same hole in the fabric.

Make Thread Tassels Step 02


Step 3

Secure the thread at the back of the fabric under nearby completed stitches, being careful not to pull the loop through from the front. Make it extra secure by creating a small knot – just thread the needle through the thread loop made when passing under stitches. Repeat this loop and secure process for every hole along the bottom row of stitches, creating an individual loop in each one.

Make Thread Tassels Step 03

Step 4

Snip the centre of the thread loops using embroidery scissors – to make sure you cut through the centre and create evenly sized tassels, insert one of the scissor blades into the thread loop and very gently pull up until you find the middle.

Make Thread Tassels Step 04

Step 5

Trim your thread fringe so it aligns along the bottom edge for a neat finish. Gently comb through the threads with your fingers to ensure the individual strands lay flat.

Make Thread Tassels Step 05

Step 6

Repeat this process for each colour to complete your rainbow thread fringe. You may find it easier to cut and trim all your loops of thread at the same time, or do it for each colour as you go if preferred.

Make Thread Tassels Step 06

Once you’ve finished your thread fringe, trim and fray the aida to make a fabric patch for a single-fold card. You should use acid free double sided tape to stick fabric onto a card blank. This will help preserve it and prevent yellow acid staining from appearing over time.

Or if you prefer displaying your finished cross stitch in apertures, check out our how to make a DIY aperture card tutorial for expert guidance.

Stitch more thread tassel fringes

You can use this thread tassel technique on all sorts of cross stitch designs to add a decorative effect. It’s great to use for hair on figures, plant foliage, clothing or as a fancy fringe on any design of your choice.

You’ll find lots of great inspiration on our site, including this cute Free giraffe cross stitch – why not add thread tassels to the edge of the giraffe’s scarf for a fun finish! You can also find more Top tips for cross stitch to help you stitch like a pro.