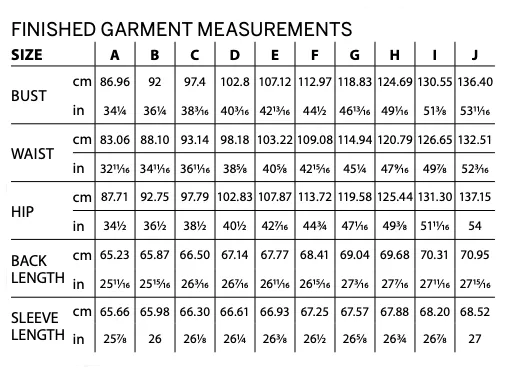
Interfacing the pieces
Step 1
Press iron-on stretch interfacing onto the WS centre edges of the lower, mid, and upper front pieces, as well as the front edge of the hood pieces. Follow manufacturer’s instructions for fusing time.
Binding the pockets
Step 1
Finish one of the long edges of both the pocket binding strips using an overlocker or zigzag stitch. Make sure you don’t trim away any fabric.
Step 2
With RS together, pin the un-neatened edge of the binding around the curved pocket edge of the lower front piece, slightly stretching the pocket binding around the mouth edge, as this will keep it taut when worn.

Step 3
Stitch in place. Trim and grade the seam allowance to reduce bulk.
Step 4
Press both the binding and seam allowance away from the pocket. With the WS facing up, wrap the binding over the seam allowance so the neatened edge just covers the seamline and pin in place.

Step 5
Sewing from the RS with a twin needle, stitch the binding in place. Line up the left needle with the seam line – this will ensure you stitch down the neatened edge on the underside of the binding. Trim off any excess binding.
Making the pocket bag
Step 1
Lay the Pocket Bag wrong side up on top of the wrong side of the Lower front piece matching up the centre front edges

Step 2
Pin and then sew the lower un-notched edge.

Step 3
Grade the seam allowance once stitched. Press the seam open.

Step 4
Bag section up onto the lower front so that the right side of both pieces now face up, and the seam is hidden inside.
Match the finished edges of the pocket mouth with the notches at the side and across the top. Then machine baste the layers together at the side seam and the top edge using the foot width as your guide (approx 0.7mm)
Neaten the 2 centre front edges together, From now on this section will be used as one piece, the lower front.

Making the lower back section
Step 1
With right sides together, pin and then sew the un-notched longer edges of the 2 lower back sections together. Press the seam open.
Step 2
Open out the lower back sections so they face right side up. Place one of the lower front sections over the top, aligning the finished bottom edges of fronts with the back seam-line, and the notches at the side. Pin in place at the side.
Step 3
Pin the second lower front onto the opposite side, and then baste the side edges with a .7 mm seam allowance.

Step 4
With the right sides facing, Fold the 2nd lower back piece over the top, sandwiching the 2 lower fronts between the 2 back pieces.

Step 5
Pin and then sew the side seams through all the layers with a 1 cm seam allowance. trim and grade the corners to reduce bulk.
Step 6
Turn through to the right side, and the front sections are now neatly encased inside the side seams.
Step 7
Press the hem edge. Pin in place and then twin needle stitch from the right side 2cm from the edge.
Step 8
Baste together the 2 layers of the lower back sections together along the un-stitched edge.
Making the upper sections
Step 1
With RS together, pin the mid fronts to the upper fronts, matching notches, then sew with a 1cm (3⁄8in) seam allowance. Neaten as before and press the seam towards the hem.
Step 2
With RS together, pin the mid back to the upper back, matching notches, and then sew with 1cm (3⁄8in) seam allowance. Neaten as before and press the seam towards the hem.
Stitching the shoulder seams
Step 1
Press a 1cm (3⁄8in) wide strip of interfacing or edge tape onto the WS of the upper back piece along the shoulders, cutting to the correct length before pressing in place.
Step 2
With RS together, pin the fronts to the back along the shoulders and then sew with a 1cm (3⁄8in) seam allowance. Neaten as before and then press the seam towards the back.

Making and attaching the sleeves
Step 1
With RS together and matching all notches, pin the upper sleeve to the mid sleeve and sew together with 1cm (3⁄8in) seam allowance. Neaten as before and press the seam downwards.

Step 2
Join the lower sleeve to the mid sleeve in the same way.
Step 3
Match the sleeves up with the corresponding armholes, with double notches are at the back, single notches are at the front. With RS together, pin the shoulder seam notch of the sleeve to the shoulder seam.
Step 4
Pin the underarm corners of the sleeve to the underarm corners of the armhole. Then find and pin the mid points between the first three pins. Continue pinning the mid points between pins until the sleeve is well pinned into the armhole.
Step 5
Sew with a 1cm (3⁄8in) seam allowance and neaten the seam allowance raw edges as before.

Sewing the underarm seams
Step 1
Fold the hoodie in half at the shoulders, RS together. Pin the side and underarm seams and the underarm seam of the sleeves, matching up the notches/seamlines.

Step 2
Stitch one continuous seam from the end of the sleeve through the armhole to the hoodie hem with a 1cm (3⁄8in) seam allowance.
Attaching the sleeve cuffs
Step 1
With RS together, fold the cuff pieces in half, aligning the shorter edges. Pin and sew with a 1cm (3⁄8in) seam allowance.
Step 2
Turn the cuffs to the RS then fold in half with WS together, lining up the raw edges.

Step 3
Using a 7mm seam allowance, tack the raw edges together.
Step 4
Fold the cuffs flat and use a pin to mark the halfway point directly opposite the seam, then mark the two quarter points in between. Mark the ends of the sleeves in the same way, slide the cuff over the end of the sleeve, lining up all raw edges, and then match the seams and the pins. Since the cuff is smaller than the sleeve, you'll be stretching the cuff to fit the sleeve. Pin the cuff in place securely.
Step 5
Using a 1cm (3⁄8in) seam allowance, stitch the cuff in place. If sewing with an overlocker, machine-stitch first as the cuff is small and fiddly.

Joining the top and bottom of the hoodie
Step 1
With RS together, pin the lower section of the hoodie to the bottom edge of the upper hoodie, matching all seamlines and notches.
Step 2
Sew along the pinned lower section with a 1cm (3⁄8in) seam allowance and neaten as before.

Step 3
Press the seamline towards the mid-section of the hoodie. If your fabric isn't too bulky, you can use a stretch twin needle to topstitch this seam in place. Neaten the centre front edges as before.
Inserting the zip
Step 1
Working on one front at a time, line up the edge of the zip tape with the centre front edge and pin in place with RS facing. The upper zip stop should be 1cm (3⁄8in) below the neckline edge, and the bottom zip stop lined up with hem or just above.
Step 2
Once the zip is pinned in place, you can unzip it as this makes sewing easier. It's important not to sew above the top zip stop. Attach a one-sided zip foot and, using the left-hand side, sew close to the zip teeth.
Step 3
Once the zip is sewn in place, fold the upper zip tape over your stitching line so it is tucked away from the neckline seam allowance. Secure in place with a stitch either by hand or machine and then trim any excess tape.

Step 4
Turn the zip towards the WS of the front edge and finger-press in line with the zip teeth. Pin in place, then topstitch approx 1.5cm (5⁄8in) away from the edge of the teeth. For an optional detail, you could use a double row of topstitching to tie in with the hem detail, or try twin needle topstitching.
Step 5
Reattach the opposite half of the zip and mark the position of the seamlines on the zip tape. This will ensure the seams line up across the zip.
Step 6
With RS together, pin the second half of the zip to the other front edge. Ensure the zip stops are in the same positions and that all seam lines match across the zip. It can be helpful to tack this side in place before sewing to ensure all points remain aligned. Sew the zip the same way as before.
Making the hood
Step 1
This hoodie uses a buttonhole for the cord, but you could substitute with an eyelet if you prefer. Follow the instructions from the manufacturer if you wish to insert eyelets instead. Transfer the buttonhole marks to the RS of the outer hood, and then follow your machine instructions to insert a buttonhole. The length of the buttonhole should be just long enough to feed the cord through. Always stitch a test sewing a buttonhole on a scrap of fabric to ensure you're happy with length and buttonhole function before stitching on your garment.
Step 2
With RS together, pin then sew the curved seam of both the outer hood, and hood lining.

Step 3
Place the outer hood inside the lining hood, with the RS together. Pin around the interfaced front edge and stitch with a 1cm (3⁄8in) seam allowance. Grade the seam allowance once stitched.
Step 4
Turn the hood to the RS and press the edge. Pin the edge in place, and topstitch around the hood mouth using a 2cm (¾in) seam allowance. Use a double row of top stitching to match the hem detail. You can use a twin needle for this but remember that both the inside and outside of the hood will be visible so you may prefer not to see the underside of a twin needle stitch.
Step 5
Pin the two raw edges together and tack. The hood will now be attached as one layer.

Attaching the hood
Step 1
Lay the hoodie with RS facing up, then place the hood on top of the neckline with the lining side facing up. Matching the shoulder seams and centre back, pin the hood around the neckline through all layers. Sew in place with a 1cm (3⁄8in) seam allowance.

Step 2
Grade the seam allowances – however, don't trim the hood lining down, as this forms the neck binding. Reduce seam bulk where you can.
Step 3
Neaten the raw edge of the hood lining.
Step 4
Press the hood lining onto the body of the hoodie. Pin/tack in place.
Step 5
From the RS, topstitch approx 7mm from the neckline seam.
Threading the drawstring
Step 1
Use a safety pin to thread your cord through a buttonhole, around the hood mouth and back out of the other buttonhole. Once threaded, trim the ends to your desired length and knot.
Step 2
Very carefully use a candle or match to singe the ends of the knot to seal it. This ensures it won't fray away through the knot.
Making a drawstring
Step 1
To make matching fabric drawstrings instead of using cord, cut a rectangle 5cm (2in) by 1.4m (1½yd).
Step 2
With WS together, fold the rectangle in half and pin along its length.
Step 3
Sew with scant 1cm (scant 3⁄8in) seam allowance. Use a tube turner or safety pin to turn it through to the RS.
Making the hoodie in a single colour
Step 1
Want to learn how to make the hoodie in a single colour? This is what you need to do to edit the pattern! Editing the pattern is as simple as overlapping the pattern pieces. The plain hoodie still has a lower panel but the upper and mid sections are cut as one piece and will be referred to as the new upper section here. Take the upper front hoodie pattern piece (A) and using a ruler and a pencil mark the 1cm (3⁄8in) seam allowance along the lower edge. Then take the mid front pattern piece (B) and mark the 1cm (3⁄8in) seam allowance on the upper edge.
Step 2
Overlap the upper and mid sections, aligning the seam allowance lines. Tape in place.
Step 3
Repeat with the upper back (E) and mid back (F) sections to create one pattern piece.
Cutting out
Step 1
From the jersey fabric cut:
- New upper hoodie front: Cut one pair
- New upper hoodie back: Cut one on fold
For all other pieces, the cutting instructions remain the same as for the colour-blocked hoodie, simply cut them all in the one fabric.