All products were chosen independently by our editorial team. This review contains affiliate links and we may receive a commission for purchases made. Please read our affiliates FAQ page to find out more.

How to draw a horse

Learn how to draw a horse with our easy step-by-step tutorial! Grab a pencil and draw along with us as we share expert knowledge so that you can sketch with confidence.

Try our magazines – get 6 issues from just £9.99!

Published: July 19, 2022 at 6:00 am

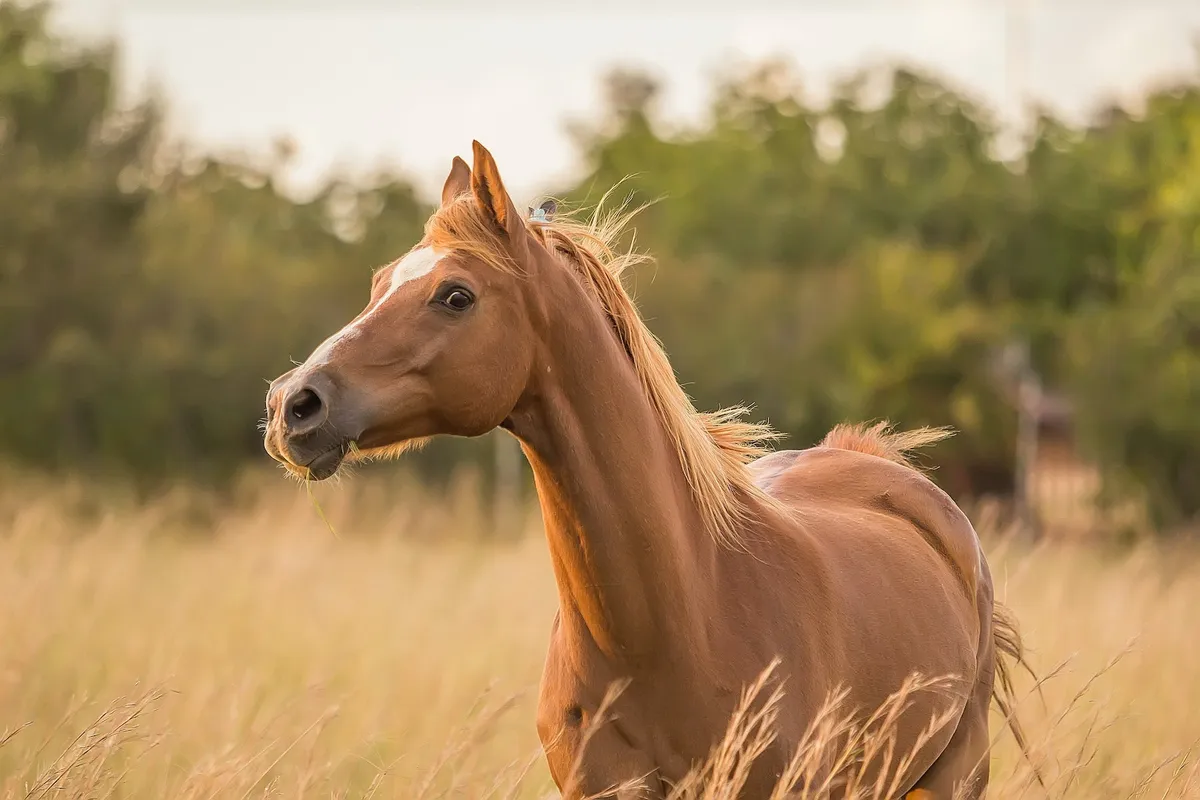
Horses feature in some of the oldest known artworks. For millennia, we have been drawn to their speed, strength, heart, and loyalty, so it’s only natural that ancient humans wanted to immortalise them on cave walls. Today, they continue to capture the imagination, and we’ve put together this easy horse drawing tutorial so that you can learn how to draw your own.

In this fun and easy-to-follow step-by-step tutorial, we show you how to build up the form of a horse using basic shapes, share expert advice and walk you through the steps needed to build up the detail on your horse. Once you’ve completed this horse drawing tutorial, use some of the techniques you’ve learnt and apply them to other horse poses, or even other animals.

© Sarah Olive

If you’re new to drawing, we think you’ll enjoy our pencil drawing for beginners and best drawing pencils guides – they’ll help you get started. Looking for more drawing projects? Check out these adorable step-by-step guides, how to draw a cat and how to draw a dog with artist Matt Breen.

Our art editor, Sarah Orme, has put together a series of useful guides to help you get the most out of your hobby. Learn how to use watercolour pencils, how to do ink drawing, or how about learning how to draw a tree step by step?

If you like the style we’ve used in this tutorial, you might like to have a look at how to draw a bird, and how to draw a tiger, both of which also have similar step-by-step tutorials.

We love seeing what you create, so don’t forget to share your art projects with us on Instagram, Facebook or Twitter, too!

Learn how to draw this horse with our easy horse drawing tutorial!

Top tips for drawing horses

  • The first step to drawing horses is to break down the subject into (very) rough shapes. It’s important to check proportions at this stage. Only press lightly with your pencil, as these lines will be erased later on.
  • If you want to keep a record of your construction lines for future reference, use a coloured pencil to mark out the initial planning stage. This way they're easily distinguishable from the final details.
  • Once you've planned out the form and proportions of the horse with basic shapes, smooth the lines between the shapes to join them together. Don’t add detail at this stage – if your proportions are still out, you’ll find yourself erasing your hard work.
  • Then, refine the head and neck. These are prominent features on the horse, so keep checking the proportions against your reference photo.
  • When you come to drawing the legs, draw the joints (knees and ankles) first as rough circles. This helps your horse look more realistic and helps with the contouring of the legs.
  • Once you’re happy with your basic shape, go over the outline with a harder pencil or fine liner.
  • Once you have mastered this horse drawing tutorial, why not try speed sketching horses? Aim to fill the page quickly, and construct your horses from basic shapes, like circles, ovals and curves. You’ll soon get a feel for the proportions, and it’s a lot of fun, too.
  • If you’re drawing horses from a photograph, choose a photograph where all parts of the horse are unobscured, and one where the lighting is decent enough to fall on the contours.
  • In general, horses have: a thin head, thick chest, thin legs, narrow (ish) waist and a fairly decent-sized rump.
© Helena Lopez
  • If you have a museum nearby, this is a fantastic place to get some ‘real life’ sketching experience, without the risk of them galloping away (unless you happen to be in the American Museum of Natural History at night…).
  • Drawing from life can be a challenge thanks to the constant movement. However, it’s a great way to sharpen your drawing skills and get to know their form, so it's a great way to get in some practice if you can.
  • If you’re keen to transform your simple horse drawing into a cartoon, try making some of the features more exaggerated. Make the eyes, head and mouth bigger, and simplify the body shape to make it appear more streamlined.

To draw a horse you will need:
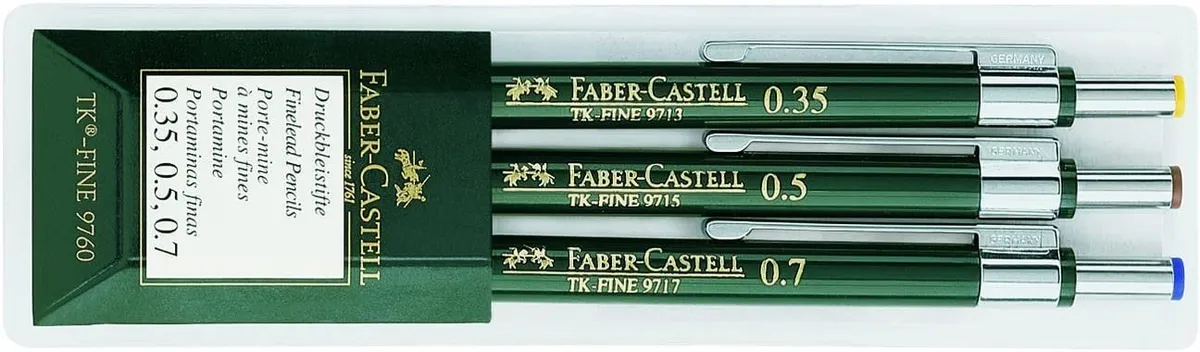
Technical pencil

Lightly sketching the rough shapes that make up your horse is a great way to build confidence in sketching the overall form of the animal.

A simple technical pencil, like these ones from Faber-Castell will do the trick. This pack comes with three different thicknesses, 0.35mm, 0.5mm and the slightly thicker 0.7mm, each colour-coded so you can easily tell which is which. Not quite what you’re looking for? Check out our round-up of the best mechanical pencils for drawing, to find the best one for you.

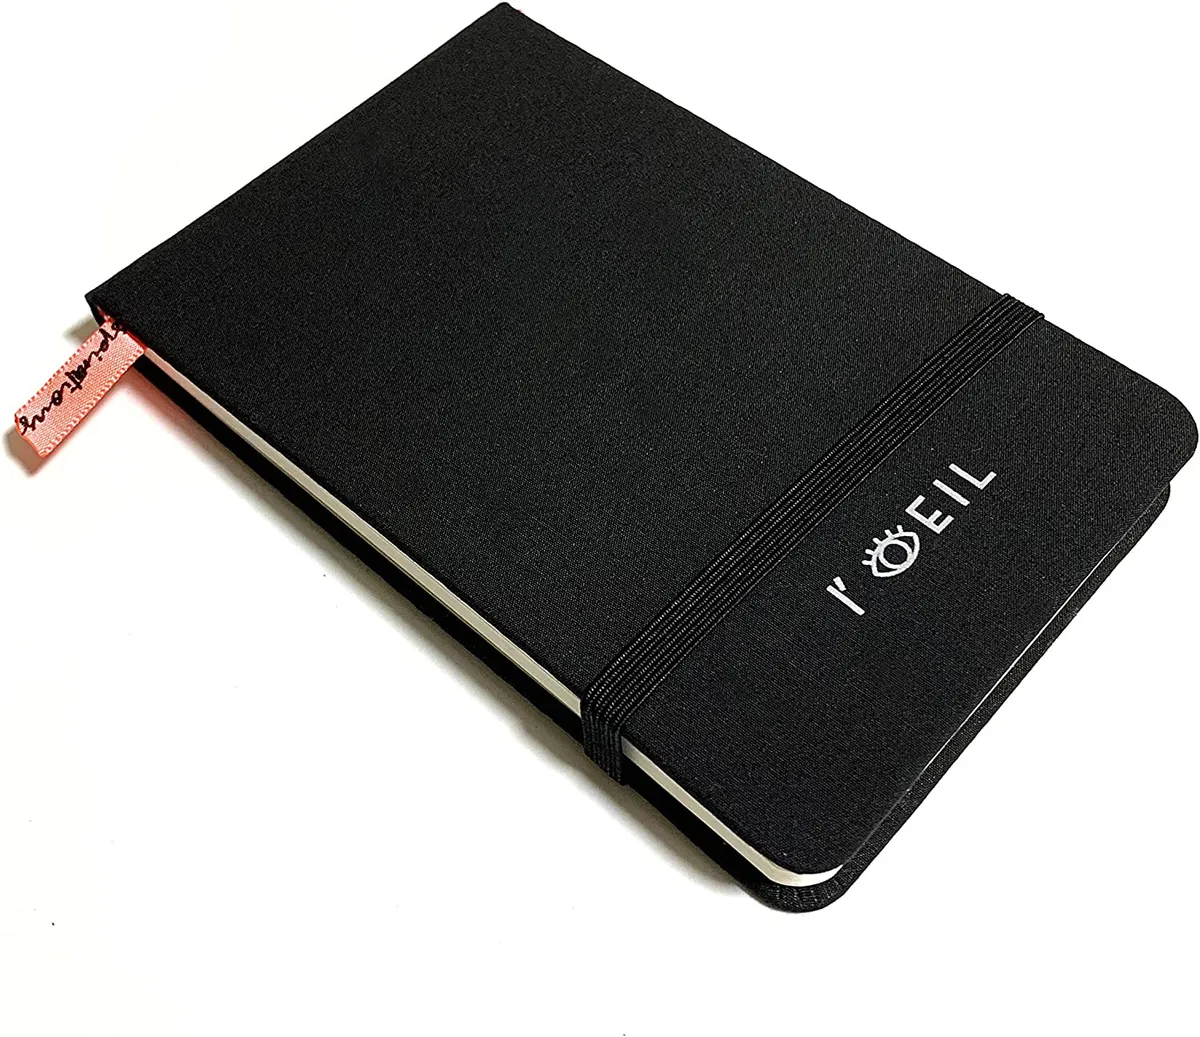
Sketchbook (or paper)

You can use any type of paper for this drawing tutorial, but we recommend something with a smooth grain. This makes erasing the construction lines easier, with a cleaner result. Be sure to experiment with different colour paper, sugar paper is good for this as it comes in an array of different colours and you can pick it up cheaply.

We love this mini sketchbook from l’oeil. It’s great for capturing animals, street scenes and people on the go. It measures just 9 x 14cm and comes with a durable cotton hardcover, so it’s ideal for throwing in a pocket or bag. It’s perfect for pencils, coloured pencils and charcoals, and it’s held together with an elastic band. There’s even a (neon) ribbon bookmark to keep your page, and an expandable pocket inside the back cover for scraps of inspiration you might want to keep. It’s a sturdy little sketchbook and the paper is of great quality, coming in at 150gsm in weight.

Eraser

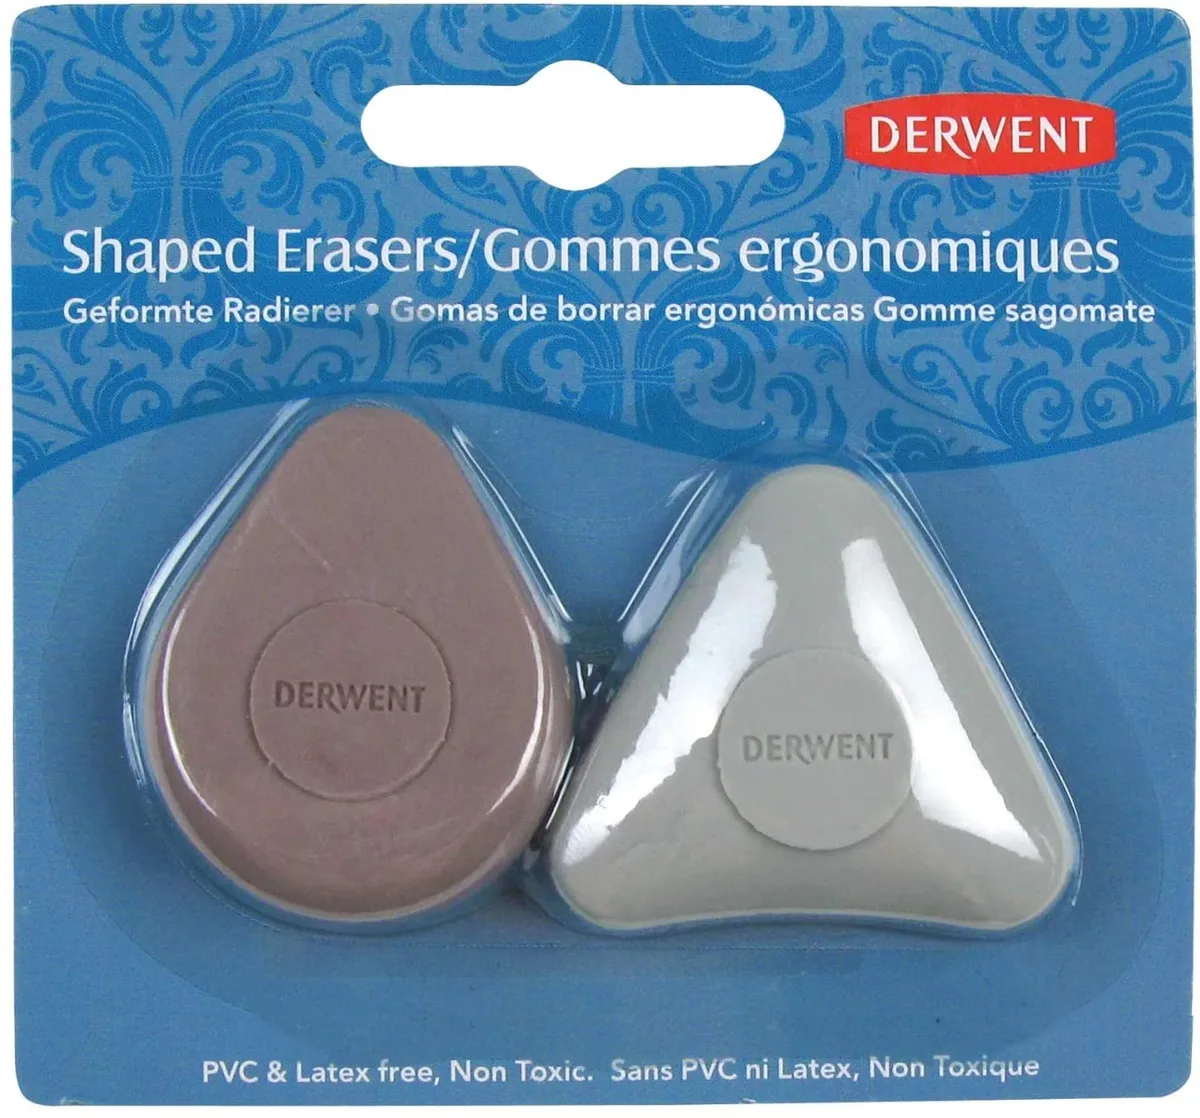
There’s something to be said for leaving the construction lines on your work. It’s loose, fun and messy. If, however you’d like to erase those lines, then I recommend using a hard, angled eraser, like these ones from Derwent.

Kneadable erasers are fine for certain types of drawing, but when you’re erasing large areas like in this horse drawing tutorial, you’ll want something that’s not going to roll itself into a sausage on the page. These ergonomic erasers are impressively smudge-free and shaped for a better grip. I really like them, and have several dotted around my craft room.

~or~

iPad

If you have the cash to splash and want to branch into digital art, the iPad Pro is a great option for drawing. However, the cheaper, "regular" iPads are just as good for the casual artist, it just boils down to how much storage you need and the types of apps you want to run.

Tech has moved quickly in the last few years, and operating systems are taking up more and more space – so keep this in mind if you’re looking to buy an iPad; as time goes on and you install more updates, the new OS will gradually take up more and more space. So, it’s worth opting for maximum storage from the off, if you can afford it.

Apple Pencil

The 2nd generation Apple Pencil has a new function - double-tap to switch between tools you need, which is very useful when switching between sketching and colouring. The upgraded apple pencil magnetically attaches to the iPad Pro, and charges wirelessly.

No more having to stick your entire Apple Pencil in the end of your iPad, and the magnet means you’re less likely to lose it. If you do happen to put it down on a flat surface, like your craft desk, the flat edges mean it’s much less likely to roll away than the original, so it’s always ready when you need it.

This is the horse you'll be learning how to draw

How to draw a horse

Follow this tutorial and learn how to draw a horse!

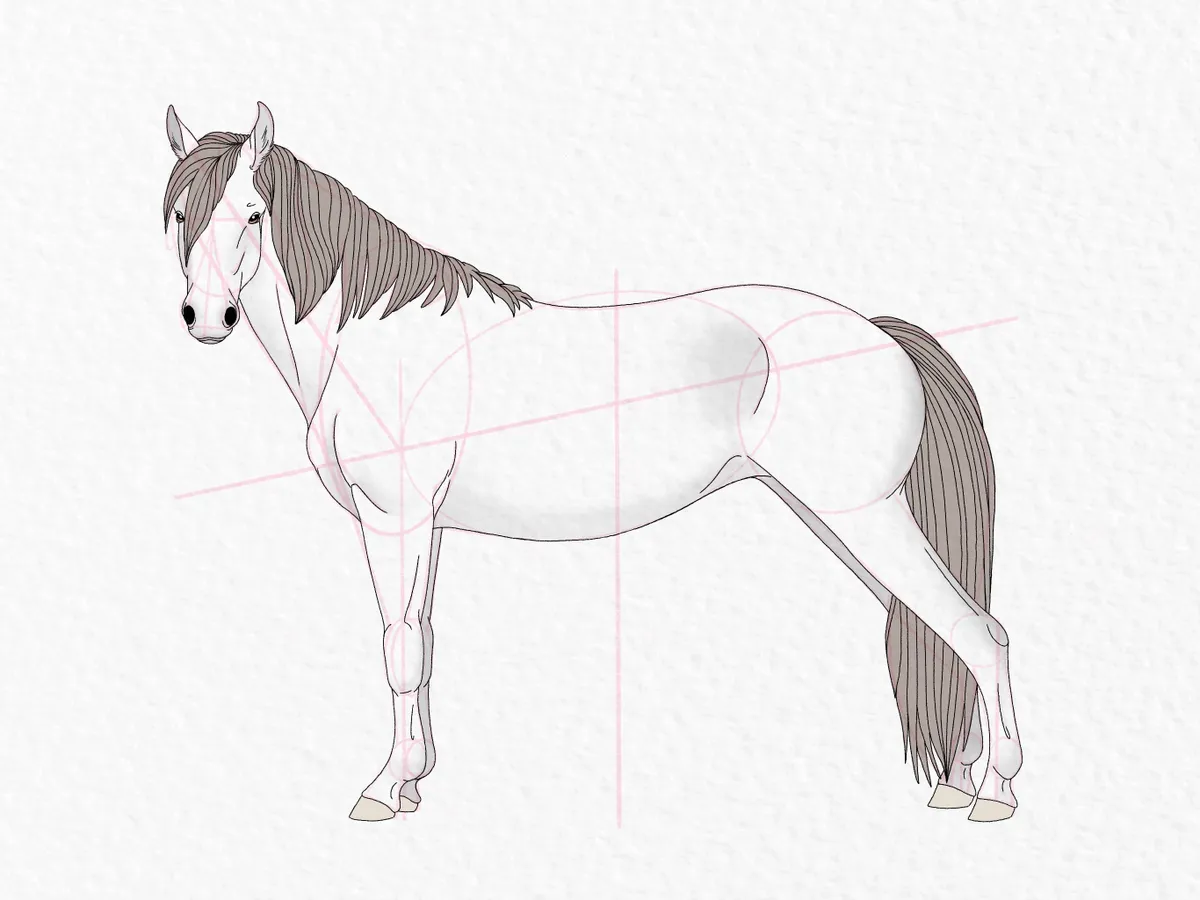
This in-depth horse drawing tutorial will take you from constructing the basic shape of the horse’s body to adding details, tail and mane. As this is a tutorial for beginners, we’ve used minimal shading, but you’ll see how just a little extra shading can make your horse leap into 3D and really pop from the page.

For the purposes of this horse drawing tutorial, we have used red to show clearly where the construction lines are, then lightened them when adding the detail on top.

Ready? Let’s go!

Step 1

First, draw a vertical line in the middle of your page. This will denote the height of the horse’s back.

How to draw a horse – step 1

Step 2

Draw a second line, slightly diagonal across the top of the first.

The front of the horse will be where the line is lower, and the rear of the horse will be where the end of the line rises up.

How to draw a horse – step 2

Step 3

Draw an oval roughly in the middle of these two lines. This will form the main part of the horse’s body, the back of the horse (where a saddle would sit).

How to draw a horse – step 3

Step 4

Draw another vertical line adjacent to the front of the oval. This will be the approximate position of the front leg.

How to draw a horse – step 4

Step 5

Draw a short, vertical line towards the rear of the sketch. Position it approximately twice the distance as the front line is from the centre line. This will mark the position of the horse’s back legs.

How to draw a horse – step 5

Step 6

Draw another, short line adjacent to this. This second line marks the position of the second back leg.

How to draw a horse – step 6

Step 7

Draw an elongated oval at the front of the body. Position the intersection of the body line (the diagonal) and the front legs approximately 1/3 the way up from the bottom of the oval.

How to draw a horse – step 7

Step 8

From that intersection, draw a vertical line upwards – approximately twice as long as the oval is wide. This marks the position of the horse’s neck.

How to draw a horse – step 8

Step 9

Draw a short, almost vertical line at the top of the neck line. This will be the horse’s head.

Draw a circle, slightly smaller than the height of the main body oval, at the back of the horse. Slightly overlap this circle with the main body oval.

How to draw a horse – step 9

Step 10

Join the line for the neck and the front oval up with a sweeping curve.

How to draw a horse – step 10

Step 11

Next, add some knees to the legs at the back of the horse. Draw three, small circles: one at the intersection of the two lines at the top, and two nearer the bottom. (Part of the leg will be hidden by the tail - that's why we are only drawing three, not four.)

How to draw a horse - step 11c

Step 12

Extend a line from these small circles, up to the larger circle at the top to form the horse's thighs.

How to draw a horse - step 12

Step 13

Join the two small circles together to create the horse's shins.

How to draw a horse - step 13

Step 14

Draw two triangles at the bottom of each circle for the hooves.

How to draw a horse - step 14

Step 15

For the front legs, draw two overlapping ovals at the same height as the ones on the back legs. Then draw two more at the bottom, again mirroring the ones you did for the back legs.

How to draw a horse - step 15d

Step 16

Still working on the front legs, join the top two ovals up with the large oval at the top, creating the top of the horse's front legs.

How to draw a horse - step 16

Step 17

Repeat lower down the leg, for the horse's front shins.

How to draw a horse - step 17

Step 18

Like before, draw two triangles at the bottom of your legs for the hooves.

How to draw a horse - step 18

Step 19

Working on the head, draw an oval shape at the top of the neck, positioning it so that the nearly vertical line runs roughly through the centre.

How to draw a horse - step 19

Step 20

Starting just below the centre of the head oval, draw a triangle as shown.

How to draw a horse - step 20

Step 21

Draw a semi-circle at the bottom of the triangle to form a muzzle.

How to draw a horse - step 21

Step 22

Add two more triangles at the top for the ears, but make the tips rounded.

How to draw a horse - step 22

Step 23

Next, mark out the position of the horse's facial features. Draw a horizontal line in the middle of the head-oval.

Draw two semicircles on either side of the nose-triangle for the nostrils.

Add a small line in the semicircle that makes up the muzzle, to mark the position of the mouth.

How to draw a horse - step 23

Step 24

At the edge of the horizontal line, roughly mark the position of the two eyes. Add two ticks on either side of the 'cheeks', to add shape to the head.

How to draw a horse - step 24

Step 25

Add a sweep of mane on one side of the head. Make this an upsidedown teardrop shape, with the tip over to one side of the head.

How to draw a horse - step 25

Step 26

Add a rough outline of the mane along the horse's neck.

How to draw a horse - step 26

Step 27

Roughly outline the shape of the tail using slightly curved, vertical lines. The tail is going to hang between the horse's legs, so draw the end of the tail to the left of the hooves.

How to draw a horse - step 27

Step 28

Build up the shape of the horse by joining up the rear sections with a semicircle.

How to draw a horse - step 28

Step 29

Continue to refine the shape of the horse by smoothing off the areas between the main construction shapes.

Add a saddle area by drawing a curved line between the neck and the rump, cutting across the top of the main body oval.

Round off the areas along the belly of the animal.

Add a small semi-circle at the front of the horse for the chest, as this area juts out slightly on the real animal.

How to draw a horse - step 29b

Step 30

Define the horse by adding some feature lines, and finish smoothing the joins between the main shapes. Give the top of the mane some volume, shape the ears and join up the triangular nose with the oval head.

That's all your construction lines done, it's time to start adding details!

How to draw a horse - step 30

Step 31

From this point on, I've lightened the construction lines to make it easier to draw the details on top.

Start by drawing the eyes, making sure to leave a white circle (highlight/reflection) at the top of each pupil. Leave an area at the bottom of each eye for the eyelid.

How to draw a horse - step 31

Step 32

Draw a top eyelid for each of the eyes and add some colour (if you wish) - I've gone for brown on the bottom eyelid, and grey for the top eyelid.

How to draw a horse - step 32

Step 33

At the tips of the triangle that you used to construct the horse's face, draw (and fill in) two ovals for the horse's nostrils. Position them almost at the edge of the horse's face.

How to draw a horse - step 33

Step 34

Following the construction lines, start to build up the shape of the horse's face. Add some wrinkles around the horse's nostrils.

How to draw a horse - step 34

Step 35

Still following the rough outline of the construction lines, add in the first ear. Add in a fold of skin where the outside of the ear twists down and to the front.

Give your horse some ear tufts, by loosely scribbling some lines, following the curve of the horse's ear.

How to draw a horse - step 35

Step 36

Repeat for the other ear.

How to draw a horse - step 36

Step 37

Use a series of curved lines to add detail to the mane.

How to draw a horse - step 37

Step 38

Continue the mane along the horse's back, making it thicker and fuller towards the front of the horse, and tapering it off towards the back. You don't need to be too neat at this stage; we'll return at the end to build up a bit more detail.

How to draw a horse - step 38

Step 39

Next, start to build up the muscles in the horse's forelegs. Use the oval you drew for the knee to suggest the edges of the joint.

How to draw a horse - step 39

Step 40

Add in the front hoof. Horse's hooves do not go vertically down from the leg, they go forward slightly. Keep your lines curved, and round off the bottom of the hoof with a slightly curved line.

How to draw a horse - step 40

Step 41

Following the first leg as a guide, draw the second leg peeping out from behind the first. This horse is standing still, so draw it in the same position as the first.

How to draw a horse - step 41

Step 42

Follow the main body shapes to build up the shape of the horse's body and rump.

Add a short, curved line at the intersection of the main body oval and the rear circle, to give the horse some definition.

How to draw a horse - step 42

Step 43

Draw the rear leg and hoof. The back legs are more stretched out than the front ones, so you don't need to add as much definition to the knee as you did before.

How to draw a horse - step 43

Step 44

As the tail hangs between the legs, add in the tail before drawing the second rear leg. Make the tail relatively smooth towards the top, and more jagged towards the bottom.

How to draw a horse - step 44

Step 45

Now that the tail is planned out, add in the second rear leg. Replicate the shape of the first rear leg, so that like the front legs, it peeps out from behind the first - avoiding the tail.

How to draw a horse - step 45

Step 46

You can leave your horse there, or you can add in some details.

Draw vertical lines to fill out your horse's tail, making them very slightly wavy as you do so. Taper the lines up towards the top of the tail.

How to draw a horse - step 46

Step 47

Repeat for the mane.

How to draw a horse - step 47

Step 48

Add in a few definition lines long the face, neck and belly. These are subtle, but help to shape your horse without too much effort.

If you want to add some shading, fully erase the construction lines at this point.

How to draw a horse - step 48a

Step 49

Almost there! Let's give the horse a wee bit more definition with some simple shading.

Colour in the hooves. Horse's hooves come in all colours, but I've gone for a warm grey.

Add some light shading along the horse's belly, tapering the shading upwards to follow the shape of the hips.

How to draw a horse - step 49b

Step 50

Add some light shading along the left of the horse's neck, the feet furthest away, and the horse's rump.

Shade in the inner part of the ears.

How to draw a horse - step 50

Step 51

Add some light shading along either side of the horse's face, the chest, and at the base of where the horses ribcage would be.

How to draw a horse - step 51

Step 52

Add some shading along the right of the rear leg, the top and right of the front leg, the bottom of the knees, and at the bottom of the horse's mouth.

How to draw a horse - step 52

Step 53

Finally, colour in the mane and tail.

How to draw a horse - step 53

Step 54

Congratulations! You've completed your own easy horse drawing!

If you've not done so already, erase the construction lines and enjoy your masterpiece.

How to draw a horse - step 53


We hope you’ve enjoyed this tutorial, how to draw a horse. If you’re looking for more inspirational, easy-to-follow projects, why not check out how to draw a tiger, how to draw with charcoal, or learn how to paint watercolour flowers.

For more pencil drawing, artist Matt Breen shares his step-by-step tutorials on how to draw a cat and how to draw a dog. Perhaps you’re keen to boost your stash? Lightboxes are extremely useful for crafters, and we’ve rounded up the best light boxes for artists to help to buy with confidence.