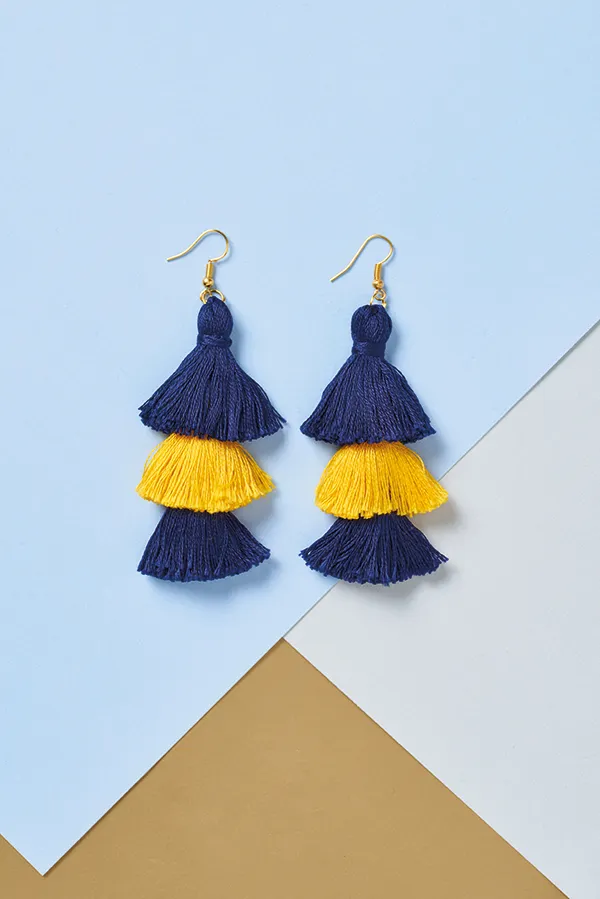
How to make tassel earrings by Holly Spanner
Tassels are hugely popular and on-trend, and our swanky tassel earrings are an easy way to capitalise on this micro-trend. Earrings always have the potential to sell well – get your costings right and you can really cash in, as they’re the perfect price point for gifts. So why not learn how to make tassel earrings to sell?

Our tassels are made with DMC Light Effects – a sparkly embroidery thread that comes in different effects: pearlescent, jewel, precious metal and antique. For speed, you can buy earring wires but for an upmarket version (and more profit if you’re looking to sell your tassel earrings) we show you how to make your own from sterling silver wire.

Learning how to make tassel earrings make for the ideal gift, and once you’ve learnt how to make tassel earrings, it’s just a case of deciding which colour combination to go for!
Looking for more awesome jewellery making tutorials? Check out these fun three-tiered DIY tassel earrings, or how about learning how to make a jewellery roll to keep all your homemade jewellery safe and protected.
We love seeing what you make, so don’t forget to share your craft projects with us on Facebook and Twitter, too!

To make these tassel earrings you will need:

How to make tassel earrings
Size
9.5cm (33⁄4in) long (including the earring wires)
Top tips
- You can harden the wire to set the earring shape by tapping with a rubber hammer on a metal block.
- You can leave the threads crinkly or press the separated bundles with a medium-hot iron
Step 1

We’ll start learning how to make tassel earrings by making the wires. To make the tassel earring wires, cut a 12cm (4¾ in) length of silver wire and bend into a U shape over the handle of your pliers. Use snipe-nose pliers to bend one tail slightly and the other tail at the same height (2.8cm from the curve) so it’s nearly at a right angle.
Step 2
 Hold the wire at the sharper bend by the very tip of the round-nose pliers. Bend the wire around to create a small loop shape. Reposition the pliers in the loop so that you can now bend the tail of the wire backwards, as shown.
Step 3

Again, hold the tail with the tip of the round-nose pliers and bend back to create a u-shaped loop. Trim the tail level with the opposite bend in the wire.
Step 4

Tuck the loose tail into the loop that you’ve just created. Trim the tail as shown, and then round off the end using a cup burr tool or a piece of very fine-grade sandpaper. Make a second earring to match.
Step 5

Pull the thread ends out of all the skeins of thread. Cut 15-20cm (6-8in) lengths of thread for each tassel. Use a large tapestry needle to separate the individual strands from each length of thread.
Step 6

Loop the bundle over a fine thread and then use the tails to pull the bundle into a jump ring. Fold the bundles in half so that the jump ring is in the middle at the top. Repeat to make the second tassel. Cut a 20cm (8in) length of silver thread and split the thread into two lots of three strands. Hold one tail down the tassel and wrap the other tail neatly around the top several times. Sew the tails under the tight wrapping and trim. Trim the tassels to about 6cm (2½in) long.
Step 7

Hook the earring wire under the top of the jump ring. Attach a small heart charm to one end of the silver chain using a small jump ring. Make two bead dangles with decorative headpins, as shown. Attach one bead dangle to the bottom jump ring and the other halfway down the chain. Feed the end link of the chain over the earring wire, so that the charm/bead embellishment sits at either the front or back of the tassel, depending on the look you prefer.
Congratulations – you’ve learnt how to make tassel earrings! Now – will you sell, keep or gift your tassel earrings?
Once you’ve made your DIY tassel earrings, be sure to tag us in a picture on Instagram, Twitter and Facebook. We’d love to see the finished result! And remember to subscribe to Mollie Makes for more fashion and interiors tutorials.