All products were chosen independently by our editorial team. This review contains affiliate links and we may receive a commission for purchases made. Please read our affiliates FAQ page to find out more.

Introduction to polymer clay

Always wanted to try crafting with polymer clay but didn't know how? Or perhaps you're looking for a new hobby? We've got you covered - here's everything you need to know about polymer clay.

Try our magazines – get 6 issues from just £9.99!

Published: November 16, 2021 at 2:55 pm

Polymer clays is popping up everywhere and with The Great Pottery Throw Down hype getting everyone potting we thought we'd give you a guide to the easiest form of pottery - polymer clay! From Tik Tok to Etsy, polymer clay kits and projects are being enjoyed by crafters of all ages.

As well as explaining all the polymer clay supplies you'll need, there's also a bunch of free polymer clay ideas at the end of this article to have you feeling inspired.

If you like polymer clay, why not check out some of our other clay crafts – like this cute clay trinket dish, or these fun clay salt spoons, or why not read up on all things pottery with our beginners guide to pottery written by expert Sarah Orme. How about learning how to make an air dry dish, with our guide, how to use air-dry clay.

We love seeing what you make, so don’t forget to share your papercraft projects with us on Instagram, Facebook or Twitter, too!

What is polymer clay?

So, what is polymer clay? Polymer clay is a type of synthetic clay that can be "set" or hardened, by baking it in a domestic oven. There are lots of different types of polymer clay to choose from, and you'll probably have heard of the most popular brand here in the UK - Fimo. In the US, Sculpy is a popular choice for modellers. As well as a huge range of colours, you can also get glitter, translucent, metallic and even glow-in-the-dark polymer clay!

Polymer clay is a colourful and versatile modelling material. It’s a perfect way to create your own stunning designs using some fascinating techniques and effects. Polymer clay can be baked in an ordinary oven to set it permanently hard. Baked polymer clay is durable and strong which makes it an ideal material for creating handmade jewellery, decorations and models.

Working with polymer clay is a tactile, absorbing and uplifting process. It’s suitable for all ages and abilities and is easily adaptable to different styles. Polymer clay can be used in a simple way or, for more complex and advanced detailed work. The possibilities are endless for making your own exciting polymer clay creations!

Buy polymer clay!

Amazon, £32.99

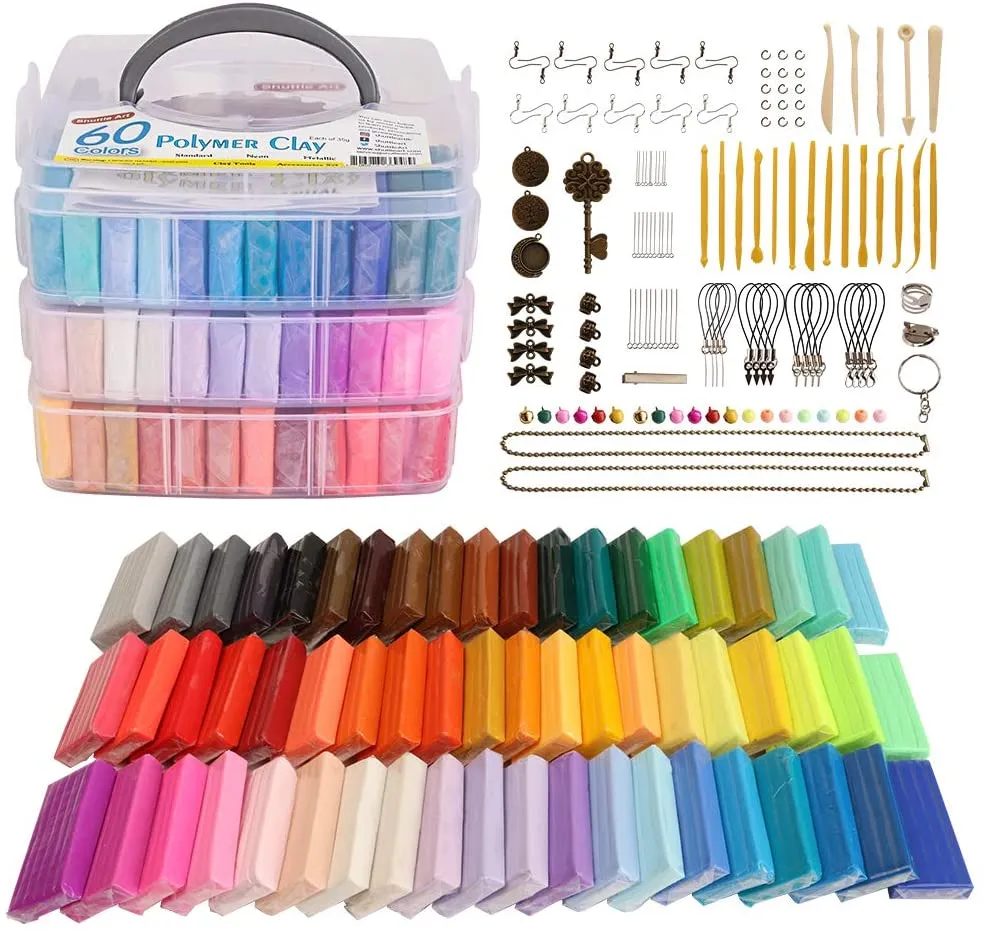
If you're after all the colours of the rainbow then this is the polymer clay kit for you. There's everything from neons to pastels and they're all contained in this handy box to keep things neat and tidy.

What is polymer clay used for?

Polymer clay is extremely light in weight, making it an ideal medium for making jewellery, ornaments and decorations. If you're into making your own jewellery, or perhaps have a side hustle, then it is also brilliant for making beads. And by mixing colours together to create a marbled look for your polymer clay creations, you can even evoke the look of Venetian glass - try it with blue and white clay!

Top tips for using polymer clay

  • Clean your hands between colour changes for neat designs
  • You can still cut and shape the clay after baking, as it won't be hard until it has cooled down
  • Line your baking tray with some aluminium foil before baking, to prevent your miniature masterpieces from sticking

Polymer clay for beginners

First - layout your working area. Make sure your surfaces are protected, as little bits of the clay can all-to-easily find themselves trodden into the carpet. Grab your rolling pin, some modelling tools and your polymer clay.

Image by Charlotte Stowell

If you have one, use a large ceramic tile or baking sheet to work on, as this provides a smooth surface (and therefore a smooth finish to your clay). Acrylic rollers designed for polymer clay are smooth to use and easy to clean.

Image by Charlotte Stowell

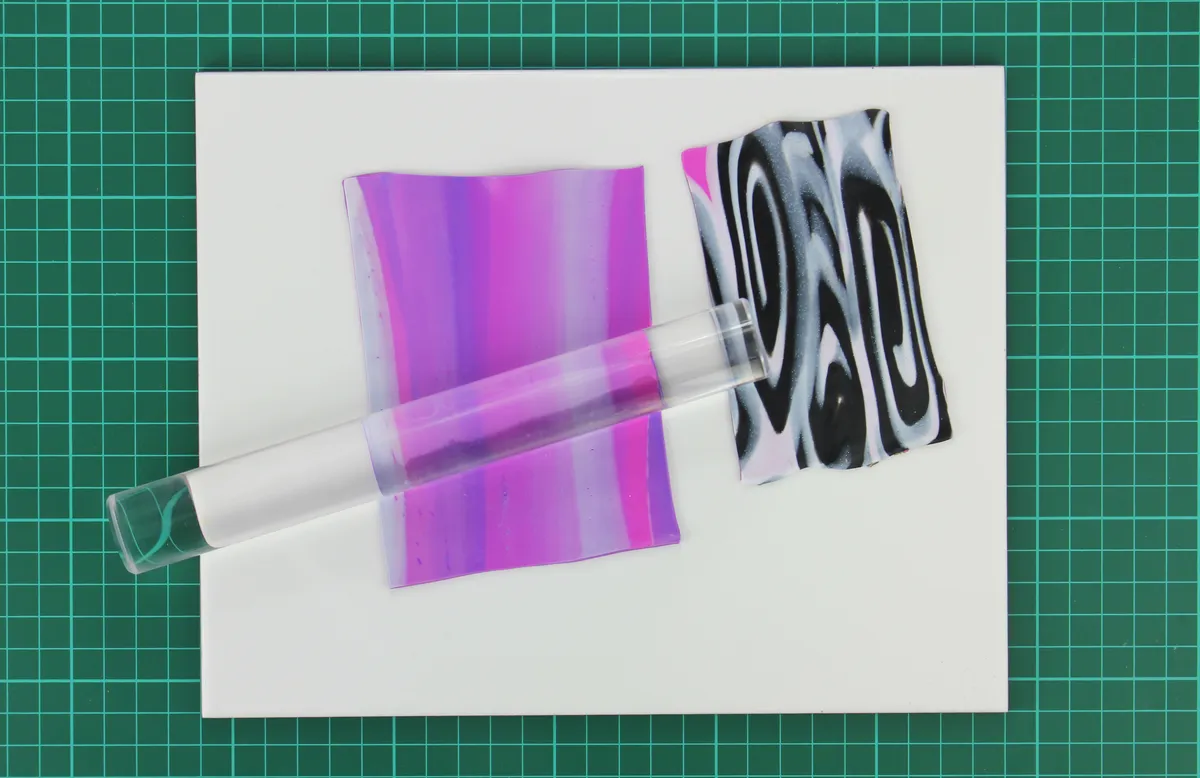
There are lots of fun techniques to explore to make polymer clay patterns, including blending, marbling, multi-coloured surface effects. A pasta machine is a quick way to roll polymer clay into a flat sheet!

Image by Charlotte Stowell

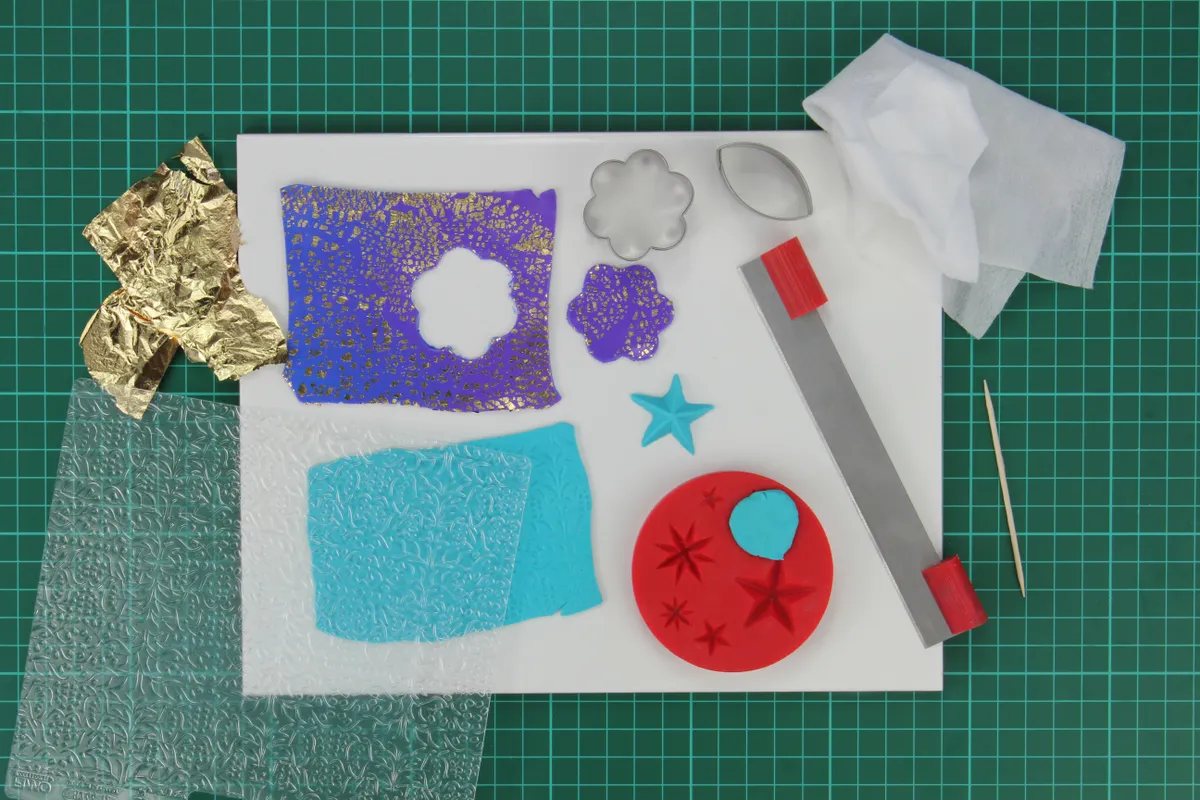
Patterns and effects can be added to polymer clay using paints, gilding wax or other materials. Try enhancing the surface with a texture sheet or use gilding flakes (or metal leaf) for a flecked foil effect. Shaped cutters and silicone moulds are a quick and easy way to make multiple shapes.

How to use polymer clay

Now you know the basics, let's get started making a project!

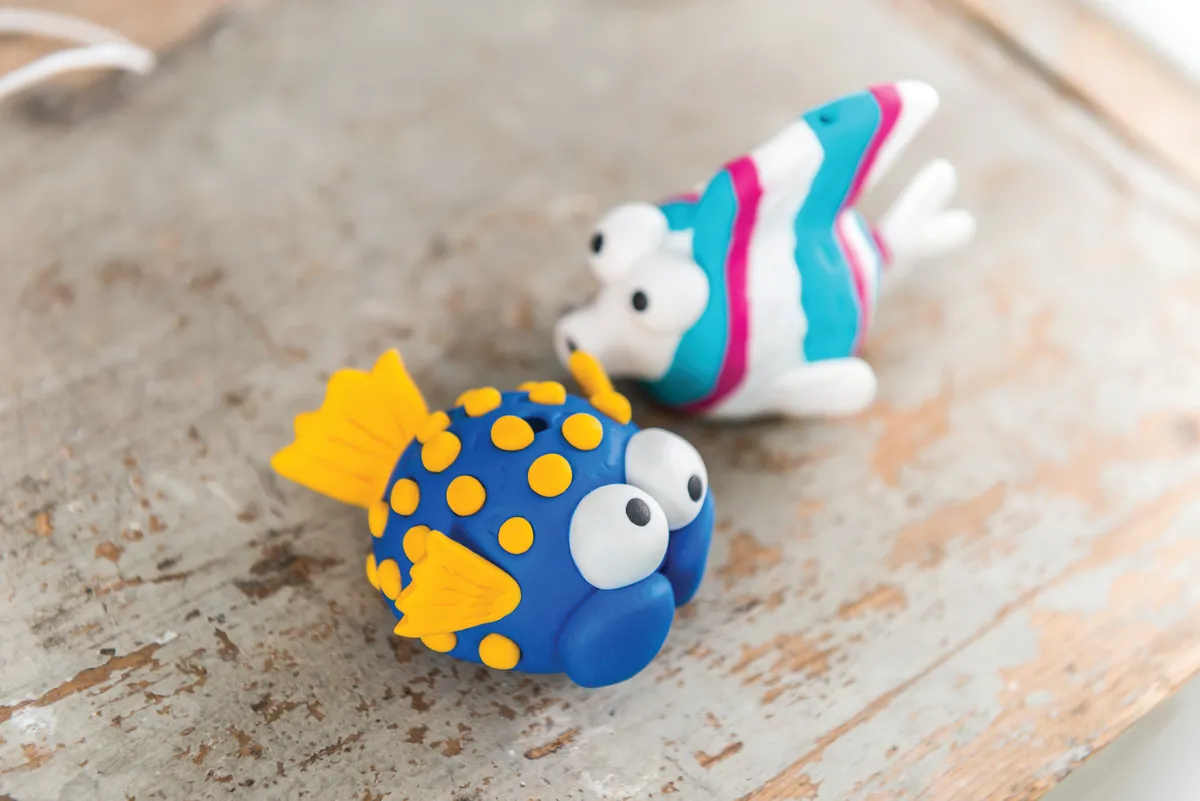
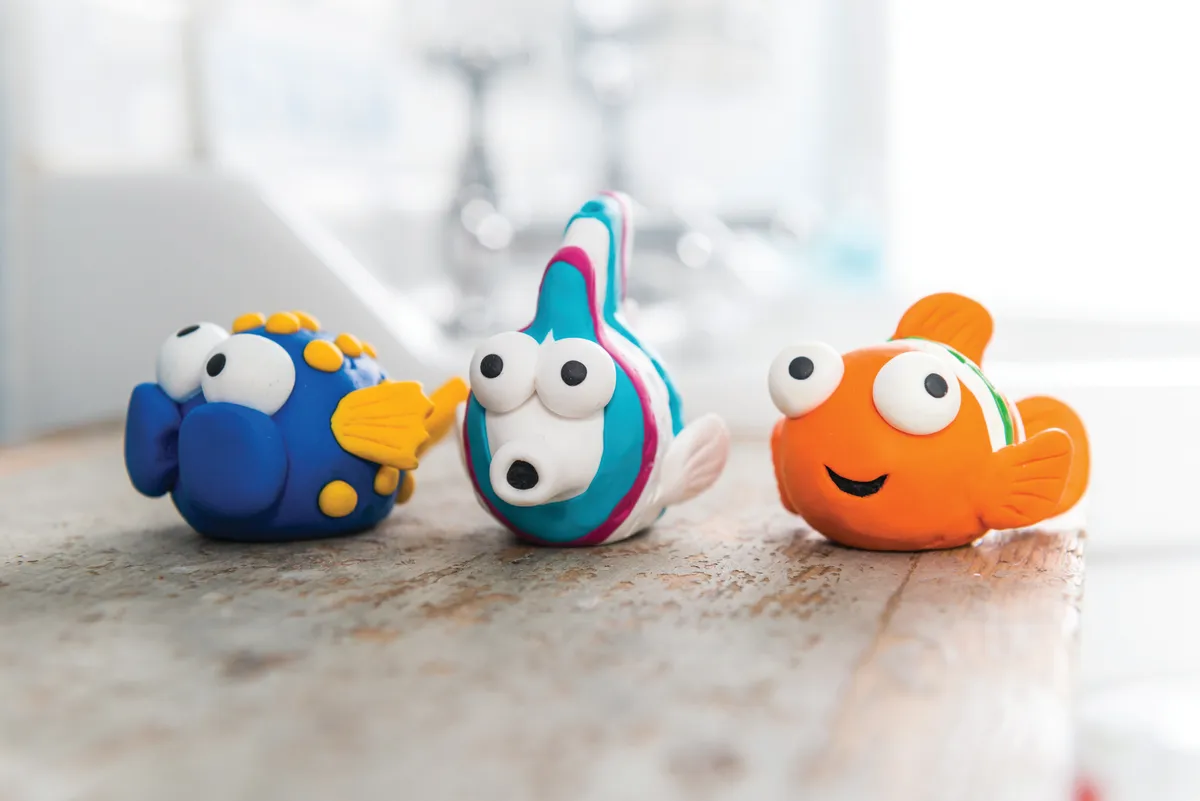
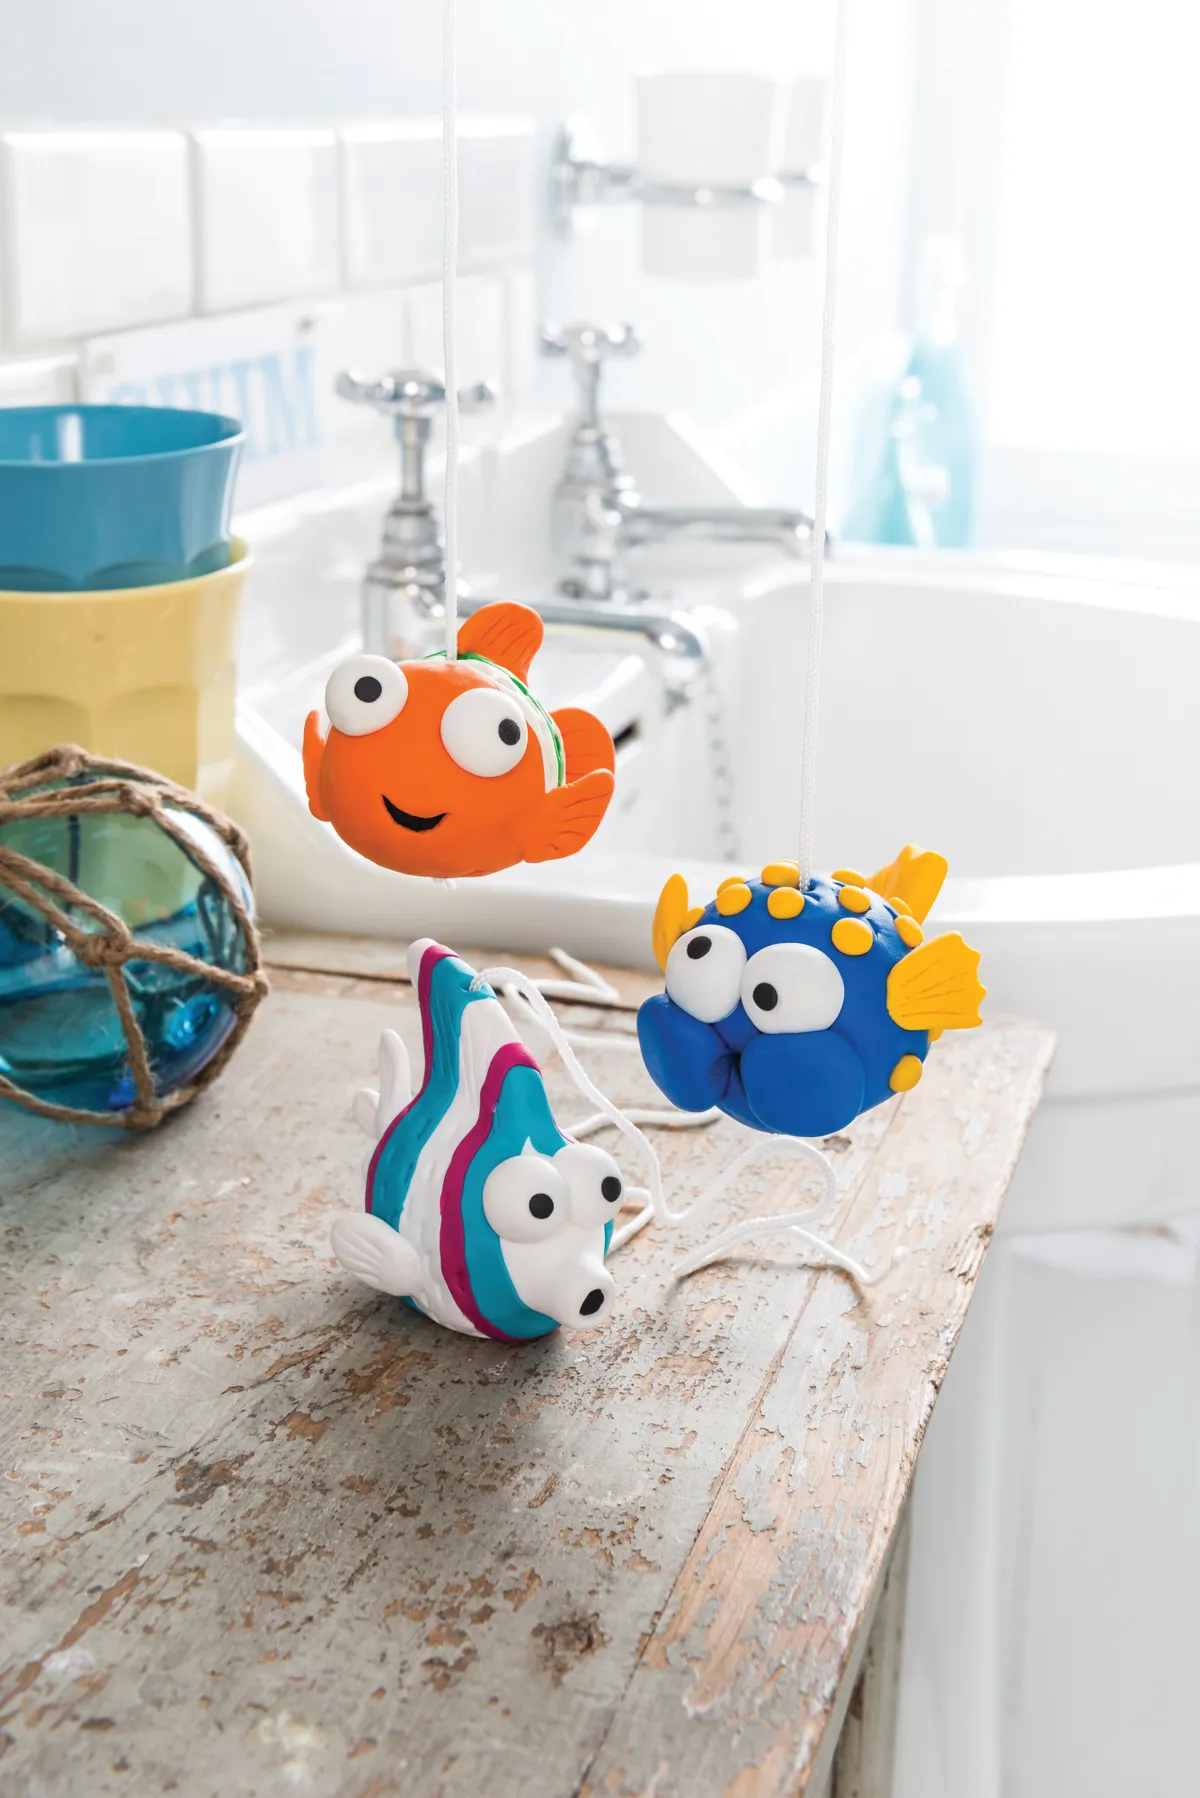
Polymer clay is brilliant for rustling up a side hustle - in this easy beginner tutorial, we show you how to make three different species of polymer clay fish. We've turned them into light pulls, but they could just as easily make cute keyrings or pendants. There’s clownfish, angelfish and pufferfish, but you can easily custom-make versions to match different bathroom colour schemes.

These fish will sell themselves with their cheeky facial expressions and tropical colours and will make an attractive display on your craft stall or website, so make sure they are arranged well to maximise sales. A versatile make, you can easily create smaller versions of these fish to wear as pendants or earrings, giving you an instant jewellery range, too!

You will need:

  • Plastic polymer clay tools
  • Craft knife
  • Three wooden kebab skewers
  • Three light pull cords
  • Baking tray

For the puffer fish:

  • Fimo Polymer Clay in Pacific Blue, Sunflower, White and Black

For the orange clownfish:

  • Fimo Polymer Clay in Tangerine, Tropical Green, White and Black

For the angelfish:

  • Fimo Polymer Clay in Raspberry, White, Peppermint and Black

How to make the pufferfish

Step 1

How to use polymer clay – polymer clay for beginners, pufferfish step 1

Roll up a 60g ball of blue clay to make the body. Follow step 2 of the clownfish light pull to make the eyes, but make them with wonky pupils for added character! Make a divet under each eye for the cheeks. Roll up two 1cm (½in) balls of blue clay and press into the divets so they are slightly flattened. Use a blunt knife to cut a round hole between the cheeks for a mouth and fill it with black clay.

Step 2

How to use polymer clay – polymer clay for beginners, pufferfish step 2

Roll up two small balls and one larger ball of yellow clay. Use your fingers to flatten all three balls of clay, then shape each one into a fin – use the smaller balls to create two side fins and the larger one to make a tail. Use a craft knife to cut a spiky shape into the ends of the fins and tail. Score lines onto each side of the side fins and put to one side to use later.

Step 3

How to use polymer clay – polymer clay for beginners, pufferfish step 3

Make a divet in the back of the fish’s body for the tail. Push the end of the tail into the divet and blend with a blunt knife until it sticks to the body. Score lines on both sides of the tail. Use a flat tool with a curved or triangular-shaped end to press randomly all over the fish’s body to create a scale texture.

Step 4

How to use polymer clay – polymer clay for beginners, pufferfish step 4

Push a kebab skewer through the body of the fish from the top to the bottom. Hold the fish on the skewer while you make small divets all over the body for the spikes. For each divet, roll up a small ball of yellow clay and press into the divet until it sticks. Attach the side fins by pressing the ends onto the body until they stick.

How to make the clown fish

Step 1

How to use polymer clay – polymer clay for beginners, clownfish step 1

Roll 50g of orange clay into a ball and shape into a fat teardrop shape for the body.

Step 2

Pinch the end to make a tail, shaping it with your fingers and a rounded tool. Bend the tail slightly to one side to make it look like the fish is swimming. Score lines into both sides of the tail.

Step 3

How to use polymer clay – polymer clay for beginners, clownfish step 3

Use a rounded tool to make two divets in the front of the fish where the eyes will be.

Step 4

How to use polymer clay – polymer clay for beginners, clownfish step 4

Roll two balls of white clay to 1cm (½in) to make the eyes. Push them into the dips in the face so that they stick in place. Make a small divet in each eye for the pupils. If you want your fish to have a cheeky facial expression, then position the pupils so they look to one side. Roll two balls of black clay to about 2mm, then press them flat. Push them into the pupil holes on the eyes so that they stick in place. Use a craft knife to cut a smiley mouth into the clay, below the eyes, then fill the mouth with black clay.

Step 5

How to use polymer clay - polymer clay for beginners, clownfish step 5

Make a long thin sausage from white clay and press it flat with your fingers to create a stripe. Position the stripe around the fish’s body behind the eyes, and cut to fit. Position another white stripe near the tail and cut to fit. Press the stripes so they stick to the body. Repeat this with the green clay, positioning the stripes so they slightly overlap the back of the white stripes.

Step 6

Roll up three small balls of orange clay and press them flat with your fingers. Shape two of them into a side fin shape and use a blunt knife to score lines into the clay. Place the side fins onto each side of the body and blend the ends of the fins into the body with a blunt knife until they stick. Shape the other piece of orange clay into a back fin and attach to the top of the body, blending the bottom of the fin into the body until it sticks. Use a blunt knife to score lines into both sides of the back fin.

Step 7

How to use polymer clay - polymer clay for beginners, clownfish step 7

Gently push a kebab skewer through the body of the fish from the top to the bottom. Hold the fish on the skewer while you use a flat tool with a curved end to press randomly all over the fish’s body to create a scale texture. Remove the skewer before baking the fish.

How to use polymer clay - polymer clay for beginners, angelfish

How to make the angelfish

Step 1

How to use polymer clay - polymer clay for beginners, angelfish step 1

Roll 50g of white clay into a ball and shape into a fat teardrop for the body. Pinch the end to make a tail, shaping with your fingers and a rounded tool. Cut the middle of the tail, separate it and shape into a double fin. Score lines into the tail fin. Roll a small ball of white clay and shape into a cylinder. Attach to the front of the body, blending the end until it sticks to the body.

Step 2

How to use polymer clay - polymer clay for beginners, angelfish step 2

Roll up two small balls of white clay and press them flat with your fingers. Shape them into side fin shapes, as shown, then use a blunt knife to score lines into both sides of the clay. Put these to one side to use later.

Step 3

How to use polymer clay - polymer clay for beginners, angelfish step 3

Roll a large ball of white clay and shape into a large pointy back fin; flatten slightly. Attach the fin to the top of the body by blending the bottom of the fin into the body until the join disappears. Roll up a small ball of white clay and shape into a small bottom fin as shown. Attach to the fish so it is positioned under the tail by blending the clay onto the body until it sticks.

Step 4

How to use polymer clay - polymer clay for beginners, angelfish step 4

Make a sausage of blue clay and press flat to make a wide stripe. Wrap three lengths of the blue stripe around the body of the fish: one on the head, one over the back fin in the middle and one near the tail. Press down with your fingers to stick to the body. Repeat with pink clay to make thinner stripes and stick to the fish, slightly overlapping the blue stripes.

Step 5

How to use polymer clay - polymer clay for beginners, angelfish step 5

Follow step 2 of the clown fish light pull to make the eyes, but make the pupils look straight ahead. Cut a round hole out of the middle of the cylinder nose to make a mouth and fill the mouth with black clay. Attach the side fins to each side of the body by blending the ends of the fins onto the body until they stick.

Step 6

How to use polymer clay - polymer clay for beginners, angelfish step 6

Gently push a kebab skewer through the body of the fish from the top to the bottom. Use a flat tool with a curved end to press randomly over the fish’s body to create a scale texture. Score lines into both sides of the bottom fin and back fin using a blunt knife. Remove the skewer before baking the fish.

How to bake polymer clay

Step 1

How to use polymer clay - polymer clay for beginners, finished models 3

Oven-bake each fish at 110°C, 100°C Fan, Gas 1 for 30 minutes. When the fish have cooled down, attach the light pull cord. Pull the cord through the hole in each fish from the top to the bottom of the body. Tie the cord into a big, tight knot at the bottom to hold the fish in place.

Essential polymer clay supplies

1. FIMO polymer clay kit

FIMO polymer clay, Amazon

Buy now: £25.55, Amazon

This polymer clay kit comes with everything you need to start modelling with polymer clay. There are 10 different colours in this set in 57g blocks, including white, black, red, tangerine, lemon, green, raspberry, plum, blue and emerald.

2. Acrylic paint

Winsor & Newton acrylic paint for painting on polymer clay, Amazon

Buy now: £23.38, Amazon

Once polymer clay has been hardened and cooled the surface can be varnished or painted with acrylics. For example, you can brush paint over a textured surface for an antique or distressed effect. Small details or writing can be added onto a baked model with permanent pens. We love the high quality of this Winsor & Newton acrylic paint set.

3. Oven thermometer

Oven thermometer for polymer clay, Amazon

Buy now: £10.99, Amazon

Polymer clay needs to be baked at a very low temperature to set it permanently hard. Carefully lift models onto a baking tray or tile, or if it’s suitable, transfer the tile or tray you’ve been working on straight into the oven to avoid lifting your work. Always refer to the manufacturer’s instructions for baking as there are slight variations on specific temperatures for the different clays. The temperature required is usually between 110oC – 130oC for around 30 minutes.  It’s useful to have a thermometer to check your oven temperature.

4. Clay modelling tools

Polymer clay modeling tools, Amazon

Buy now: £2.49, Amazon

A set of clay modelling tools (also used for shaping icing – so check the cake aisle of your craft shop if you can’t find them) are really handy for shaping and smoothing clay. You’ll soon find yourself accumulating tools for a wide range of marks – for example, safety pins are brilliant for creating fine details, and you’ve probably already got some lying around the house.

5. Rolling pin

Sculpey rolling pin for polymer clay, Amazon

Buy now: £11, Amazon

Use a clear acrylic rolling pin to roll your polymer clay out into smooth sheets that are easy to work with. You can use an ordinary kitchen rolling pin, but the acrylic ones have been specially designed to use with polymer clay. We love this rolling pin from Sculpey.

6. Craft knife

Craft knife for polymer clay, Amazon

Buy now: £2.99, Amazon

A craft knife is useful for cutting the polymer clay so that you get a nice, crisp edge to your creations. It’s also great for cutting around templates. Just be sure you change the blade regularly as a blunt blade will cause the clay to “drag".

7. Tweezers

Craft tweezers for polymer clay, Amazon

Buy now: £5.99, Amazon

A pair of tweezers is extremely useful, especially when positioning small components, such as jewellery stones or other embellishments onto the fresh clay. Using the tips of the tweezers will help you embed the stones into the clay.

8. Cutters

Sculpey clay cutters, Amazon

Buy now: £7.50, Amazon

Have you ever used cookie cutters? Well – you can use them for polymer clay, too! There are special cutters (generally smaller than for making cookies) designed for polymer clay, that allow you to cut shapes from polymer clay quickly and easily.

9. Tissue blade

FIMO cutting tools for polymer clay

Buy now: £8.48, Amazon

Tissue blades are commonly found in polymer clay blade sets, and they’re used for cutting extremely precise, straight lines, usually through a stratacut block or similar. Because the blades are so thin, they are also flexible and can be bent to create a gentle curve. Because these blades are so thin – it is also very sharp, so please note this is not for children and should be kept in a sealed container when not in use.

More polymer clay ideas

1. Polymer clay ideas: Earrings

polymer clay ideas earrings

Polymer clay earrings are one of the most made projects and we totally see why! Craft your own funky earrings with Raising Noble’s tutorial then make a whole bunch for your friends.

2. Polymer clay ideas: Christmas star garland

scandinavian christmas star

Creature Comforts DIY Christmas star garland is the perfect festive polymer clay project. All you’ll need is your polymer clay, a glue fun, a piece of twine and some sequins.

3. Polymer clay ideas: Keyrings

polymer clay ideas keychains

A quick polymer clay craft you can make is keychains. These mini rainbows and funky leopard print designs by Rising Noble‘s are the sweetest mini make.

4. Polymer clay idea: Trinket dish

clay trinket dish diy

Everyone needs somewhere to store their trinkets which is why this tropical polymer clay dish is the best! Use Emily Ashbourn’s tutorial and start shaping your leaf.

5. Polymer clay ideas: Hair clips

polymer clay ideas hair clips

Polymer clay ideas for your hair now! Make these funky barrettes using Pretty Life of Girls free tutorial.

6. Polymer clay ideas: clay coasters

making coasters terrazzo style

Mollie Makes have loads of polymer clay ideas here on Gathered and this one is especially lovely. Embrace the terrazzo trend with designer Sophie Gibbons free DIY coaster tutorial.

7. Polymer clay ideas: Plant pot

polymer clay ideas planter

Give old plant pots a colourful polymer clay makeover with Life of Making’s free tutorial. It’s a great upcycling project because you can upgrade old pots, empty candle pots or glass jars into planters.

8. Polymer clay ideas: Ring holders

polymer clay cactus holder

Keep your rings neat and tidy with A Little Craft in Your Day’s polymer clay tutorial. Her cool cactus ring holder is easy to make and will look so fab on your bedside table.

9. Polymer clay ideas: hanging ornaments

polymer clay gift tag

These adorable clay gift tags are a great festive polymer clay project. Follow Movita Becoup’s free tag tutorial and whip up a bunch to add to your presents.

10. Polymer clay ideas: charm necklace

polymer clay ideas necklaces

Polymer clay ideas don’t come cuter than Urban Rhino’s charm necklace. Head over to their blog for the free step by step tutorial.

11. Polymer clay ideas: rainbow mobile

polymer clay rainbow

Show off your polymer clay skills with Collective Gen’s adorable rainbow mobile tutorial. It looks super effective but it’s also super easy!


We hope you’ve enjoyed our introduction to polymer clay and will try out some of these funky polymer clay ideas. For more fun craft projects head to our resin crafts and punch needle kits.