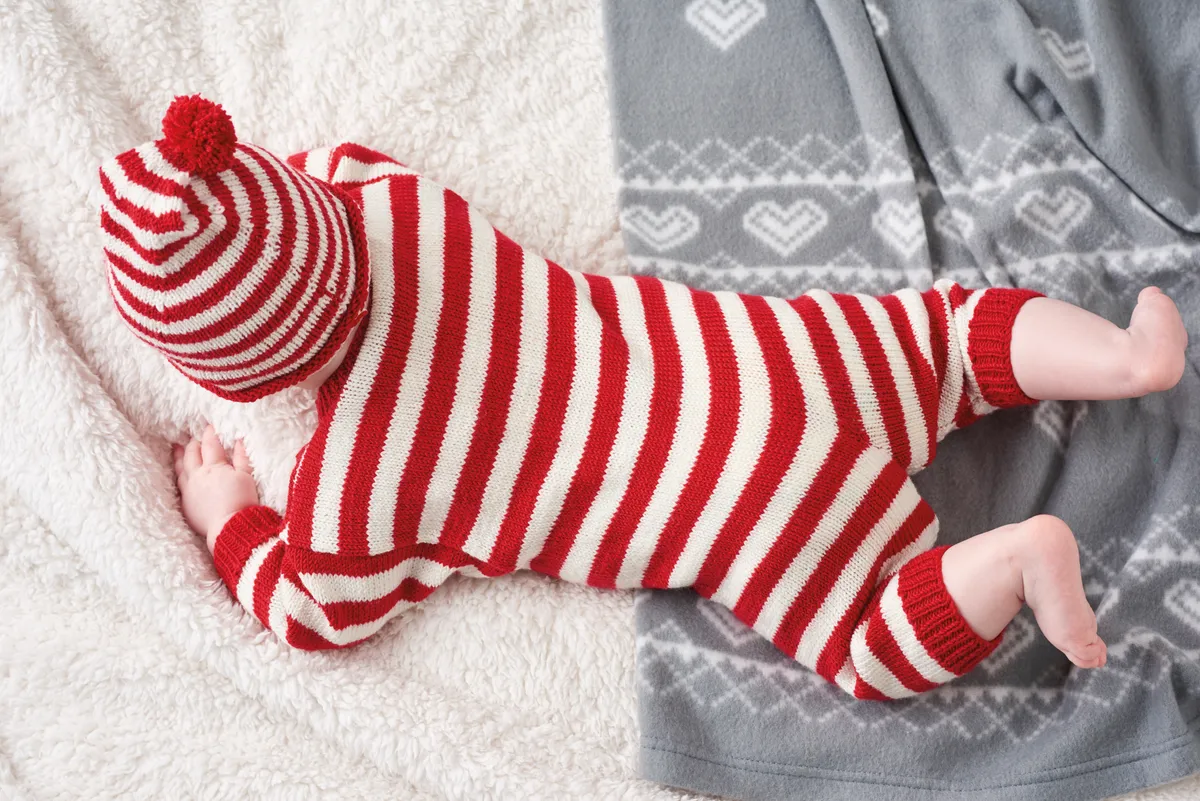
Even if you’re only months into your knitting journey, we’re convinced you could give this gorgeous baby onesie a go. Worked mainly in stocking stitch, its shaping is straightforward and easily understood. Designer Monica Russel’s simple stripes in 4ply yarn are bang on-trend and can be altered to suit your colour preferences or your stash. This knitted onesie is adorable, but if you are after patterns for even tinier babies, they our premature baby hat pattern.
If you're not sure on what a stocking stitch is, or need a refresher, check out our in-depth tutorial - What is a Stocking Stitch? You'll find more advice on the basic techniques you needing our knitting for beginners article.
Once you've finished this project, how about knitting a cute softie? We love this adorable free toy dog knitting pattern, or why not try a panda, giraffe or these adorable animal baby hats. Oh and for more knitting projects and inspiration sign-up to our newsletter!
If you've knitted this project, don't forget to share it on Facebook or post them on Instagram, we love to see what you make!
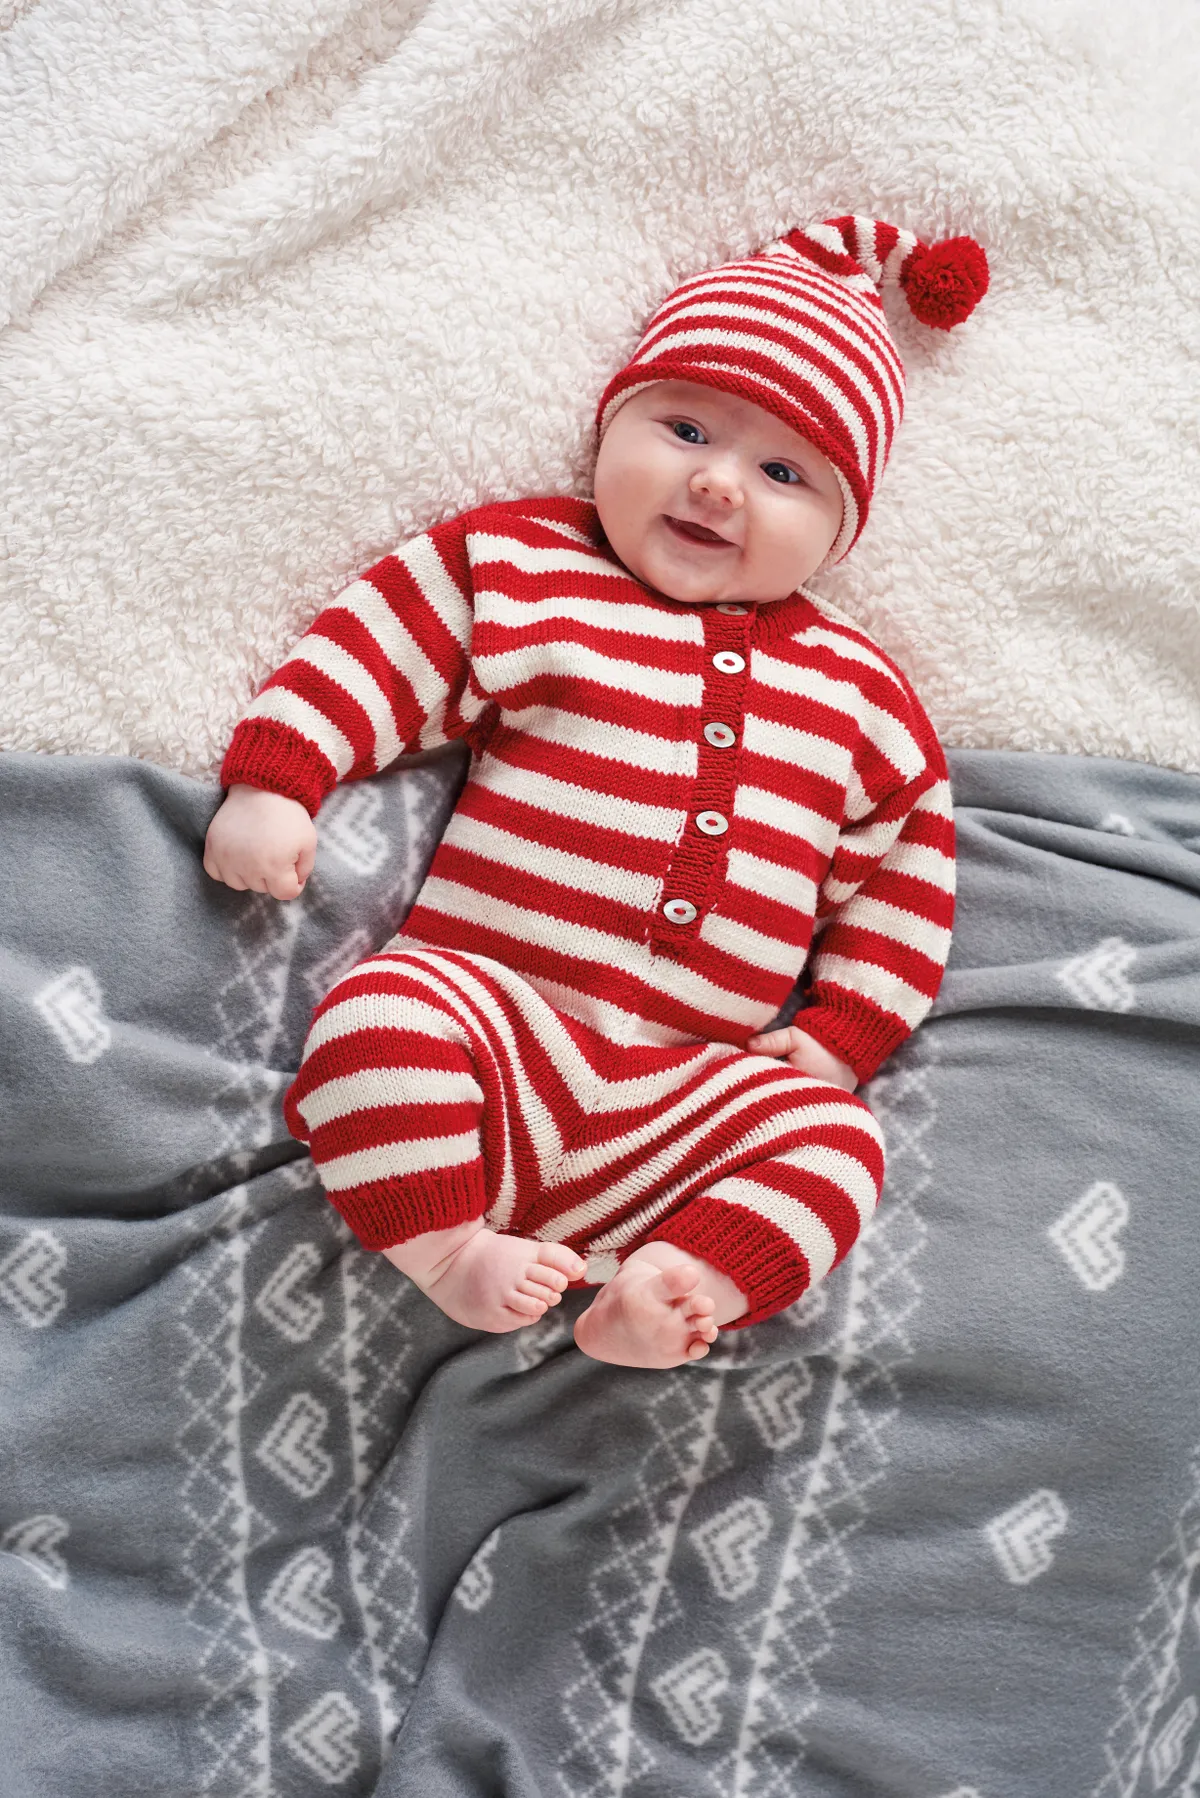
Knitted baby onesie and hat materials:
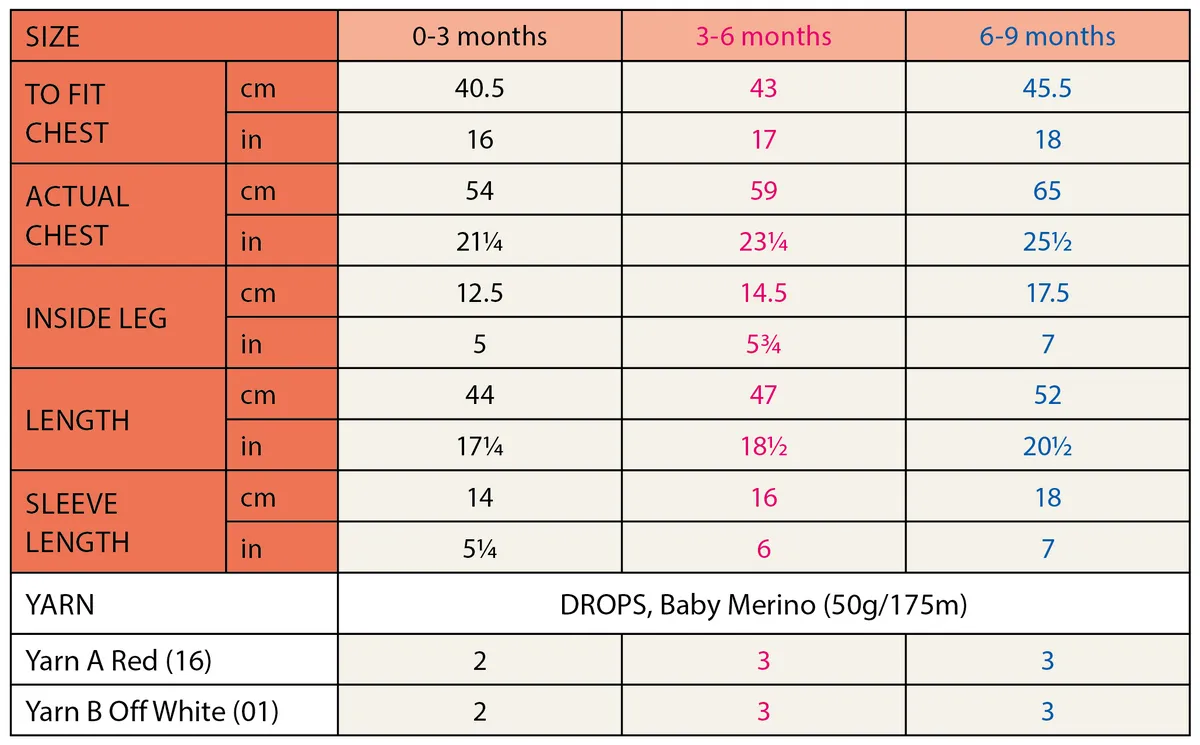
- DROPS, Baby Merino (100% wool, 50g/175m) Yarn A Red (16) Yarn B Off White (01) Buy Drops Baby Merino yarn on Etsy
For the onesie
- A pair of 3mm needles
- A pair of 31/4mm needles
- 5 buttons
For the hat
- A 23/4mm circular needle, 40cm long
- A 31/4mm circular needle, 40cm long
- A set of 31/4mm double-pointed needles (DPNs)
Knitted baby onesie and hat pattern
Tension
Yarn used knits as 4ply to this tension: 24 sts and 32 rows to measure 10x10cm (4x4in) over st st using 31/4mm needles. To find out more about tension and why it is important, see our knitting tensions squares article.
Measurements
Hat circumference 35cm (36.5: 38)cm, (133/4 (141/2: 15)in)
Abbreviations
You’ll find our standard knitting abbreviations in this pattern. This pattern is written in UK metrics but it’s really easy to convert, just check out our yarn weight conversion chart and beginner’s guide.
LEFT LEG
Cast on 46 (50: 54) sts using 3mm needles and Yarn A.
Rib Row *K1, P1, rep from * to end.
Repeat Rib Row another 8 (10: 12) times ending with WS facing for next row.
Inc Row Rib 5 (2: 3) *M1, rib 4 (5: 4), rep from * to last 5 (3: 3) sts, M1, rib 5 (3: 3).
[56 (60: 67) sts]
Change to 31/4mm needles.
Starting with a K row and Yarn B, begin working in st st and in stripes of 6 rows of each Yarn A and Yarn B, at the same time inc 1st at each end of the 3rd (3rd: 5th) row and every foll alt row until there are 84 (90: 97) sts.
Cont straight until leg measures 12.5 (14.5: 17.5)cm, ending with a purl row.
SHAPE CROTCH
Cast off 4 sts at the beg of next 2 rows.
[76 (82: 89) sts]
Dec 1 st at each end of next row and the foll 4 alt rows. [66 (72: 79) sts]
Work 3 rows without shaping.**
Place a marker in last st worked to measure from later.
Cut yarn and leave rem sts on a holder.
RIGHT LEG
Work as Left Leg to ** using stripes to ensure that both sides are even.
MAIN BODY
Knit across the sts from Right Leg then across the sts from Left Leg on your st holder. [132 (144: 158) sts]
Cont straight until piece measures 8cm from marker, ending with a P row.
Cast off 3 sts at beg of next 2 rows.
[126 (138: 152) sts]
Cont straight until Body measures 29 (32: 35)cm from cast-on edge, ending with a RS row.
ARMHOLES
Next row P31 (34: 38), turn and work on these sts for Left Front.
LEFT FRONT
Cont on these sts for a further 9 (10: 12)cm ending with a WS row.
SHAPE NECK
Dec 1 st at neck edge on every row until 20 (22: 24) sts rem.
Cont straight until work measures 44 (47: 52)cm from cast-on edge, ending at Armhole edge.
SHAPE SHOULDER
Cast off 10 (11: 12) sts at beg of next row.
Work 1 row.
Cast off rem 10 (11: 12) sts.
BACK
With WS facing, join yarn and purl across next 64 (70: 76) sts, turn and work on these sts.
Cont straight until work measures 44 (47: 52)cm from cast-on edge, ending with a P row.
SHAPE SHOULDER
Cast off 10 (11: 12) sts at beg of next 2 rows and 9 (10: 11) sts at the beg of foll 2 rows.
Place rem 26 (28: 30) sts on a holder.
RIGHT FRONT
Work as Left Front reversing shaping.
SLEEVES
Cast on 32 (34: 36) sts using 3mm needles and Yarn A.
Row 1 *K1, P1, rep from * to end.
Rep Row 1 until work meas 3cm ending with a RS row.
Inc Row (WS) Rib 4 (2: 2) sts *M1, rib 3 (2: 2), rep from * to last 4 (2: 2) sts, M1, rib 4 (2: 2). [41 (50: 53) sts]
Change to 31/4mm needles.
Beg with a K row cont in st st and 6 row stripes as set, at the same time inc 1 st at each end of the 3rd and the 13 (16: 19) foll alt rows. [69 (84: 93) sts]
Cont without shaping until work measures 13.5 (15.5: 17.5)cm from cast-on edge, ending with a WS row.
Cast off.
Join shoulder seams.
COLLAR
With RS facing and using 3mm needles and Yarn A, pick up and knit 26 (27: 28) sts across right-side front neck, to sts on Back holder, 26 (28: 30) sts from holder, 26 (27: 28) sts down left-side front neck. [78 (82: 86) sts]
Row 1 *K1, P1, rep from * to end.
Rep Row 1 for 6 more times.
Cast off in rib.
BUTTONHOLE BAND
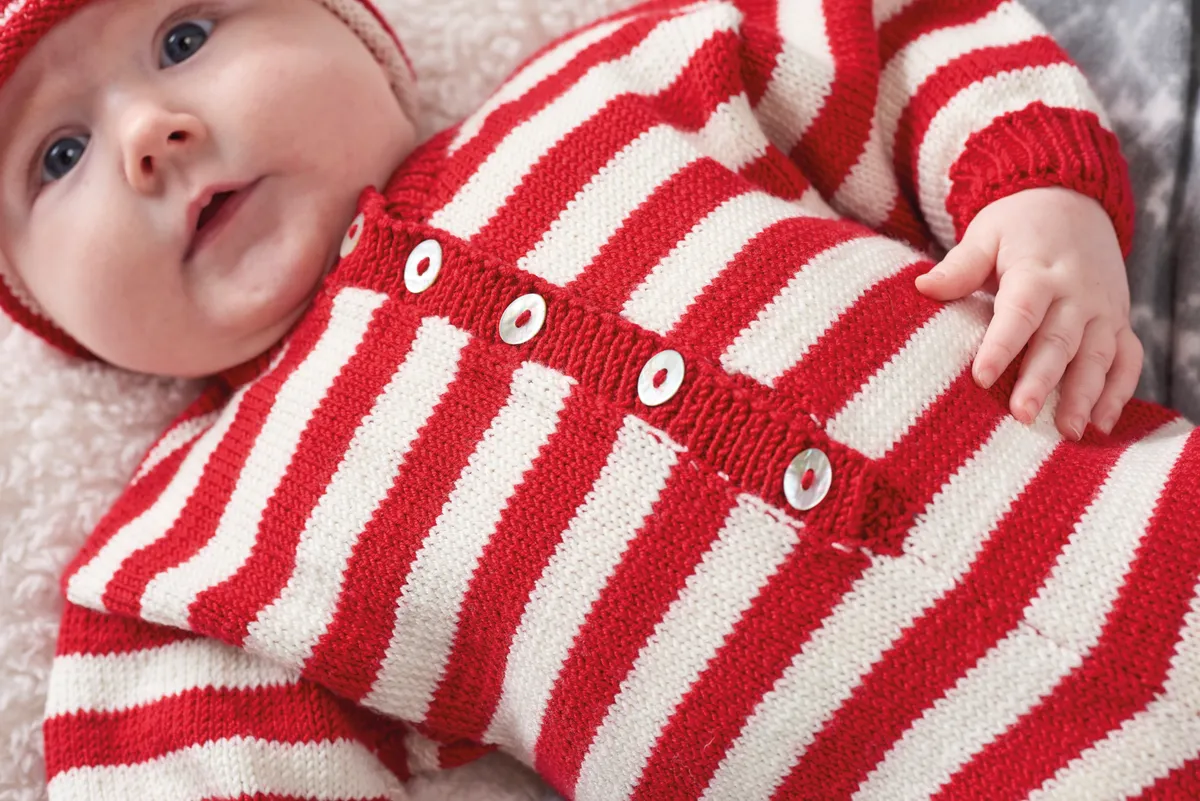
Using Yarn A with RS facing and 3mm needles pick up and knit 62 (72: 82) sts along right-front opening.
Row 1 *K1, P1, rep from * to end.
Rep Row 1 for 2 more rows.
Buttonhole row Rib 4 (5: 6), *k2tog, yo, rib 11 (13: 15) sts; rep from * 3 more times, k2tog, yo, rib 4 (5: 6).
Rep Row 1 for 3 more rows.
Cast off.
BUTTON BAND
Using Yarn A with RS facing and 3mm needles pick up and knit 62 (72: 82) sts along left-front opening.
Row 1 *K1, P1, rep from * to end.
Rep Row 1 for 6 more rows.
TO MAKE UP
Sew in Sleeves. Join leg and crotch seams.
Sew on buttons to correspond with buttonholes.
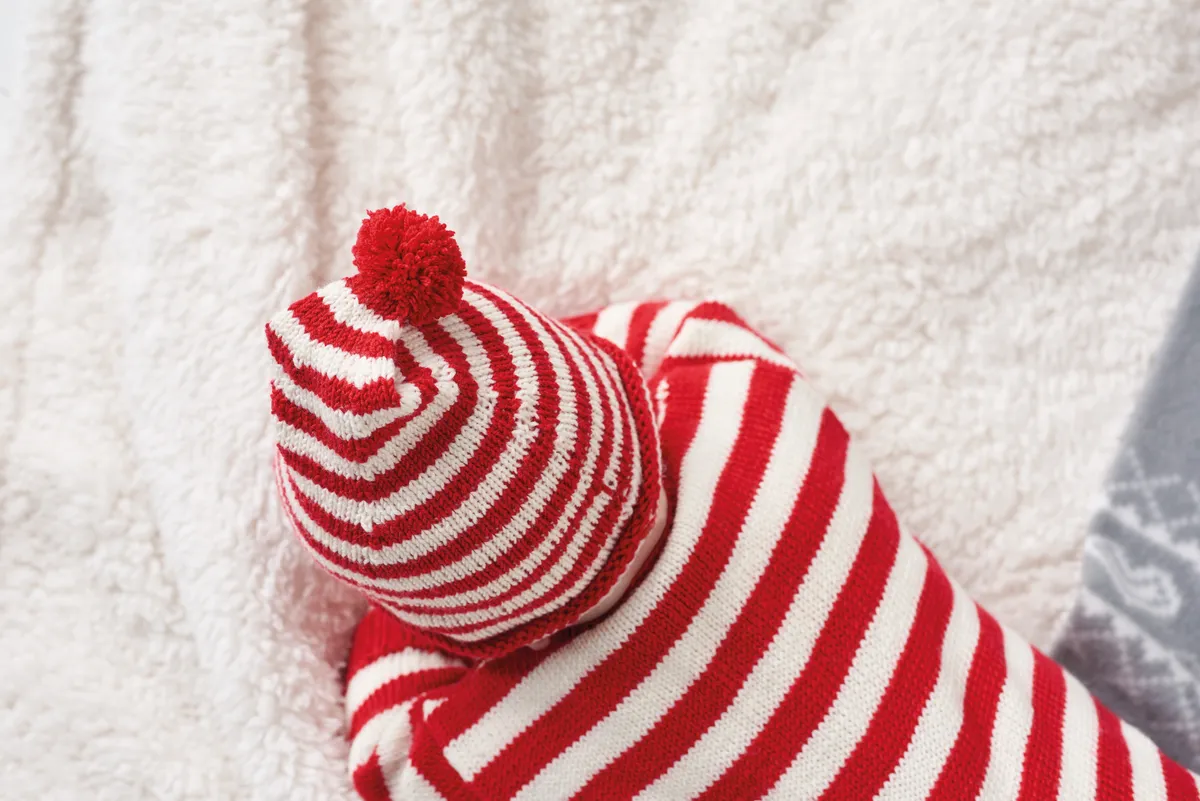
HAT
Cast on 84 (88: 92) sts using a 23/4mm circular needle and Yarn A. Join to work in the round, taking care not to twist sts.PM to denote start of round.
Purl 5 rounds.
Change to a 31/4mm circular needle.
*Using Yarn B, knit 4 rounds.
Change to Yarn A and knit 4 rounds.
Rep from * until work measures 8 (9: 10)cm.
SHAPE CROWN
Round 1 *K19 (20: 21), skpo; rep from * to end of round. [80 (84: 88) sts]
Round 2-3 Knit.
Round 4 *K18 (19: 20), skpo; rep from * to end of round. [76 (80: 84) sts]
Rounds 5-6 Knit.
Round 7 *K17 (18: 19), skpo; rep from * to end of round. [72 (76: 80) sts]
Rounds 8-10 Knit.
Round 10 **K16, (17: 18), skpo; rep from * to end of round. [68 (72: 76) sts]
Continue decreasing every 3rd round as set, working 1 less st before working the skpo each time until there are 12 sts left, and changing to DPNs when necessary.
Knit 2 rounds.
Cut yarn and using a needle thread it through rem sts and draw them up tightly and fasten off.
TO MAKE UP
Using Yarn A make a pompom approx 4.5cm in diameter and sew it onto the end of the hat. Weave in ends.
Find your size
More like the knitted baby onesie pattern
Ypu'll find more great designs for babies right here on Gathered. Try our easy baby knitting patterns roundup for ideas, or download our free baby matinee jacket knitting pattern. We bet you'll also like our baby romper suit knitting pattern and our free knitted baby hat pattern.