Free heart embroidery: sew a heart hoop

Spread the love with this gorgeous heart embroidery pattern designed by the talented Anne Oliver.

Try 6 issues of Love Embroidery magazine for just £9.99| SAVE 77%

Published: January 15, 2022 at 10:00 am

Play around with textures and colours in this felt-filled heart embroidery - it’s sure to brighten anyone’s day! This project is ideal for anyone looking to step up their embroidery skills, as it takes a wide variety of stitches, materials and techniques to complete this piece. In saying that, anyone who knows the basics of embroidery should be able to take this on with ease. Even if you are a complete beginner, after checking out our guide to embroidery for beginners and practising your stitches, you should be able to follow along with the step-by-step guide below. Our guide will take you through the techniques and materials you'll need, plus you'll find demonstration photos and some helpful hints and tips along the way!

This heart embroidery would make the perfect gift for that special someone for Valentine's Day. We all appreciate a handmade gift because we know that lots of time and effort has been put into it. How romantic! Once you've finished your heart embroidery you could either finish it in the hoop and give it to your significant other, or frame it to give it that extra special touch.

The heart embroidery is suitable for advanced beginners but it does use a variety of stitches, be sure to check out our helpful guide to embroidery stitches for beginners, if you need a hand getting started. If you are new to embroidery or simply need a little refresh, take a look at our embroidery for beginners guide which contains everything you need to get started on the embroidered wall hanging.

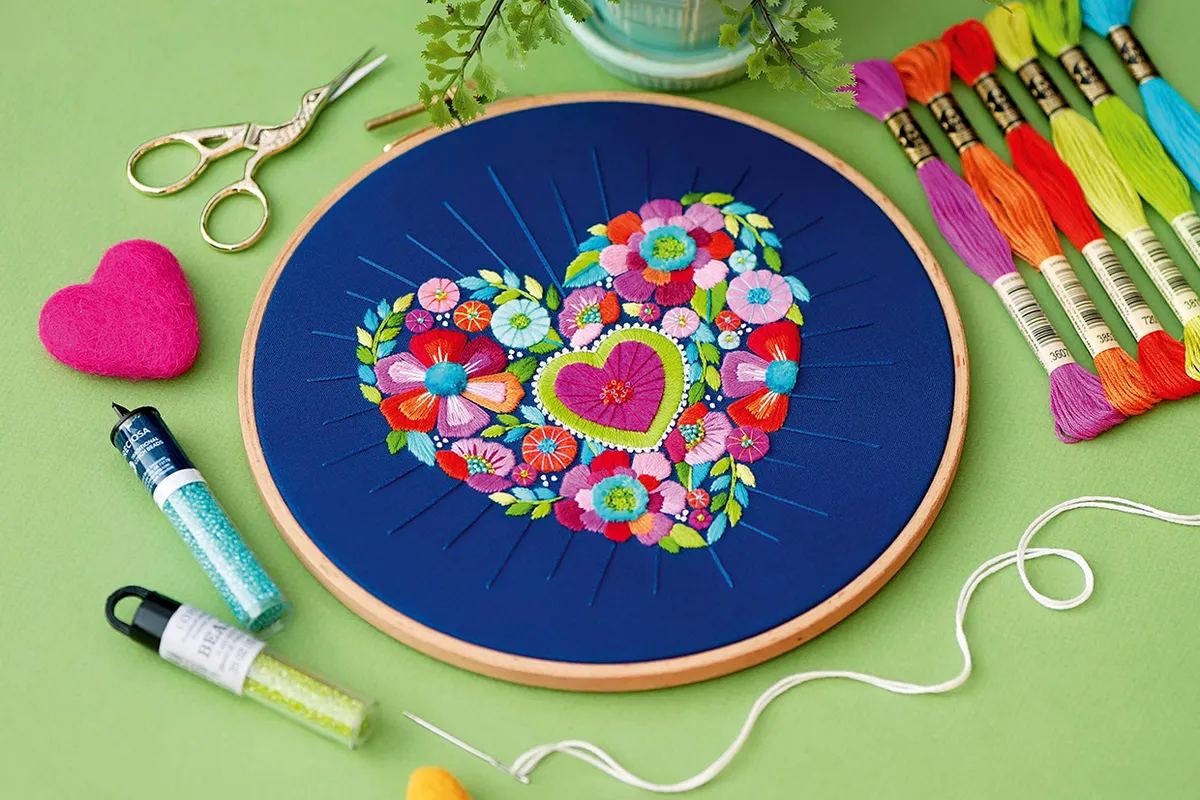
The beautiful heart embroidery was designed by Anne Oliver and first appeared in Love Embroidery issue 10.

Stitches key for the heart embroidery

Heart embroidery materials:

  • Cotton fabric: 40x40cm, navy
  • Stranded cotton: 1 skein each of royal blue, green, bright green, light green, orange, dark orange, light orange, pink, dark pink, light pink, red, dark turquoise, light turquoise and white
  • Felt: 6x6cm each of aqua, orange, dark pink and light pink
  • 11/0 seed beads: green and turquoise
  • Embroidery hoop: 20cm diameter

Free heart embroidery template and guide

You’ll also need the free heart embroidery template.

And this handy heart embroidery guide.

You will need:

  • Cotton fabric
  • Stranded cotton
  • Felt
  • seed beads
  • Embroidery hoop
  • Basic embroidery kit

Step 1

Transfer the design from the template using your preferred method. We used white carbon paper and a ballpoint pen, then  a white gel pen. Tightly stretch your fabric in the hoop, inserting backwards so the fabric lays flat against your work surface. Cut the carbon paper so it fits inside the hoop and place carbon-side down on the fabric. Place the pattern on top of the carbon paper and tape it in place so it won’t move. Trace over the design with a ballpoint pen, using a very firm pressure. Remove the paper and check to make sure all of your lines have transferred. Go over any faint lines using a white gel pen.

heart embroidery step 1

Step 2

For all of the flower petals and the single leaves, use Split Stitch to outline each shape, then fill with Satin Stitch over the stitched edge. The direction of this Satin Stitch should angle from the outside edge of the petals towards the centre. Stitch the various flower petals in orange, dark orange, light orange, pink, dark pink, light pink and red. Stitch single leaves in green, bright green, dark turquoise and light turquoise. Refer to the Embroidery Guide on p38 for placement.

heart embroidery step 2

Step 3

For the six-petaled flowers, add three Straight Stitches using two strands of white thread in the centre of each interior petal. Add a line of Straight Stitch down the centre of some of the large single leaves in either light green or light turquoise.

heart embroidery step 3

Step 4

In the centre of the layered flowers, use six strands of light turquoise to work two rings of Turkey Stitch around the outside border of the centre circle.

heart embroidery step 4

Step 5

Trim the loops of the Turkey Stitch to about 3mm, then gently rub over the trimmed stitches to make them fluffy.

heart embroidery step 5

Step 6

Fill the centre of the Turkey Stitch ring with French Knots, using three strands of bright green and green.

heart embroidery step 6

Step 7

Next, work the centre of the large six-petaled flowers. Use six strands of dark turquoise to work two rings of Turkey Stitch around the outside border of the centre circle. Fill the remainder of the centre with Turkey Stitch, this time using six strands of light turquoise. Trim all of the loops to 3mm and fluff the threads as before.

heart embroidery step 7

Step 8

Once the three-petaled flowers have been filled with Satin Stitch, work seven Straight Stitches using red, light pink or pink inside the largest petal. Fill the bottom centre of these flowers with a triangle of eight turquoise seed beads and then add a row of six green seed beads along the top.

heart embroidery step 8

Step 9

Now, for the leaf sprigs, use Split Stitch in light green for the stems. Work Satin Stitch in each small leaf using green, bright green, light green, dark turquoise and light turquoise. Refer to the Embroidery Guide on p38 for colour placement. Start by bringing your needle up on the outside edge of the leaf and bringing it down at the bottom centre of the leaf. Then, work your way up the leaf towards the point.

heart embroidery step 9

Step 10

Make each round flower by cutting out a circle of felt using the template. Attach the felt to your fabric using one strand of thread and Straight Stitch, starting at the centre and radiating outwards around the circle. In the centre of the large felt flowers, stitch a cluster of French Knots. In the centre of the medium felt flowers, sew three seed beads, using one strand of thread to attach each bead. Sew one seed bead in the centre of the smallest felt flowers. Mix and match the colours of felt and stranded cotton or refer to the Embroidery Guide on p38.

heart embroidery step 10

Step 11

For the central heart, use three strands of bright green in Split Stitch to outline the shape. Then, fill with Satin Stitch over the stitched edge, angling your stitches from the outside edge towards the centre. With two strands of white, Backstitch an outline around the heart. Add French Knots in two strands of white about 3mm apart around this outline.

heart embroidery step 11

Step 12

Cut the heart out of dark pink felt using the template. Then, attach it to the fabric with Straight Stitches in one strand of dark pink, just as you did before. Stitch a circle of French Knots in the centre with dark orange, pink, orange and light orange. Add the white dots scattered throughout the design using French Knots in two strands of white. Finish by stitching the radiating lines in long Straight Stitches using royal blue. If you wish to display your finished stitching in the hoop, turn to p69 for our guide to do just that.

heart embroidery step 12

Tips and Tricks for the heart embroidery

  • White gel ink is permanent, so make sure you trace carefully and cover all of the lines with your stitching as they won’t wash out.
  • To keep your fabric tight the whole time you’re stitching, wrap the inner hoop with cotton twill tape. This will allow the hoop to squeeze the fabric more tightly and keep it from loosening as you stitch. Tight fabric means you can achieve more accurate stitches.

More like the heart embroidery

We hope you loved this gorgeous heart embroidery pattern. Are you looking for similar projects? Don’t miss our free embroidered buttons pattern, which will liven up your cardis! If you can’t get enough of the moon and stars, take a look at the constellation embroidery or the star embroidery (one of our favourites). If you’re a nature lover check out the embroidered wall hanging, the mushroom embroidery pattern or the bee embroidery. Want to relax in the evening, try this beautiful wildflower design. If you’re also looking to delve into machine embroidery or would like to find out more about it take a look at our guide to the best embroidery machine

About the designer:

Anne Oliver

Anne is a designer who loves fun stitches and lots of colour. Chasing that spark of imagination, picking the fabrics, colours and threads as she creates each design is the definition of ‘happy days’ to her!

Take a look at Anne Oliver’s website.