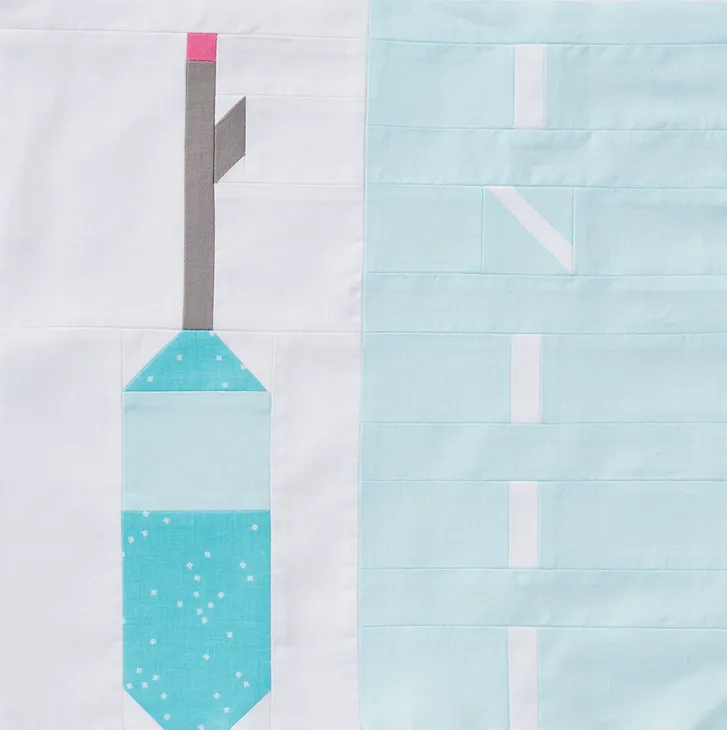
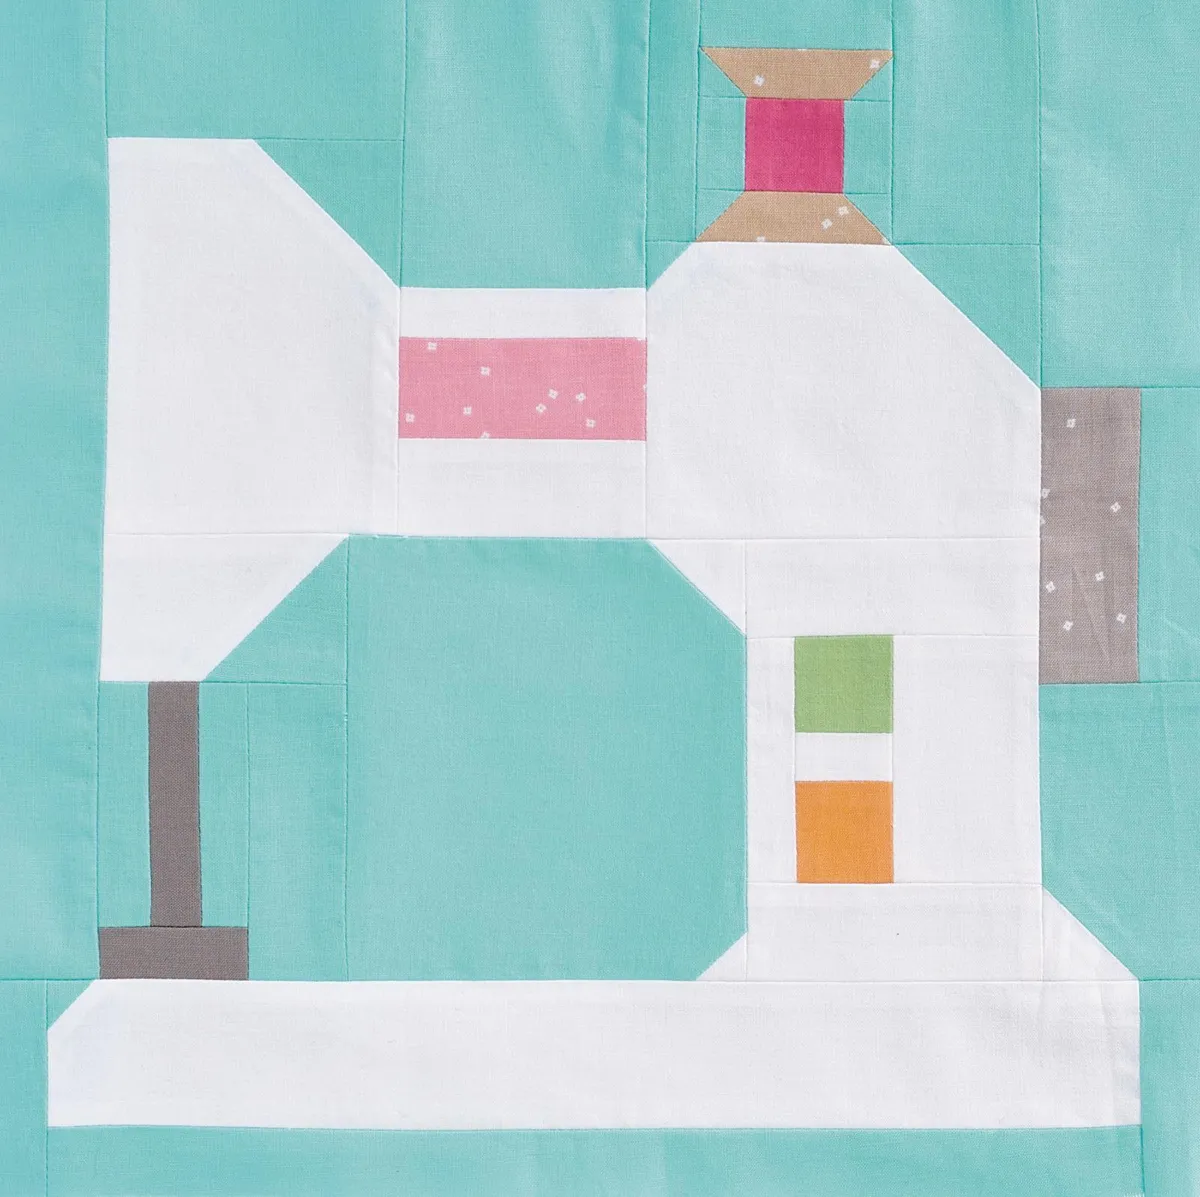
Look no further, your next quilting project is here! This Tools & Spools series of quilt block patterns by Gracey Larson was featured in issue 89 of Love Patchwork & Quilting. We think they'll look fab hanging up in your sewing room! To piece some matching blocks pick up a digital copy of the issue, or read on for instructions on how to make bonus blocks from the series: here you'll find a safety pin quilt block pattern, along with a seam ripper, needle and thread, sewing pins, sewing machine and thread spools. You'll be able to immortalise all your fave stitchy notions in fabric!
Check out our beginner quilting patterns and quilting templates for more quilting goodness. You might also like our Free star quilt block pattern, Free snowflake quilt block pattern or for a tropical twist, how about How to sew pineapple quilt blocks?
Your free quilt block patterns
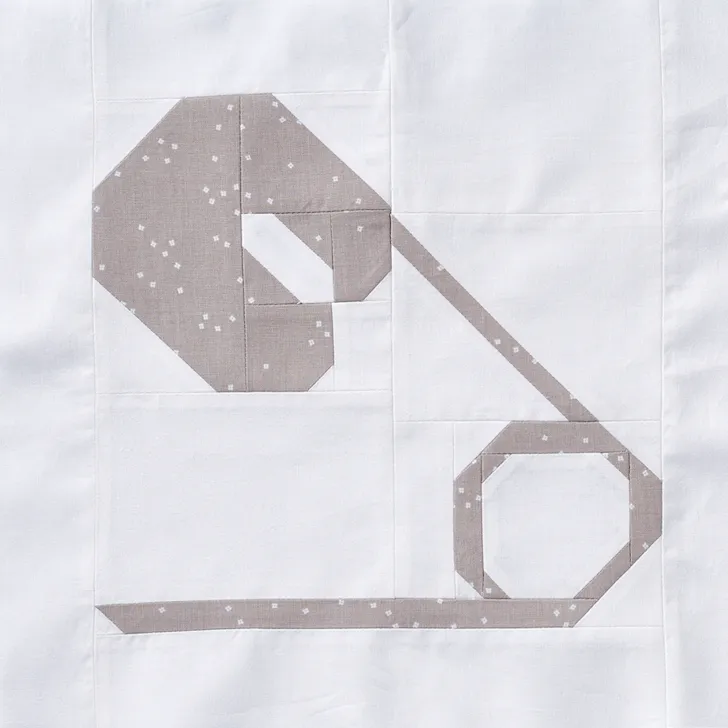
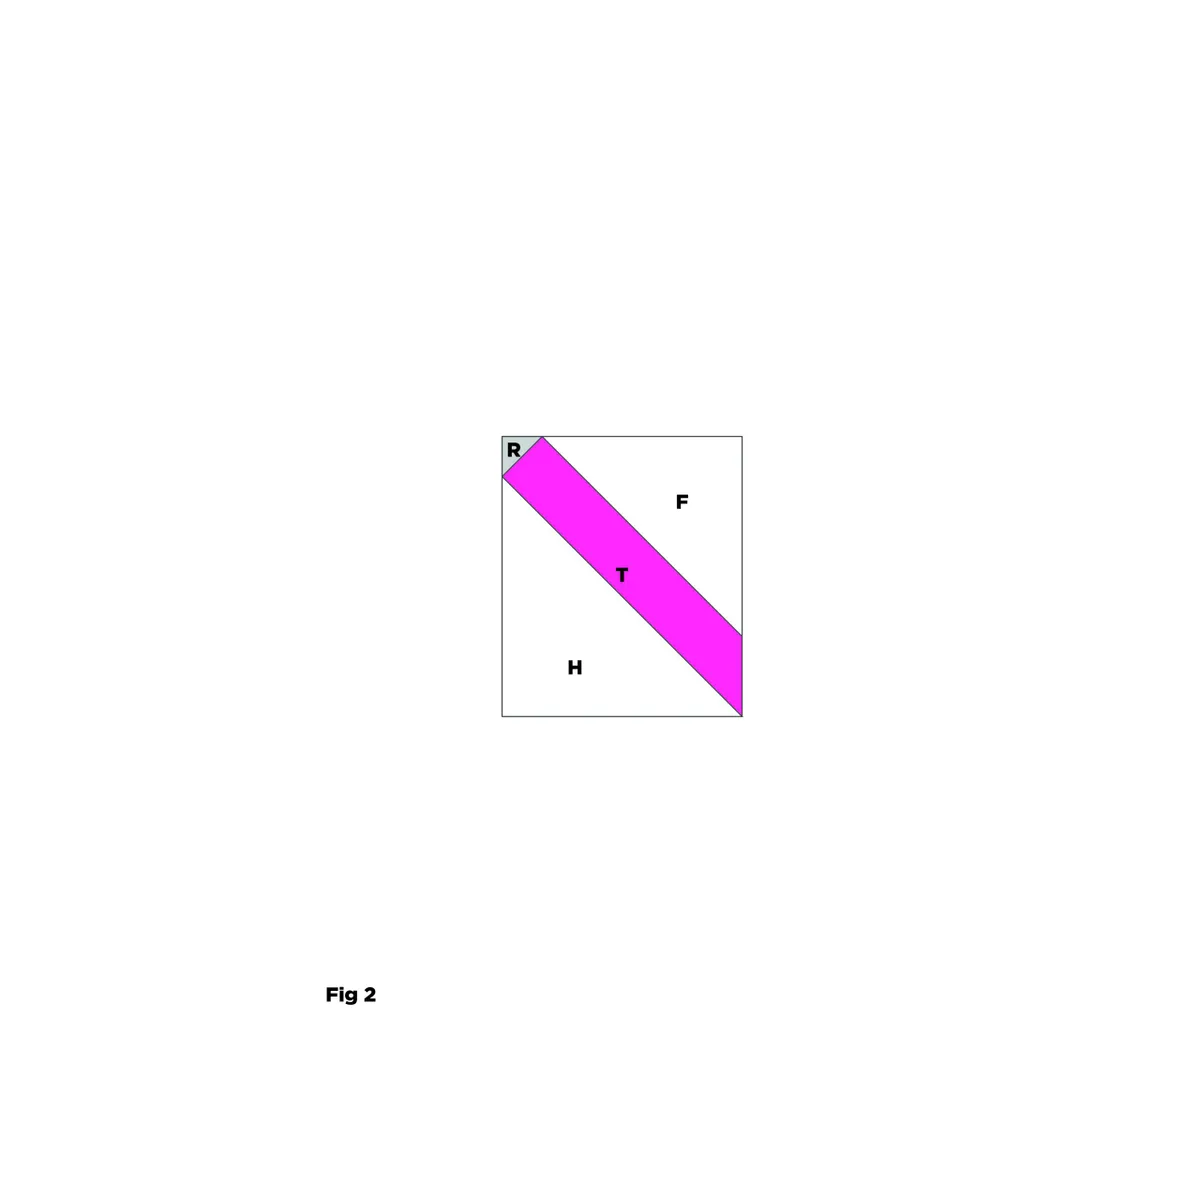
Safety Pin Quilt Block Pattern
You will need
- White fabric: 1⁄4yd
- Grey fabric: 1/8 yd
Finished size
12in square
Cutting out
Step 1
From the white fabric cut:
- One (1) 1 ½ in x 12 ½in (A).
- Two (2) 4in x 5in (B).
- One (1) 3in square (C).
- One (1) 3 ½ in square (D).
- Two (2) 1 ½in squares (E).
- Three (3) 2in squares (F).
- Four (4) 1in squares (G).
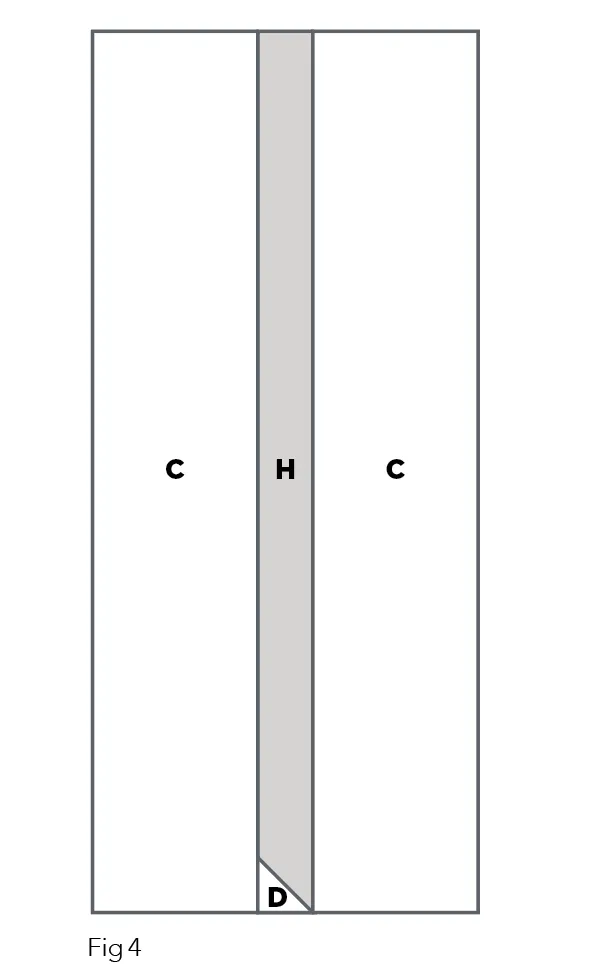
- One (1) 1 ½in x 3 ½in (H).
- One (1) 2in x 10in (I).
- One (1) 4in x 5 ½in (J).
- One (1) 2in x 12 ½in (K).
- Two (2) 2 ½in squares (L).
- One (1) 2in x 5 ½in (M).
- One (1) 1 ½in x 2in (N).
Step 2
From the grey fabric cut:
- One (1) 2in square (O).
- One (1) 4in square (P).
- Two (2) 1in x 3 ½in (Q).
- One (1) 1in x 3in (R).
- Three (3) 1in squares (S).
- Three (3) 1 ½in squares (T).
- One (1) 1in x 10in (U).
- One (1) 3in x 5 ½in (V).
- One (1) 2 ½in x 3in (W).
- One (1) 1 ½in x 2in (X).
Piecing the block
Step 3
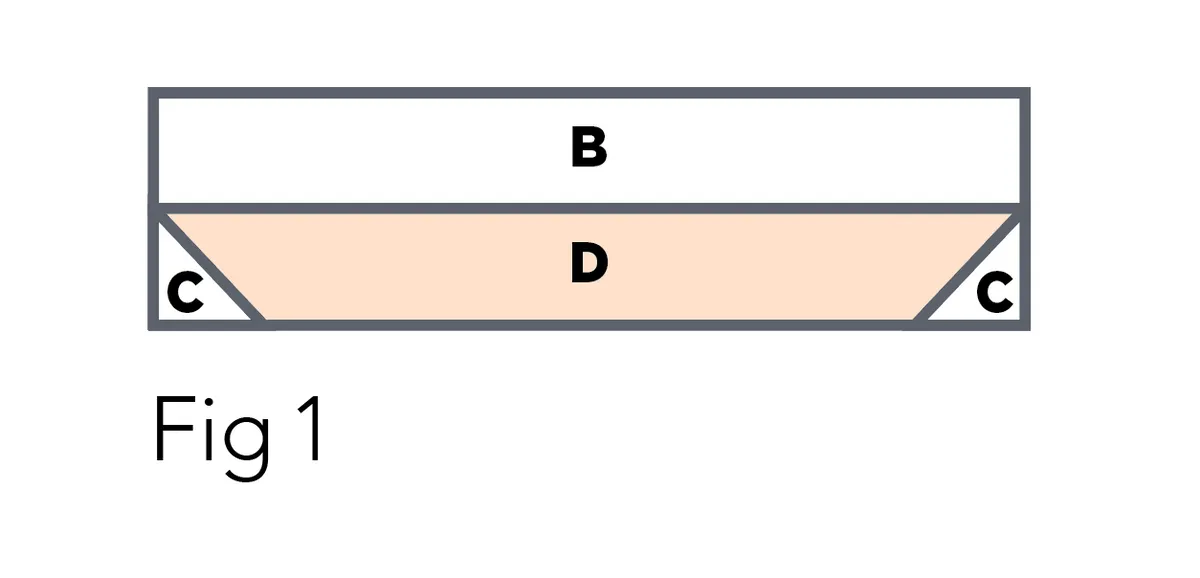
Join the P corner-square triangle to the bottom right corner of a B. Join the D corner-square triangle to the bottom right corner of B.
Step 4
Join an S corner-square triangle to the top left, bottom left and bottom right corners of C. Join a T corner-square triangle to the top right corner of C.
Step 5
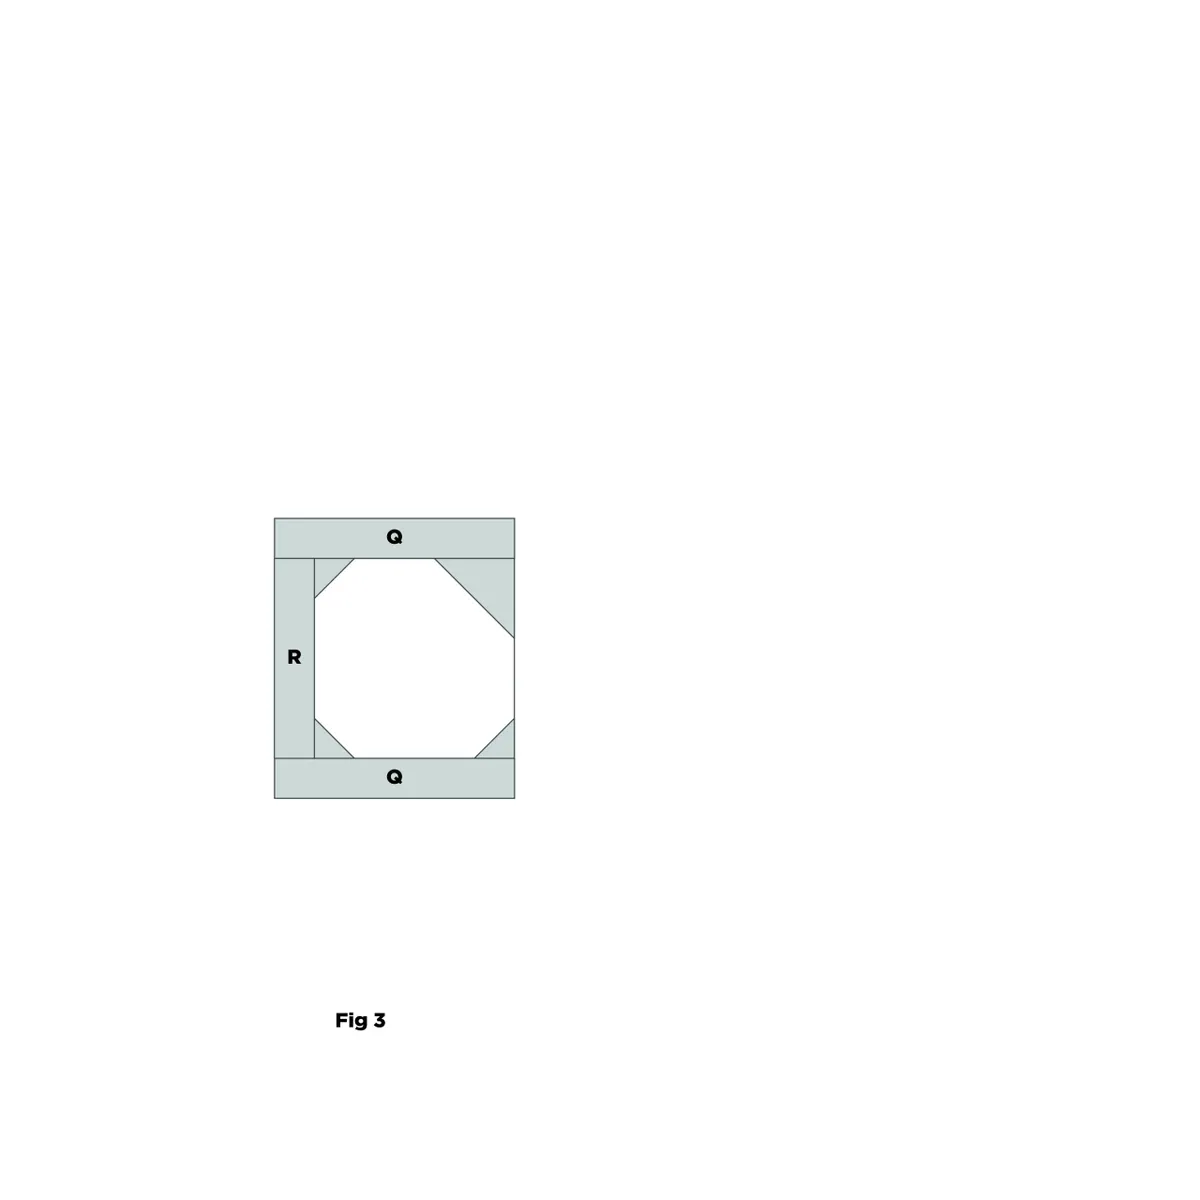
Join R to the left side of C. Join Q to the top and bottom.
Step 6
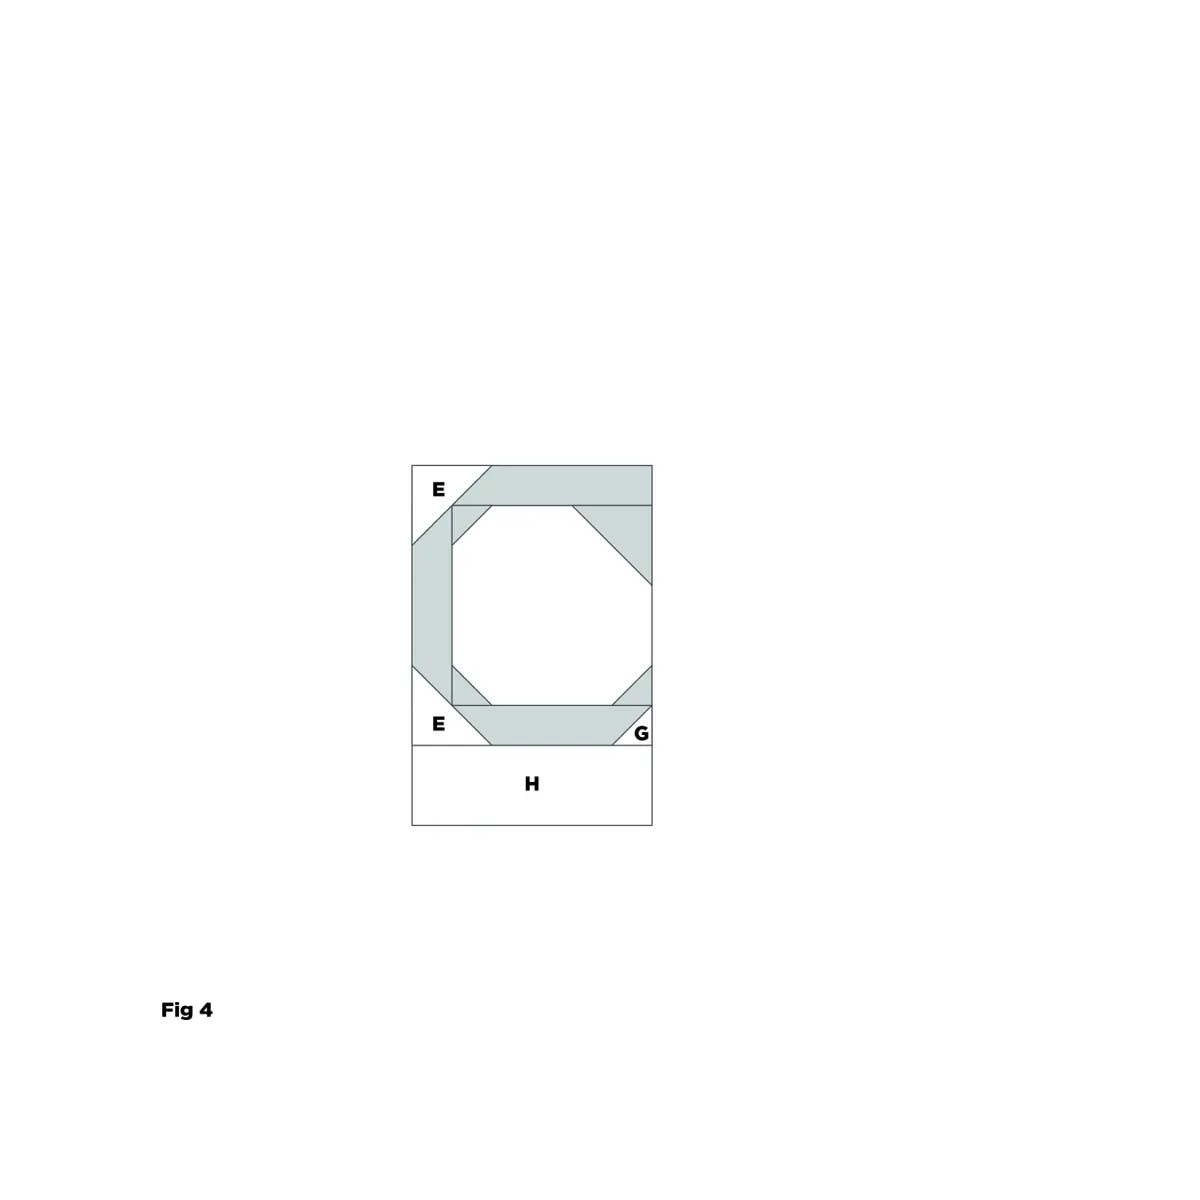
Join an E corner-square triangle to the top left and bottom left corners of the C unit. Join a G corner-square triangle to the bottom right corner of the C unit. Join H to the bottom of the C unit.
Step 7
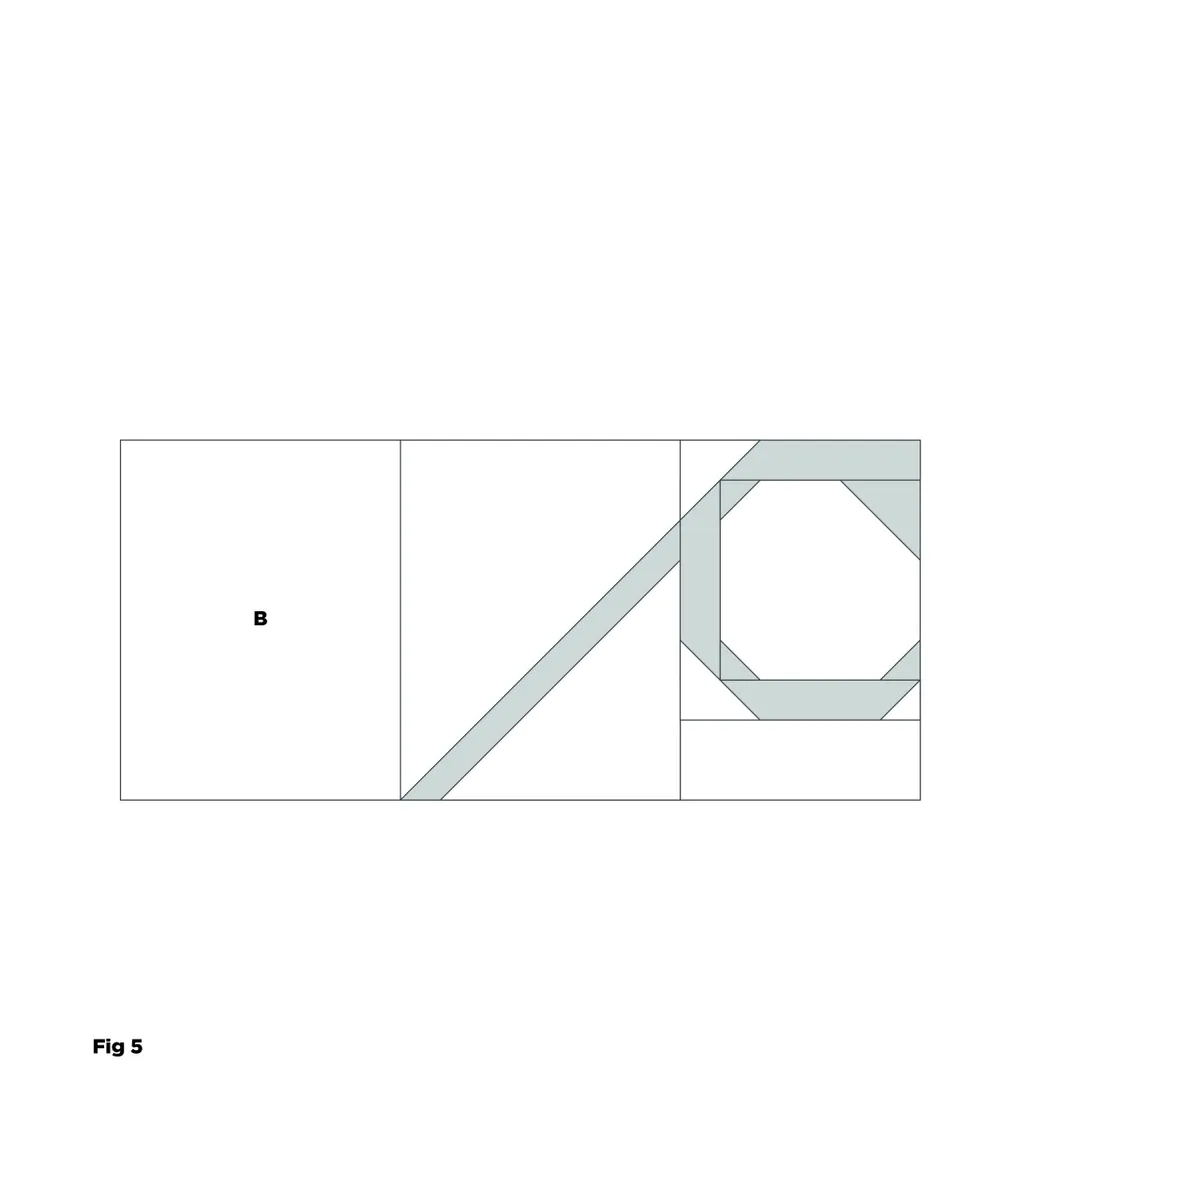
Join the C unit to the right side of the unit from B and join the remaining B to the left side to form the top unit.
Step 8

Join an L corner-square triangle to the top left corner of W.
Step 9
Join a T corner-square triangle to the top left and bottom right corner of an F. Join X to the top of F to form the F unit. Join a G corner-square triangle to the top right corner of the F unit.
Step 10
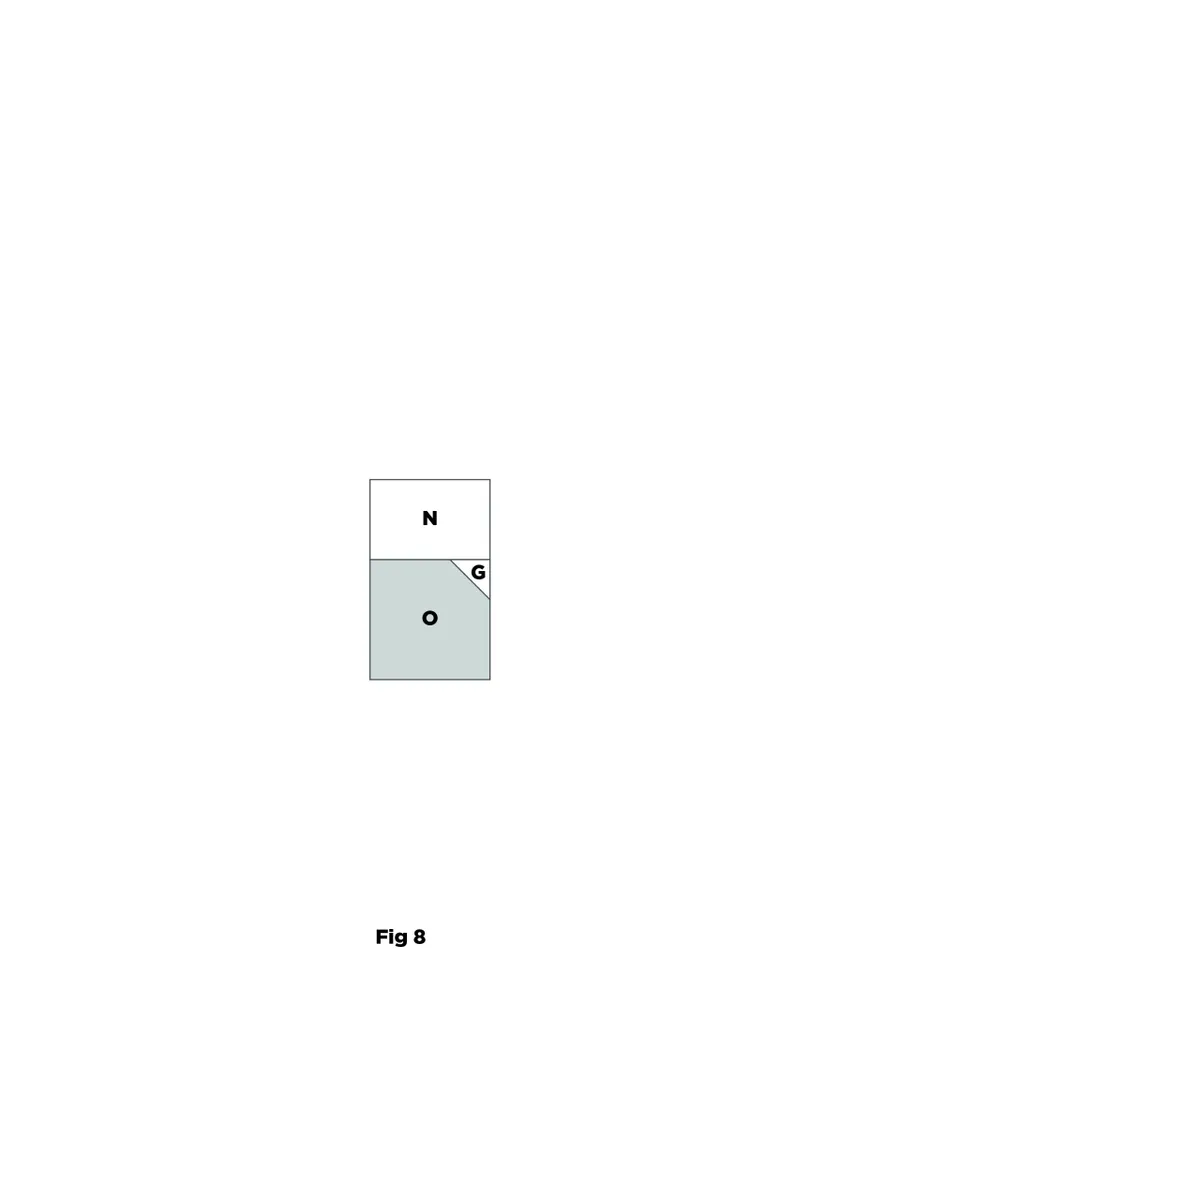
Join a G corner-square triangle to the top right corner of O. Join N to the top of O to form the O unit.
Step 11
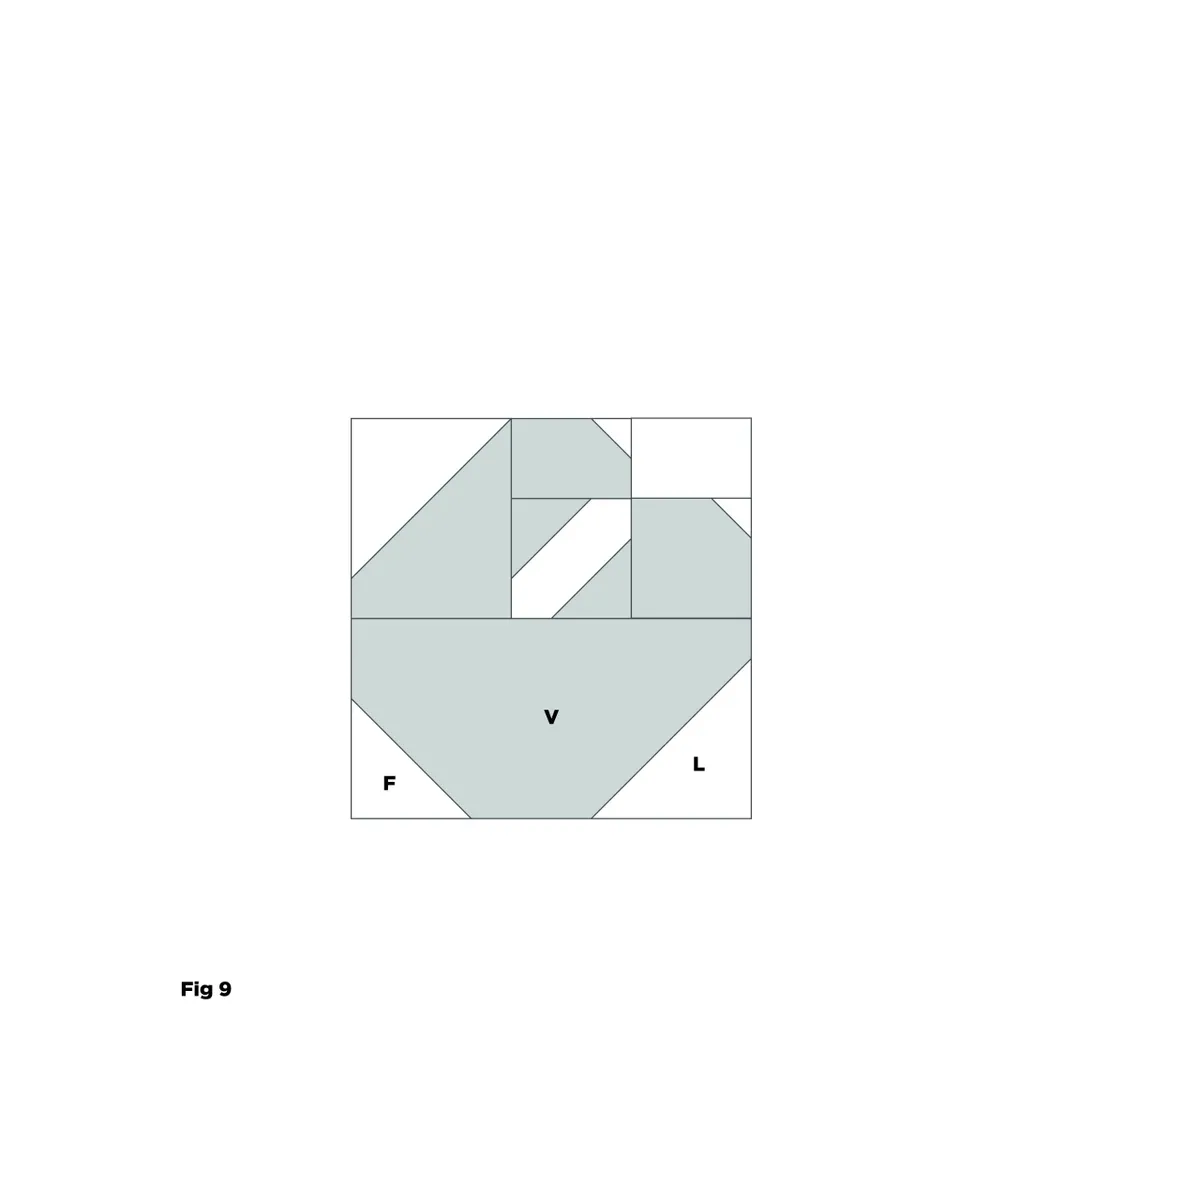
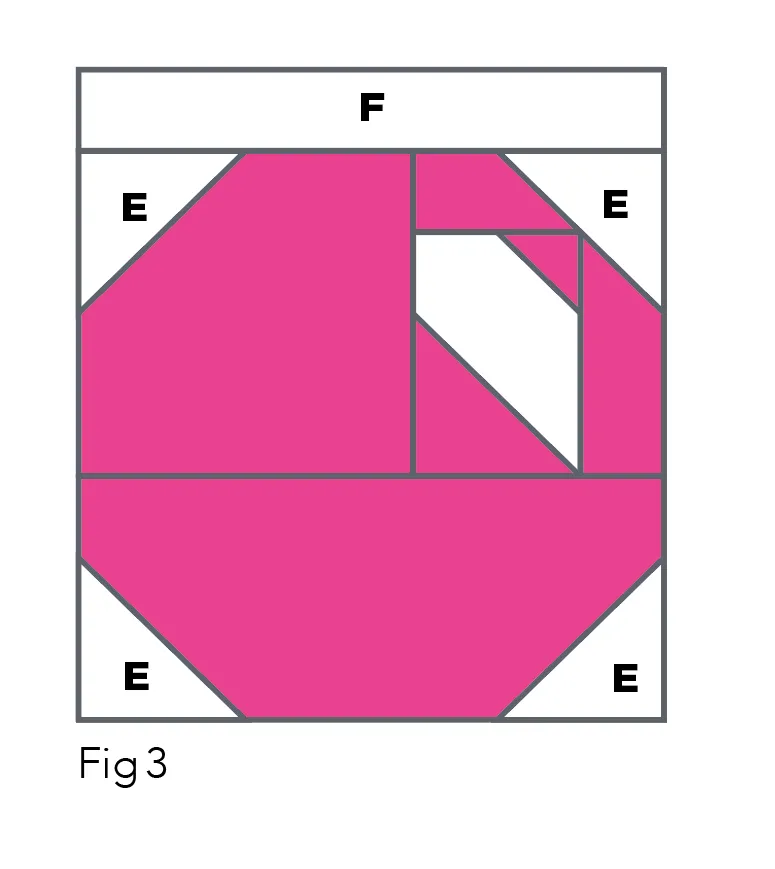
Join the O unit to the right side of the F unit and join W to the left side of the F unit to form the safety pin unit. Join V to the bottom of the safety pin unit. Join an F CST to the bottom left corner, and an L CST to the bottom right corner.
Step 12

Join J to the right side of the safety pin unit and join M to the left side of the safety pin unit.
Step 13
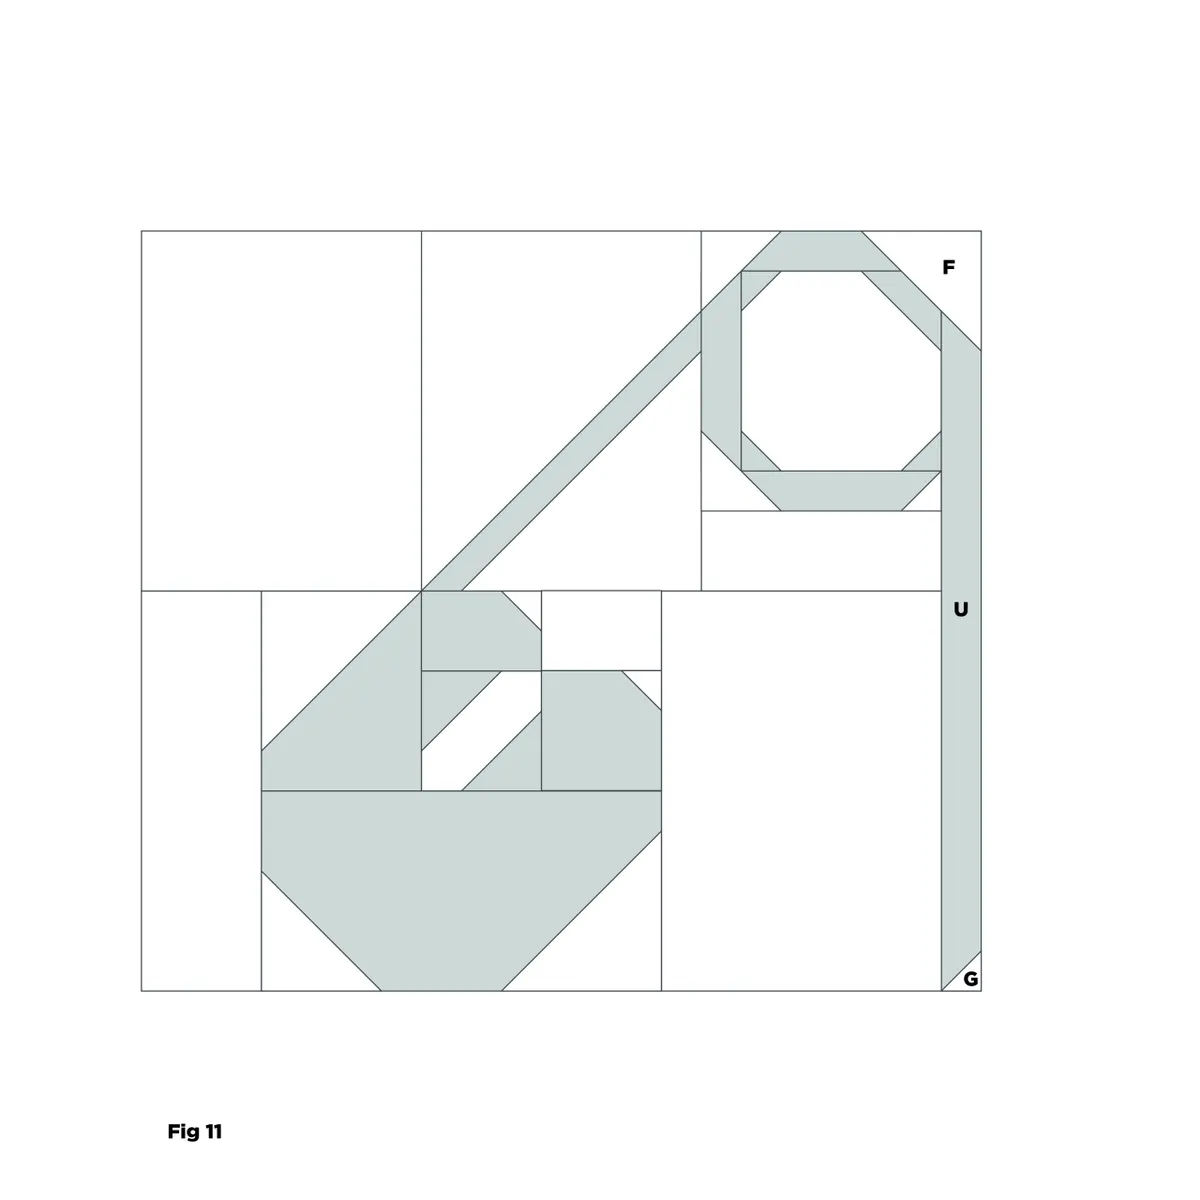
Join the safety pin unit to the bottom of the top unit to form the pin unit. Join U to the right side of the pin unit. Join an F corner-square triangle to the top right corner of the pin unit and join a G corner-square triangle to the bottom right corner of the pin unit.
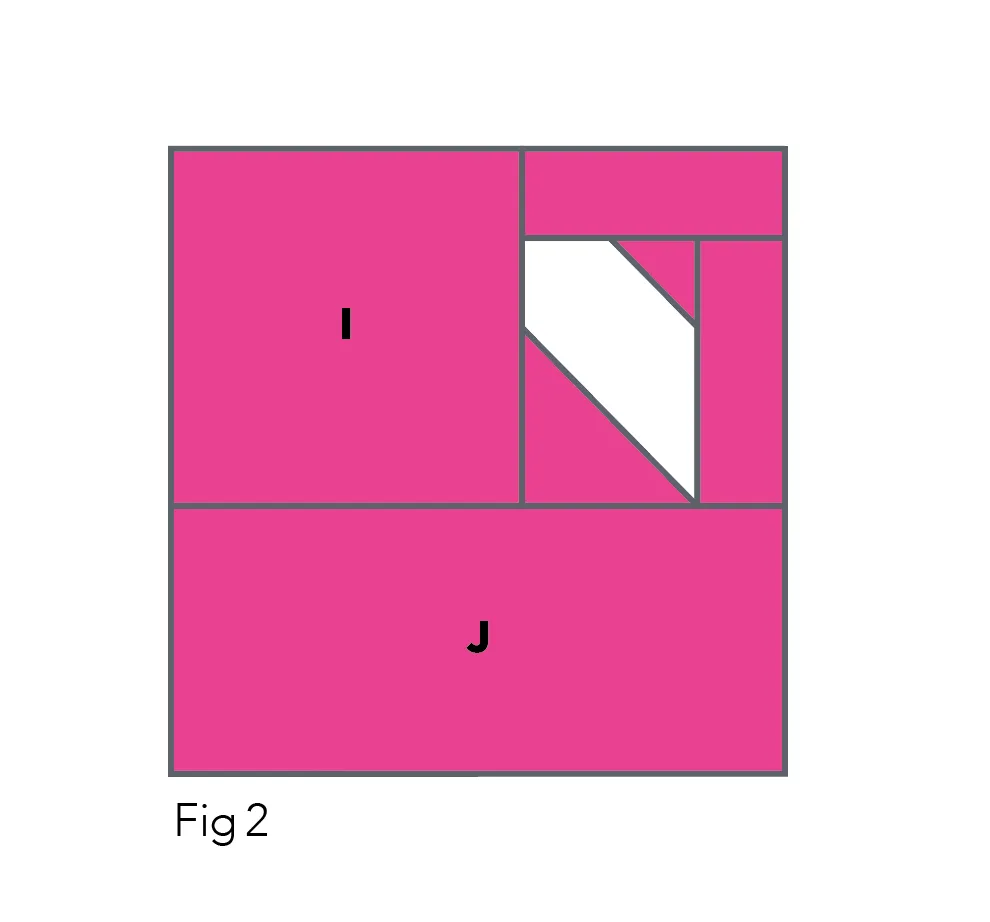
Step 14
Join I to the right side of the pin unit. Join A to the top of the pin unit and join K to the bottom of the pin unit to form the finished block.
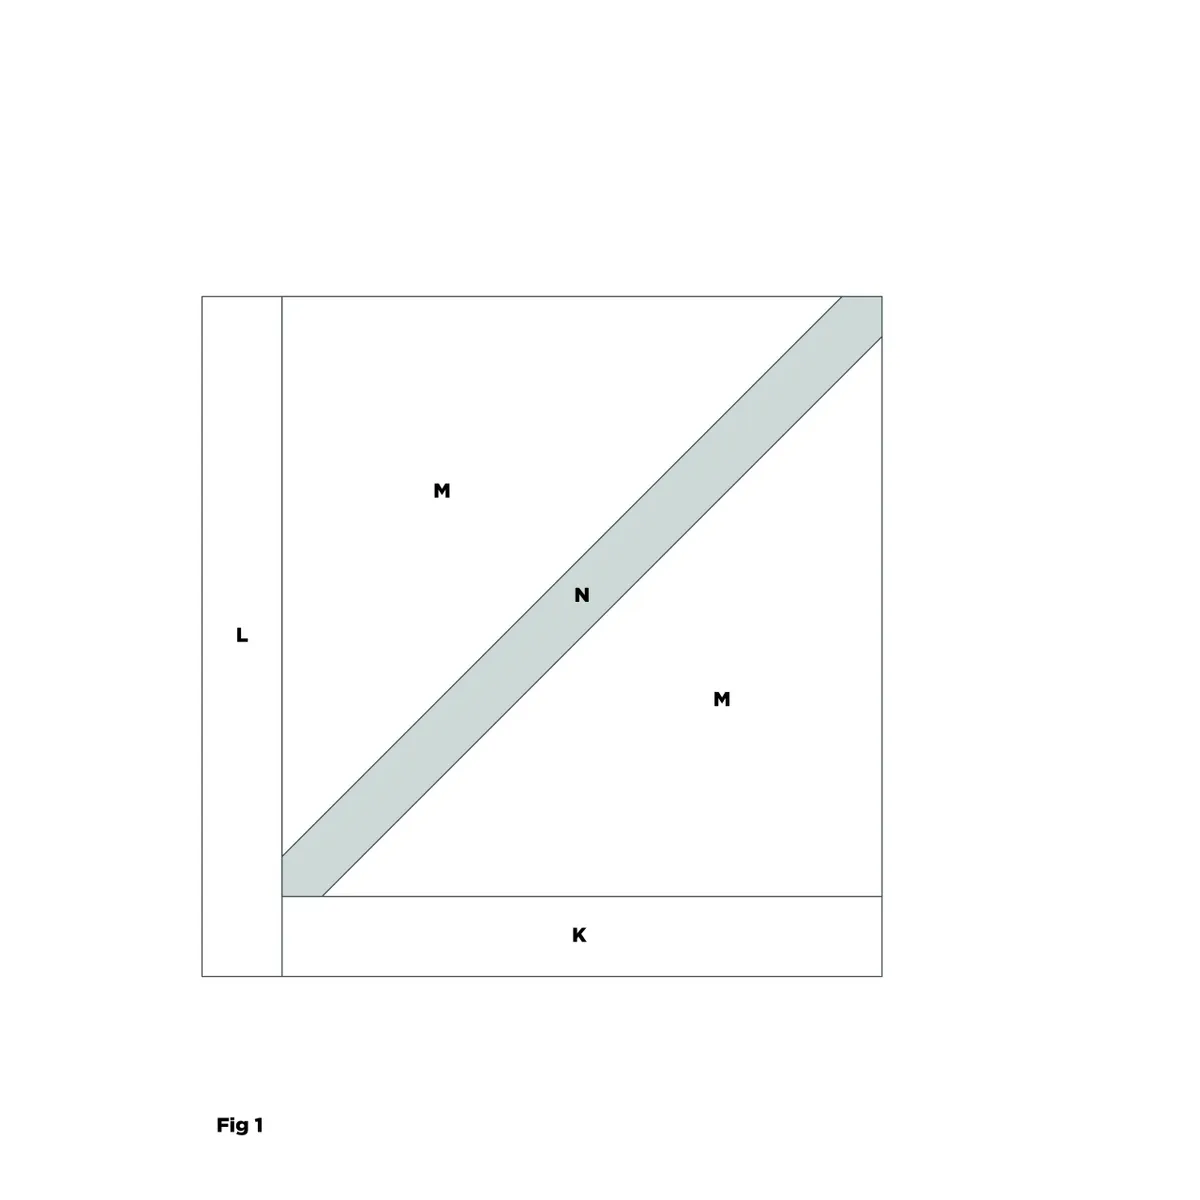
Seam Ripper Quilt Block Pattern
You will need
- White fabric: 1/8 yd
- Red fabric: 1in square
- Grey fabric: 1in x 7in
- Dark aqua fabric: 4in x 5in
- Light aqua fabric: 1/8 yd
Finished size
12in square
Cutting Out
Step 1
From the white fabric cut:
- One (1) 1in x 6½in (A).
- One (1) 3 ½in x 5 ½in (B).
- Four (4) 1in squares (C).
- One (1) 1 1½in x 3in (D).
- One (1) 2in x 2 ½in (E).
- One (1) 3in square (F).
- Two (2) 1 ½in squares (G).
- One (1) 2 ½in x 7in (H).
- One (1) 2in x 7in (I).
- Four (4) 1in x 2in (J).
- One (1) 2in square (K).
Step 2
From the red fabric cut one (1) 1in square (L).
Step 3
From the grey fabric cut:
- One (1) 1in x 5in (M).
- One (1) 1in x 2in (N).
Step 4
From the dark aqua fabric cut:
- One (1) 1 ½in x 3in (O).
- One (1) 3in x 4in (P).
Step 5
From the light aqua fabric cut:
- One (1) 2 ½in x 3in (Q).
- One (1) 1in x 6 ½in (R).
- Five (5) 2in x 3in (S).
- Four (4) 2in x 3 ½in (T).
- Four (4) 1 ½in x 6 ½in (U).
- One (1) 2in x 2½in (V).
- One (1) 1 ½in square (W).
- One (1) 2in square (X).
Piecing the Block
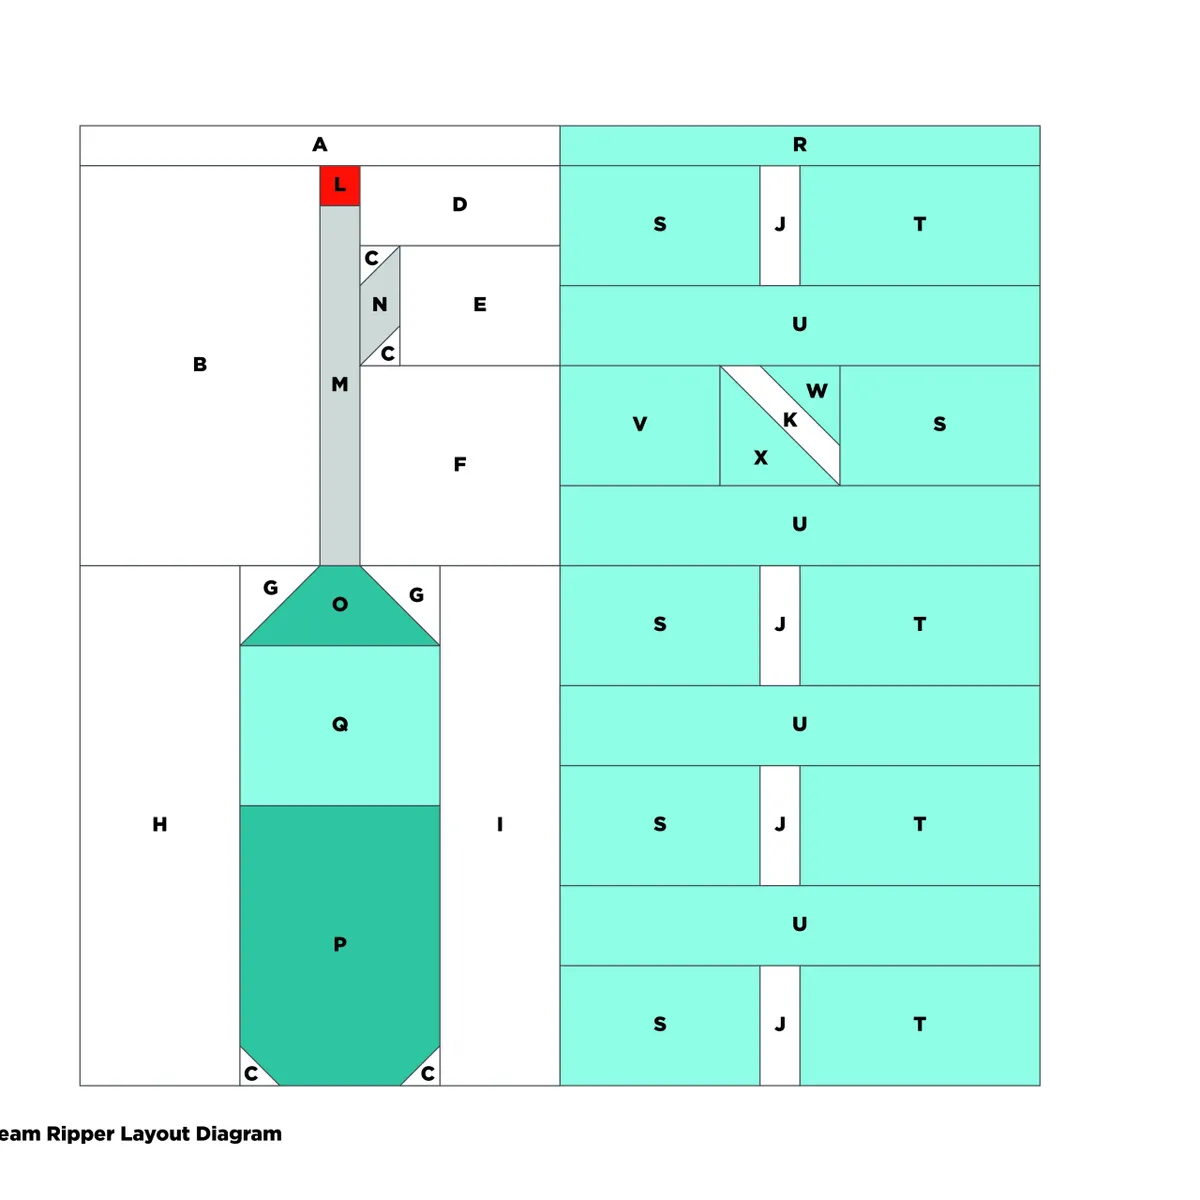
Step 6
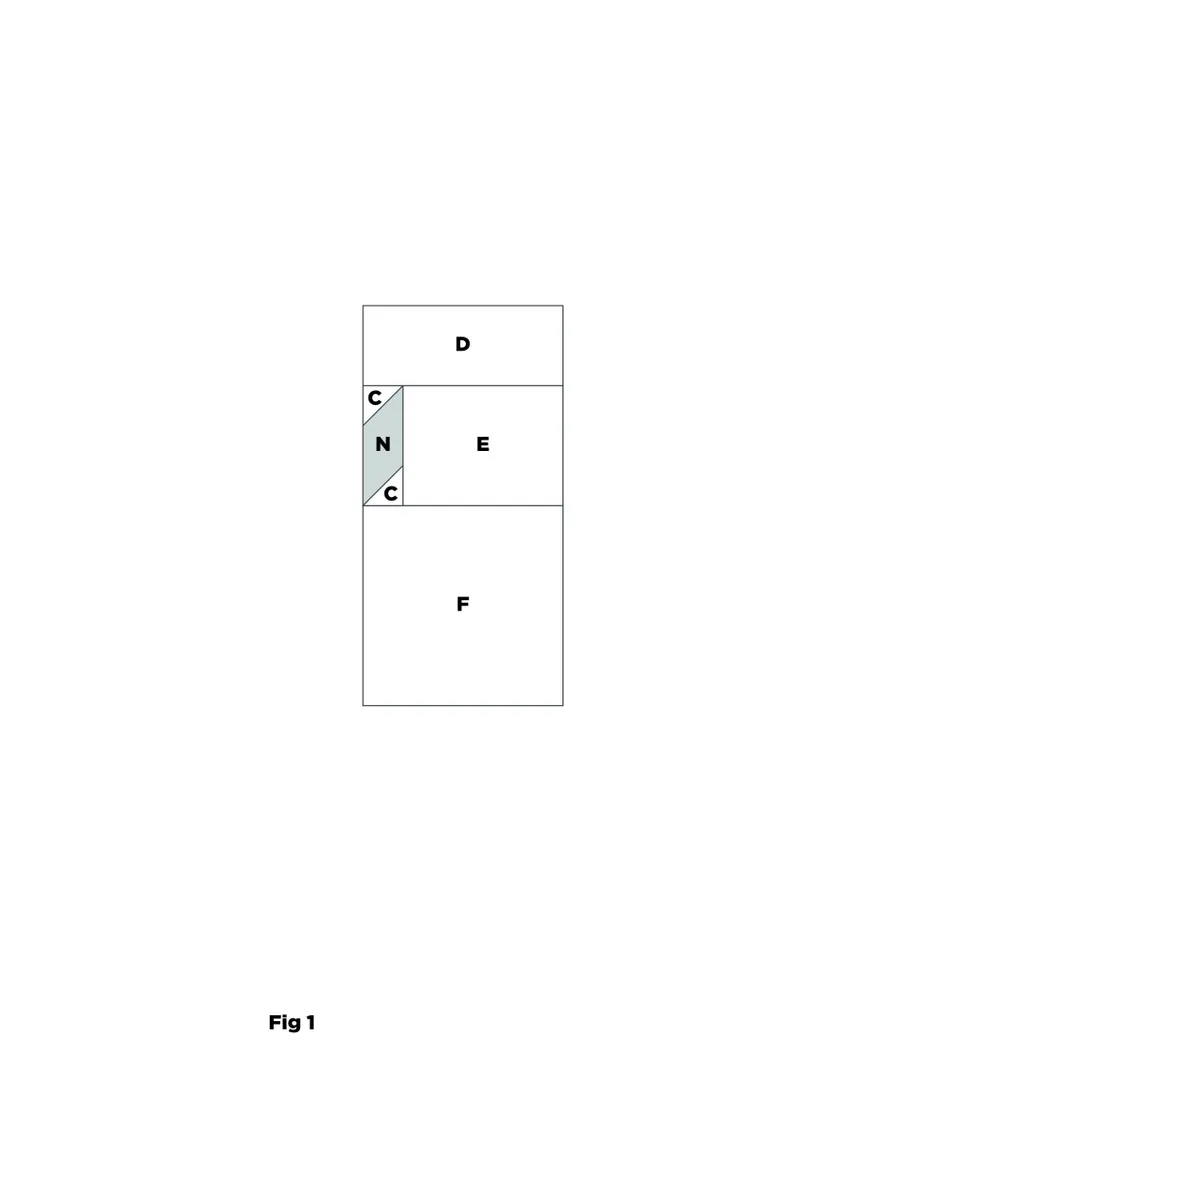
Add a C corner-square triangle to the top left and bottom right corners of the N piece. Join E to the right side of the N. Join D to the top of N and join F to the bottom of N to form the N unit.
Step 7
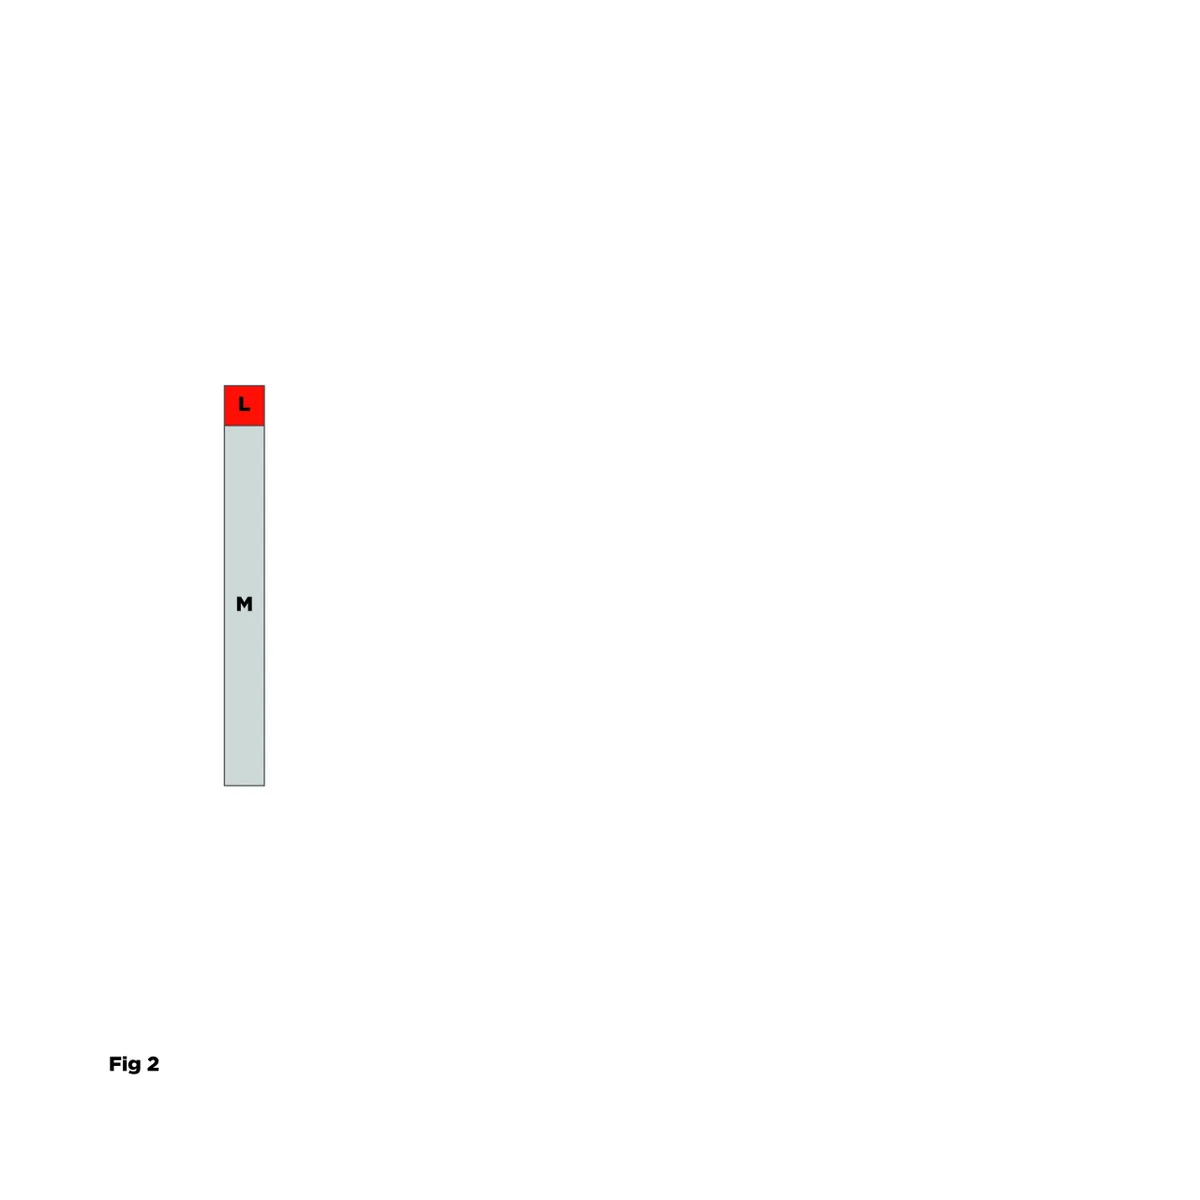
Join L to the top of M to form the M unit.
Step 8
Join B to the left side of the M unit and join the N unit to the right side of the M unit. Join A to the top of the M unit to form the seam ripper unit.
Step 9
Join O to the top of Q and join P to the bottom of Q to form the Q unit. Join a G corner-square triangle to the top left and top right corners of the Q unit. Join a C corner-square triangle to the bottom left and bottom right corners of the Q unit.
Step 10
Join H to the left side of the Q unit and join I to the right side of the Q unit to form the handle unit. Join the seam ripper unit to the top of the handle unit.
Step 11
Join S to the left side of J and join T to the right side of J to form a J unit. Make four J units.
Step 12
Join the X corner-square triangle to the bottom left corner of K. Join the W corner-square triangle to the right top corner of K. Join V to the left side of K and join S to the right side of K to form the K unit.
Step 13
Join R, the J units, the U pieces, and the K unit, as shown, to form the stitches unit.
Step 14
Join the stitches unit to the right side of the seam ripper unit to form the finished block.
Needle and Thread Quilt Block Pattern
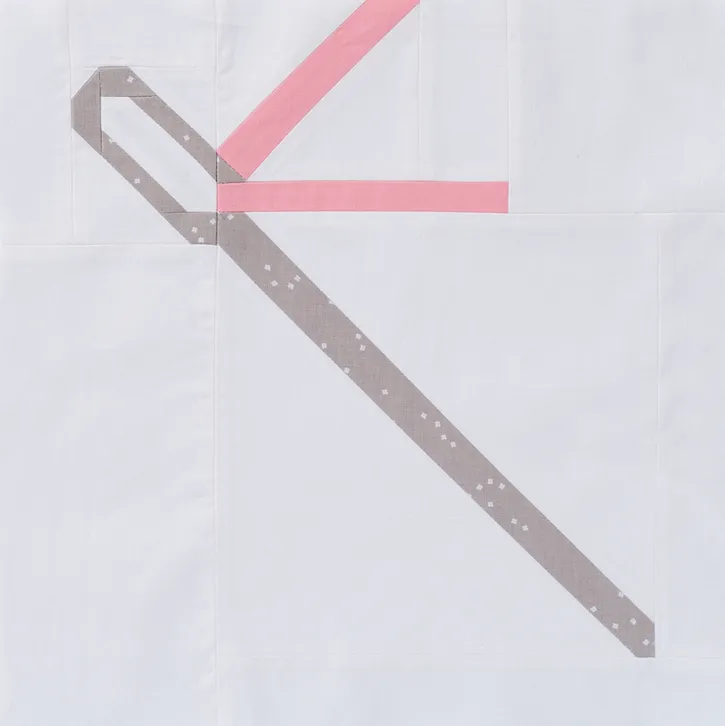
You will need
White fabric: 1⁄4 yd
Grey fabric: 1/8 yd
Pink fabric: 5in x 6in
Finished Size
12in square
Cutting Out
Step 1
From the white fabric cut:
One (1) 4in x 8 ½in (A).
One (1) 1 ½in x 4 ½in (B).
Two (2) 2 ½in squares (C).
One (1) 1 ½in x 3in (D).
One (1) 2in square (E).
One (1) 3in square (F).
One (1) 1in square (G).
One (1) 3 ½in square (H).
One (1) 2in x 3 ½in (I).
One (1) 4in square) (J).
One (1) 1 ½in x 8in (K).
One (1) 1 ½in x 9in (L).
Two (2) 7 ½in squares (M).
Step 2
From the light grey fabric cut:
One (1) 8in square (N).
Two (2) 2in squares (O).
Two (2) 1in x 2 ½in (P).
One (1) 1in x 3 ½in (Q).
One (1) 1in square (R).
Step 3
From the pink fabric cut:
One (1) 1in x 5 ½in (S).
One (1) 3 ½in x 4in (T).
Piecing the Block

Step 4
Join an M corner-square triangle to the top left and bottom right corners of N. Join K to the bottom of N. Join L to the left side of N to form the N unit.
Step 5
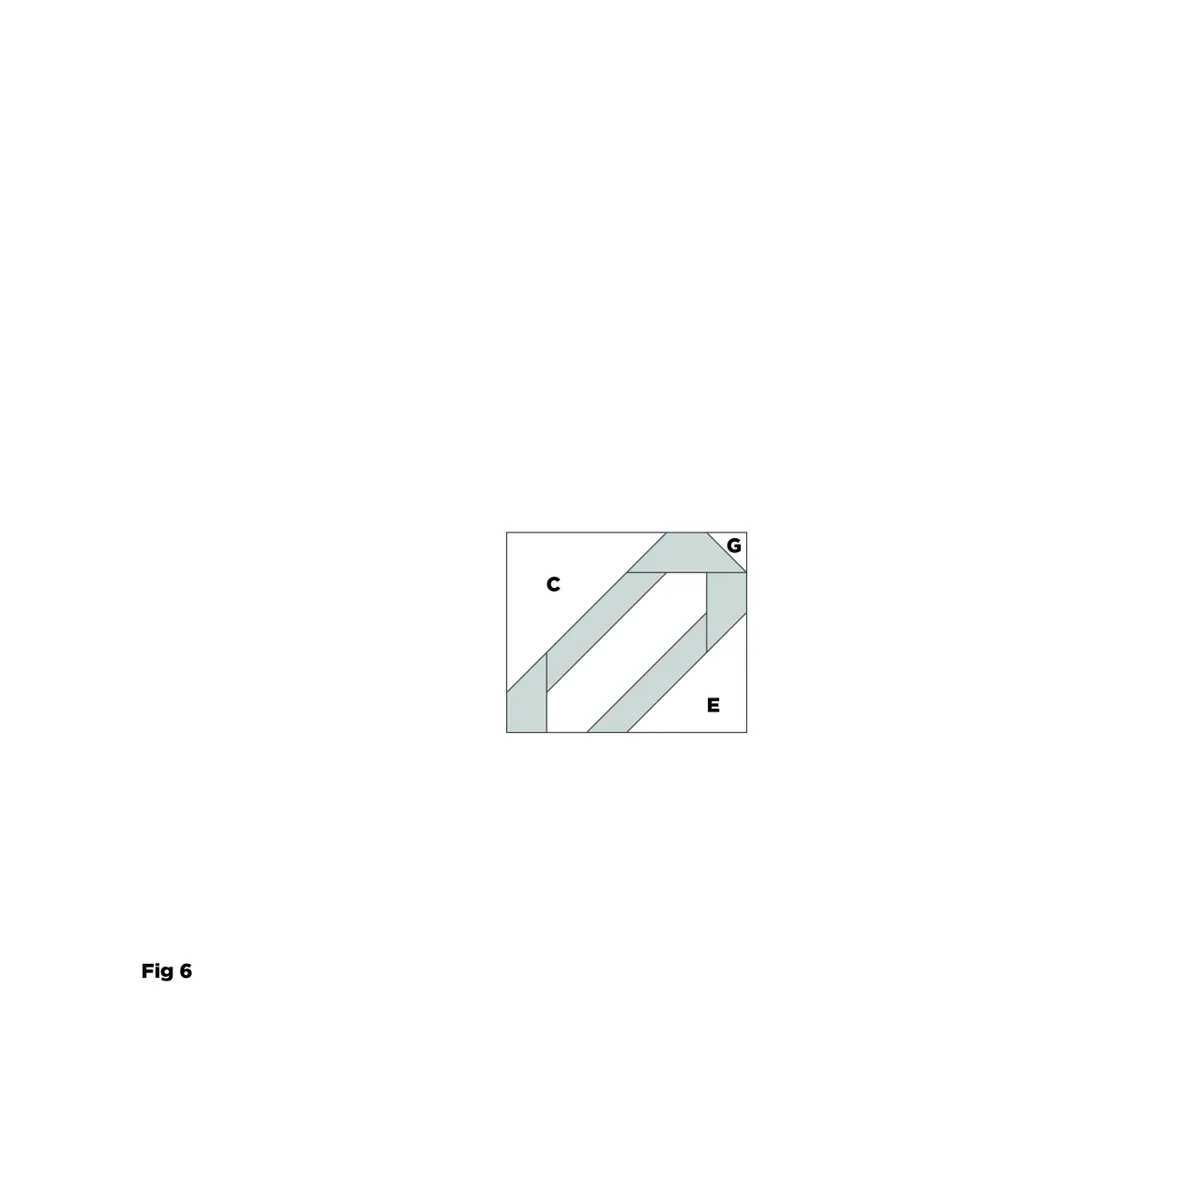
Join the F corner-square triangle to the top right corner of T. Join the H corner-square triangle to the bottom left corner of T. Join the R corner-square triangle to the top left corner of T.
Step 6
Join I to the bottom of T. Join S to the left side of T to form the T unit. Join J to the bottom of the T unit.
Step 7
Join the T unit to the right side of the N unit to form the needle unit.
Step 8
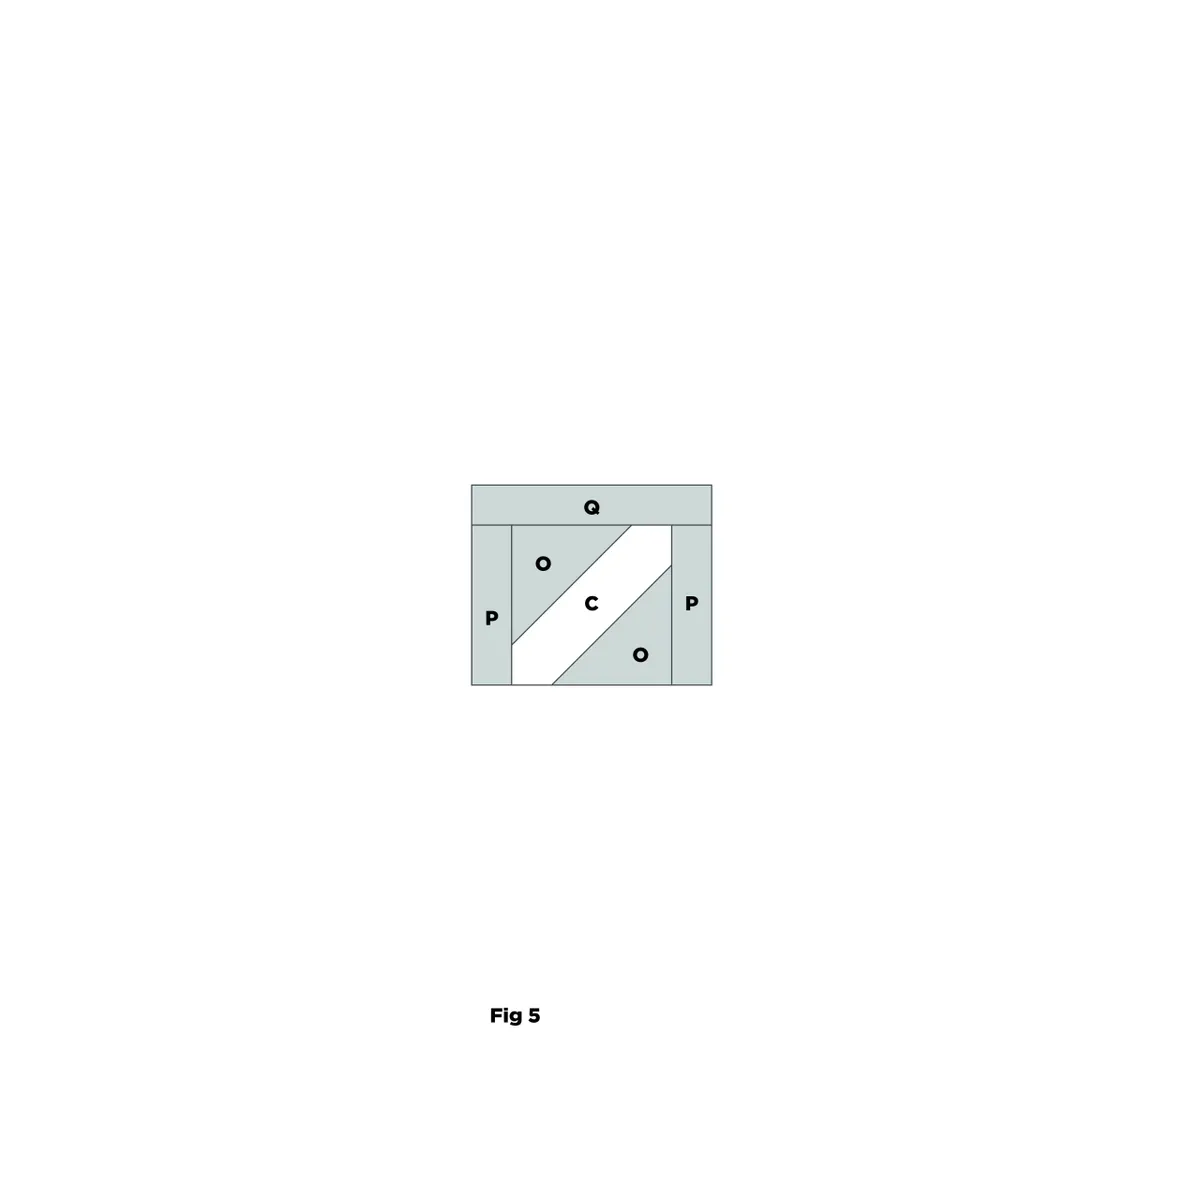
Join an O corner-square triangle to the top left and bottom right corners of C. Join P to the left and right sides of C. Join Q to the top of C to form the C unit.
Step 9
Join the C corner-square triangle to the top left corner of the C unit. Join the G corner-square triangle to the top right corner of the C unit. Join the E corner-square triangle to the bottom right corner of the C unit.
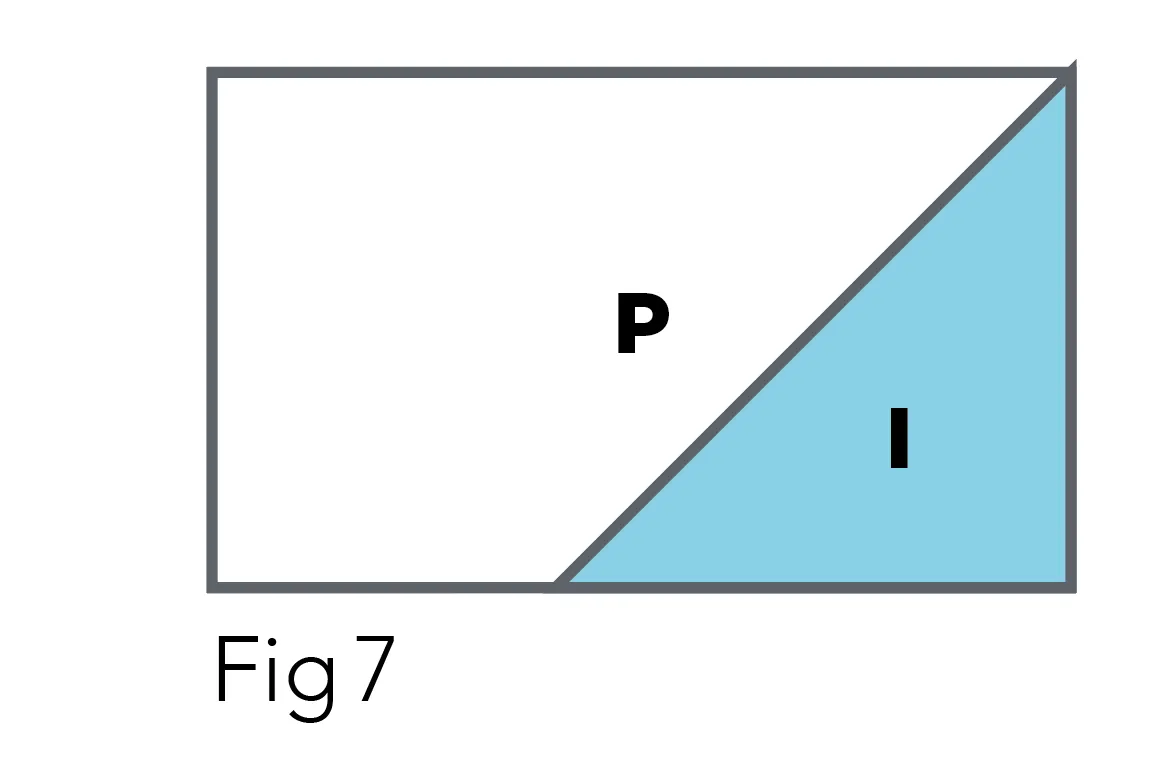
Step 10
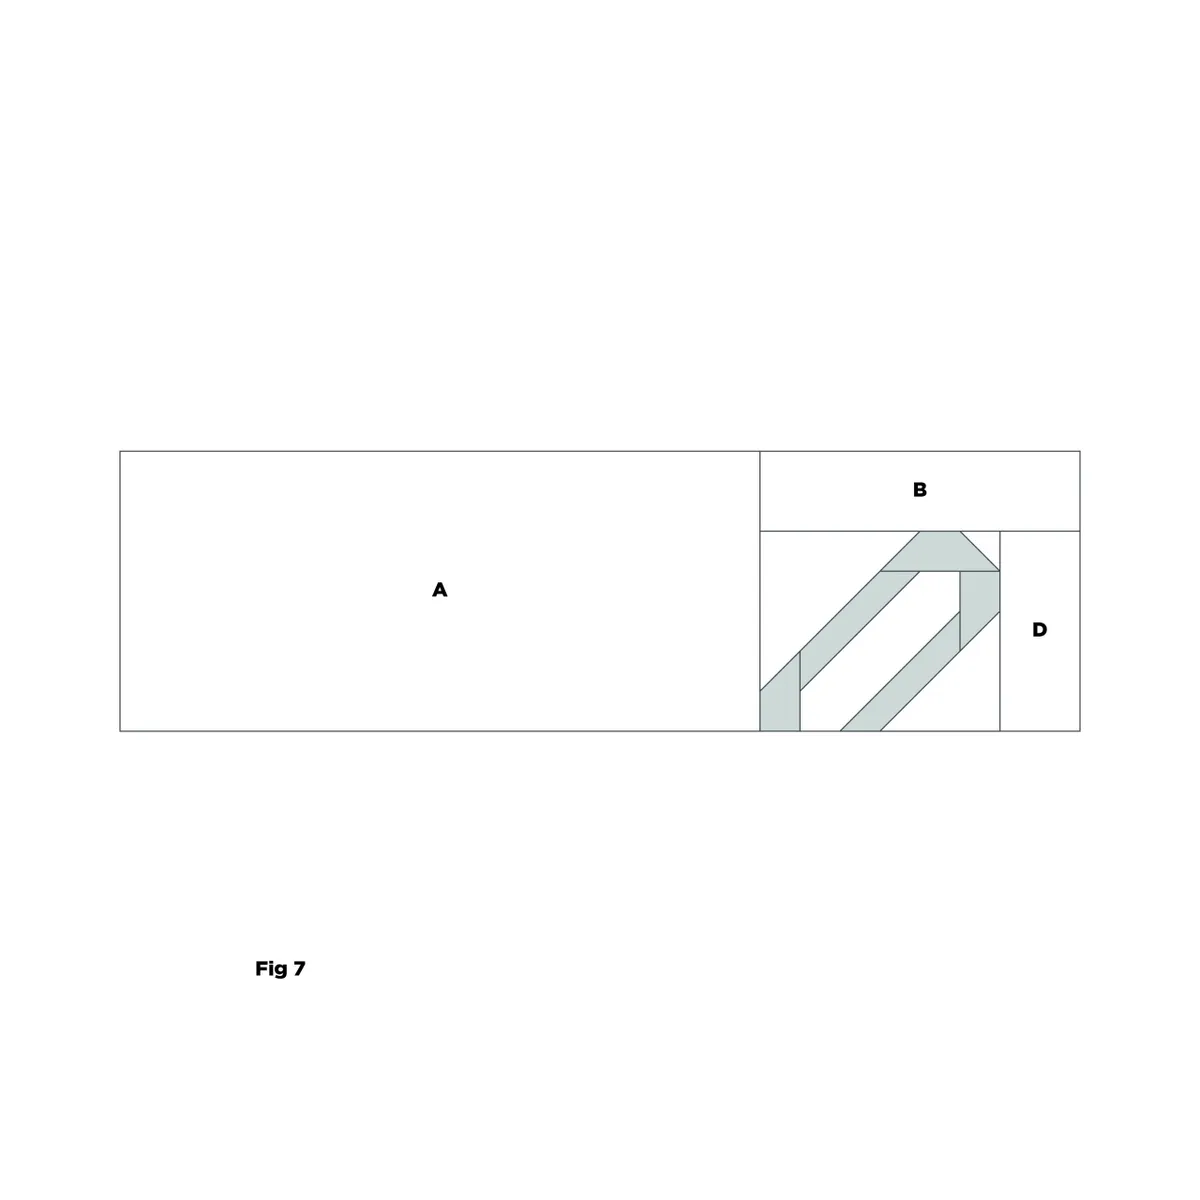
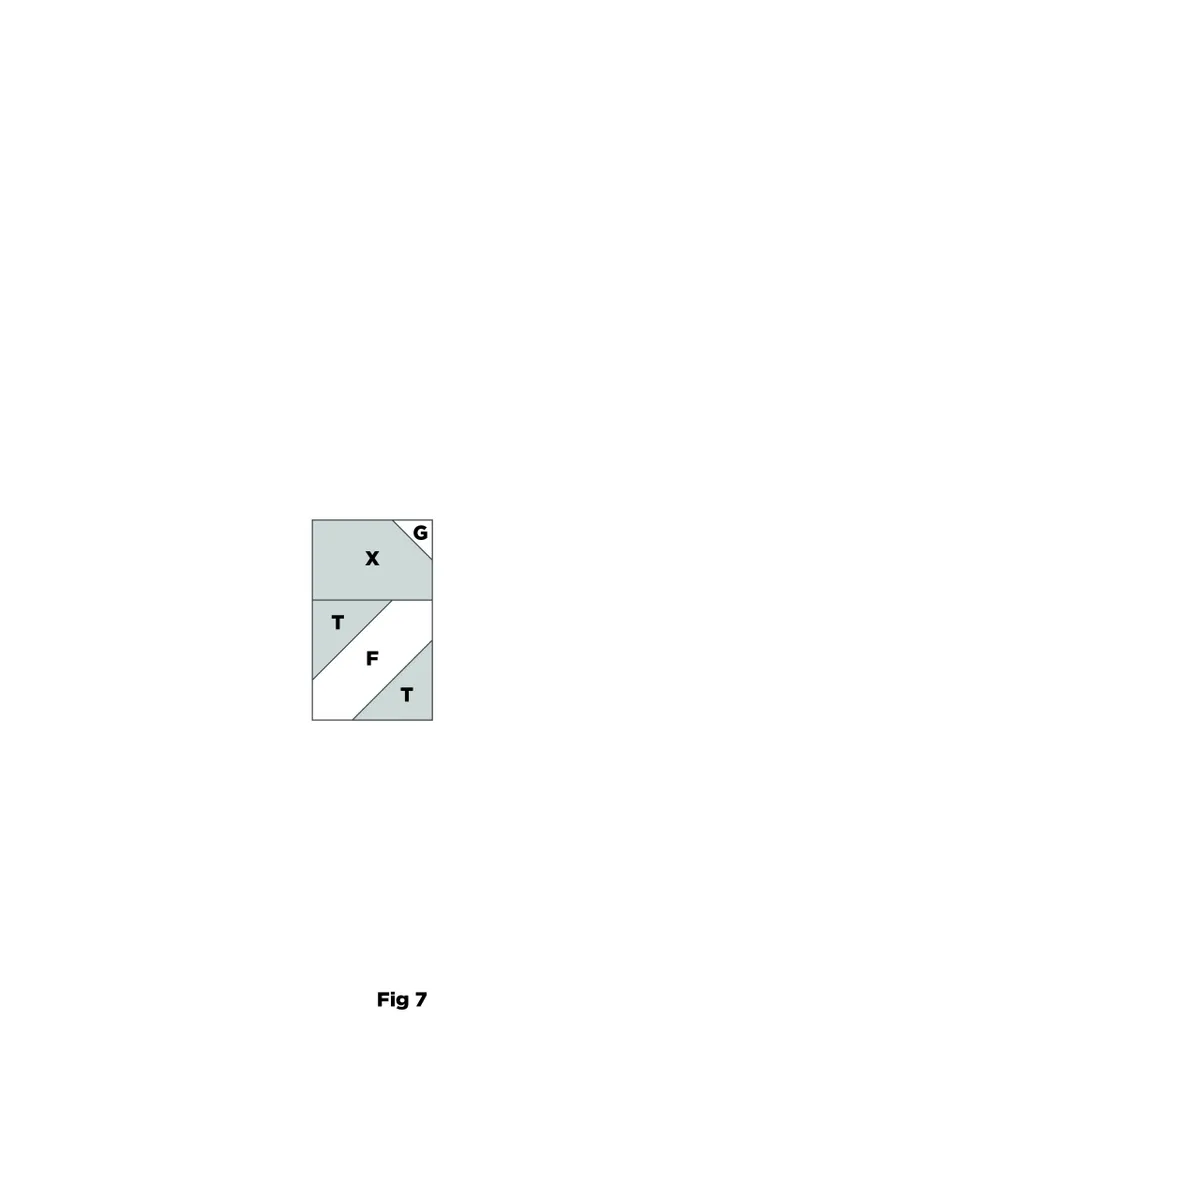
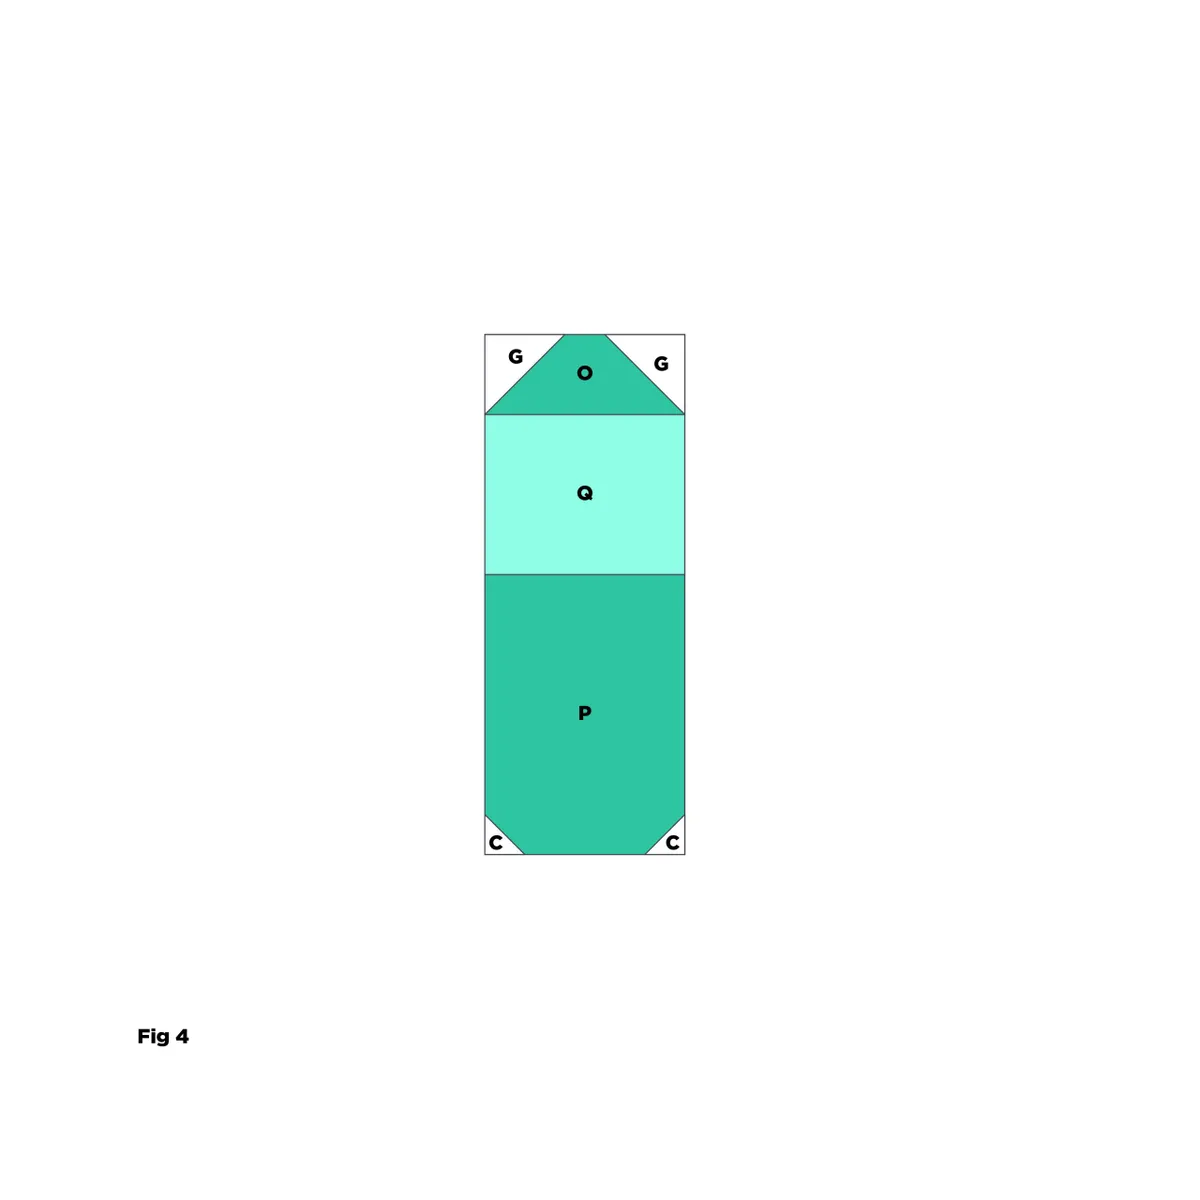
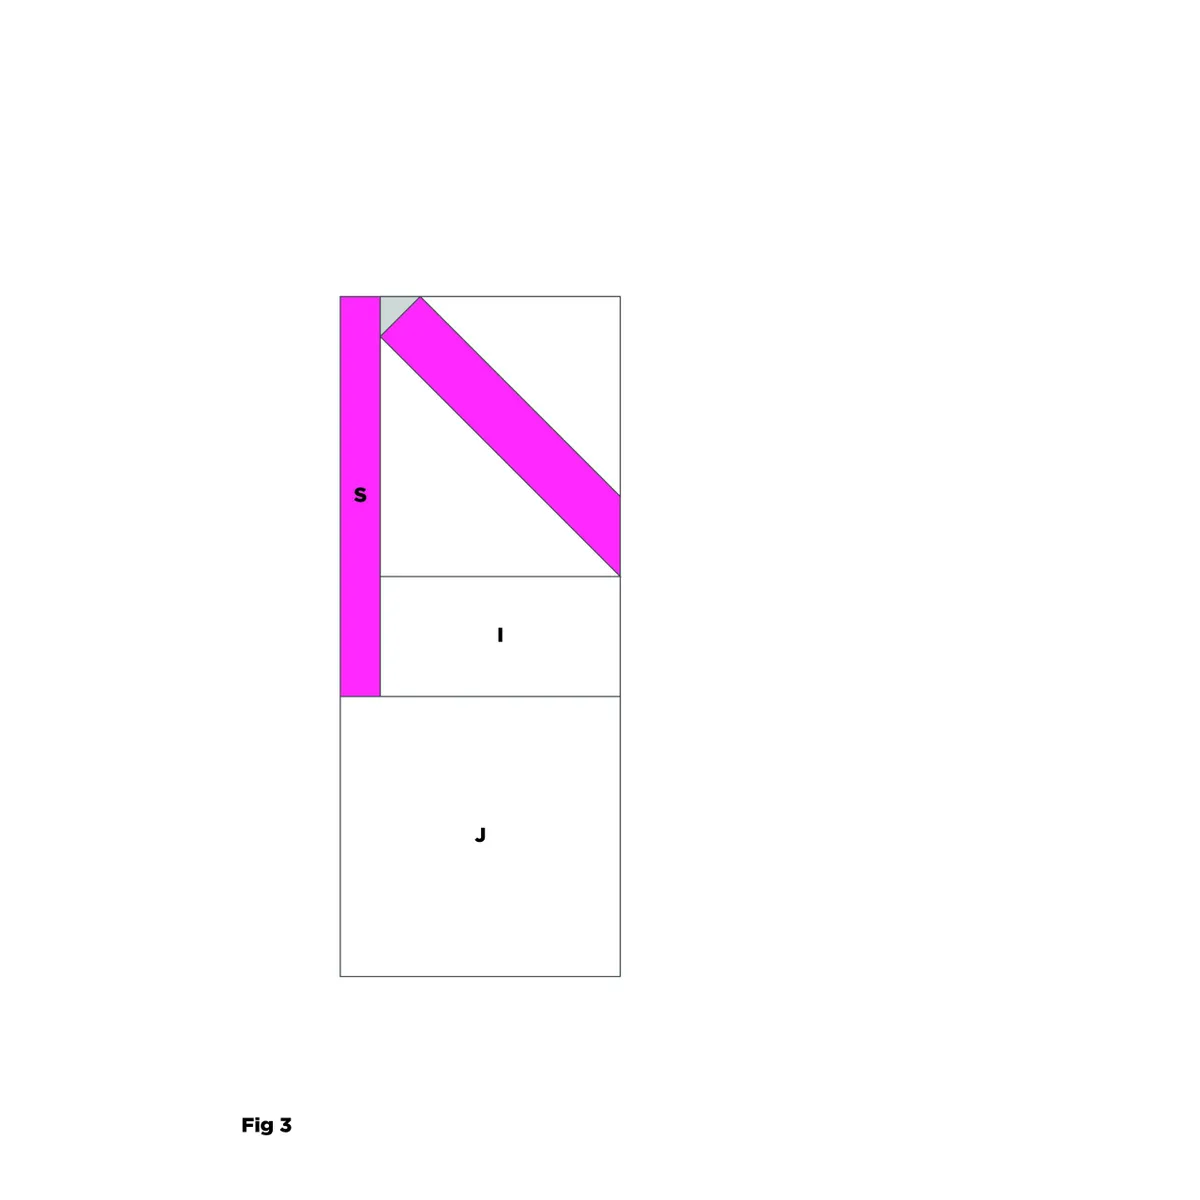
Join D to the right side of the C unit. Join B to the top of the C unit. Join A to the left side of the C unit to form the eye unit (Fig 7).
Step 11
Join the eye unit to the top of the needle unit to form the finished block.
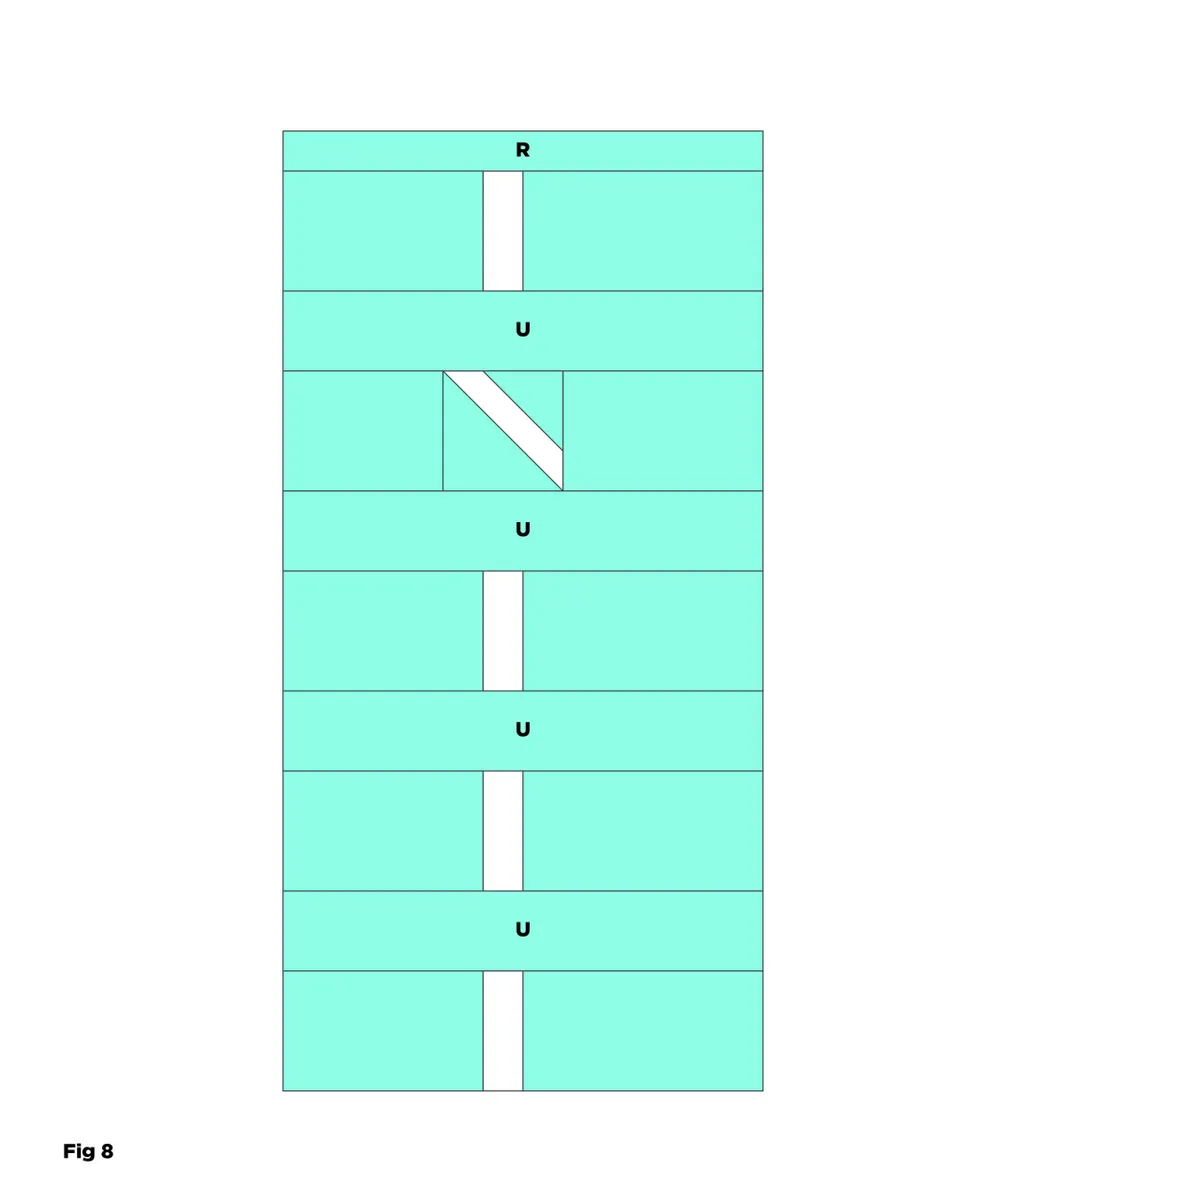
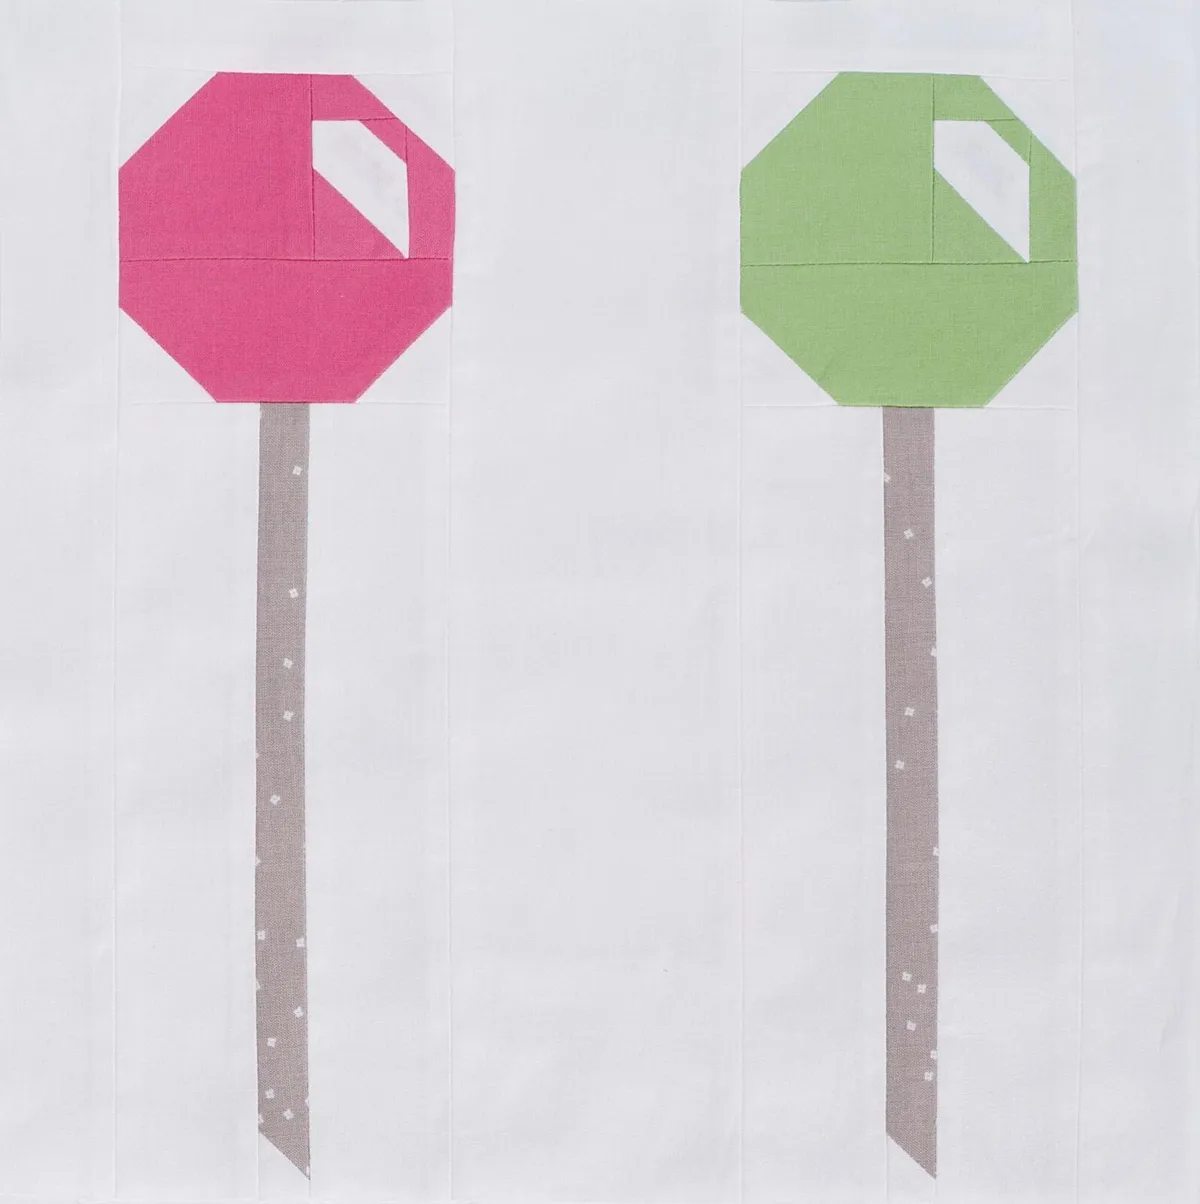
Sewing Pins Quilt Block Pattern
Cutting Out
Step 1
From the white fabric cut:
- Two (2) 11/2in x 121/2in (A).
- One (1) 31/2in x 121/2in (B).
- Four (4) 2in x 81/2in (C).
- Two (2) 1in squares (D).
- Eight (8) 11/2in squares (E).
- Two (2) 1in x 4in (F).
- Two (2) 11/2in x 2in (G).
Step 2
From the grey fabric cut:
- Two (2) 1in x 81/2in rectangles (H).
Step 3
From each of the pink and green fabrics cut:
- One (1) 21/2in square (I).
- One (1) 2in x 4in (J).
- Two (2) 1in x 2in (K).
- One (1) 1in square (L).
- One (1) 11/2in square (M).
Piecing the Block
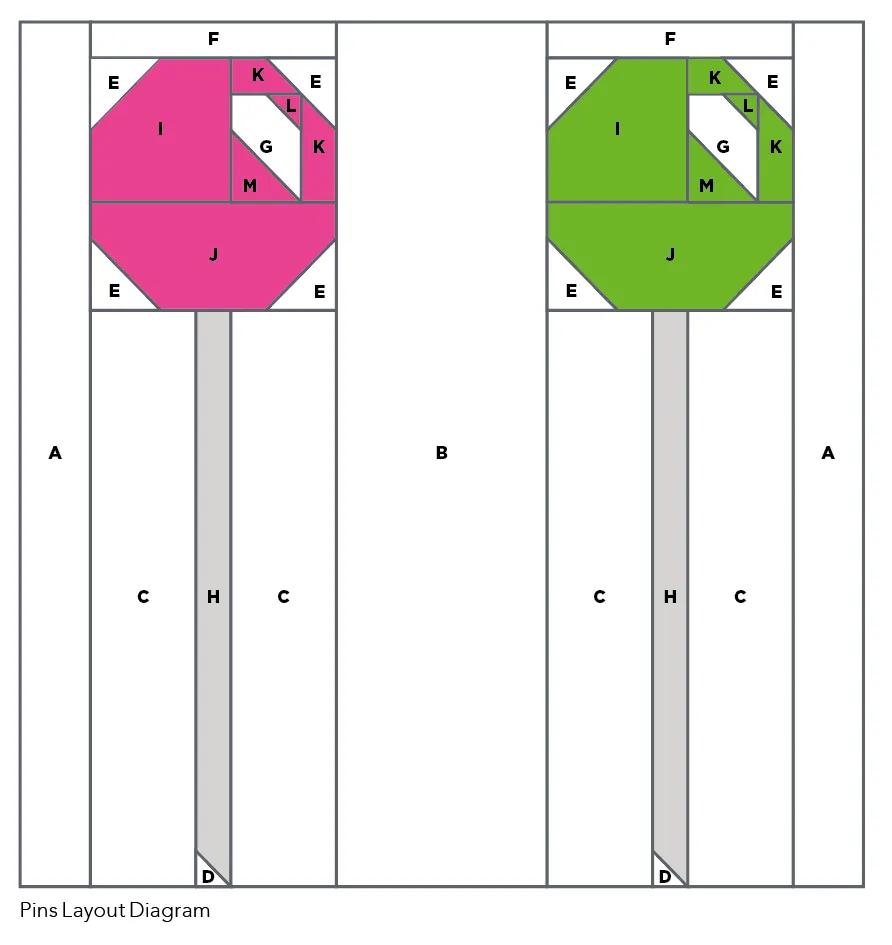
Step 4
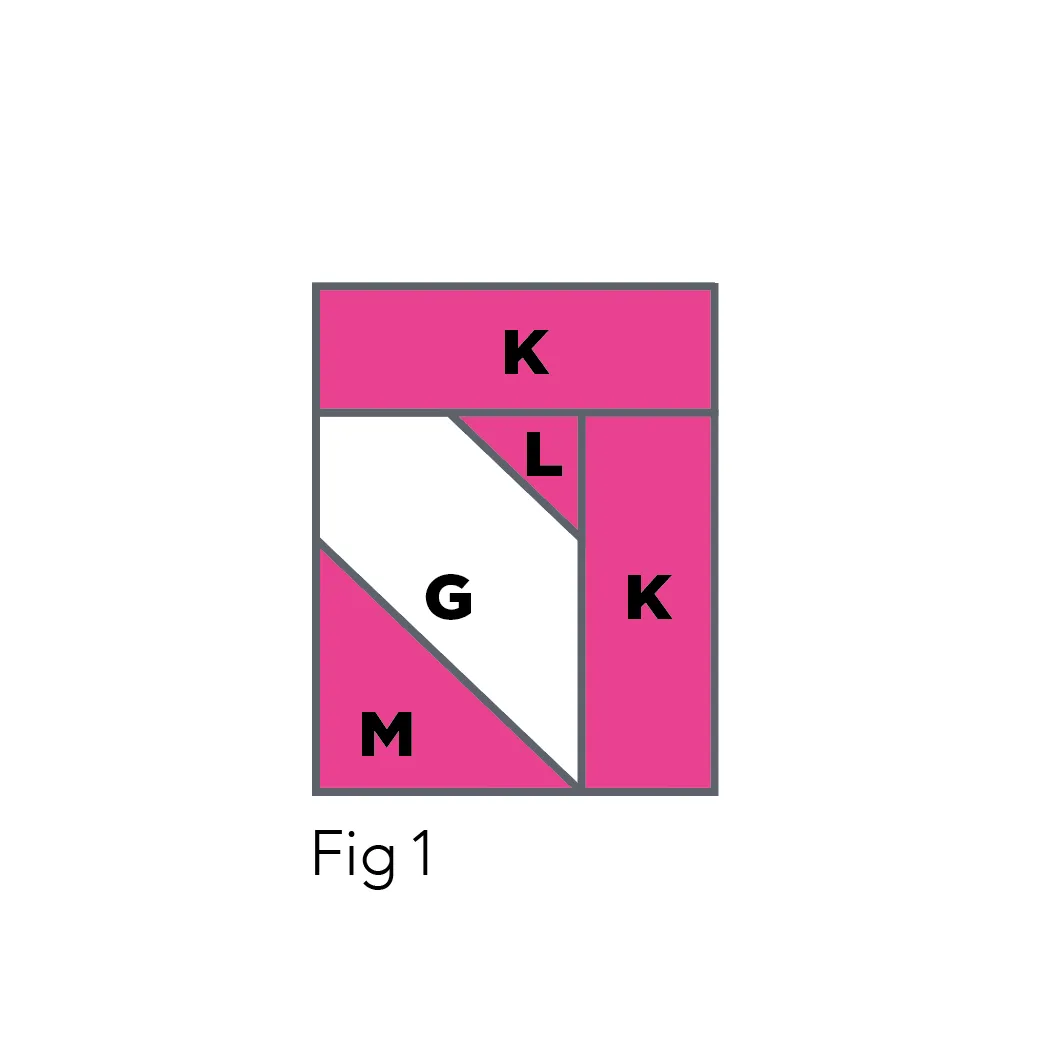
Join a pink L CST to the top right corner of a G piece and join the pink M CST to the bottom left corner of the G piece. Join one K to the right side of the G piece, then join a second K to the top. (Fig 1).
Step 5
Join I to the left side of the G piece. Join J to the bottom to form the pin unit (Fig 2). Join an E CST to all corners of the pin unit. Join F to the top (Fig 3).
Step 6
Repeat the process in steps 4–5 using the green cut pieces to make an identical green pin unit.
Step 7
Join a D CST to the bottom left corner an H piece. Join C to the left and right sides of the H piece to form the H unit (Fig 4). Repeat this process to make a second H unit.
Step 8
Join an H unit to the bottom of each pin unit (Fig 5).
Step 9
Join the pink sewing pin unit to the left side of B and then join the green sewing pin unit to the right side of B to form the pins unit. Join A to both the left and right sides of the pins unit to form the finished block.
Sewing Machine Quilt Block Pattern
Cutting Out
Step 1
From the aqua fabric cut:
- One (1) 11/2in x 101/2in (A).
- One (1) 2in x 31/2in (B).
- One (1) 3in x 31/2in (C).
- Three (3) 1in x 3in (D).
- Three (3) 1in x 21/2in (E).
- Six (6) 1in squares (F).
- Two (2) 1in x 11/2in (G).
- One (1) 2in x 3in (H).
- Three (3) 2in squares (I).
- One (1) 2in x 41/2in (J).
- One (1) 1in x 31/2in (K).
- One (1) 2in x 31/2in (L).
- One (1) 1in x 111/2in (M).
- One (1) 41/2in x 5in (N).
- One (1) 11/2in x 31/2in (O).
Step 2
From the white fabric cut:
- One (1) 2in x 3in (P).
- Two (2) 1in x 3in (Q).
- One (1) 11/2in x 3in (R).
- Two (2) 31/2in x 41/2in (S).
- Two (2) 11/2in x 31/2in (T).
- Two (2) 11/2in squares (U).
- One (1) 1in square (V).
- One (1) 1in x 11/2in (W).
- One (1) 2in x 3in (X).
- One (1) 2in x 111/2in (Y).
Step 3
From the grey fabric cut:
- One (1) 1in x 3in (Z).
- One (1) 1in x 2in (AA).
Step 4
From the light grey fabric cut:
- One (1) 11/2in x 31/2in (BB).
Step 5
From the tan fabric cut:
- Two (2) 1in x 21/2in (CC).
Step 6
From the coloured scrap fabrics cut:
- One (1) 11/2in x 3in (DD).
- Three (3) 11/2in squares (EE).
Piecing the Block

Step 7
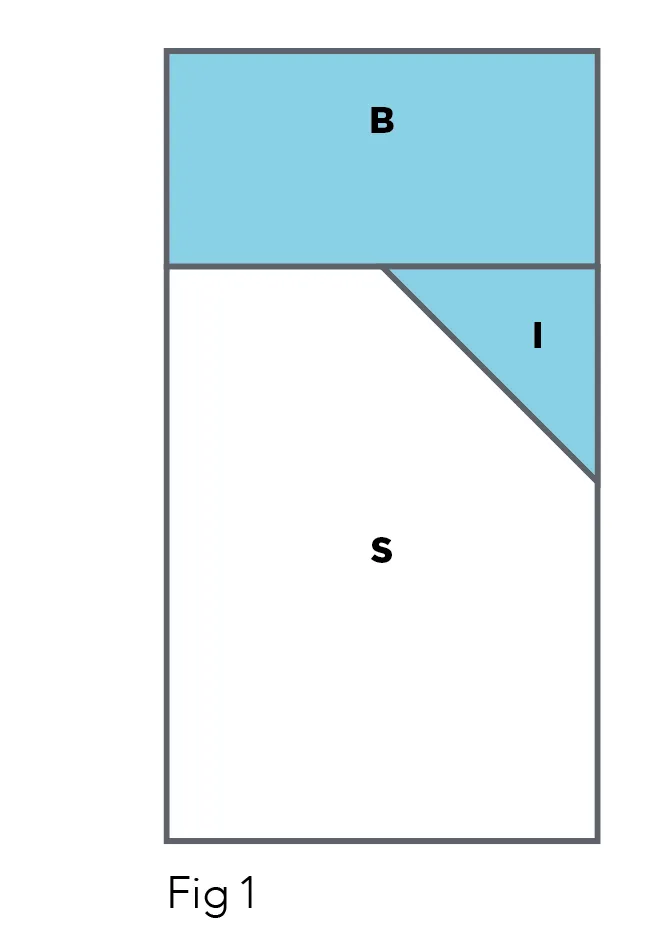
Join an I CST to the top right corner of an S. Join B to the top of S to form the B unit (Fig 1).
Step 8
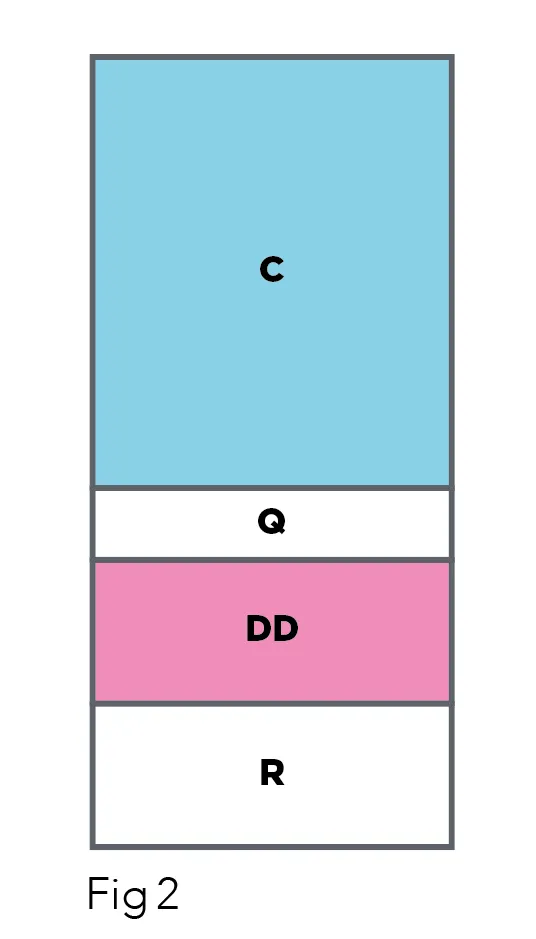
Join the C piece to the top of a Q piece to form the C unit. Join the C unit to the top of DD and join R to the bottom of DD to form the DD unit (Fig 2).
Step 9
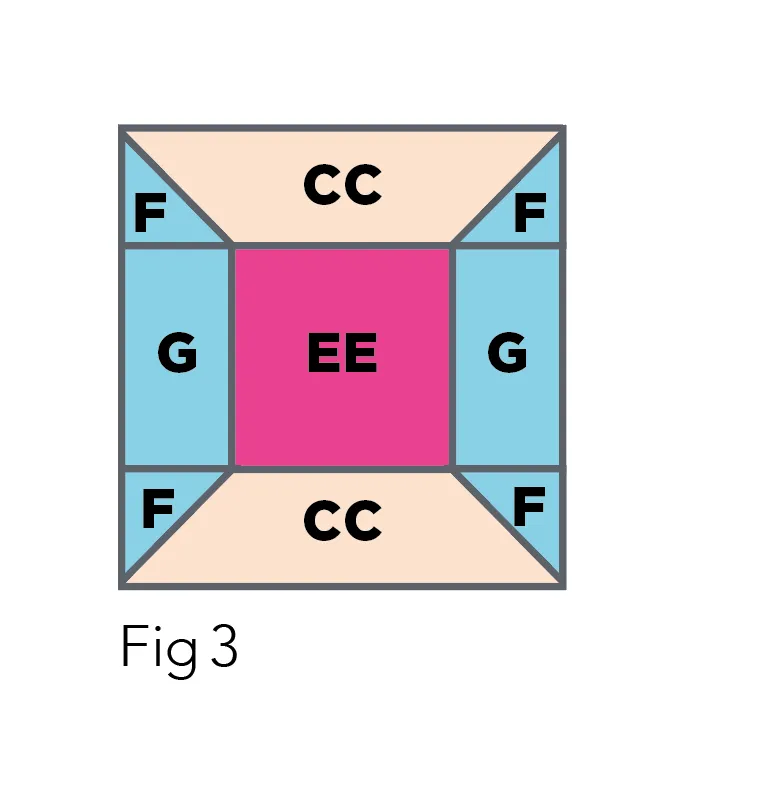
Join an F CST to the bottom left and bottom right corners of a CC piece. Make two. Join G to the left and right sides of a EE square. Join CC to the top and bottom of EE, rotating the pieces, as pictured, to form the thread unit (Fig 3).
Step 10
Join E to the top of the thread unit. Join D to the left side of the thread unit and join H to the right side (Fig 4).
Step 11
Join an F CST to the top left corner of an S piece and join an I CST to the top right corner of S. Join S to the bottom of the thread unit (Fig 5).
Step 12
Join the thread unit to the right side of the DD unit and join the B unit to the left side of the DD unit to form the top sewing machine unit (Fig 6).
Step 13
Join an I CST to the bottom right corner of P (Fig 7).
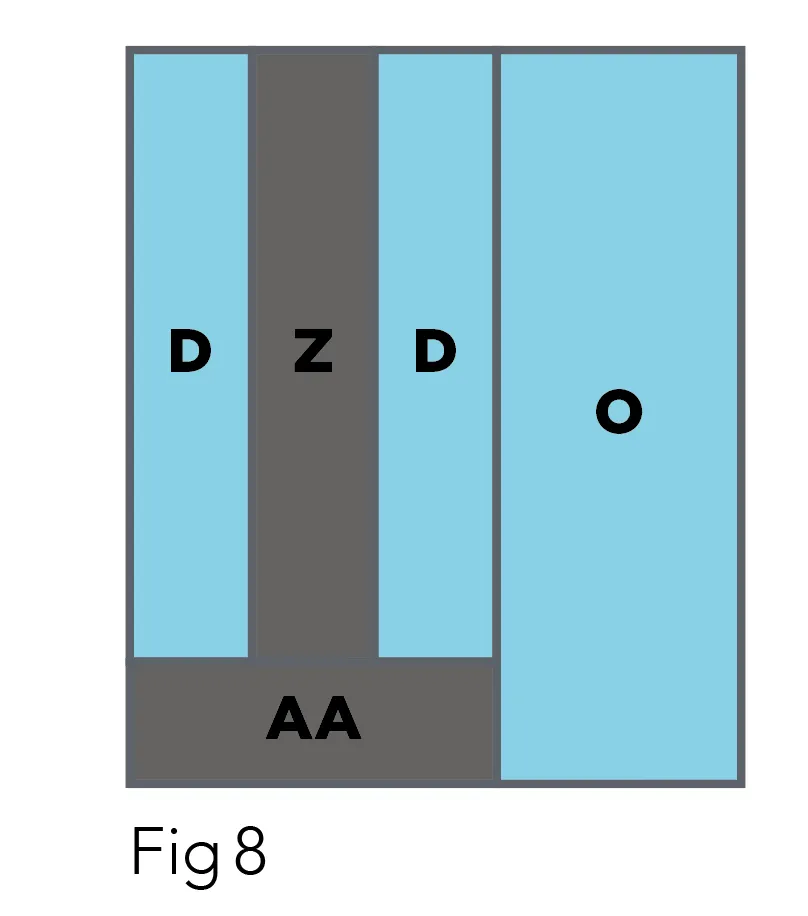
Step 14
Join D to the left and right sides of Z to form the Z unit. Join the AA to the bottom of Z. Join O to the right side of the Z unit (Fig 8).
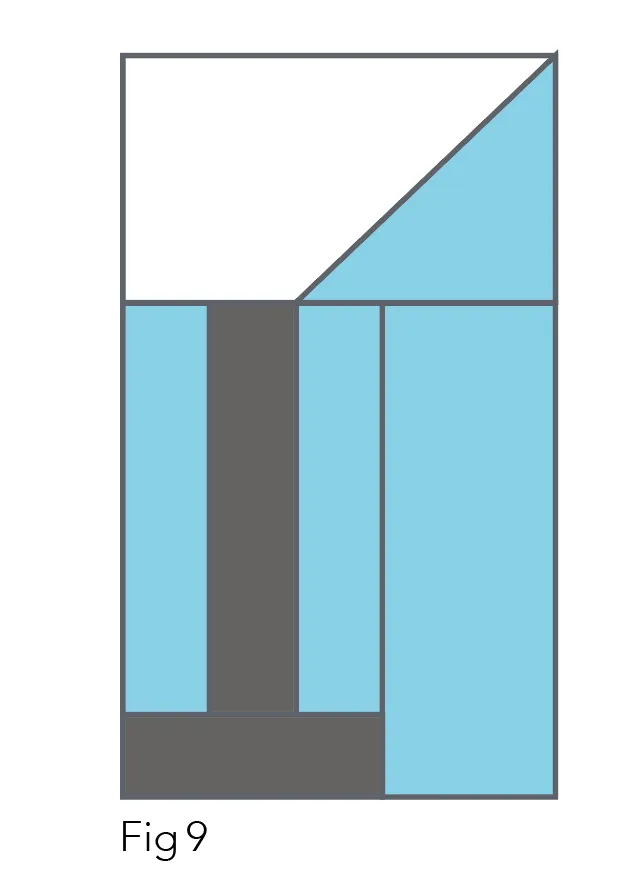
Step 15
Join the P unit to the top of the Z unit to form the needle unit (Fig 9).
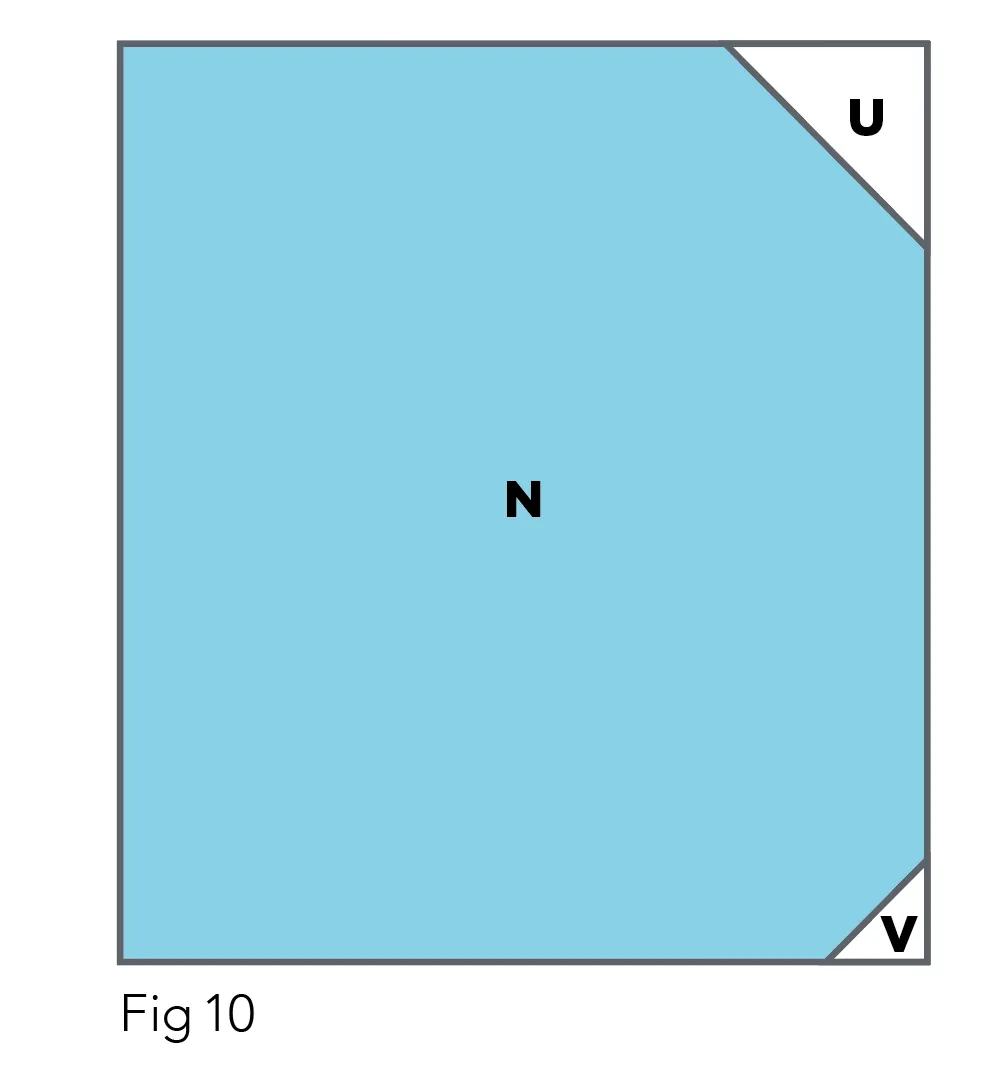
Step 16
Join a U CST to the top right corner of N and join the V CST to the bottom right corner of N (Fig 10).
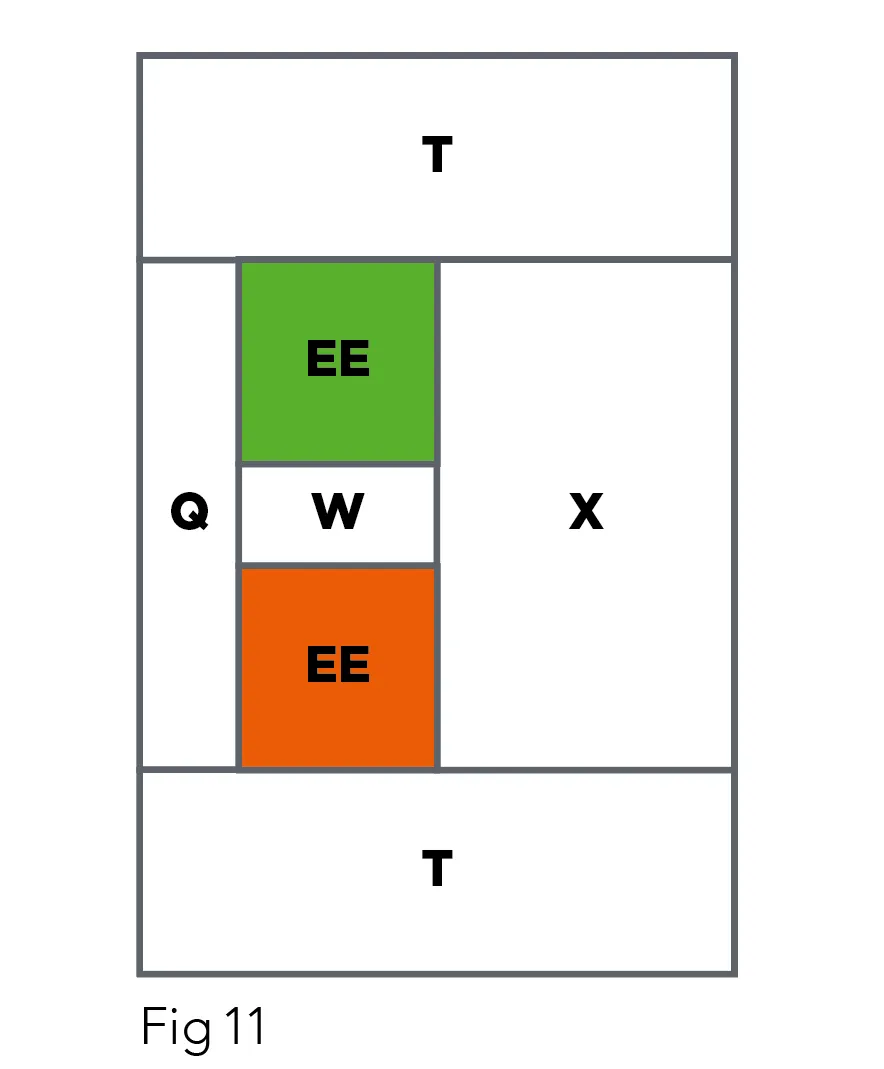
Step 17
Join EE to the top and bottom of W. Join Q to the left side of W and then join X to the right side of W to form the buttons unit. Join T to the top and bottom of the unit (Fig 11).
Step 18
Join the buttons unit to the right side of N and join the needle unit to the left side of N to form the bottom sewing machine unit (Fig 12).
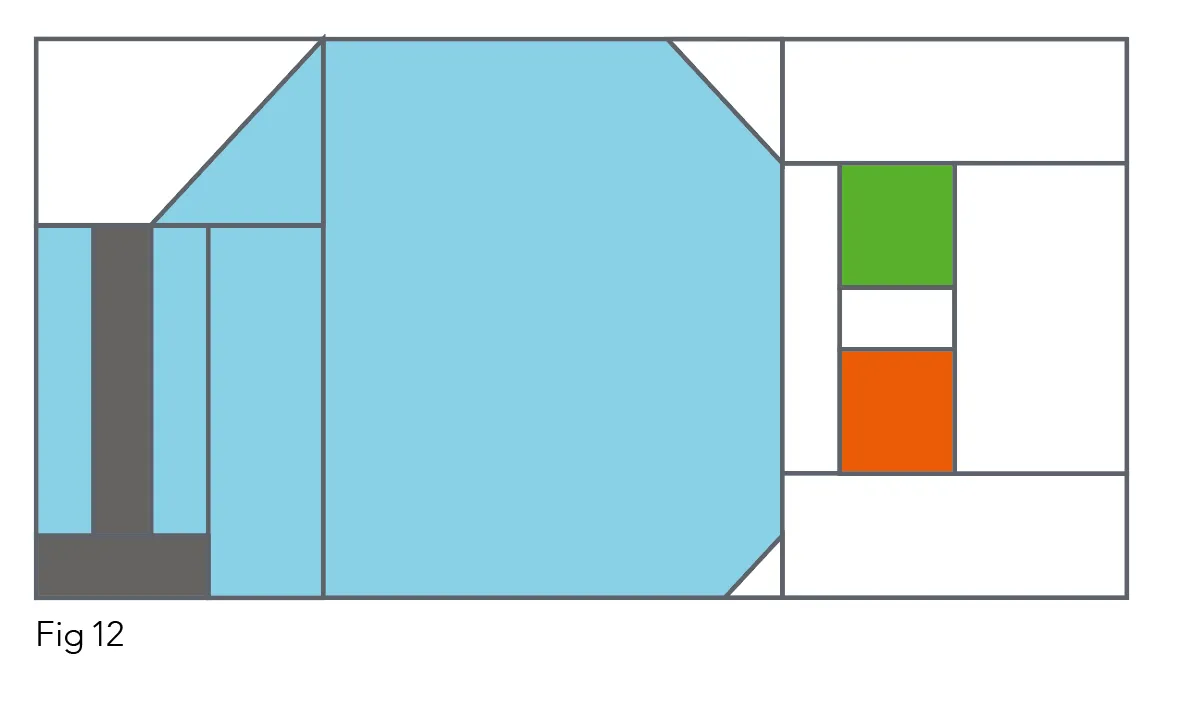
Step 19
Join a U CST to the bottom left corner of L. Then join K to the right side of BB. Join J to the top of BB and then join L to the bottom of BB to complete the BB unit (Fig 13).
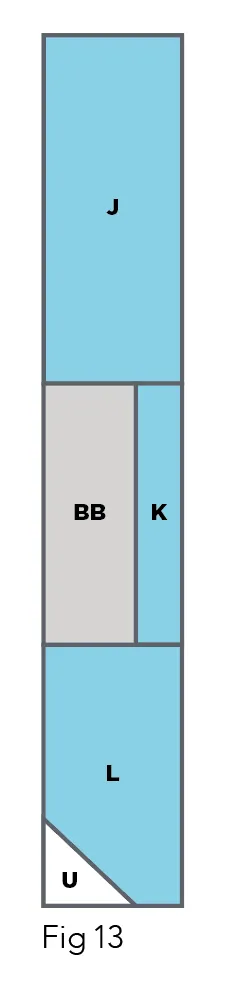
Step 20
Join the top sewing machine unit to the top of the bottom sewing machine unit to form the sewing machine unit. Join the BB unit to the right side of the sewing machine unit and join A to the left side of the sewing machine unit (Fig 14).
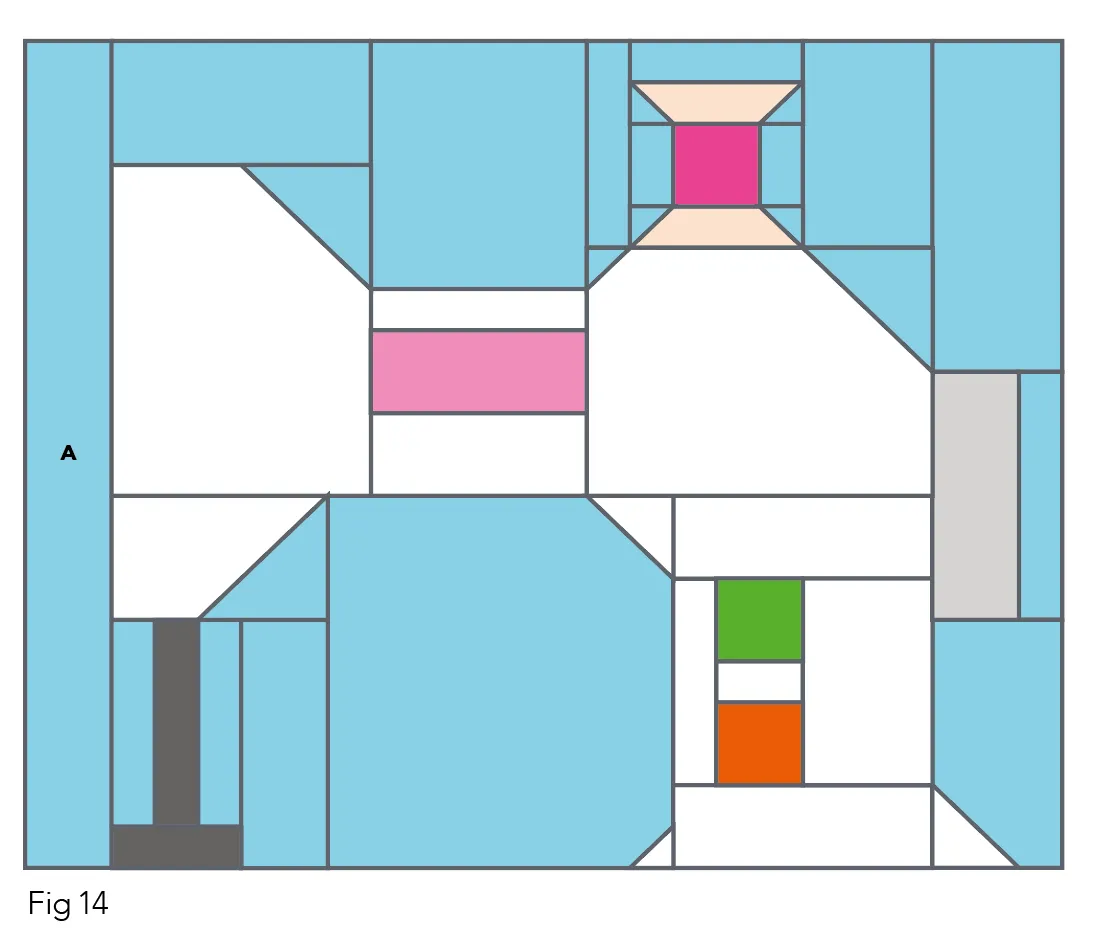
Step 21
Join an F CST to the top left corner of Y. Join M to the bottom of Y. Join E to the left and right sides of Y to form the Y unit (Fig 15).

Step 22
Join the Y unit to the bottom of the sewing machine unit to form the finished block.
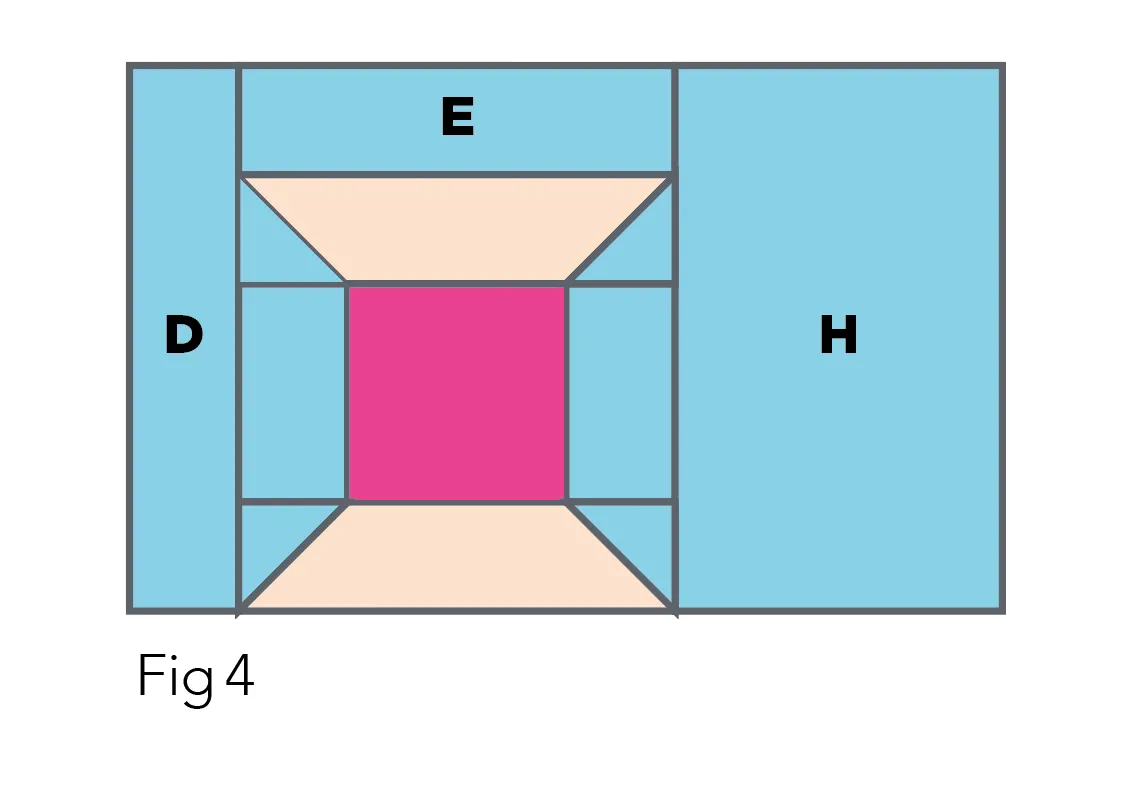
Thread Spool Quilt Block Pattern
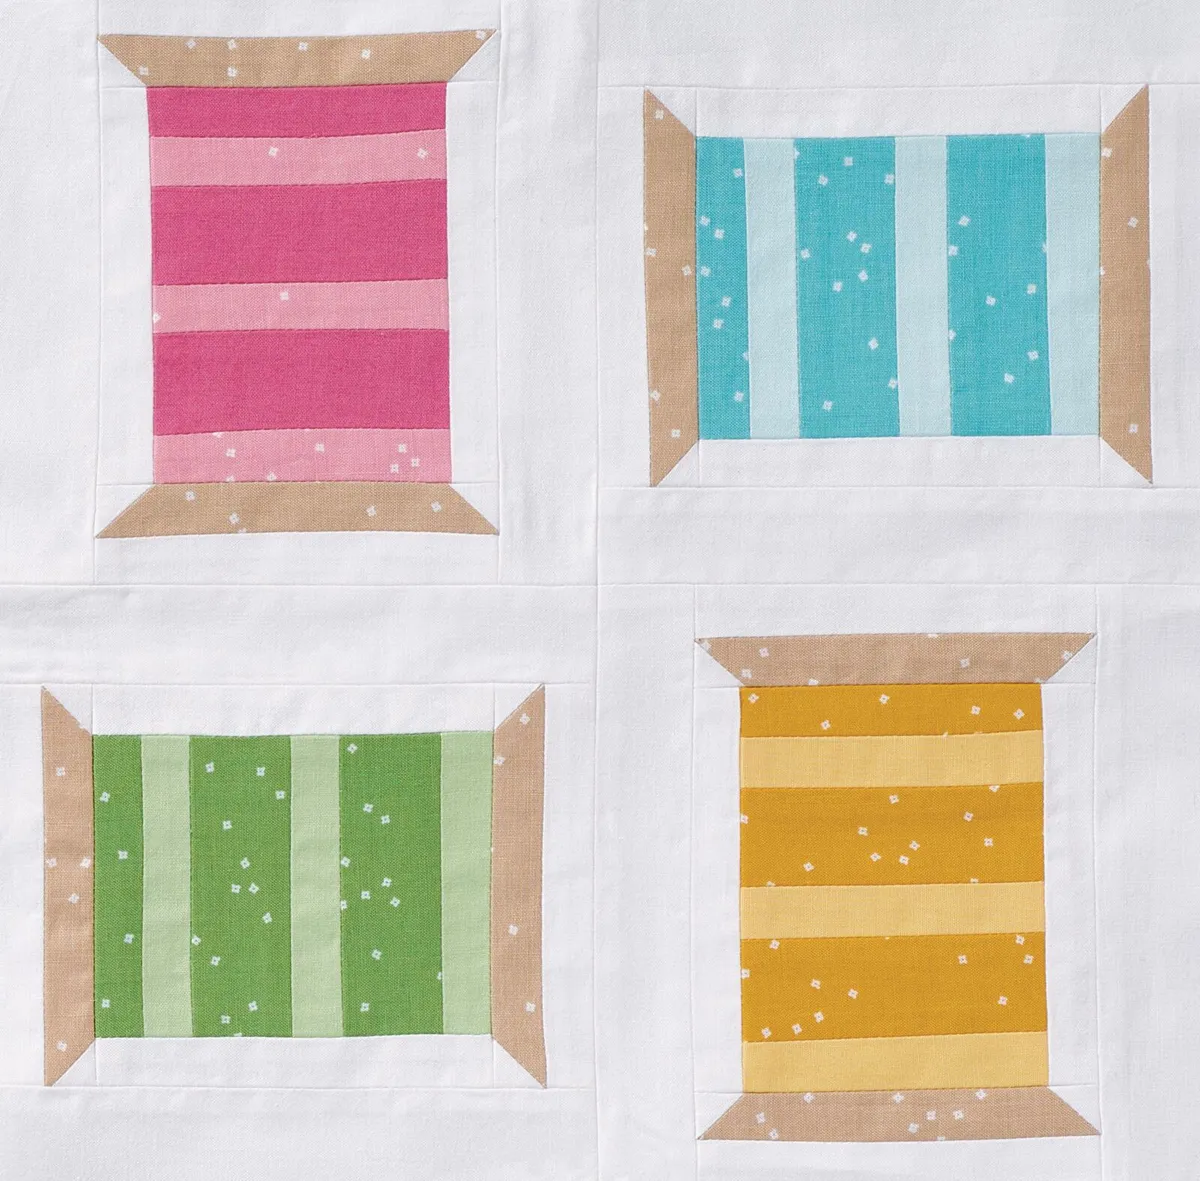
Cutting Out
Step 1
From the white fabric cut:
- Eight (8) 11/2in x 61/2in (A).
- Sixteen (16) 1in x 41/2in (B).
- Sixteen (16) 1in squares (C).
Step 2
From the tan fabric cut:
- Eight (8) 1in x 41/2in (D).
Step 3
From each of the light aqua, yellow, green and pink fabrics cut:
- Three (3) 1in x 31/2in (E).
Step 4
From each of the dark aqua, yellow, green and pink fabrics cut:
- Two (2) 11/2in x 31/2in (F).
- One (1) 1in x 31/2in (G).
Piecing the block

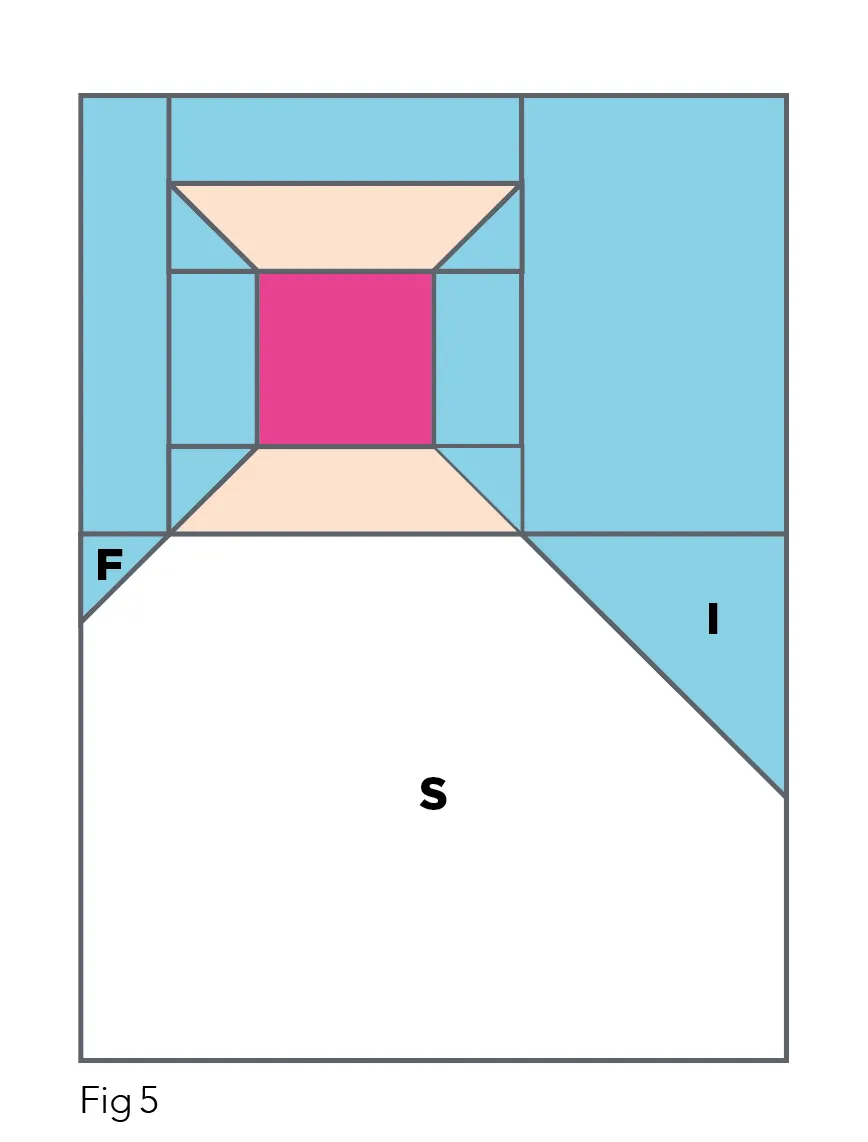
Step 5
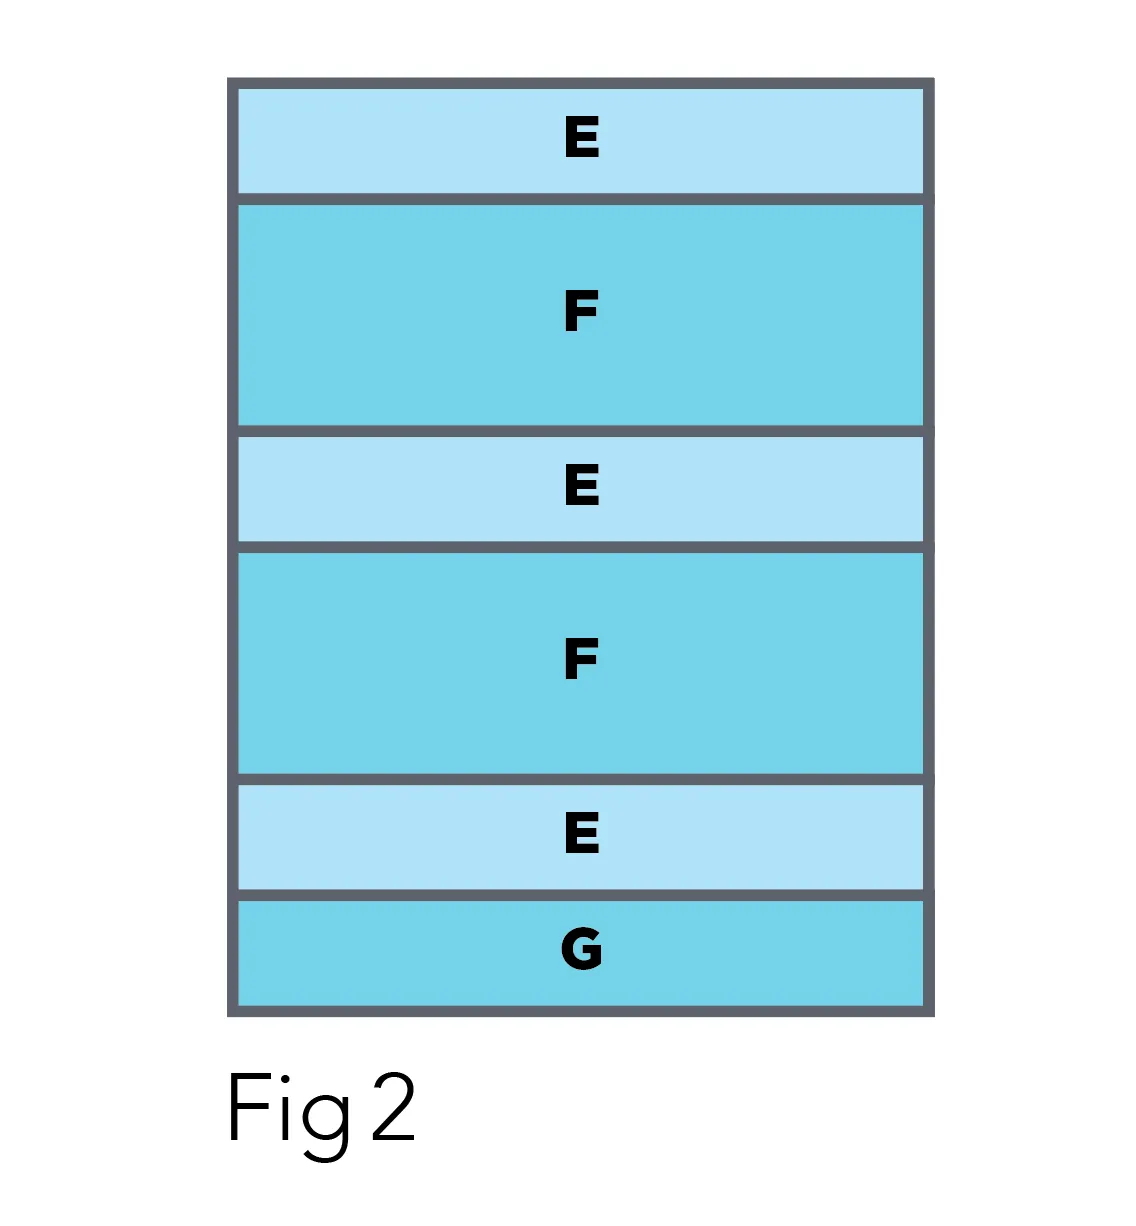
Join a C CST to the bottom left and bottom right corners of D. Join B to the top of each D to form the spool units. Make eight spool units (Fig 1).
Step 6
Join the aqua E, F and G pieces as shown to form the aqua thread unit (Fig 2). Repeat with the yellow, green and pink pieces.
Step 7
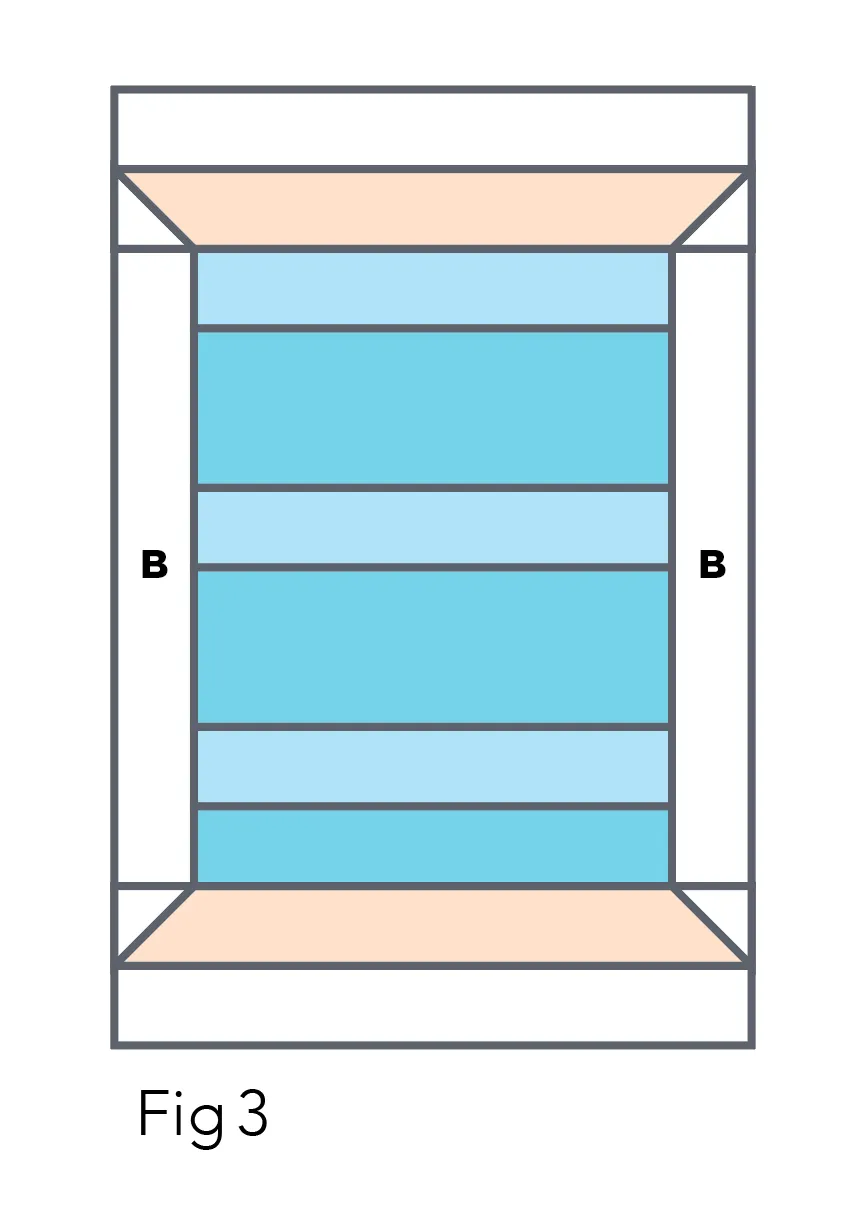
Join B to the left and right sides of each thread unit. Join a spool unit to the top and bottom of each thread unit, rotating the spool units so that D matches the thread units (Fig 3).
Step 8
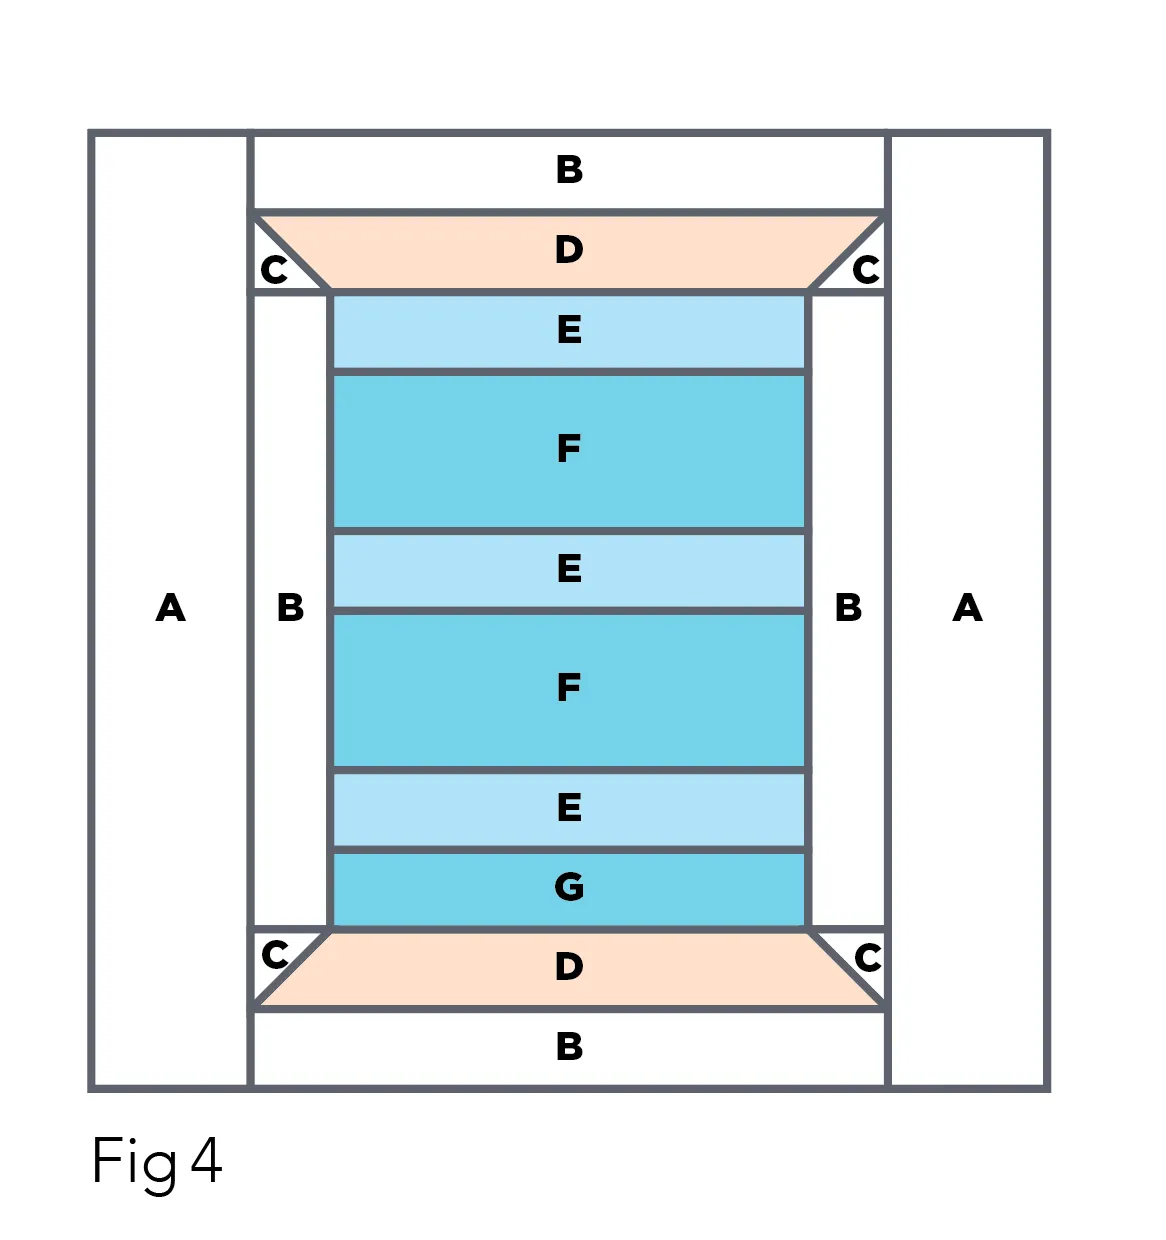
Join A to the left and right sides of each spool unit (Fig 4).
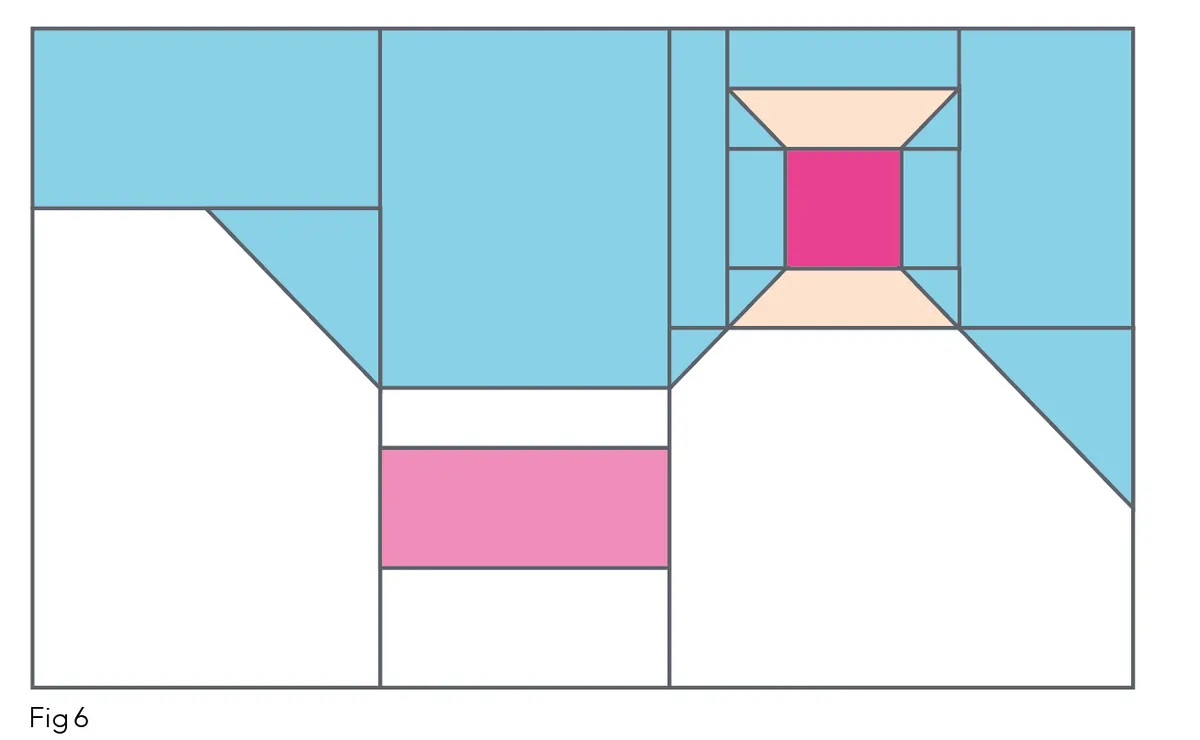
Step 9
Arrange the spools into two rows of two, rotating as shown in the Layout Diagram below. Sew the spools together in pairs and press the seams in opposite directions. Sew the pairs together, nesting seams, to complete the spool block.
We hope you enjoy stitching Gracey's free quilt block patterns. Tag us in a photo of your quilt blocks on Instagram and for more quilting projects check out these free tutorials.
